Login to your OneSignal account, here: https://dashboard.onesignal.com/login
Select your app and go to “Settings > Keys & IDs” on your sidebar:
.avif)
On this page you will be able to find and copy your App ID and Rest API Key:
.avif)
Learn how to send notifications and extend their functionality
Login to your OneSignal account, here: https://dashboard.onesignal.com/login
Select your app and go to “Settings > Keys & IDs” on your sidebar:
On this page you will be able to find and copy your App ID and Rest API Key:

UTMs (Urchin Tracking Modules) are a great way to track the performance of your push notification campaigns, and the behavior of the users who get to your app through a push notification, in Google Analytics.
The first step would be to create a URL that contains all the UTM parameters for your campaign, you can do this easily with this tool: https://ga-dev-tools.google/campaign-url-builder/
Here is an example of how your URL will look like after you add your UTM parameters: https://vendrux.com/?utm_source=help_article&utm_medium=link&utm_campaign=utm_education
Make sure your have Google Analytics configured to track your app usage, you can check this guide for more details: https://www.vendrux.com/docs/track-app-data-in-google-analytics-with-google-tag-manager-gtm
Now let’s head to OneSignal to send a push notification: https://onesignal.com
In your account’s “Push” area, on the top right side, click “New push”:

Fill your push notification content with a title, message, and image (optional):
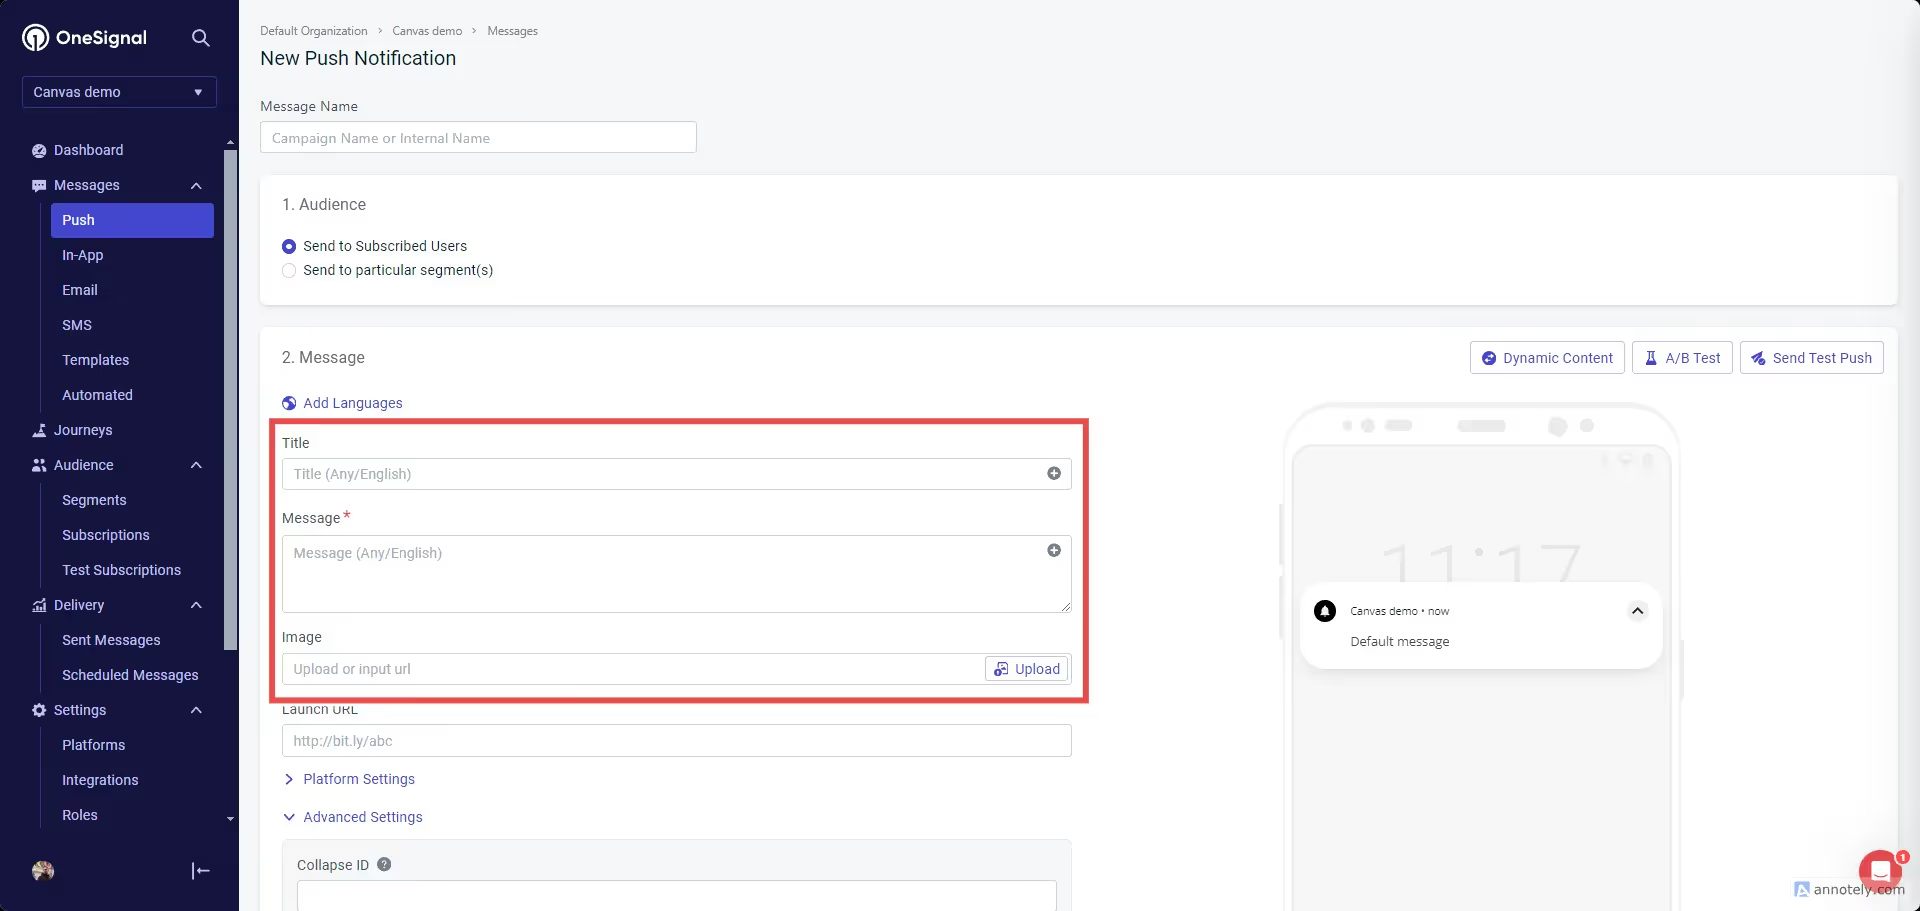
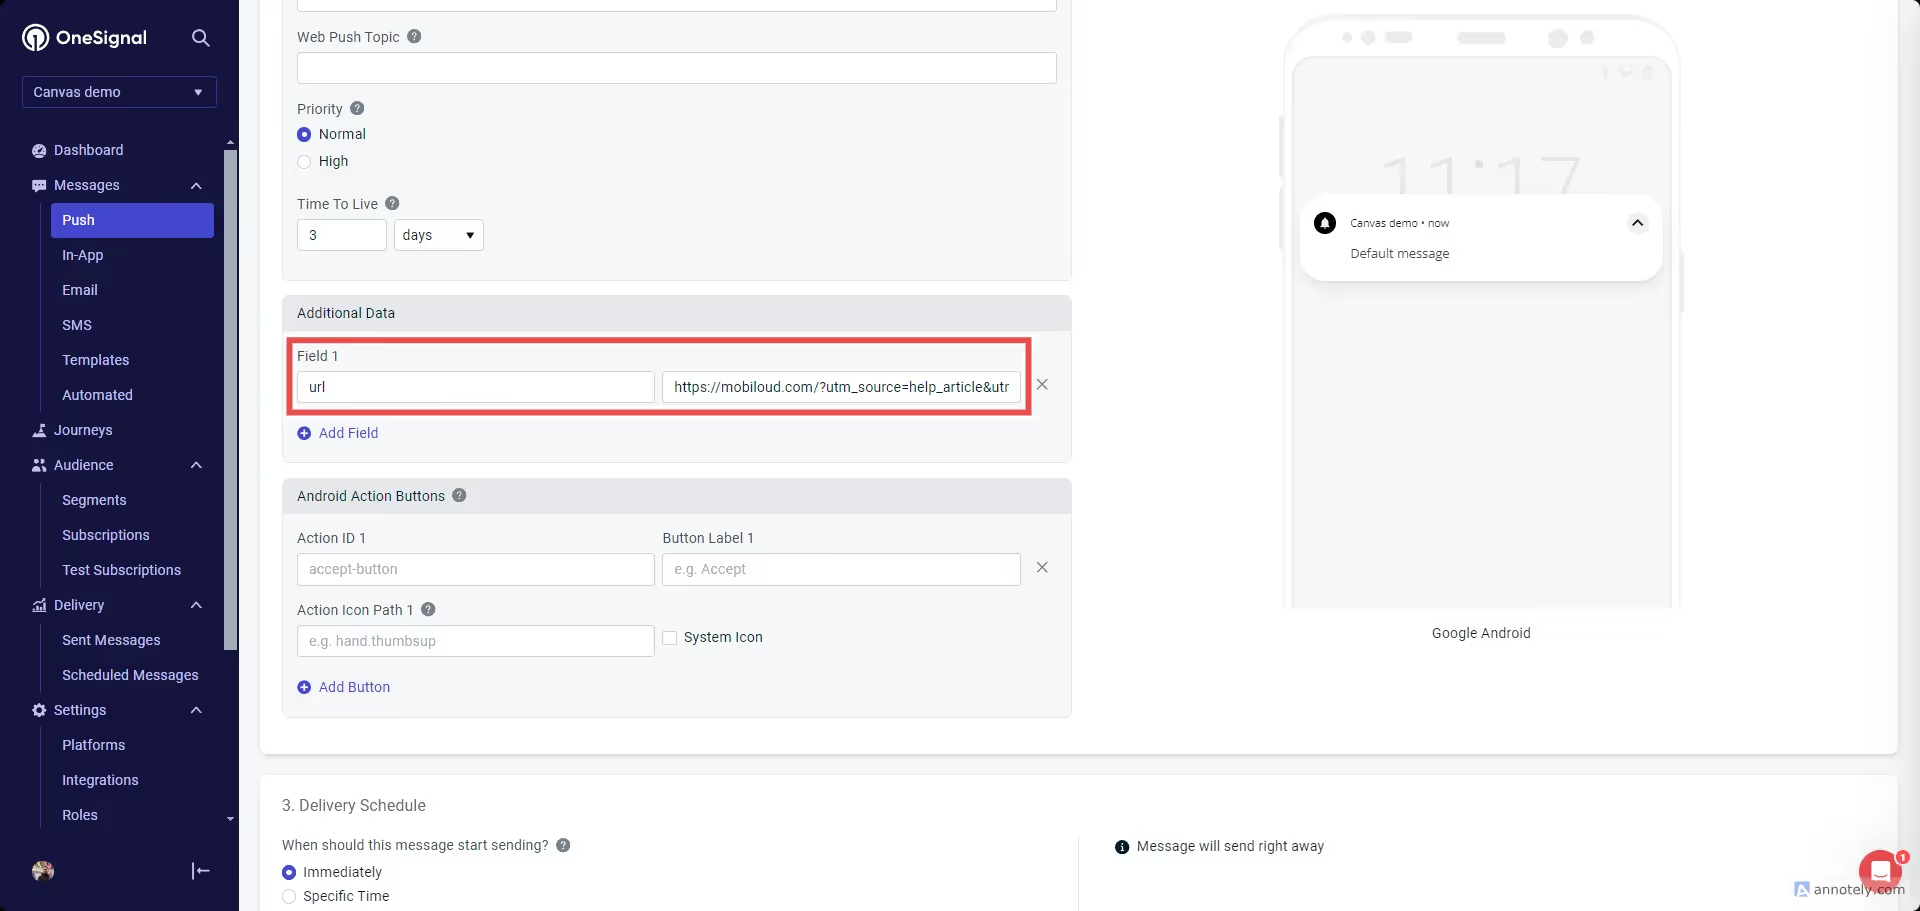
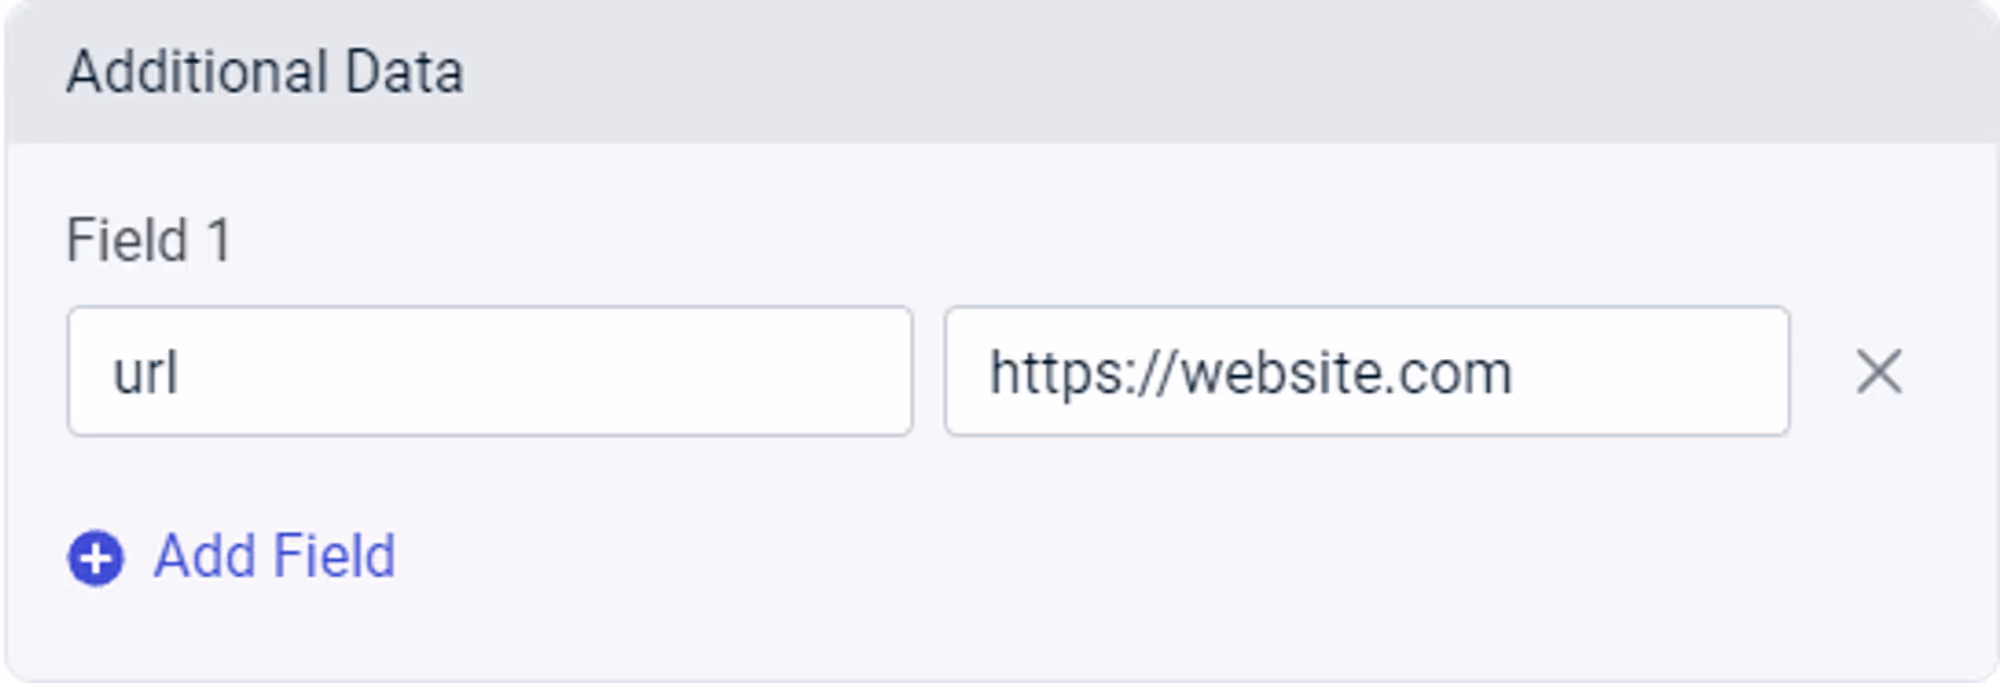
For your notification URL scroll a bit further until you see the “Additional Data” field. In the first field type “url”, and in the second one add your URL containing the UTM parameters:
That’s it! You can now send the notification to your users and track the UTM parameters via your Google Analytics account.
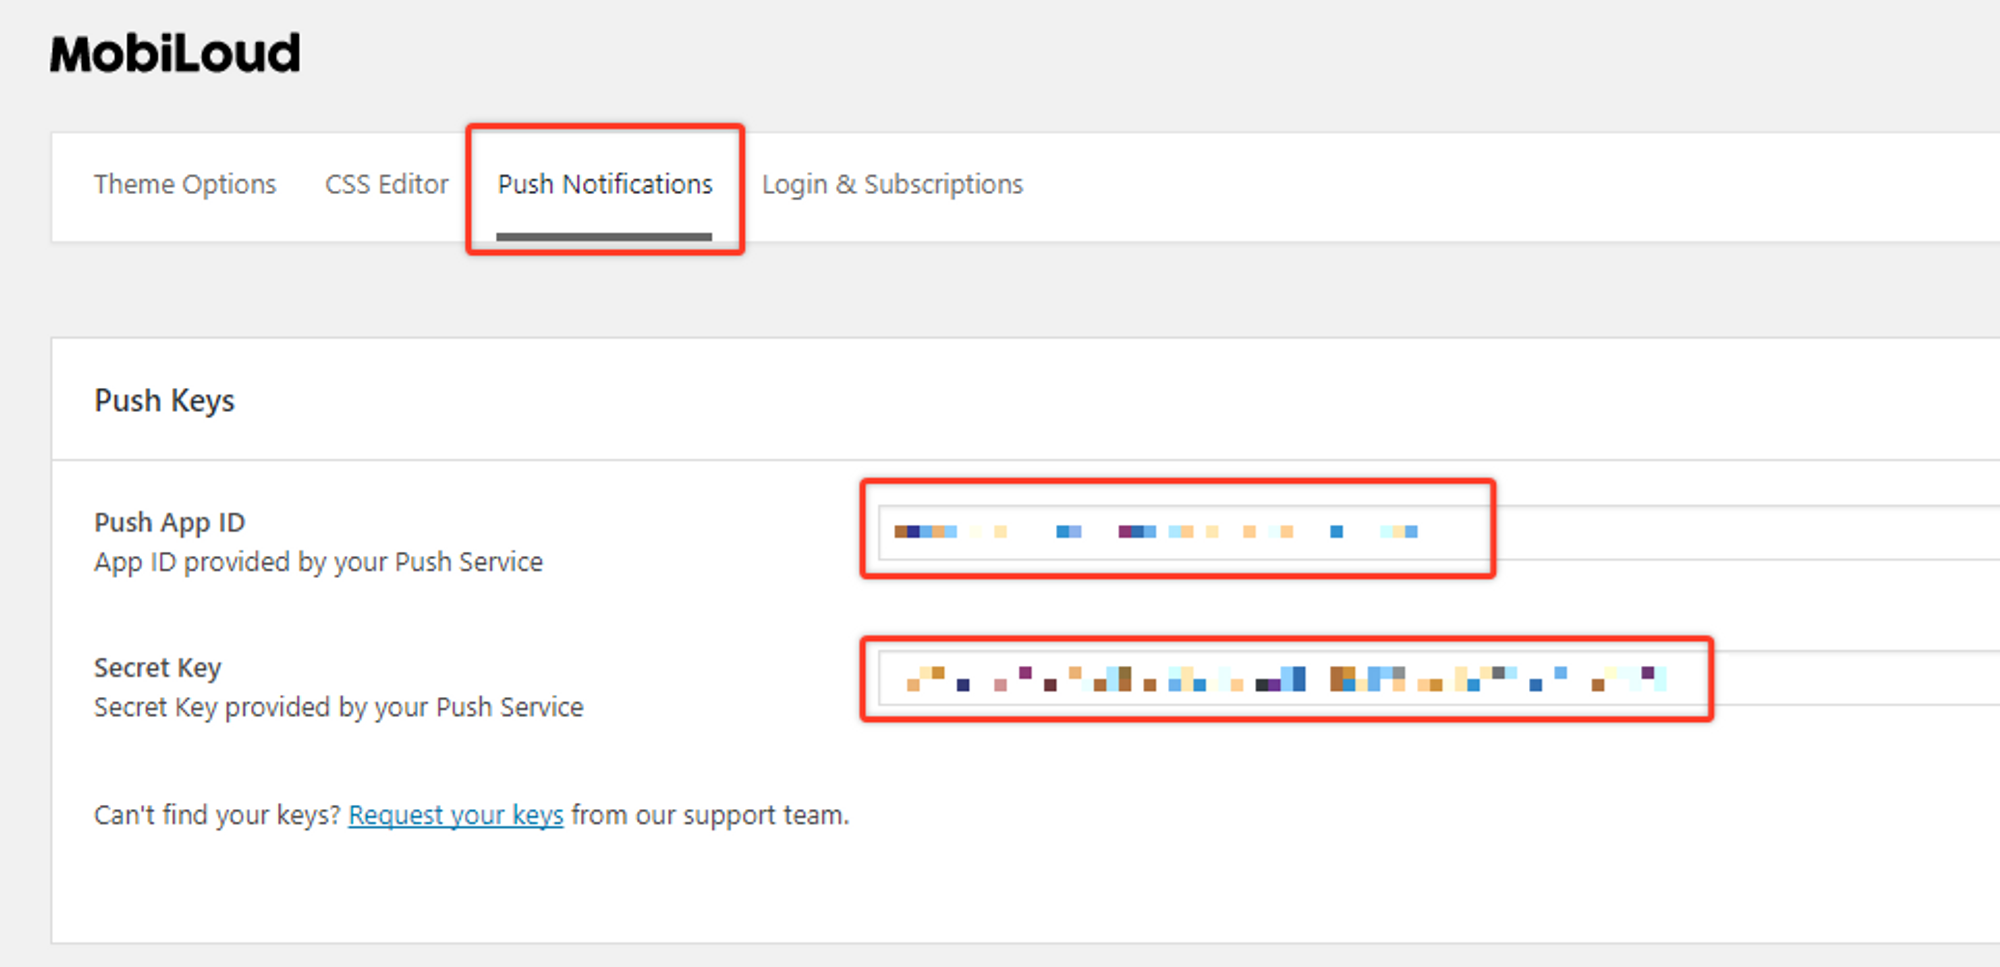
In order to start sending push notifications from your WordPress Dashboard you will need to fill the “Push App ID” and “Secret Key” fields, under the “Push Notifications” tab, with your OneSignal keys.
The mentioned fields can be found under “Vendrux > Configuration > Push Notifications” as you can see below:

These keys can be found in your OneSignal account, under the “Settings > Keys & Ids” area as you can see below:

Once you save your Push Notifications settings, a new section will be available, as you can see below:
The Push Notifications area will allow you to send manual notifications to your users and tracking information about previously sent notifications.

If you would like to send automatic notifications to your users when a new post is published on your website, you can enable this feature under “Vendrux > Configuration > Push Notifications”.
At the very bottom of the page you will find all the settings to configure notifications that will be automatically sent when a new post is published, as you can see here:

Tags will allow you and your users to segment the notifications they will receive.
In your app, if you have the “Alerts” tab enabled, users will be able to determine for which tags they will receive notifications, as you can see here:

In this case, Main Alerts, Jobs, Updates, and News are all tags that the user can enable or disable so that when a notification is sent with one of these tags assigned to it, only users that have that tag enabled will receive it.
You can create or edit the tags directly from your Vendrux Dashboard, keeping in mind that each tag will have two values assigned to it:
To clarify, “Main Alerts” would be the label and “main-alerts” the ID of this tag.
The Vendrux plugin gives you two options for tags, both explained below:
When you attach a post to your notification, you can mark this option to include the “category slugs” of that post as tags in the notification. If a post is assigned to the “Featured News” category, the “featured-news” tag will be assigned to your notification and only users that have that tag enabled will receive the notification.
Keep in mind that you will need to manually create this specific tag in your “Vendrux Dashboard”, like this:

If instead, you prefer to add tags to your notification manually you can use this option. You can simply add the IDs of your tags in the text field and those will be included in your notification.

Whenever a user enables or disables a specific tag, his profile in OneSignal will be updated with his selection, as you can see below:

The actual notification that you send, will include the necessary logic to ensure it only gets delivered to users that have the selected set of tags turned on:

⚠️ The “Launch URL” field provided by OneSignal won’t work inside the app, you will need to use “Additional Data” in order to display a specific URL in the app when the notification is clicked.
When you create a push notification, either via the OneSignal Dashboard or the REST API, you can specify a URL to open when the notification is clicked.
To do so, you must include a field called “url” in the “Additional Data” area, with the URL that must be opened as the value.
Below you can see what that should look like:
.avif)
//OneSignal REST API

"included_segments": [
  "Subscribed Users"
],
"data": [
	'url' = 'https://website.com'
],
"contents": {
  "en": "Notification content",
}⚠️ This guide should not be used if you have a WordPress website.
There are many situations in which you will want to trigger push notifications to your users, here are some examples:
For all of these examples, the notification will need to target a specific user when a specific event happens on your website. In order to be able to send these notifications you will need the following implemented into your website’s code:
Keep in mind that this is not an implementation guide for the OneSignal REST API, each server and website is different and will require a developer to find the best approach for integrating the OneSignal REST API. The purpose of this guide is to give you a better understanding of how to integrate your website with the Vendrux platform for sending targeted, or transactional push notifications.
Let’s go through each one of the requirements:
Since Vendrux uses OneSignal for push notifications, you will need to use the OneSignal REST API to trigger the notifications.
Whenever a push notification is expected to be sent, you will need to make a call to the OneSignal REST API with the notification details (title, text, link, image, tags, etc), this call must be implemented on your website.
Here you can find the complete documentation for the OneSignal REST API: https://documentation.onesignal.com/reference/create-notification
Implementing the OneSignal REST API should be straightforward, but at some point, you will ask yourself “How do I target a specific user?”, and that’s where the Vendrux native functions come into play.
On your website, you are probably using a unique ID or even an email to identify your users, but in OneSignal that unique identifier is not available out of the box, so the idea here is to tell OneSignal to store the same unique user ID from your website into the OneSignal profile of that user.
To do this, we are going to trigger the following Javascript function as soon as the user has logged in:
// Check the user agent for the "canvas" string
const isApp = navigator.userAgent.toLowerCase().indexOf('canvas') > -1;
// Check if we are in the app
if (isApp) {
try {
// Set the external user ID
let externalUserId = 1;
// Trigger the native function to save to OneSignal
nativeFunctions.onesignalSetExternalUserId(externalUserId);
// Log the event in the console
console.log("External user ID set");
} catch (ex) {
console.log(ex.message);
}
}
We recommend adding the Javascript code inline rather than using a separate file, to avoid compatibility issues.
Fo more details on how to target users using the External User ID, you can refer to the OneSignal documentation here: https://documentation.onesignal.com/docs/external-user-ids