Author: Vendrux

  • What You Need For a Successful App Launch

    At Vendrux, we’re committed to getting your mobile app live within 30 days. While our team handles the technical heavy lifting, your involvement is crucial for a smooth and successful launch. Here’s what we need from your side to make it happen.

    Required Team Resources

    The most successful launches happen when the right people are involved from day one. We need:

    • Decision makers who can approve app designs and features
    • Team members authorized to manage vendor relationships (Apple, Google, OneSignal)
    • Quick feedback on app builds and features
    • Participation in key meetings: onboarding, launch planning, and marketing strategy

    Required Access & Setup

    To build and launch your app, we need access to:

    • Apple Developer account
    • Google Play Developer account
    • OneSignal (for push notifications)
    • Google Analytics
    • A test user account for your website

    Testing Requirements

    Quality assurance is a team effort, and your team’s expertise with your own website is crucial for thorough testing. While we handle technical testing, only you know all the nuances of how your site should work.

    Your role includes:

    • Testing core app functionality thoroughly
    • Verifying all content displays correctly
    • Checking navigation and links
    • Testing any custom features specific to your website
    • Ensuring all important user flows work as expected

    For ecommerce apps, you’ll need to:

    • Test the complete shopping experience from browsing to checkout
    • Verify all payment methods work correctly
    • Process test orders in production
    • Handle any necessary refunds or order cancellations
    • Ensure backend integration works properly

    We rely on your expertise because:

    • You know your website’s functionality best
    • You have access to backend systems needed for testing
    • Only you can verify business-specific features work correctly
    • You can quickly identify if something doesn’t work as intended
    • You have the ability to process and refund test transactions

    Launch Timeline

    To hit our 30-day launch target, we need you to:

    • Complete the onboarding form within 2 weeks of signup
    • Provide quick feedback on app builds
    • Make key decisions promptly
    • Have your team available for critical meetings
    • Test the app thoroughly when it’s ready for release

    Communication Standards

    Clear and timely communication helps us maintain momentum:

    • Respond to important emails within 24 hours
    • Let us know about any potential delays
    • Flag any concerns or issues early
    • Keep us updated on any relevant changes to your website or business

    Why This Matters

    While we do the heavy lifting of building your app, your involvement ensures that:

    • The app perfectly matches your business needs
    • We can resolve any issues quickly
    • The app store submission process goes smoothly
    • Your app launches on schedule
    • You’re fully prepared to make the most of your mobile app

    Meeting these requirements helps us deliver your app on time and ensures you get the most value from your investment in mobile. When we work together effectively, we can often exceed expectations and create an outstanding mobile experience for your users.

    Need help with any of these items? Our team is here to support you – just reach out to your project manager.

  • What percentage does Apple take from in app purchases?

    Every App Store, including Apple App Store and Google Play Store charge a fee on in-app purchases. They take a significant cut of your revenue on any one time and subscription charge in your app, that’s how they make money.

    Subscription billing is particularly popular these days and both Apple and Google have tried enticing developers with a revenue structure that reduces their commission over time.

    What percentage does Apple take from in app purchases?

    For one-time purchases Apple charges a 30% fee.

    Since 2016, Apple has reduced the fees they charge for subscriptions, but only after 12 months of service.

    In the first year of a subscription, Apple takes a 30% cut of your revenue, so you receive 70% of the subscription price at each billing cycle, monthly or annual, minus applicable taxes.

    After a year of service, your revenue share increases to 85% of the subscription price, minus applicable taxes, so Apple takes 15% of your revenue.

    Update: Want to avoid Apple’s 30% App Store fee? Apple is changing their rules about what’s allowed and what not. It’s now allowed for you to contact app users about payment options outside of the app. You can’t link to other payment options yet, but you might be able soon.

    All subscriptions on all Apple platforms are eligible, including paid introductory periods (pay as you go, pay up front). The period calculation excludes free trials and bonus periods. Upgrades, downgrades, or crossgrades between subscriptions in the same group don’t affect the one year calculation. A move to a subscription in a different group resets the count of days.

    What percentage does Google take from in app purchases?

    Like for one-time purchases, Google’s revenue share on subscriptions is 30% of the price. You receive 70% of the payment.

    Like for Apple, Google’s cut on your revenue for subscriptions decreases to 15% after a year, so you’ll retain 85% of the revenue after 12 months.

    Subscribers within a grace period, or that recover from an account hold, grace period, pause, or subscription restore still count. Same for people that sign up at introductory pricing, those that upgrade or downgrade or re-sign up within two months of cancelling. What doesn’t count towards the 12 months are free trials, refunded purchases and any time while the account is on hold.

    Payout schedules

    You don’t get your money immediately when you sell a subscription. Google pays out just a few days after the end of the month, with no minimum.

    Apple makes payments 30 days following the end of each monthly period. To receive payment, you must have provided all required banking and tax information and meet a minimum threshold, ranging from 10USD to 150USD.

  • What is a DUNs number and where to find it?

    A D-U-N-S Number is a number that is used to identify your business. D-U-N-S stands for Data Universal Numbering System, a system developed in the 60s by the Dun & Bradstreet (D&B) company for their own business. It has become a standard to identify a business and Apple uses it to verify the identity of your company.

    A DUNS number is a unique nine-character identification number Dun & Bradstreet provides free of charge.

    The ‘DUNS’ system was quickly adopted worldwide and it’s used by Apple to verify you’re a registered business and the identity of your Company.

    Where do I register a DUNS number?

    Before you start, use the DUNS Number look up tool to check if you already have one. If your company is not in the database, you can submit your information and get your DUNS number.

    How long does it take?

    Obtaining a DUNS Number for your business is quite straightforward. The process usually takes about five working days.

    Once you receive your number, please allow up to 2 business days for Apple to receive your information from D&B. After this, you can apply for the Apple Developer Program as a company.

    What information will I need to provide?

    To apply for a DUNS Number if your business, you will need to supply the following information:

    • Your work contact information
    • Legal structure or type of business (corporation, partnership, proprietorship, etc.)
    • Year the entity was created
    • The primary line of business
    • Total number of employees (full-time and part-time)

    How much does it cost?

    The service from D&B is free for normal registration. You shouldn’t pay anything for requesting a DUNS number. You are also not obligated to purchase any of D&B’s products.

  • What are native functions | vendrux Docs

    Vendrux apps include a Javascript API built into their source code, allowing your website to trigger certain in-app actions using Javascript functions.

    The Native Functions are not available for use until your page is fully loaded within the app, for that reason when a page loads in the app we trigger an event, which tells us that the Javascript API is ready to be used. You will want to listen to that event to make sure the functions are called at the right time, preventing errors in your application.

    Here you can see an example of how to listen to the event triggered by the app:

    >
    try {
        // Get the user agent and convert it to lowercase for case-insensitive comparison
        var userAgent = navigator.userAgent.toLowerCase();
    
        // Check if the user agent contains the string "canvas"
        if (userAgent.indexOf('canvas') > -1) {
            // Run the code only if "canvas" is present in the user agent
            nativeFunctions.onesignalSetExternalUserId("1");
        }
    
    } catch (ex) {
        // Log any error messages for easier debugging
        console.log(ex.message);
    }


    We have also prepared a sample page that can be used in your app for testing the native functions, or if you prefer, you can copy its code and add it to your website directly, you can find the page here: https://mobiloudsupport.github.io/nativefunctions/

    Below you can find a list of all the available native functions in the Vendrux platform:

    >
    try {
        // Get the user agent and convert it to lowercase for case-insensitive comparison
        var userAgent = navigator.userAgent.toLowerCase();
    
        // Check if the user agent contains the string "canvas"
        if (userAgent.indexOf('canvas') > -1) {
            // Run the native functions only if "canvas" is present in the user agent
            nativeFunctions.login();
            nativeFunctions.logout();
            nativeFunctions.onesignalSendTags("1", "2");
            nativeFunctions.onesignalDeleteTags("1", "2");
            nativeFunctions.onesignalSetEmail("user@email.com");
            nativeFunctions.onesignalLogoutEmail();
            nativeFunctions.onesignalRemoveExternalUserId("user ID");
            nativeFunctions.onesignalSetExternalUserId("user ID");
        }
    
    } catch (ex) {
        // Log any error messages for easier debugging
        console.log(ex.message);
    }
    
    
  • Welcome to vendrux | vendrux Docs

    Welcome to the Vendrux documentation center. We understand that creating mobile apps can seem daunting, especially when you’ve invested significant time and resources into your website. Vendrux bridges this gap, allowing you to leverage your existing web presence while providing your users with a premium mobile app experience.

    Understanding Vendrux’s Approach

    The mobile app landscape often presents a challenging decision: build native apps from scratch at significant cost, or settle for a basic web wrapper that fails to meet user expectations. Vendrux offers a sophisticated middle ground through a hybrid approach that brings together the best of native and web technologies.

    How Vendrux Works

    Vendrux operates on a unique three-pillar system that combines native app capabilities, your website’s existing infrastructure, and a flexible configuration layer. Let’s explore each component:

    Native Elements 📱

    The foundation of your Vendrux app is built with pure native code – Swift for iOS and Kotlin for Android. This isn’t just a technical choice; it’s essential for delivering the performance and experience users expect from mobile apps. The native layer handles critical functions like:

    • Navigation: Users experience smooth, responsive navigation through a native bottom tab bar that feels natural on each platform
    • Push Notifications: Direct integration with device notification systems ensures reliable delivery and proper handling
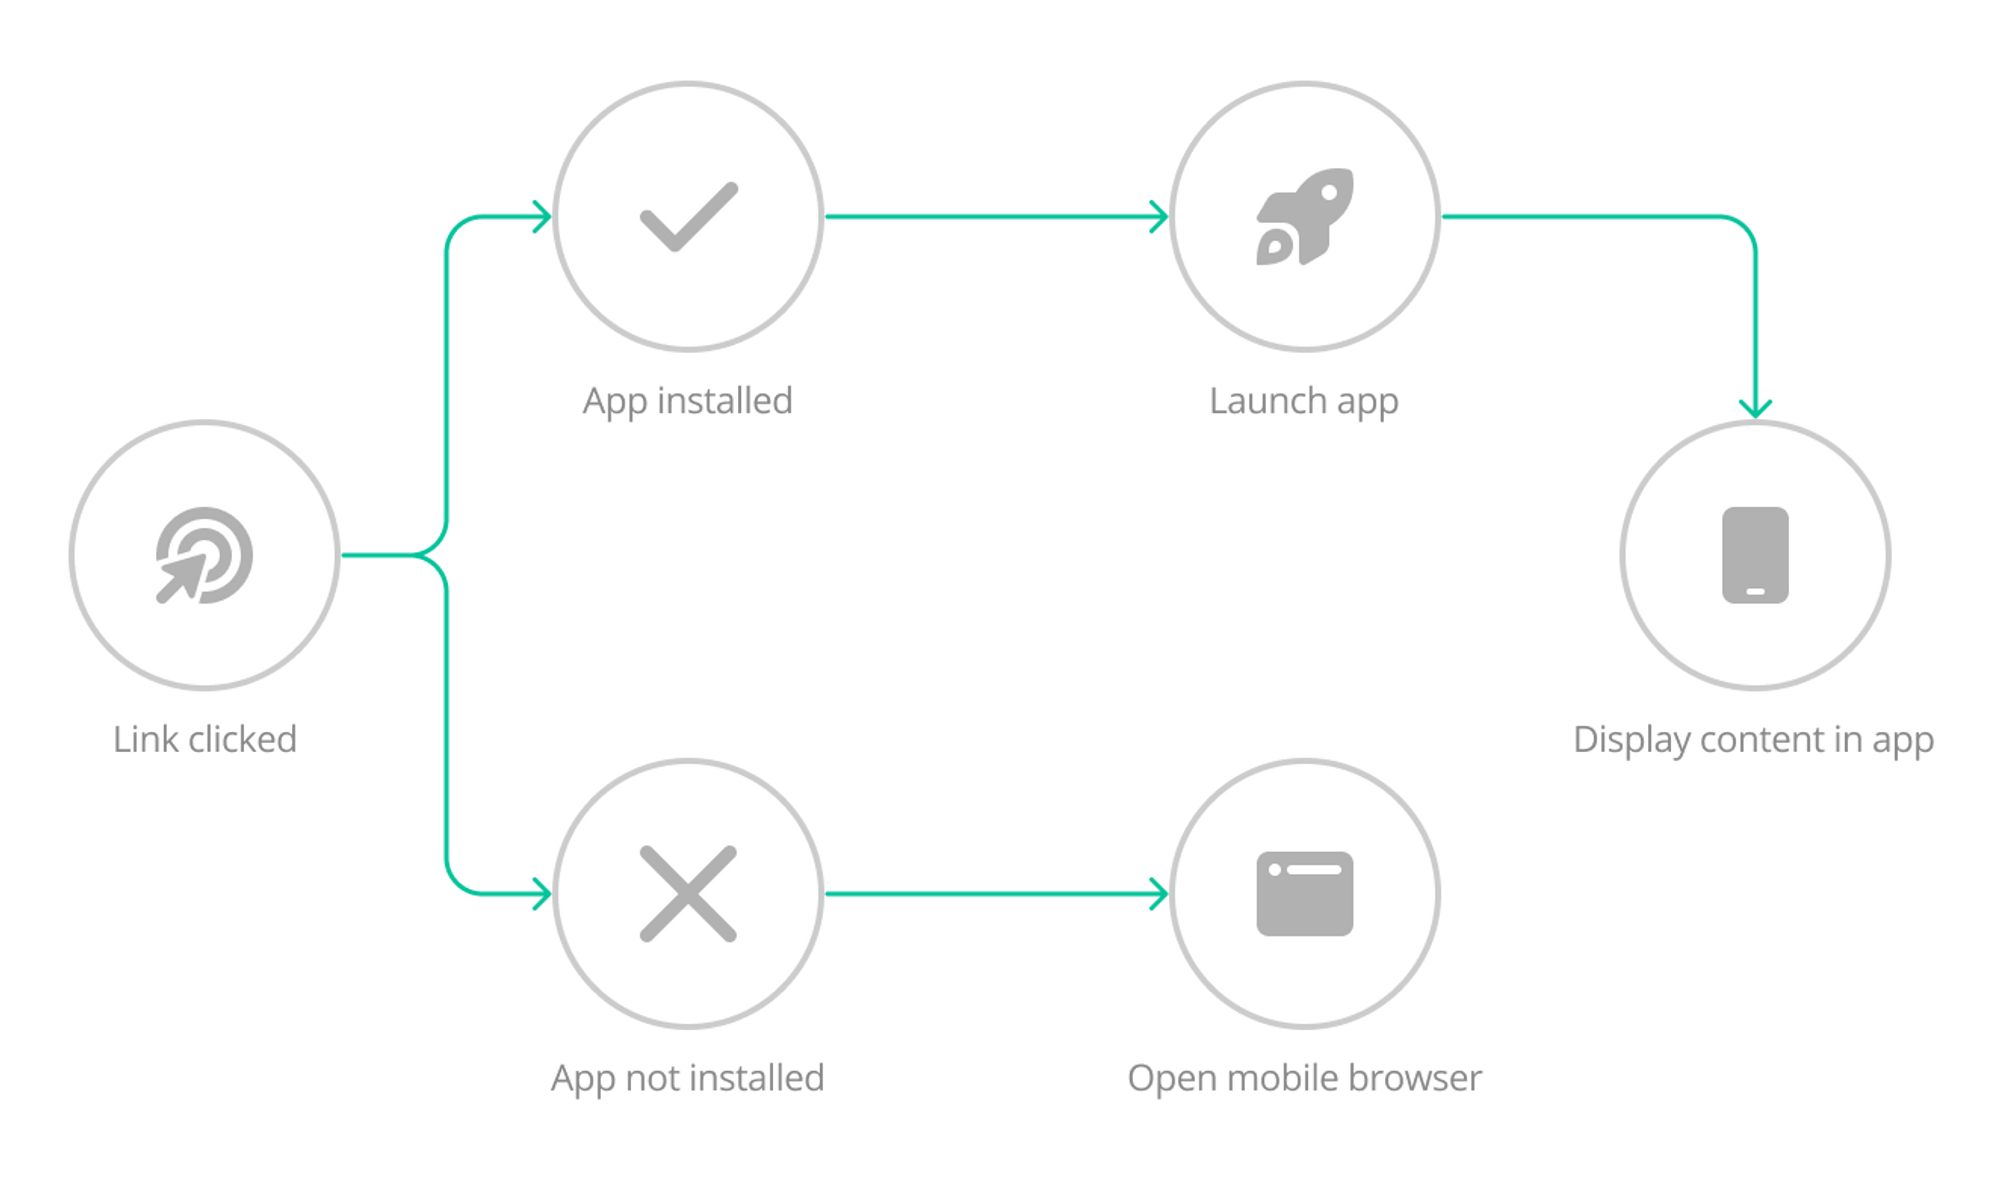
    • Deep Linking: Seamless handling of links between app content and external sources
    • Device Features: Access to camera, location services, and other device capabilities when needed

    Think of the native layer as a sophisticated frame that holds your website content while providing all the benefits of a true mobile app.

    Your Website Content 🌐

    Your website serves as the dynamic heart of your mobile app. This approach offers several powerful advantages:

    • Content Synchronization: Any updates you make to your website automatically appear in your app, eliminating the need for separate content management
    • Feature Parity: All your existing functionality – from e-commerce to user accounts – works seamlessly within the app
    • Development Efficiency: Your web development team can maintain both website and app content using familiar tools and processes
    • Proven Systems: Your existing backend, databases, and business logic continue to power your app experience

    This isn’t simply displaying your website in a frame – Vendrux optimizes how your web content is presented and handled within the native app container, ensuring it feels natural and responsive.

    Configuration Layer ⚙️

    The configuration layer is where Vendrux truly shines, offering unprecedented flexibility without requiring app store updates. Through the Vendrux Dashboard, you can:

    • Control Navigation: Customize how users move through your app, including tab bar organization and deep linking behavior
    • Style Your App: Adjust colors, icons, and visual elements to match your brand
    • Manage Features: Enable and configure push notifications, authentication, and other functionality
    • Set Rules: Define how different types of content and links should behave within your app

    Think of the configuration layer as your app’s control center, allowing you to fine-tune the experience without diving into code.

    The App Publishing Process

    We transform your website into native mobile apps through a streamlined 30-day process that ensures quality while maintaining efficiency. The journey includes:

    1. Kickoff & Setup: We collect your assets and requirements
    2. App Configuration: Our team builds and configures your app
    3. Testing: You preview and test your app
    4. Store Submission: We handle all technical requirements
    5. Launch: Your app goes live on both platforms

    For a detailed breakdown of each phase, see our complete App Publishing Process Guide.

    Core Features

    Navigation and Structure

    The foundation of any great mobile app is intuitive navigation. Vendrux provides powerful tools to create a navigation structure that feels natural and native to mobile users. Through our dashboard, you can configure a bottom tab bar navigation, manage deep linking behavior, and control how different types of content are displayed in your app. Our navigation system supports:

    Push Notifications

    Push notifications are crucial for engaging your mobile app users. Vendrux offers multiple ways to send notifications, supporting both OneSignal and Klaviyo integrations. Whether you need automated content notifications or targeted marketing messages, our system provides the tools you need:

    E-commerce Integration

    For e-commerce websites, Vendrux provides seamless integration with popular platforms, particularly Shopify. Our Shopify integration enables:

    • Native shopping experience
    • Push notifications for orders
    • Cart synchronization
    • Customer account management

    Learn more about our Shopify integration:

    User Authentication

    Authentication is critical for personalized experiences and secure access. Vendrux supports multiple authentication methods to match your existing system while maintaining a native feel. Our authentication system is flexible and secure:

    Analytics and Tracking

    Understanding how users interact with your app is essential for optimization and growth. Vendrux integrates with leading analytics platforms to provide comprehensive insights into user behavior and app performance:

    Security and Optimization

    We provide tools and guidelines to ensure your app is secure and performs optimally:

    Development Resources

    While Vendrux handles the complex native app development, we provide powerful tools and APIs that allow developers to customize and enhance the app experience. Whether you’re looking to modify the appearance, add custom functionality, or optimize performance, our development resources provide the flexibility you need.

    Customization

    Vendrux offers multiple approaches to customize your app’s appearance and behavior. Our customization tools allow you to create an app experience that perfectly matches your brand while maintaining native performance and functionality.

    Visual Customization

    Control how your website appears within the app environment:

    Functional Customization

    Extend your app’s capabilities through our native bridges:

    Push Notification Development

    Implement advanced notification features:

    Testing and Quality Assurance

    Thorough testing is crucial for delivering a high-quality app experience. Our testing tools and guidelines help ensure your app functions perfectly across all devices and scenarios.

    Testing Infrastructure

    Comprehensive testing resources:

    Performance Optimization

    Tools and guides for optimal app performance:

    Testing Tools

    Screen recording and debugging tools:

    Development Best Practices

    Code Organization

    • Keep custom CSS and JavaScript organized and documented
    • Use consistent naming conventions for custom elements
    • Maintain separate styles for app-specific modifications
    • Document all custom implementations

    Testing Strategy

    • Test on multiple devices and OS versions
    • Verify performance impact of customizations
    • Ensure consistent behavior across platforms
    • Monitor analytics for usage patterns

    Security Considerations

    • Follow secure coding practices
    • Implement proper error handling
    • Protect sensitive user data
    • Validate all user inputs

    Widget Development

    Vendrux provides a suite of pre-built widgets to enhance your app:

    Version Control and Updates

    Vendrux manages app updates and versioning, but you should:

    • Document all custom modifications
    • Track changes to custom code
    • Test updates before deployment
    • Maintain backup copies of customizations

    Legal Requirements and Compliance

    Successfully launching and maintaining a mobile app requires adherence to various legal requirements and privacy regulations. Vendrux helps you navigate these requirements while ensuring your app remains compliant with app store policies and international privacy laws.

    Privacy Policy Requirements

    Every app needs a comprehensive privacy policy that accurately reflects how user data is collected, used, and protected. This is not just a best practice – it’s required by:

    • App Store Guidelines
    • Google Play Store Policies
    • Privacy Laws (GDPR, CCPA)
    • Third-party Services (Analytics, Push Notifications)

    Key resources:

    User Data and GDPR

    If your app may be used by EU residents, GDPR compliance is essential. Key considerations include:

    • User consent for data collection
    • Right to data deletion
    • Data processing transparency
    • Privacy by design

    Resources for managing user data:

    Store Compliance

    Both Apple and Google have specific requirements that must be met:

    Apple App Store:

    • Account deletion functionality
    • Privacy declarations
    • Data usage transparency
    • Sign in with Apple (if using other social logins)

    Google Play Store:

    • Data safety section
    • Runtime permissions
    • Personal/sensitive data handling
    • Privacy policy requirements

    Our platform helps ensure compliance through:

    • Built-in account deletion functionality
    • Privacy-respecting analytics integration
    • Secure data handling
    • Compliant push notification implementation

    For specific requirements and implementation details, you can refer to:

    Getting Started

    1. Review the App Publishing Process
    2. Check the Launch Requirements
    3. Set up your Vendrux Dashboard
    4. Plan your Push Notification Strategy

    Support and Resources

  • Welcome Screen | vendrux Docs

    The Welcome Screen is a customizable initial screen that appears when a user opens your app for the first time. This feature provides an important opportunity to create a positive first impression, gather necessary permissions, and guide users into your application experience.

    Configuration

    To set up the Welcome Screen, you’ll need to modify your configuration JSON in the Canvas Dashboard under the “Advanced” section. The welcome screen parameters must be placed within the “General” object in the configuration JSON:

    "General": {  
      // other parameters...  
      "Welcome_Screen_URL": "https://mobiloudsupport.github.io/welcome-screen/",
      // other parameters...
    }

    The Welcome_Screen_URL parameter should point to the HTML page you’ve created for your welcome screen. This can be hosted on any web server accessible to your users.

    Creating Your Welcome Screen

    Your welcome screen can be a simple HTML page with any design elements you choose. The only requirement is to include a dismissal element with this specific onclick attribute:

    button onclick="mlConfirmButton.performClick()">Close Welcome Screenbutton>

    When this element is clicked, the welcome screen will be dismissed and will not appear again on subsequent app launches.

    Important System Prompts

    The welcome screen is the ideal place to request crucial permissions and present required system notifications:

    Request Push Notification Permission:

    button onclick="nativeFunctions.triggerPushPrompt()">Enable Push Notificationsbutton>

    Trigger App Tracking Transparency Prompt (iOS/Android):

    button onclick="nativeFunctions.triggerTransparencyTracker()">Allow Trackingbutton>

    Benefits of Using a Welcome Screen

    1. Improved Permission Acceptance Rates

    When permissions like push notifications or tracking are requested without context, users often decline them. A welcome screen allows you to explain the benefits before triggering the system prompt, significantly increasing opt-in rates.

    2. Enhanced User Onboarding

    The welcome screen provides an opportunity to highlight your app’s key features and value proposition before users enter the main experience.

    3. Legal Compliance

    Many regions require explicit consent for tracking and data collection. The welcome screen offers a clean implementation point for these requirements.

    4. Reduced Bounce Rates

    First impressions matter – a well-designed welcome screen helps set expectations and orient new users, reducing the likelihood they’ll immediately close the app.

    5. Branding Opportunity

    The welcome screen can reinforce your brand identity with custom visuals, messaging, and tone before users see the standard interface.

    Best Practices

    • Keep the welcome screen simple and focused – aim for 1-3 key messages
    • Clearly explain the benefits of enabling notifications and permissions
    • Use compelling visuals that reflect your brand
    • Consider a progress indicator if you have multiple welcome screens
    • Test different designs to optimize permission acceptance rates

    Template

    Vendrux has prepared a template to get you started, you can download it clicking here.

  • UTM Injection for Google Analytics

    Vendrux allows you to inject parameters into all URLs loaded in your app to track app usage through UTMs in Google Analytics without needing extra configuration.

    To enable this feature, edit the app’s advanced configuration by adding the following parameters:

      "Parameter_Injection": {
        "Enabled": true,
        "Parameter": "utm_source=app&utm_medium=webview&utm_campaign=tracking",
        "Exclusion_Rules": [
          {
            "Regex": ""
          }
        ]
      }

    Parameter

    Under the "Parameter" key, specify the string to be appended to all URLs loaded in the app. We recommend using UTM parameters for seamless tracking by Google Analytics, but you can use any parameters as needed.

    The parameters will be appended to the final URLs even if there is a redirect, and the app will ensure that the URL structure remains intact if it already contains parameters.

    Exclusion Rules

    Exclusion rules allow you to specify which URLs should not have the parameters appended. These rules use Regex to match URLs. If a URL matches the Regex pattern, the parameters will not be injected.

    Here are a few examples:

    Matches all URLs that are different from vendrux.com

    {
        "Regex": "^(?!.*vendrux\\.com).*$"
    }

    Matches all URLs containing google in them

    {
        "Regex": ".*google.*"
    }

  • Use App Links and Universal Link

    Use App Links and Universal Link

    App Links and Universal Links are features that have the exact same purpose: allow links to be opened inside apps when the app is already installed on the device.

    So why do they have different names? Since these are system-specific features, one for Android and the other for iOS, their developers (Apple and Google) decided to give their own names.

    How do they work?

    When someone shares a link to your website, via Telegram, WhatsApp, or any other messaging app, clicking on that link will take the user to Safari or Chrome, where the content will be loaded. This is the default behavior in any mobile device.

    With App Links and Universal Links that behavior will be different. If the user who clicked on the link has your app installed, that link will be opened inside your app instead.

    What if my app is not installed?

    Due to limitations on how App Links and Universal Links work if the user doesn’t have your app installed the default behavior will apply, meaning that the link will be opened in Safari or Chrome.

    Notion Image
    How App Links and Universal Links work

    How to set it up

    Vendrux will take care of all configuration and development required to get App Links and Universal Links implemented into your Vendrux App.

    By the end of the process, you will receive the following files:

    • apple-app-site-association for iOS
    • assetlinks.json for Android

    Both files must be placed inside a folder called /.well-known in your website’s root directory. They must be accessible when you open them directly using a link like this: https://yourwebsite.com/.well-known/apple-app-site-association or https://yourwebsite.com/.well-known/assetlinks.json

    To do this, you will need FTP or SSH access to your server, and if you are not familiar with those, you will want to ask your website developer or hosting provider to assist.

  • Trigger Push Prompt Programmatically | vendrux Docs

    This guide explains how to implement smart push notification prompts in Vendrux apps using the available APIs and best practices. For the purpose of this guide, we will create a button that is only displayed under the correct conditions, and that when clicked, triggers the push notification prompt.

    Setup Flow Overview

    Here’s the basic flow for implementing a push notification button:

    1. Configure your app to disable automatic prompts (iOS_Enable_Push_Notifications: false)
    2. Wait for page load and Vendrux APIs to be ready
    3. Check if button should be shown (user in app + notifications disabled)
    4. Display button with appropriate text
    5. Set up real-time listener for subscription status changes
    6. Handle button clicks to trigger push prompt
    7. Update button text based on subscription status changes

    App Configuration

    To have full control over when push prompts appear, you should configure your Vendrux app to disable the default push prompt that shows immediately when the app opens. Add these parameters to your app configuration:

    {
      "App_Permissions": {
        "iOS_Enable_Push_Notifications": false,
        "Android_Enable_Location": false
      }
    }

    Setting iOS_Enable_Push_Notifications to false disables the automatic push prompt that Vendrux normally shows on app launch. This gives you complete control over when and how to present the push notification request to your users.

    Vendrux APIs & Objects

    1. App Detection

    Check if user is in Vendrux app:

    function isInApp() {    
    	return navigator.userAgent.toLowerCase().includes('canvas');
    }

    Vendrux apps inject “canvas” into the user agent string. This is how we determine if the user is accessing your website from within the app or from a regular browser. Push prompts should only appear when users are in the app context, since regular browsers don’t have access to the native push notification functionality.

    2. Push Subscription Status

    Get current status:

    function isPushEnabled() {
        try {
            return !!(window.mobiloudAppInfo && window.mobiloudAppInfo.pushSubscribed);
        } catch (e) {
            return false; // Assume disabled if can't read
        }
    }

    Vendrux injects an object called mobiloudAppInfo into the DOM that allows you to pull certain details about the user, including their current push notification subscription status. The pushSubscribed property is a boolean that tells you whether the user has already enabled push notifications for your app. This is super useful because you don’t want to keep asking users who have already subscribed!

    Object: window.mobiloudAppInfo.pushSubscribed

    • Type: Boolean
    • Purpose: Current push notification subscription status

    3. Real-time Status Changes

    Listen for status changes:

    // Override the global callback
    window.mlPushStatusChanged = function(isSubscribed) {
        console.log('Push status changed:', isSubscribed);
        // Update your UI here
        updatePromptVisibility(isSubscribed);
    };

    Here’s the thing – we can’t update that mobiloudAppInfo object in real-time when the user’s subscription status changes. This is due to limitations in the WebView. So instead, Vendrux triggers a global function called mlPushStatusChanged whenever the subscription status changes. This makes it super easy for you to update your UI elements immediately when the user enables or disables notifications, giving them a much smoother user experience. No need to constantly check the status or refresh the page!

    Function: window.mlPushStatusChanged(isSubscribed)

    • Type: Global callback function
    • Parameter: isSubscribed (boolean)
    • Triggered: When user enables/disables notifications
    • Use: Real-time UI updates without polling

    4. Trigger Push Prompt

    Show native permission dialog:

    function triggerPushPrompt() {
        // Only trigger if in app context
        if (isInApp()) {
            nativeFunctions.triggerPushPrompt();
        }
    }

    This function triggers the native OS-level permission dialog that asks the user to enable push notifications. It’s the actual system prompt that appears on iOS and Android devices.

    Function: nativeFunctions.triggerPushPrompt()

    • Purpose: Shows OS-level permission dialog or settings redirect
    • Automatic fallback: Handles platform limits automatically

    API Availability & Timing

    Waiting for APIs to Load

    The nativeFunctions object and mobiloudAppInfo are not available immediately when the page loads. The app needs time to initialize and inject these APIs into your webpage. Here’s how to handle this:

    Option 1: Polling Method

    function waitForNativeFunctions(callback, maxAttempts = 50) {
        let attempts = 0;
        
        function check() {
            attempts++;
            
            // Check if APIs are ready
            if (typeof nativeFunctions !== 'undefined' && window.mobiloudAppInfo) {
                callback(); // APIs ready, proceed
            } else if (attempts             setTimeout(check, 100); // Try again in 100ms
            }
            // Stop after 5 seconds (50 × 100ms)
        }
        
        check();
    }

    Option 2: Event-based approach

    // Wait for page to load, then start checking
    document.addEventListener('DOMContentLoaded', function() {
        waitForNativeFunctions(() => {
            setupPushPrompt();
        });
    });

    This ensures your code doesn’t try to access APIs before they’re available, which would cause errors.

    Platform Limitations & Automatic Fallback

    How Platform Limits Work

    Both iOS and Android have built-in restrictions on how many times an app can show the push notification permission prompt:

    • iOS: Allows only a limited number of permission requests per app installation
    • Android: Similar restrictions that vary by Android version

    Automatic Fallback Handling

    The good news is that nativeFunctions.triggerPushPrompt() handles these limits automatically! When the platform limits are reached, instead of showing the native system dialog, it will automatically display a different prompt that directs users to manually enable notifications through their device settings.

    You don’t need to detect or handle this yourself – just call triggerPushPrompt() and the function will either show the native dialog or the settings redirect as appropriate.

    Complete Implementation Example

    class PushNotificationButton {
        constructor() {
            this.button = null;
            this.init();
        }
        
        init() {
            // Wait for page to load
            document.addEventListener('DOMContentLoaded', () => {
                this.setup();
            });
        }
        
        setup() {
            // Wait for Vendrux APIs to be available
            this.waitForNativeFunctions(() => {
                // Set up the button if conditions are met
                this.updateButton();
                // Listen for real-time status changes
                this.setupStatusListener();
            });
        }
        
        updateButton() {
            const shouldShow = this.isInApp();
            const isSubscribed = this.isPushEnabled();
            
            if (shouldShow) {
                if (!this.button) {
                    // Create button if it doesn't exist
                    this.createButton();
                }
                
                // Update button text based on subscription status
                if (isSubscribed) {
                    this.button.textContent = '✅ Notifications Enabled';
                    this.button.disabled = true;
                } else {
                    this.button.textContent = '🔔 Enable Notifications';
                    this.button.disabled = false;
                }
            } else {
                // Hide button if not in app
                this.hideButton();
            }
        }
        
        createButton() {
            // Create the button element
            this.button = document.createElement('button');
            this.button.style.cssText = `
                padding: 12px 24px;
                background-color: #007AFF;
                color: white;
                border: none;
                border-radius: 8px;
                font-size: 16px;
                cursor: pointer;
                margin: 10px;
            `;
            
            // Handle button clicks
            this.button.onclick = () => this.handleClick();
            
            // Add button to page (you can change this to any container)
            document.body.appendChild(this.button);
        }
        
        handleClick() {
            // Only trigger if user is in app and not subscribed
            if (this.isInApp() && !this.isPushEnabled()) {
                // This will show native prompt or settings redirect automatically
                nativeFunctions.triggerPushPrompt();
            }
        }
        
        isInApp() {
            // Check if user is in Vendrux app
            return navigator.userAgent.toLowerCase().includes('canvas');
        }
        
        isPushEnabled() {
            // Check current subscription status
            try {
                return !!(window.mobiloudAppInfo && 
                         window.mobiloudAppInfo.pushSubscribed);
            } catch (e) {
                return false;
            }
        }
        
        setupStatusListener() {
            // Store any existing callback
            const original = window.mlPushStatusChanged;
            
            // Override with our handler
            window.mlPushStatusChanged = (isSubscribed) => {
                // Call original callback if it existed
                if (typeof original === 'function') original(isSubscribed);
                
                // Update button based on new status
                this.updateButton();
            };
        }
        
        hideButton() {
            // Remove button if it exists
            if (this.button) {
                this.button.remove();
                this.button = null;
            }
        }
        
        waitForNativeFunctions(callback, maxAttempts = 50) {
            let attempts = 0;
            
            function check() {
                attempts++;
                
                // Check if both APIs are available
                if (typeof nativeFunctions !== 'undefined' && window.mobiloudAppInfo) {
                    callback(); // Ready to go!
                } else if (attempts                 setTimeout(check, 100); // Try again in 100ms
                }
                // Stop after 5 seconds total
            }
            
            check();
        }
    }
    
    // Initialize the notification button
    new PushNotificationButton();

    Button Behavior Summary

    The button will automatically:

    • Show when user is in the app
    • Hide when user is in a regular browser
    • Display “🔔 Enable Notifications” when push notifications are disabled
    • Display “✅ Notifications Enabled” when push notifications are enabled
    • Become disabled when notifications are already enabled
    • Update in real-time when subscription status changes
    • Handle clicks by triggering the push prompt or settings redirect

  • Track app data in Google Analytics

    Track app data in Google Analytics

    If you are using Google Tag Manager (GTM) on your website, check our Google Analytics with Google Tag Manager guide instead.

    Tracking the performance of your app is key to make sure your goals are achieved, in this guide you will learn how to adjust your website Google Analytics integration to allow you to track your app separately from your website.

    Configure Google Analytics Tracking Code

    Your existing Google Analytics tracking code should look like this:

    
        window.dataLayer = window.dataLayer || [];
        function gtag(){dataLayer.push(arguments);}
        gtag('js', new Date());
        gtag('config', 'G-XXXXXXXXX');
    

    We will add a few lines of code that will add an extra user property to users who view your website through the Vendrux app.

    Here is the code that you will need to add:

    
    	var isApp = navigator.userAgent.toLowerCase().indexOf('canvas') > -1;
        if(isApp) {
          gtag('set', {'app_session': 'true'})
        } else {
          gtag('set', {'app_session': 'false'})
        }
    

    Your final Google Analytics tracking code will look like this after the changes:

    
          window.dataLayer = window.dataLayer || [];
          function gtag(){dataLayer.push(arguments);}
          gtag('js', new Date());
    
          gtag('config', 'G-XXXXXXXXX');
    			var isApp = navigator.userAgent.toLowerCase().indexOf('canvas') > -1;
          if(isApp) {
            gtag('set', {'app_session': 'true'})
          } else {
            gtag('set', {'app_session': 'false'})
          }
    

    That’s it for the first part, now let’s jump into your Google Analytics Dashboard.

    Create a Custom Dimension

    Under your Google Analytics Dashboard you will need to create a custom dimension.

    Click the “Gear” icon located on the bottom left area of your screen:

    Click “Custom definitions” in the “Property” column:

    Click the “Create custom dimension” button:

    Fill the details as follows:

    • Dimension name: app_session
    • Scope: user
    • Description: Determines if the user is viewing the website on the browser or through the app
    • User property: app_session

    Save your custom dimension, and you are done!

    You Need to Wait

    Once you have created the custom dimension you will need to wait until a few users have opened your app, and for the data to be processed by Google Analytics, which usually takes 24 hours at least.

    To clarify, you will not be able to see segment your users immediately, you will need to wait 24 hours before doing so.