Google Play is the largest mobile app store in the world, with more than 3 million apps available for Android users to download.
Impressive, right?
Standing out is important. You need a great product page to rank well for key search terms and to entice potential users to download your Android apps.
When you build apps with Vendrux, we support you heavily in this process, but it’s still important to understand what makes a great Google Play product page.
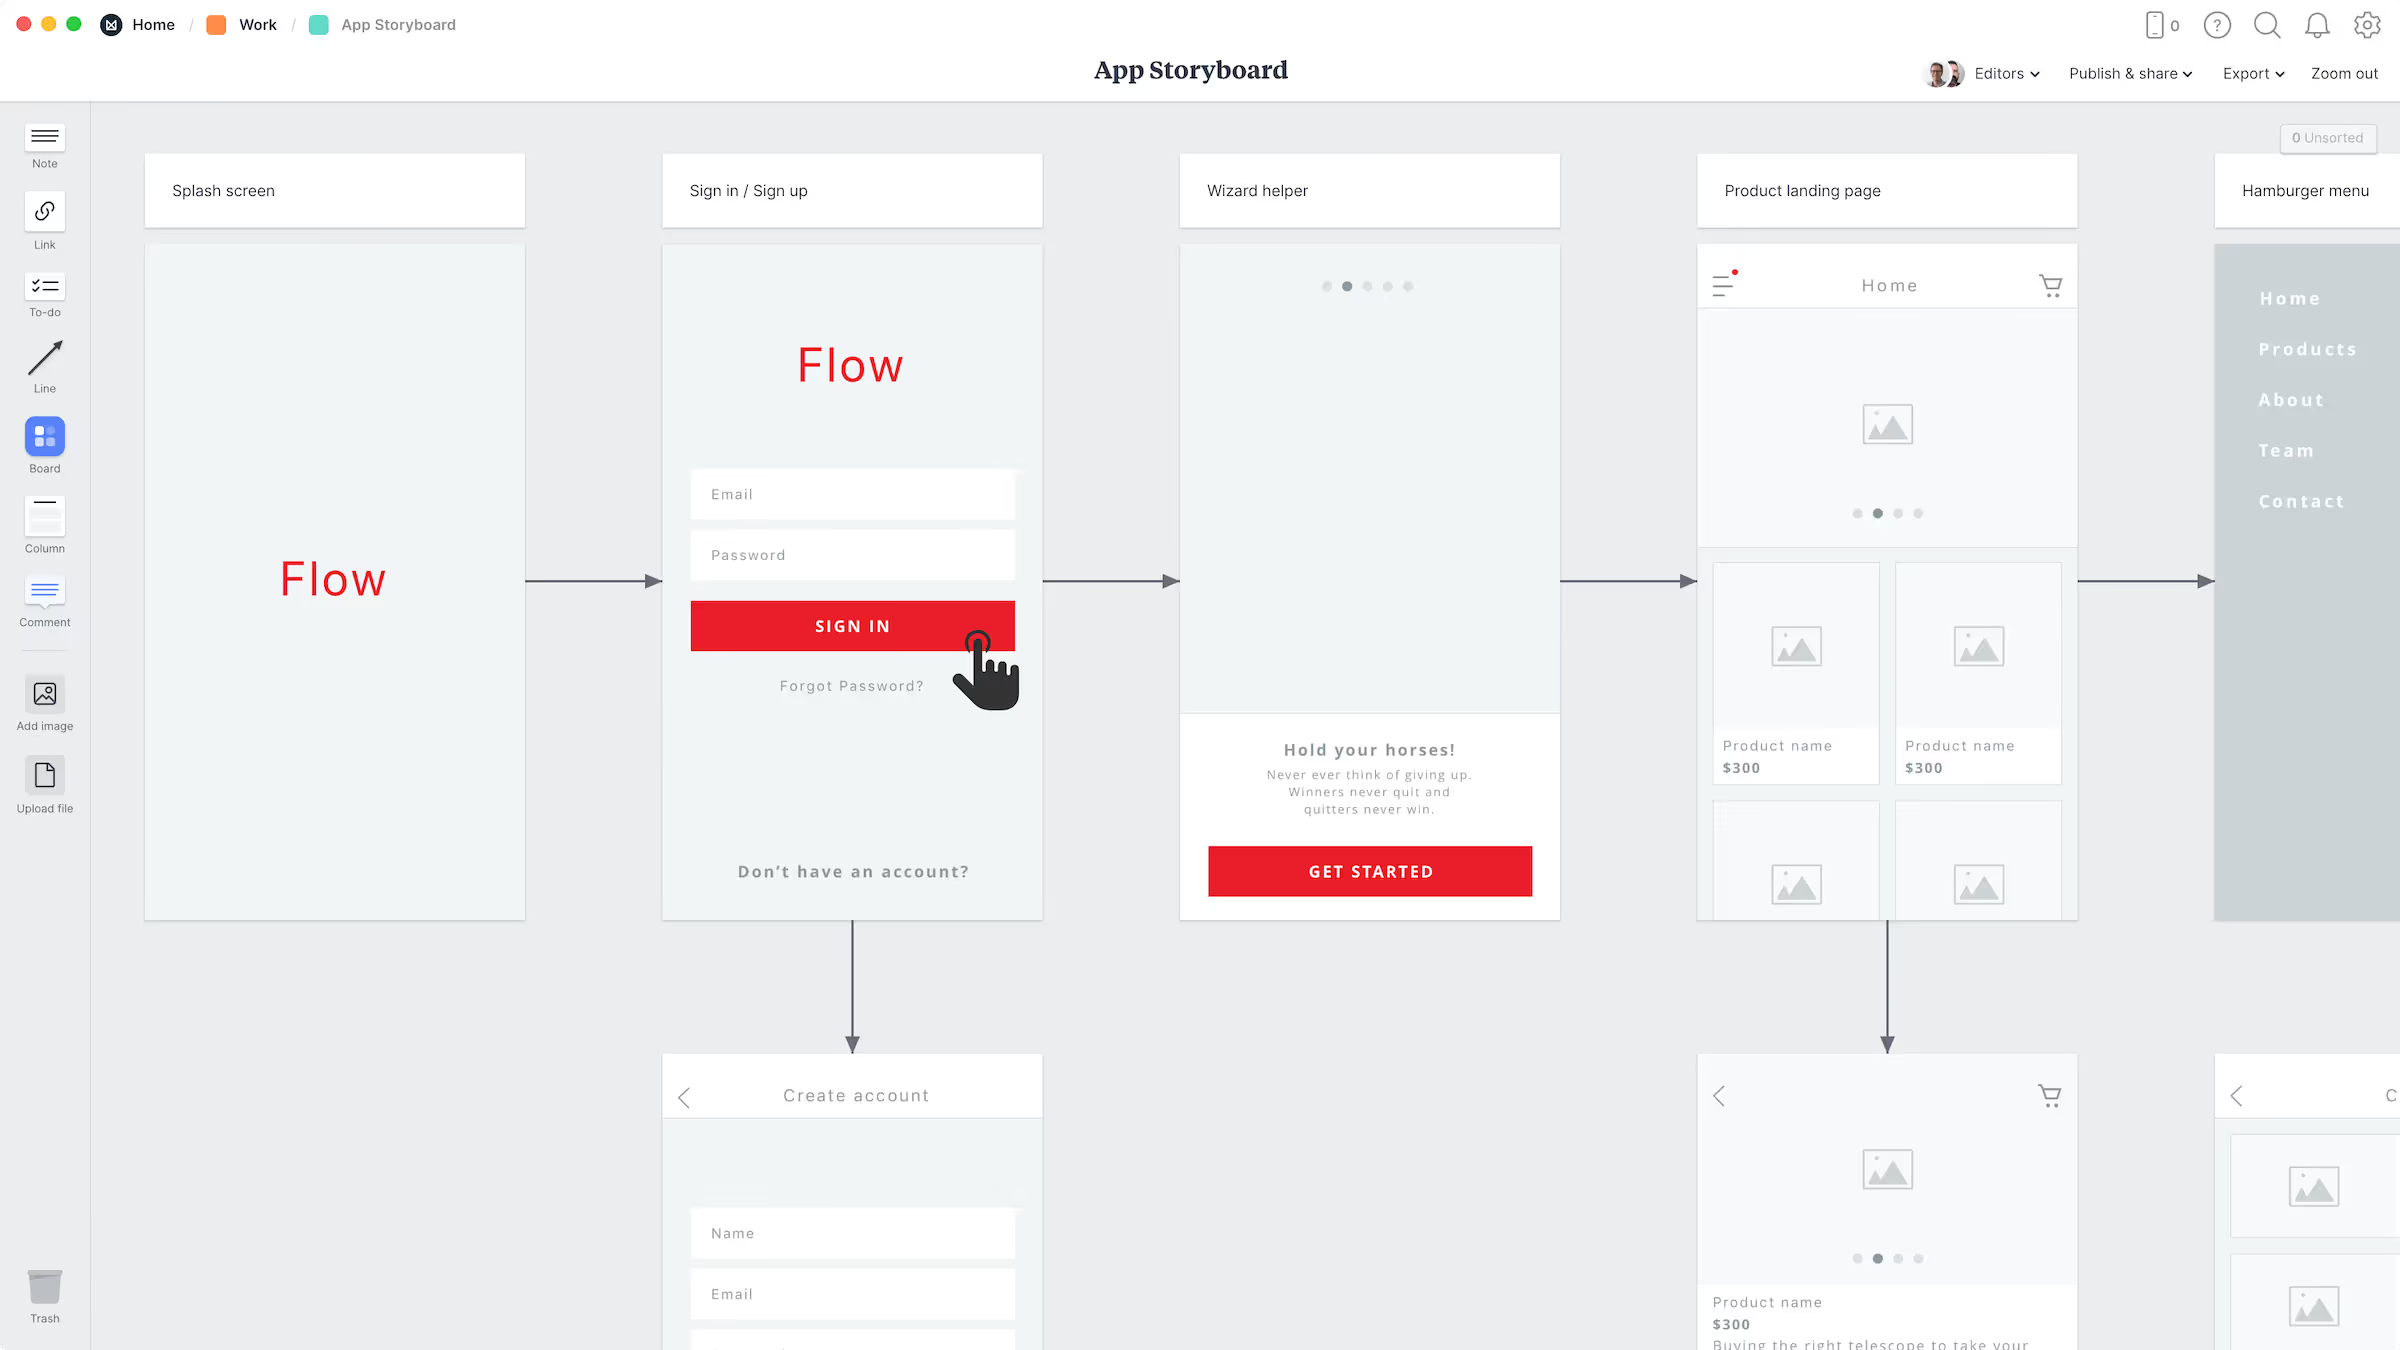
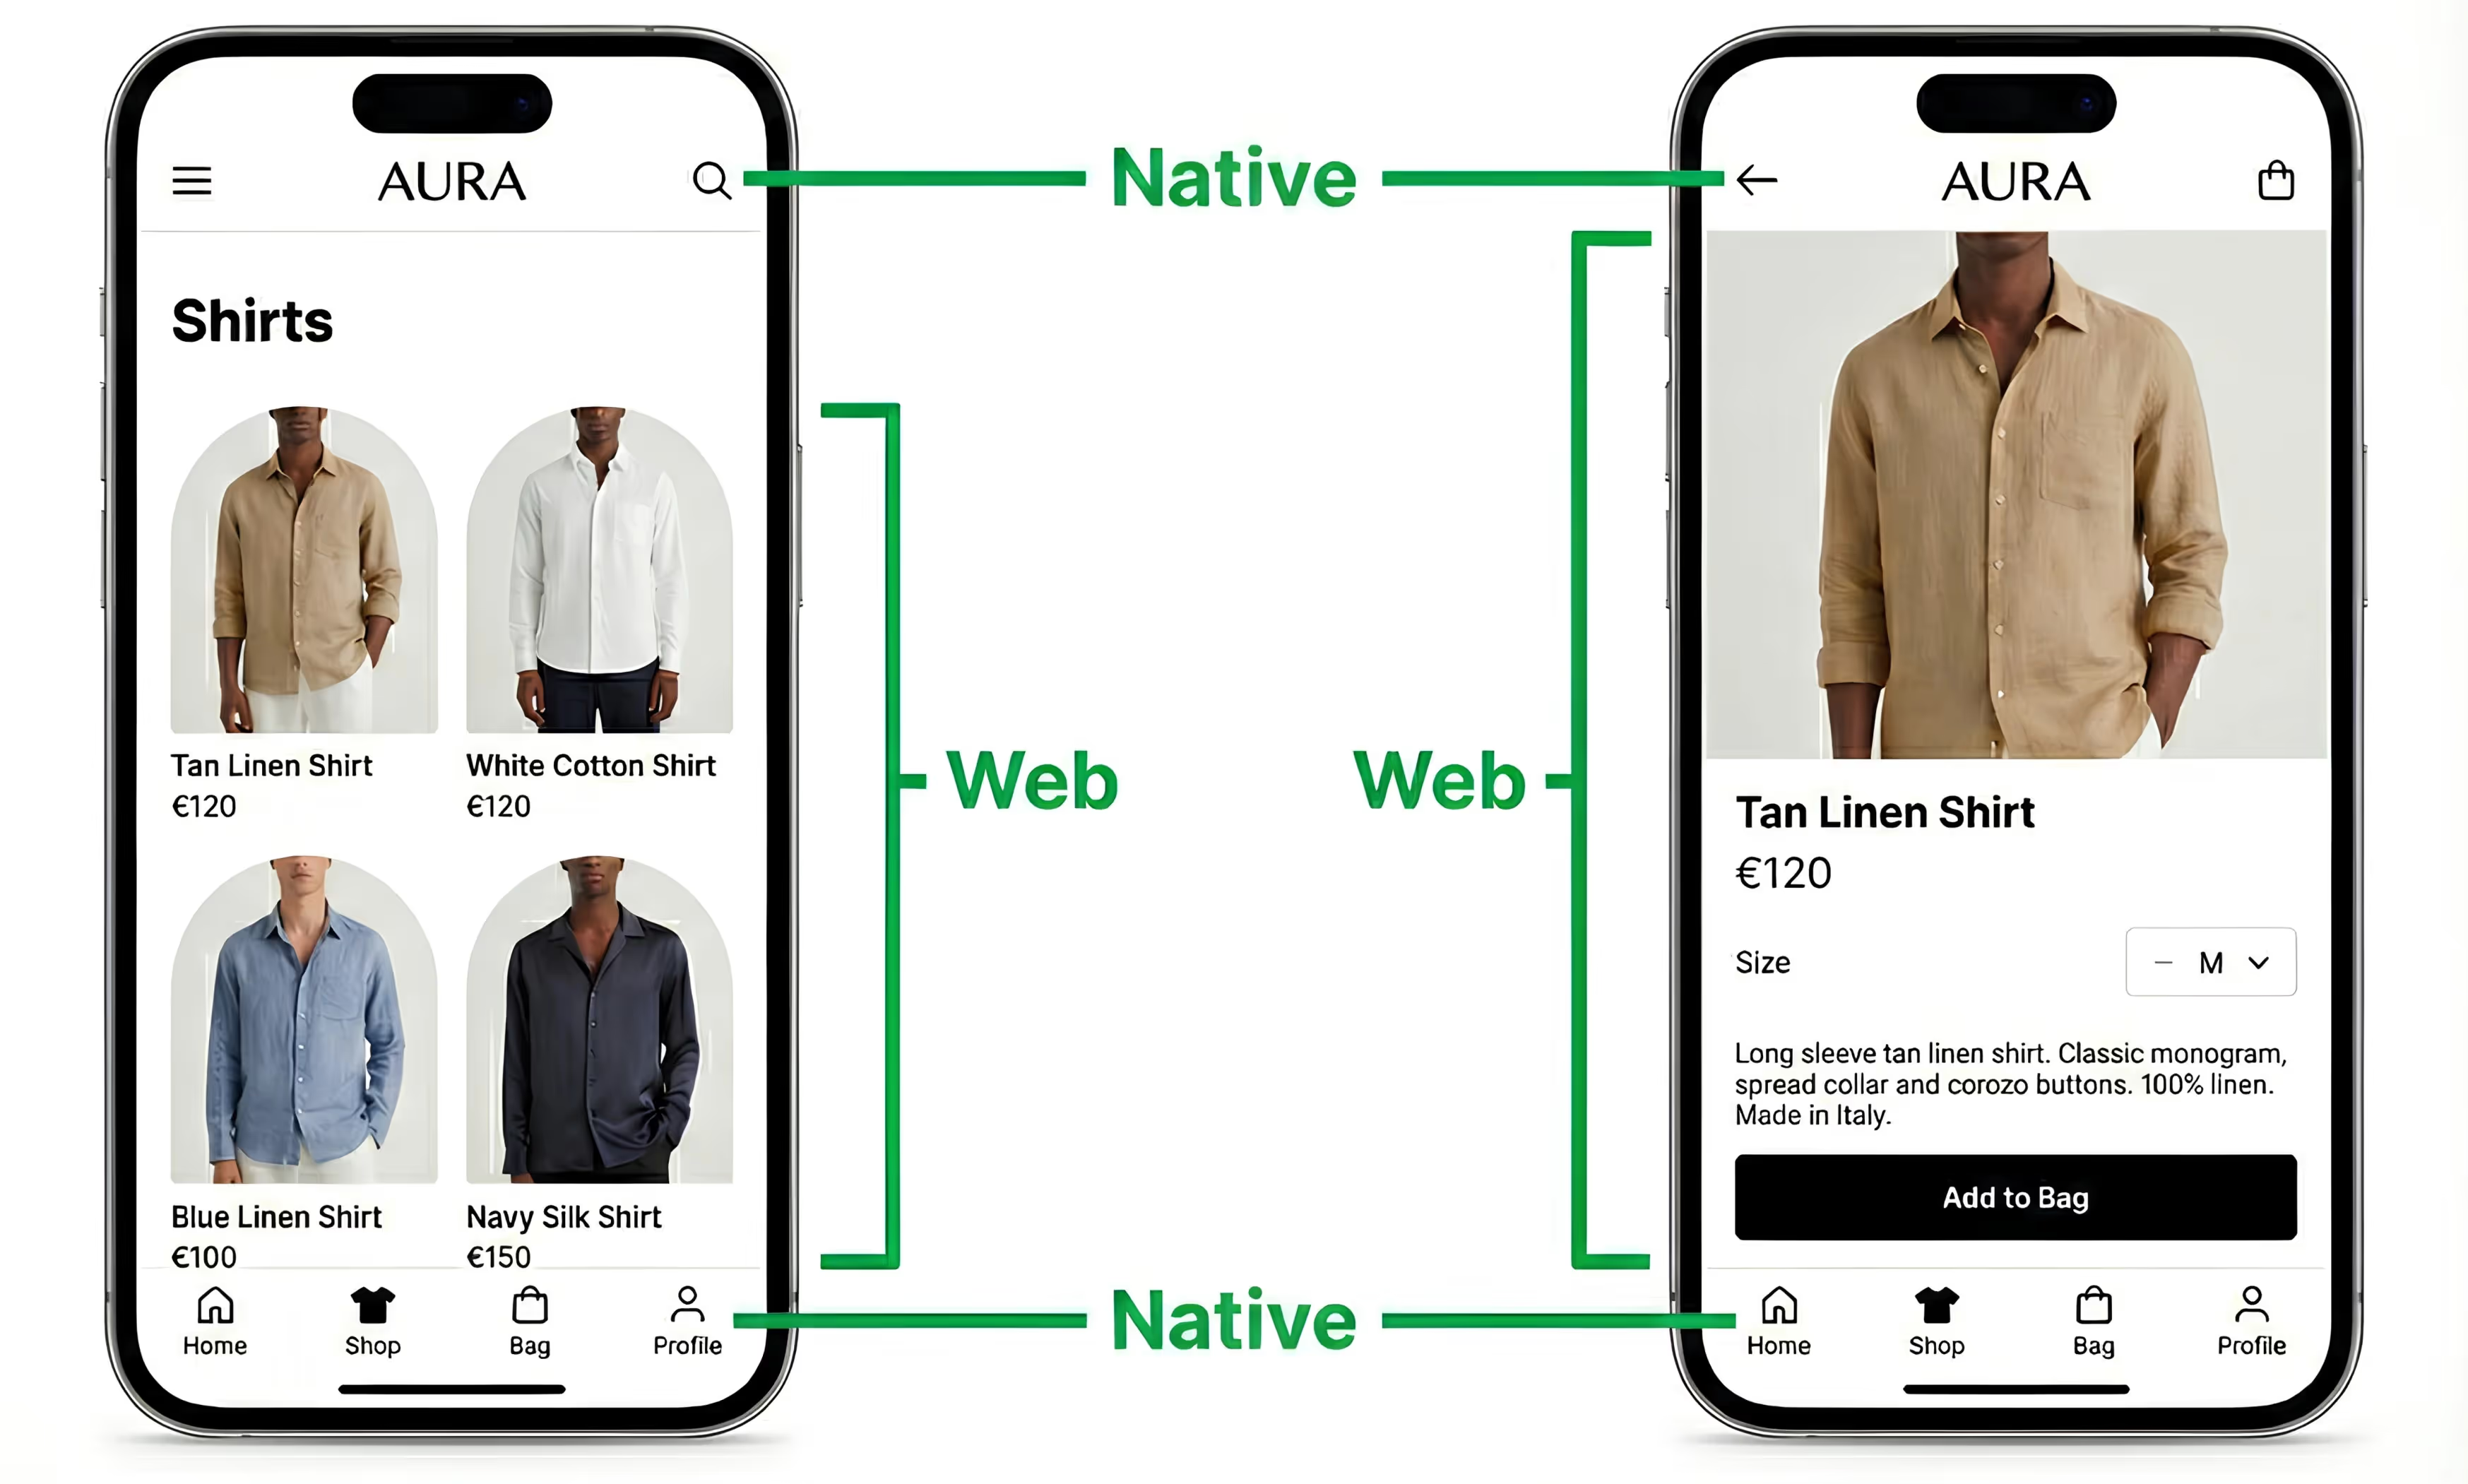
What is a Google Play Product Page?
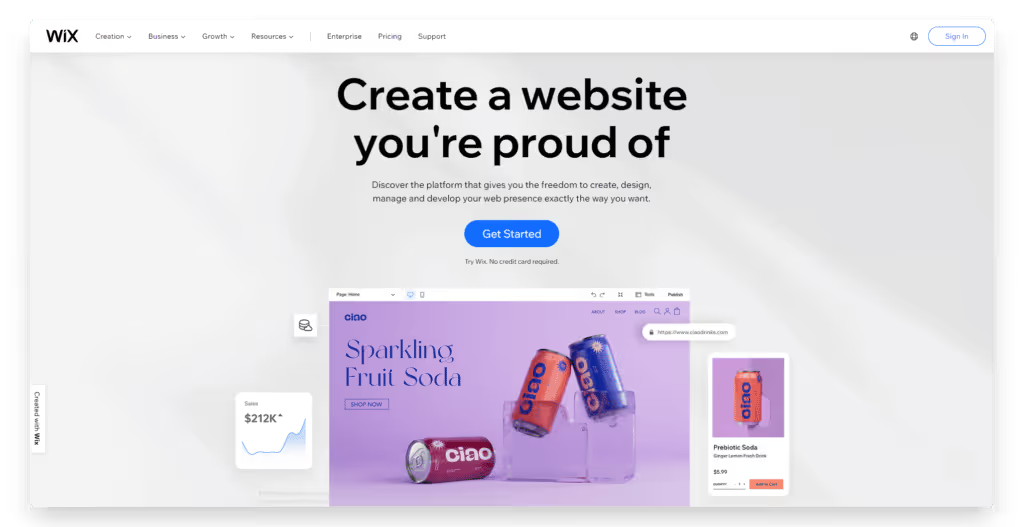
Your product page is the key landing page for your app in the Play Store. It’s designed to show off the core functionality and value propositions of your app in a digestible and appealing way.
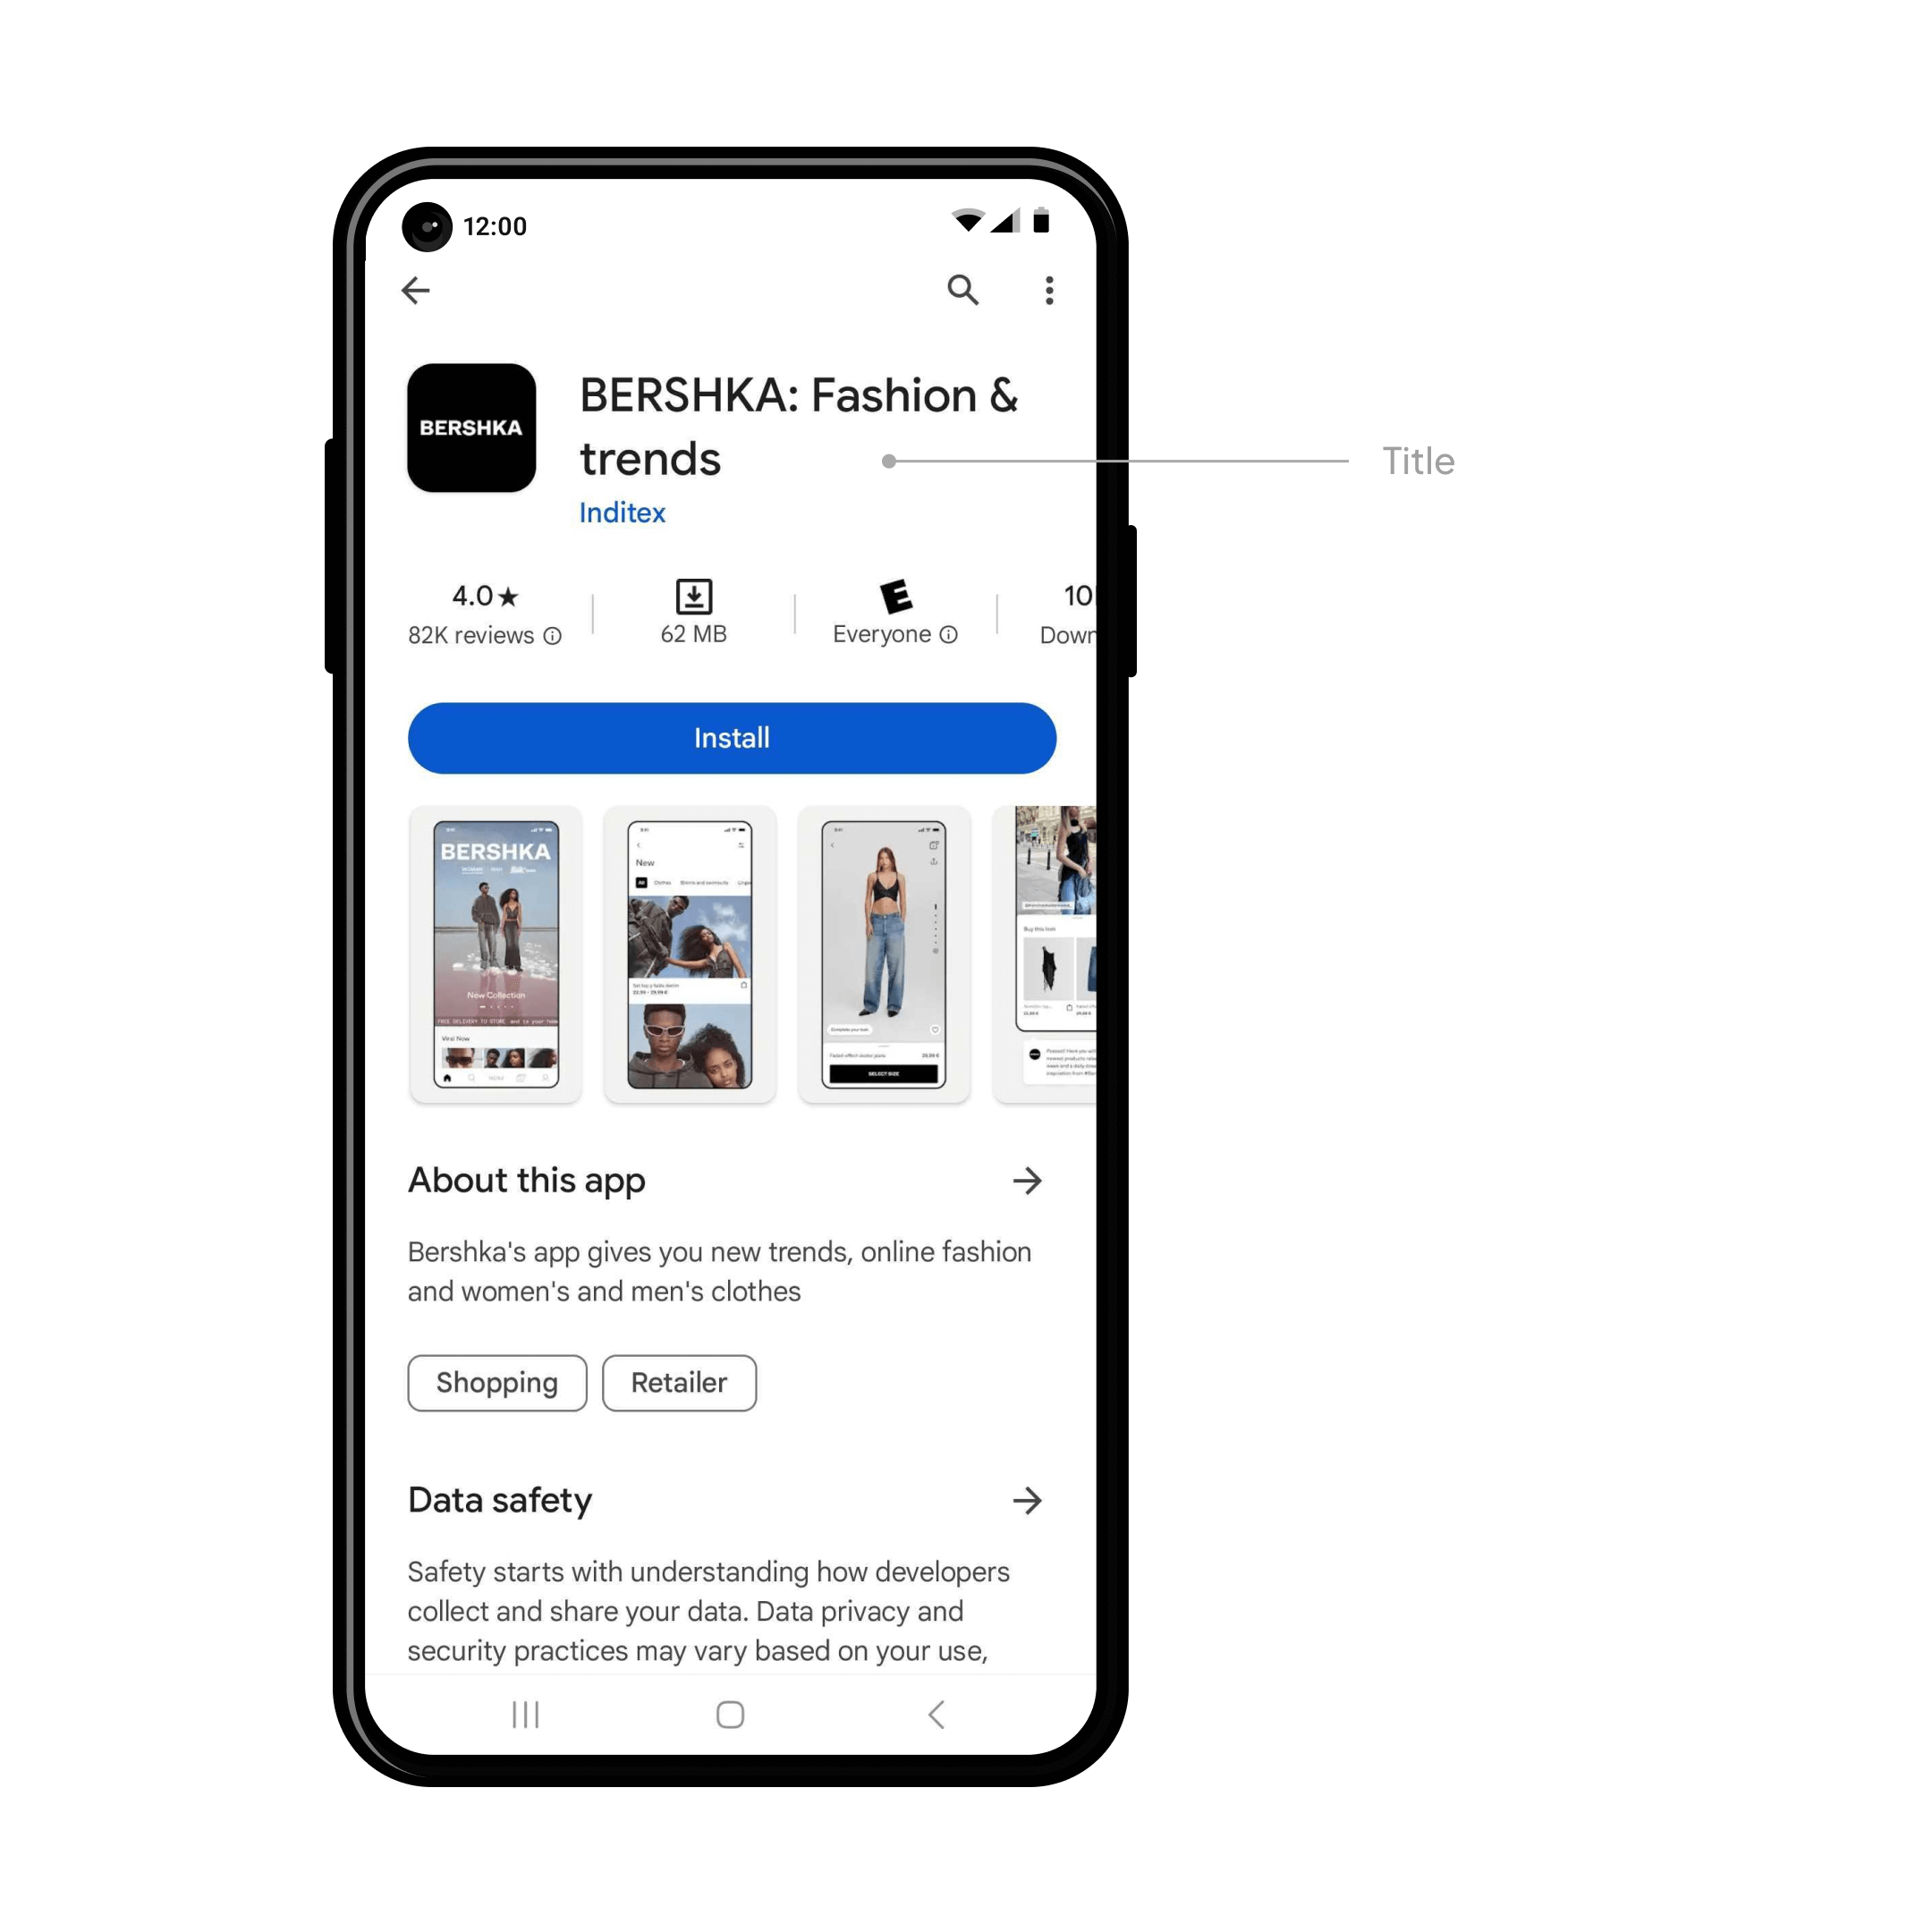
Go and visit the Google Play store now if you have an Android device, and click through to any app that catches your eye. You’ll be taken straight to the app’s product page – which we’re now going to break down into its essential parts.
Title
The title of your app is all-important, the cornerstone of your brand in the search results, categories, the user’s home screen, and everywhere else.
Google has a few specific requirements. Your title should:
Be unique, easy to spell and remember, catchy and brandable
Accurately communicate what your app is all about
Be no more than 50 characters long
Not include misspellings of popular terms or trademarked terms
Localized into different languages if appropriate
With Vendrux apps, usually the name is straightforward. Because we convert your existing website or ecommerce store, generally you’ll just use your existing brand name. This generally makes the most sense – unless your app deviates in some major way from your web presence.
Icon
The icon is the first thing people will see in the search results, top charts, and the product page.
More specifically, Google Play’s requirements are:
32-bit PNG (with alpha)
Dimensions: 512px by 512px
Maximum file size: 1024KB
When you build apps with Vendrux, our set up fee covers all this. We work with experienced designers to create the perfect app icon for you that perfectly fits both your brand and Google’s requirements.
Short Description
Writing a compelling short description for your Play Store listing is key for grabbing the attention of users and enticing them to download.
It’s important to be concise. You’ve only got 80 characters to highlight the core value proposition of your app and tell users why they should install it on their device. Think of what sets your app apart, why should the user download it.
Use your existing knowledge of your audience from the web to focus on your key messages and to speak directly to your target user.
There are a few important best practices to follow too. Descriptions should avoid specific performance claims, CTAs, special characters and unusual punctuation. You should also localize the description for different languages where appropriate.
Description
Users can expand the short, 80 character description into the full description – up to 4000 characters. This is where you can go more into depth, and really give a comprehensive overview of your app’s features and functionality.
It’s important to really focus on what sets your app apart and why they should install it. You can use bullet points to summarize key features and social proof to win the user’s trust.
Of course, it is as important as ever to adhere to Google’s content guidelines and metadata policy.
Screenshots
It’s recommended to have at least four high quality screenshots from your app on the product page.
These demo the core features of your app in a visual manner – making it easy for potential users to understand what your app is all about.
It’s important to create high quality and informative images that comply with Google’s in-depth guidelines.
When you build apps with Vendrux, our designers and app experts handle all of this for you.
Ratings and Reviews
Ratings and reviews are a crucial piece of social proof for your Google Play product page. High ratings can really boost trust and downloads, offering page visitors valuable insights into your app’s features and UX.
They’re prominent on your product page and one of the first things users see below the fold. At the top of the ratings and section you’ll see summary statistics like overall average rating, and below that the individual reviews (and your replies) for users to read.
It’s really important to get as many reviews as possible, which helps you both to rank for your key search terms and to get more downloads. Vendrux apps come with automatic ratings reminders, so you’ll maximize this on autopilot.
Get ready for the Google Play Store today
At Vendrux, we’ve built thousands of apps for clients ranging from small startups to multibillion dollar multinationals. We build iOS and Android apps from your existing site – allowing you to reuse everything you’ve already built.
It’s the perfect way to build native mobile apps fast and cost-effectively.
We build the apps for you, through a full service.
Part of this service includes publishing on both the Apple App Store and Google Play. We’ve been through the process countless times, and know exactly how to navigate it and guarantee approval.
We help you to prepare everything we’ve mentioned in this article – from the description to the screenshots prepared by our design team.
We’ve built over 2,000 ecommerce mobile apps at Vendrux over the past decade. We’ve worked with brands on Shopify, Magento, BigCommerce, Salesforce Commerce Cloud, and fully custom platforms. We’ve seen what works, what doesn’t, and where brands waste time and money.
This is everything we know about converting an ecommerce website into a mobile app. Not a fluffy, high-level overview. Just a clear, honest explanation of what this actually involves, to help real ecommerce operators understand what it takes to launch an app.
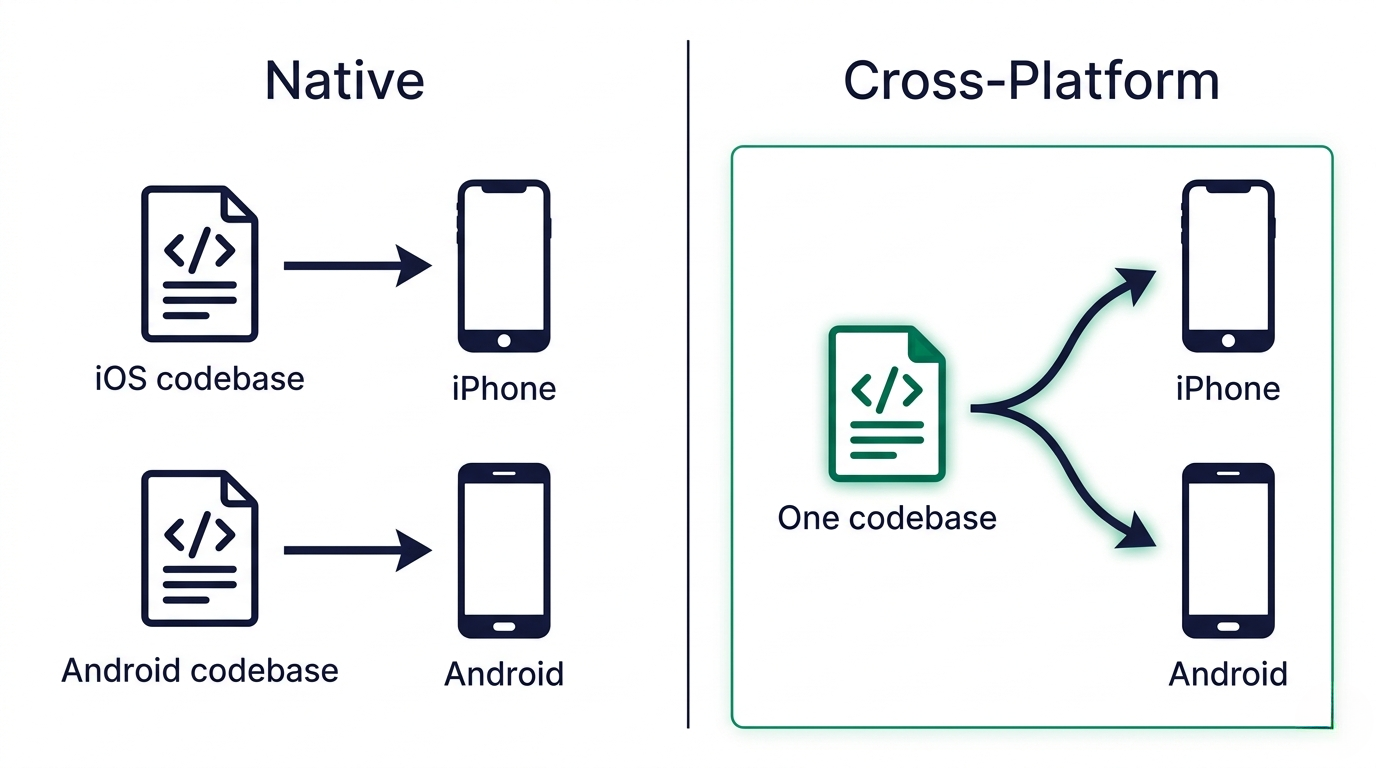
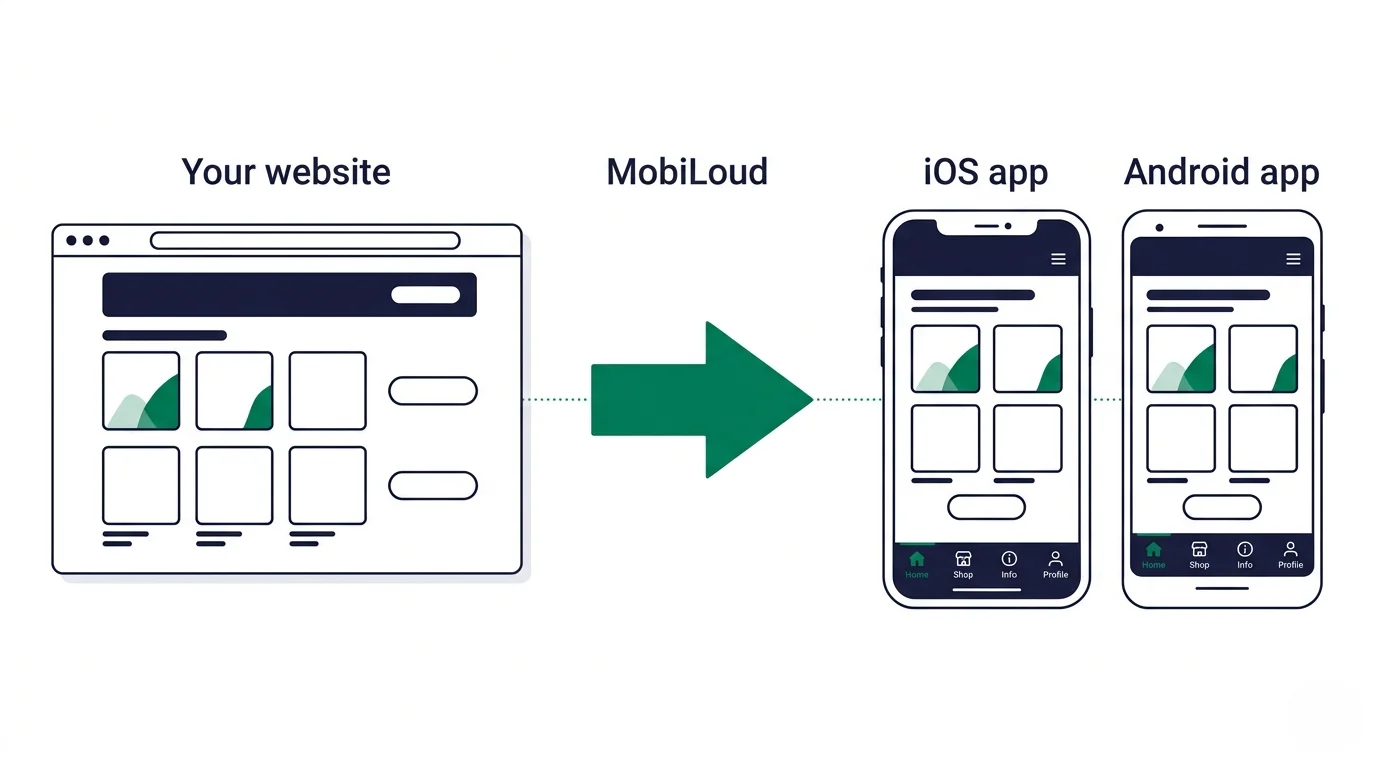
What Does “Converting” Your Site into an App Actually Mean?
There’s a distinction between converting your site into an app and building a new app from scratch which a lot of people don’t fully grasp.
Most resources or tools that talk about converting your site into an app really mean rebuilding it.
You use a no-code tool to build a new UI, new homepage, new product pages, and pull in data from Shopify.
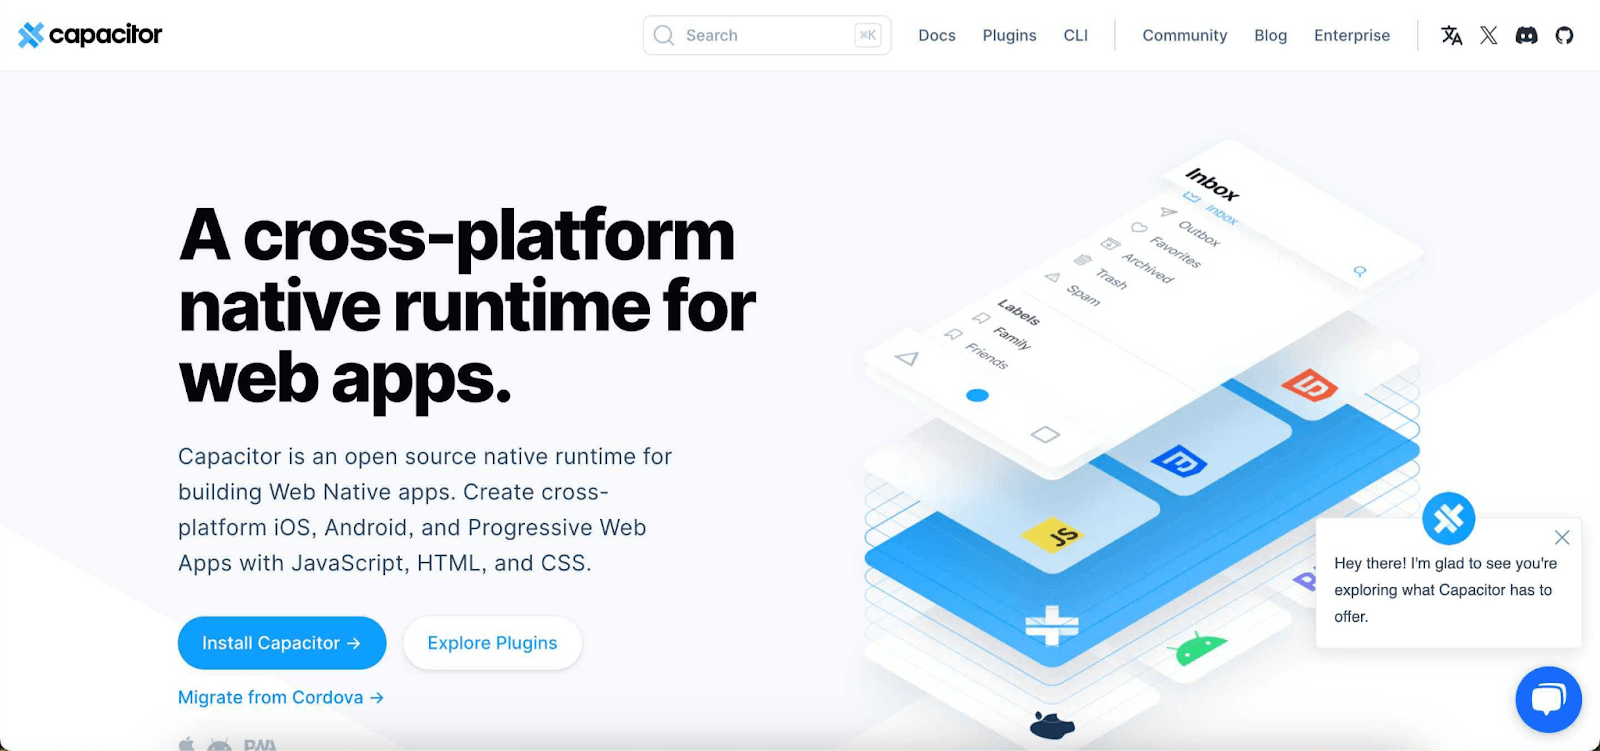
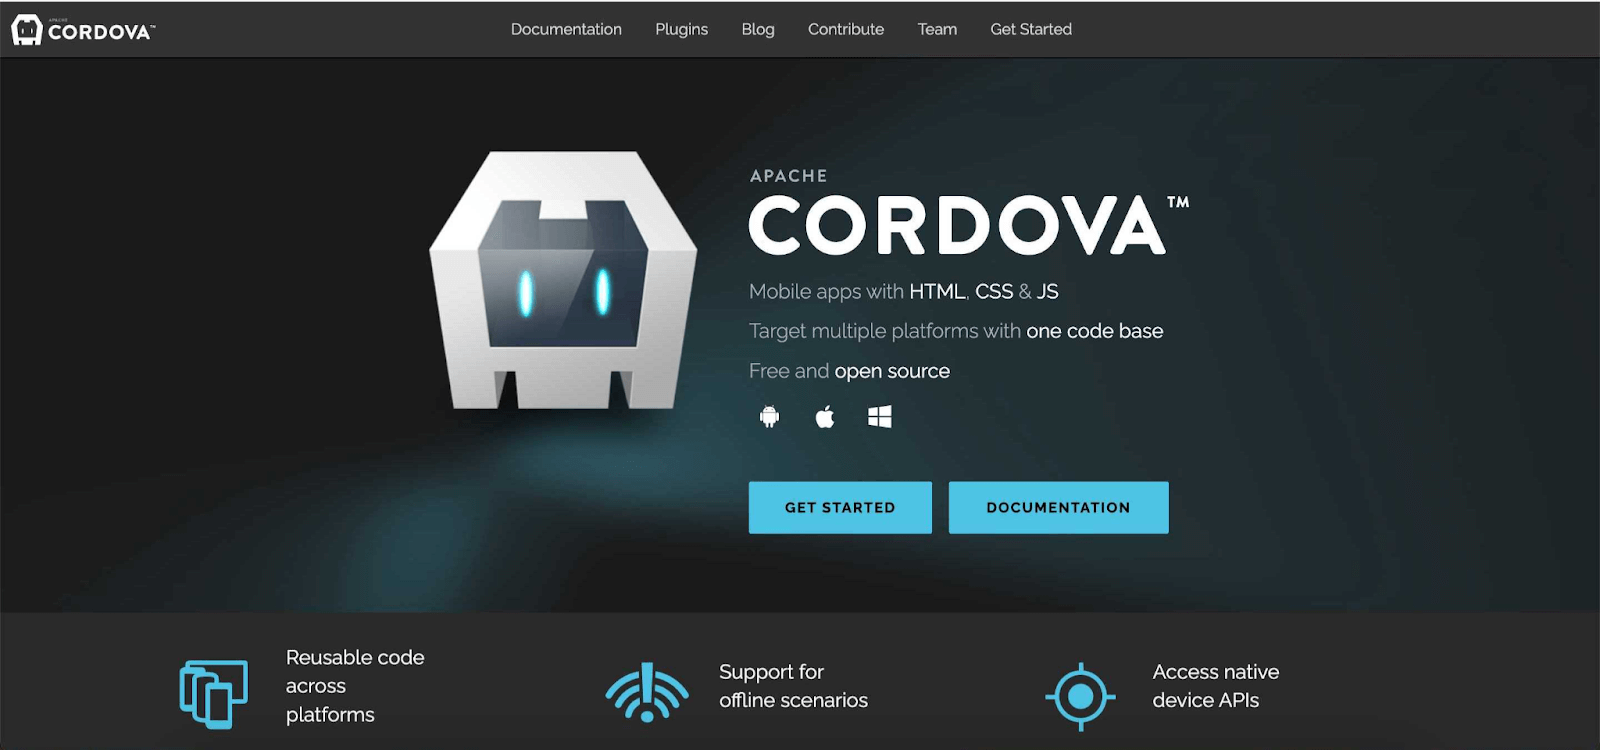
Or you build something new in React Native/Flutter/Capacitor/Swift, create APIs, connect them to your store’s backend.
None of this is converting what you already have. It’s building a new storefront.
That’s important, because it means more work to launch, difficulty achieving parity with your website (especially with no-code tools, which work from templates and pre-built blocks), and much more maintenance work after you launch.
Can You Convert Your Ecommerce Site into an App?
Yes. And it’s far more common than most people realize.
The majority of successful apps, including some of the biggest in the world, blend native code with web content. They’re conversions, not custom apps.
Amazon, Instagram, and Gmail all mix native and web elements. Shopify published a detailed engineering post describing web-based views as “a critical part of Shopify’s mobile strategy.”
These companies have massive engineering teams. They could build everything natively. They choose to reuse what they’d already built instead.
Why Converting Your Site Is Better Than Rebuilding It
Think about what your ecommerce website actually is.
It’s a mobile-friendly product catalog, conversion-optimized, everything dialed in for small screens and convenience.
That is 90% of what your mobile app needs to be.
App users aren’t looking for something brand new. They just want to be able to launch your app from their home screen, browse and buy with fewer distractions, get push notifications for order updates, promos, product launches, etc.
That’s the 10% that makes it an app; not a different UI, not some kind of flashy feature you can’t build on the web.
And when you convert, instead of rebuild, you:
Save a significant amount of time/money on the initial build
Save even more on maintenance and updates over the lifetime of your app
Manage just one platform – your website – because whatever you build for the web syncs to the app automatically
Launch risk-free – because you know you’re building from what already works, not taking a shot in the dark with a new UX
It’s about extending, not starting over. For the majority of ecommerce brands, this is the better approach.
“There is no real business case for building an app from scratch for $1M+ when our mobile website is already good enough!” — Thomas Moberg, Product Owner, Bestseller (Jack & Jones, Only, Vero Moda)
Three Ways to Convert an Ecommerce Site Into an App
If we’re being precise about what “converting a website into an app” means, there are really three approaches.
Let’s break them down, so you can start to form a picture of what makes sense for your brand.
Progressive Web App (PWA)
This is the lightest version of conversion. A Progressive Web App still runs inside the browser, but it gives an “app-like experience”.
You add modern browser APIs to your website so it can be installed to a user’s home screen, cache content for faster loading, and (on Android) send push notifications.
The upside is simplicity. There’s nothing to submit to an app store, no separate build, and no ongoing maintenance beyond your website. The improved user experience applies to all your website visitors, too – not just those who download your app.
The downside: it’s not a real app experience.
Your options for sending push notifications are limited, few people actually add your PWA to their home screen, and you can’t get in the App Store.
That’s not to say turning your site into a PWA is a bad thing. The opposite: you should absolutely do this.
But it’s not a substitute for a real mobile app.
Custom-developed hybrid app
This is what brands like Amazon and Shopify do.
You hire developers to build a native app framework that loads your web content inside it. This could be Ionic/Cordova, or perhaps a React Native build or Swift with webviews.
It’s a real app, in every sense of the word. You can customize the UX extensively. It’s fast, it’s mobile-native.
The downside: it costs a lot – even if you’re not building a fully custom app, you’re still looking at a big price tag, and you’ll need a dedicated mobile app team to maintain it.
That’s why it makes sense for Amazon, but not for most ecommerce brands.
Vendrux
Vendrux directly converts your ecommerce store into a mobile app.
It gives you more or less the same end result as custom hybrid development (a native app framework built around your website, with push notifications, deep linking, native navigation, and app store presence).
But it’s much more cost-effective, and requires much less from your team.
For a predictable monthly cost (with no revenue share, no hidden costs), you get a team who builds, submits, and maintains the app for you. You don’t need developers, you don’t need to manage the app, and everything you build for the web automatically carries over to your mobile app.
Vendrux is the leading service in the ecommerce website to app category, with 2,000+ apps launched across every major ecommerce platform.
It’s a risk-free, low-overhead, high-upside way to go live with your own mobile app; whether you’re a major global brand or a lean DTC team.
Want to see what’s possible? Get a free consultation and we’ll break down how you can go live with your own mobile app in ~30 days.
PWA
Custom Hybrid
Vendrux
App Store listing
✗ No
✓ Yes
✓ Yes
Push notifications
Very limited
✓ Full
✓ Full
Build cost
Low ($2K-$10K)
$50K-$200K+
~$1-2K setup
Ongoing cost
Minimal
$5K-$20K+/mo
~$1,000/mo
Time to launch
Days-weeks
3-6+ months
~4 weeks
Dev team required
Web dev only
Mobile dev team
✗ None
Who maintains it
You
Your dev team
Vendrux
Syncs with your website
✓ It IS the website
✓ Yes
✓ Automatic
What a Mobile App Gives You That Your Website Can’t
You already know the general pitch: apps are better for engagement and retention. But it’s worth understanding the specific mechanics, because they explain why apps consistently outperform mobile websites for ecommerce.
Home Screen Real Estate
When someone downloads your app, your brand icon sits on their phone alongside Instagram, Amazon, and their banking app.
Your website, no matter how good it is, lives behind a browser. Your customers have to remember to visit it, or you have to pay to bring them back (ads, email, SMS). An app lives on the device. It’s visible every time they unlock their phone. That ambient presence drives repeat visits that no other channel can match.
Push Notifications
This is the single biggest reason ecommerce brands launch apps, and it deserves more than a bullet point.
Push notifications land directly on your customer’s lock screen, instantly, at zero cost per message. They’re virtually guaranteed to be seen; they don’t disappear in the promotions folder or spam.
The use cases for ecommerce brands are immediate and high-impact.
Abandoned cart reminders that get seen instantly.
Back-in-stock alerts that reach customers while the intent is still fresh.
Flash sale announcements that hit every opted-in user simultaneously.
Order and shipping updates that keep customers engaged through fulfillment.
And unlike SMS (which costs $0.01-0.05 per message and requires carrier compliance), push is free.
Some of our customers have recovered over $200,000 in a single month from abandoned cart push notifications alone. At zero per-message cost, the economics are hard to ignore.
The Psychology of the Download
This one is underrated. When a customer downloads your app, they’ve made a small but meaningful commitment to your brand. They chose to give you space on their device.
That’s a signal of intent and loyalty that you don’t get from a website visit.
App users behave differently from mobile web visitors. They convert at roughly 3x the rate of mobile web visitors in ecommerce. They browse more products per session. They spend more per order. And they come back more frequently, typically delivering 3-7x higher lifetime value over time.
Some of that is selection bias (your most loyal customers are the ones who download the app). But some of it is the app itself creating a better, faster, more frictionless experience that reinforces the buying habit.
App Store Presence
Being listed in the App Store and Google Play gives your brand credibility and discoverability that a website alone can’t provide.
Whether it’s the social proof boost of the “Available on the App Store” badges on your website, your app store listings showing up when someone searches for your brand in Google, or the ability to show up in App Store searches, there’s only upside here.
The Rebuild Trap
Apps can be a major revenue channel. Many ecommerce brands we’ve worked with get between 20-35% of their total revenue through their mobile apps.
Some do so on a relatively minor share of their overall customers – like Pharmazone, who gets 63% of their online revenue from less than 15% of their customers, or Junior Couture, who made 50% of their BFCM revenue in 2025 from just 5% of their customers.
It’s absolutely a channel that any ecommerce brand with a mobile-first customer base and high repeat purchase potential should explore.
But the biggest mistake is going for a rebuild, not a conversion.
This changes the risk dynamics greatly.
You’re building something new (not extending what already works), so there’s no guarantee it’s going to resonate.
You may not be able to convert everything from your website into the app, leaving open the possibility your website ends up being better than your app (which basically kills any chance of your app being successful).
It takes longer; the market might move before you launch.
The app needs to be managed separately from your website; adding overhead, operational complexity, and slowing you down.
And, of course – it costs a lot more.
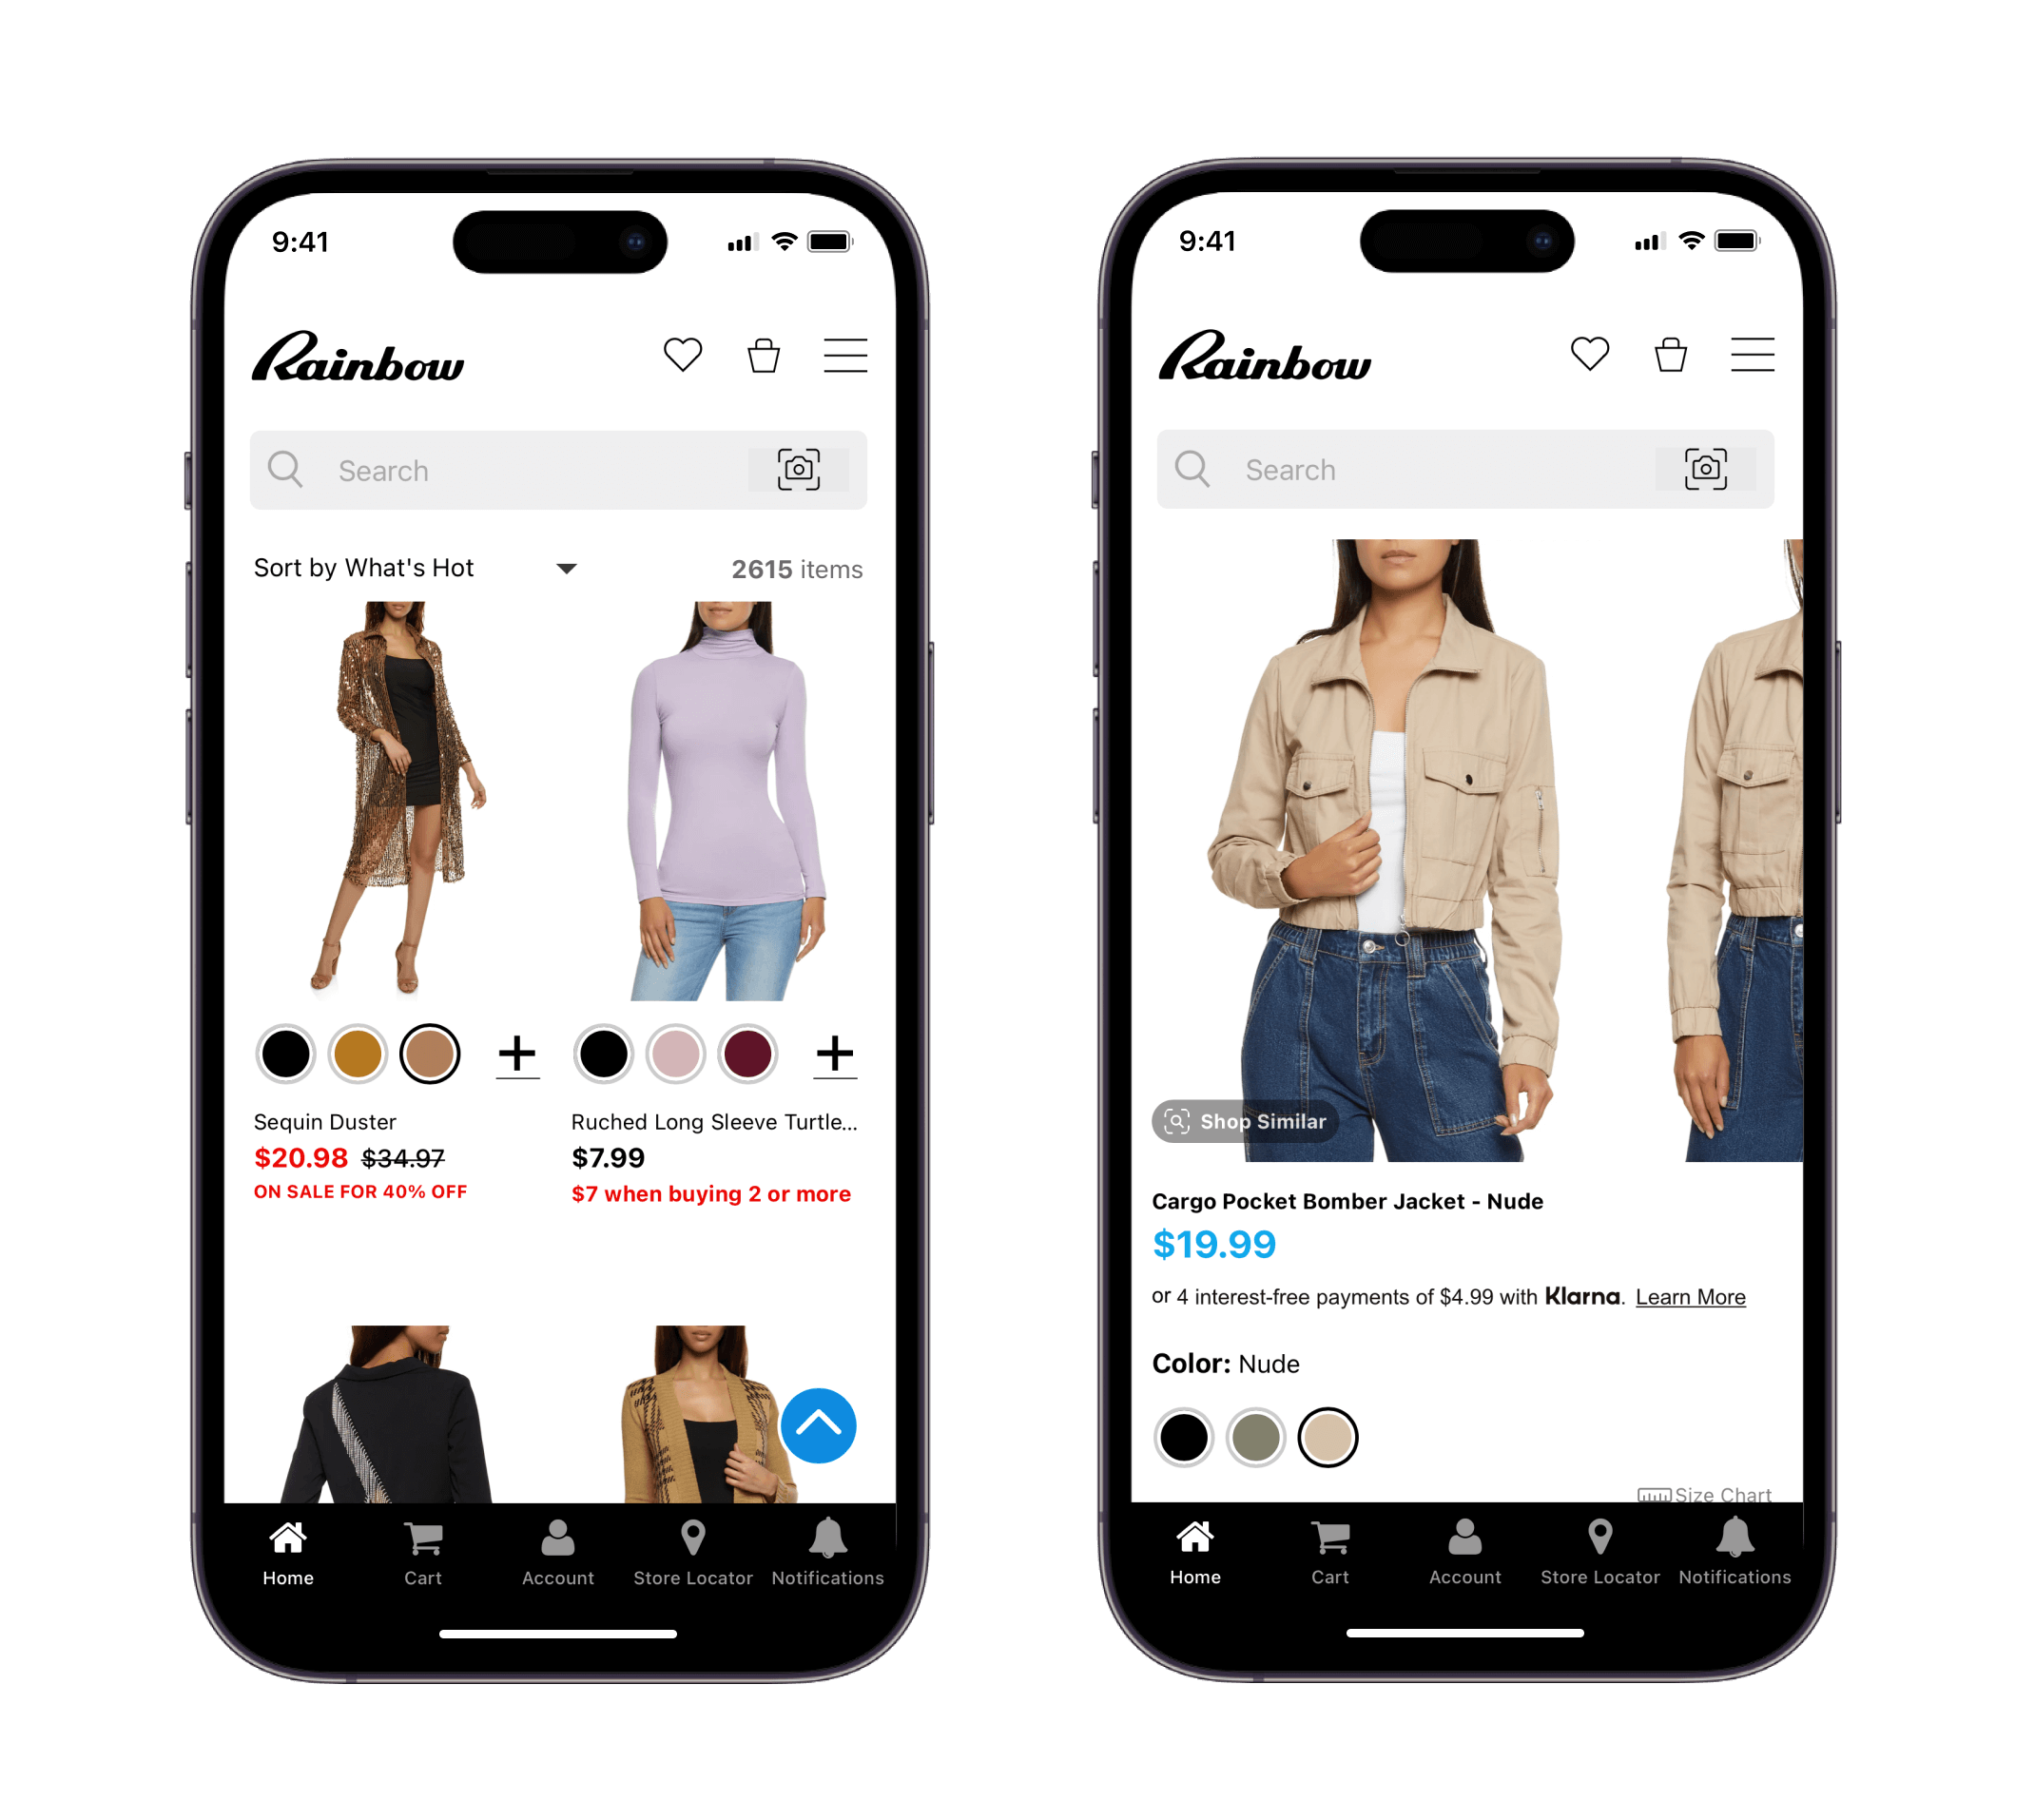
“If we had unlimited time and money, we would probably go for a custom native app, but that is half a million to a million a year to maintain.” — David Cost, VP of Ecommerce, Rainbow Shops
Your app needs to move the needle in a much bigger way to justify the investment. It could do that, certainly. But it’s harder to be sure.
And what we see most often from brands who built custom before they came to us, is the work needed to maintain an app parallel to their website was too much.
You’re maintaining another storefront. That’s not a small amount of work, even if it doesn’t seem like much.
Things start out ok, until the app starts to fall behind the website. Eventually, the team stops maintaining the app, and it falls into disrepair.
When you convert, instead of rebuild, the app stays up to date automatically. Just another reason why this is the best way to build an ecommerce app.
Converting Your Ecommerce Site Into an App: Step-By-Step
If you’ve read this far and think converting your website into an app is the right approach, here’s what the process looks like with Vendrux.
Vendrux is a fully managed service. You’re not configuring an app yourself in a dashboard. The Vendrux team handles the build, the testing, the app store submission, and the ongoing maintenance.
Your team stays focused on running your business, maintaining and iterating on your website, like you already do. You get a team that takes care of everything to do with the app for you.
Here’s how it works:
Strategy call. Get on a call with us. Our team will answer your questions, break down the process, and assess your website to make sure converting your site into a mobile app is the right move. No commitment. Book a free 30-minute call here.
Build, QA, and submission. Vendrux builds the production app, runs QA testing across devices and OS versions, writes your app store listing, generates screenshots, and handles the entire Apple and Google submission process. If reviewers request changes, we take care of it. The whole process takes about 4 weeks from kickoff to live in the app stores.
Launch and growth. Once your app is live, we manage any app-specific maintenance, so you can keep your focus on your website. We also help out with app promotion and strategy post-launch, to help you make your app a success.
What you get
Native iOS and Android apps listed in the App Store and Google Play
Full parity with your website: every feature, every integration, every page
Unlimited push notifications integrated with OneSignal and Klaviyo, at no per-message cost
Automatic sync: update your website and the app updates too
Ongoing maintenance, OS updates, and support
Works with any ecommerce platform: Shopify, WooCommerce, BigCommerce, Magento, Salesforce Commerce Cloud, and custom builds
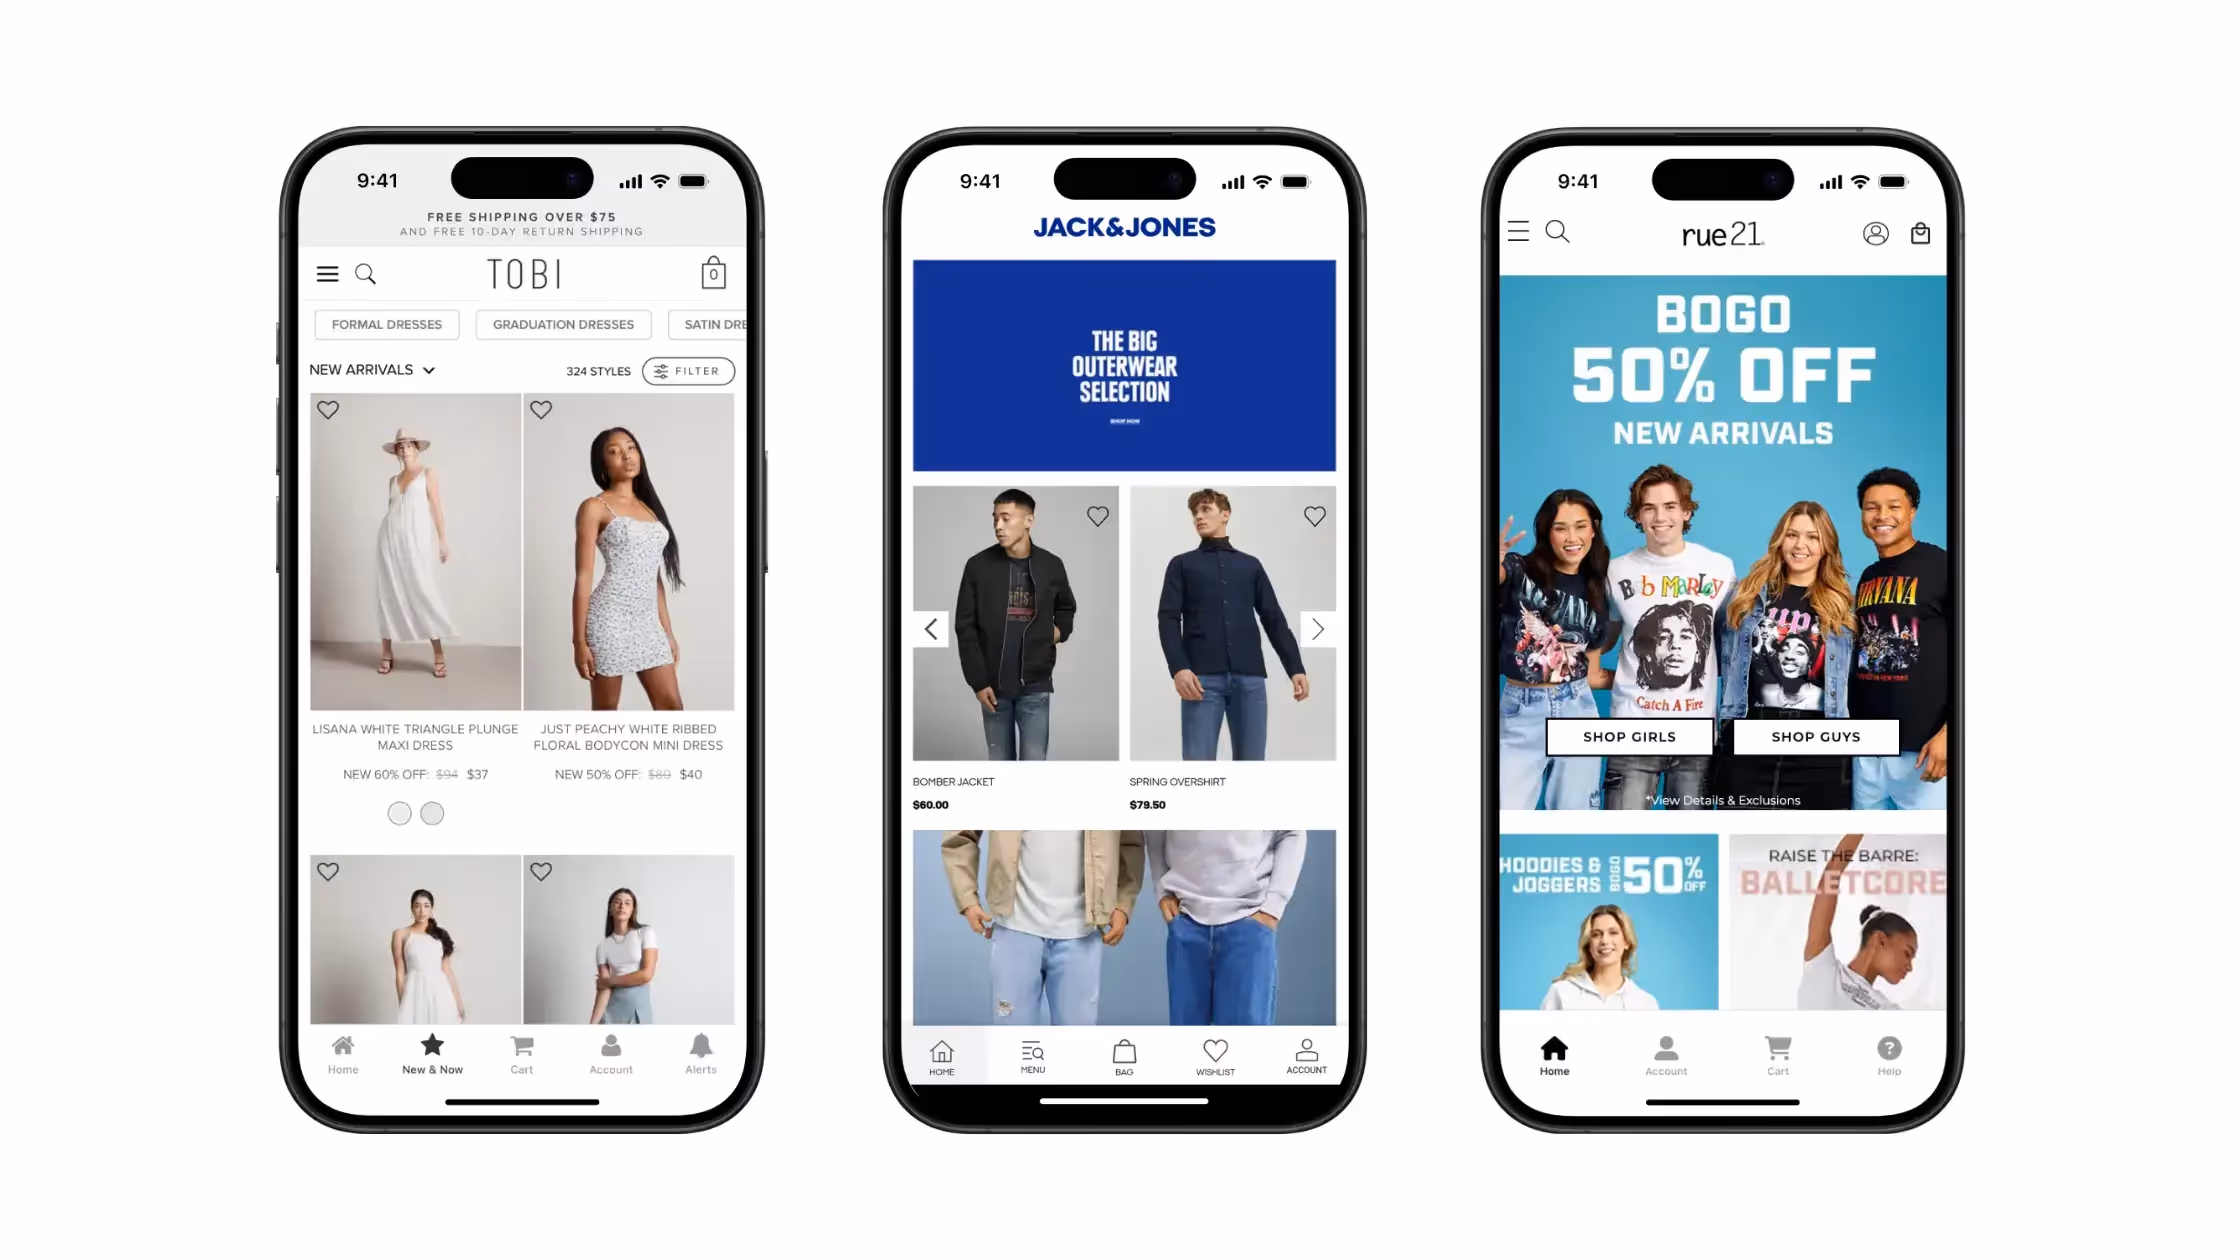
Some of the successful native apps launched by Vendrux customers
What brands say
“Our website is already well-optimized so using Vendrux to transform our site into an app was a no-brainer. No crazy costs, no integration headaches, and we were launched in a month.” — Ahmed Yousef, Director of Ecommerce, Pharmazone
“We tried six companies and I feel like you guys have the best combination of service, functionality, and price.” — Kenneth Chan, Founder & CEO, TOBI
“Vendrux keeps this whole thing simple and streamlined. No more juggling two different platforms, no more wasted time on maintenance.” — Eric Lowe, Director of Ecommerce, XCVI Fashion
If your mobile website needs significant work, it’s worth fixing that first. Don’t use a mobile app as a way to deal with a broken mobile web experience. You’ll get far more people land on your mobile website than download your app, so this is where you should put your focus first.
If you need the app to be a fundamentally different product from your website (not just a mobile-optimized version, but a different experience entirely), converting your site into the app may not be ideal.
You might want to look into custom development, or a DIY mobile app builder instead, which comes with its own tradeoffs, but allows greater app-specific customization.
And if you need device-specific features that don’t exist on the web (AR, NFC, complex offline workflows), a custom native build is really the only option.
Getting Started
Want to see how your website would look as an app? Want to hear how other brands like yours have successfully launched their apps by converting their existing website?
We’ll share all of that with you, and answer any questions, on a free 30-minute strategy call.
We’ve launched 2,000+ apps for brands like yours, and we’ll give you an honest assessment of whether this is the right move.
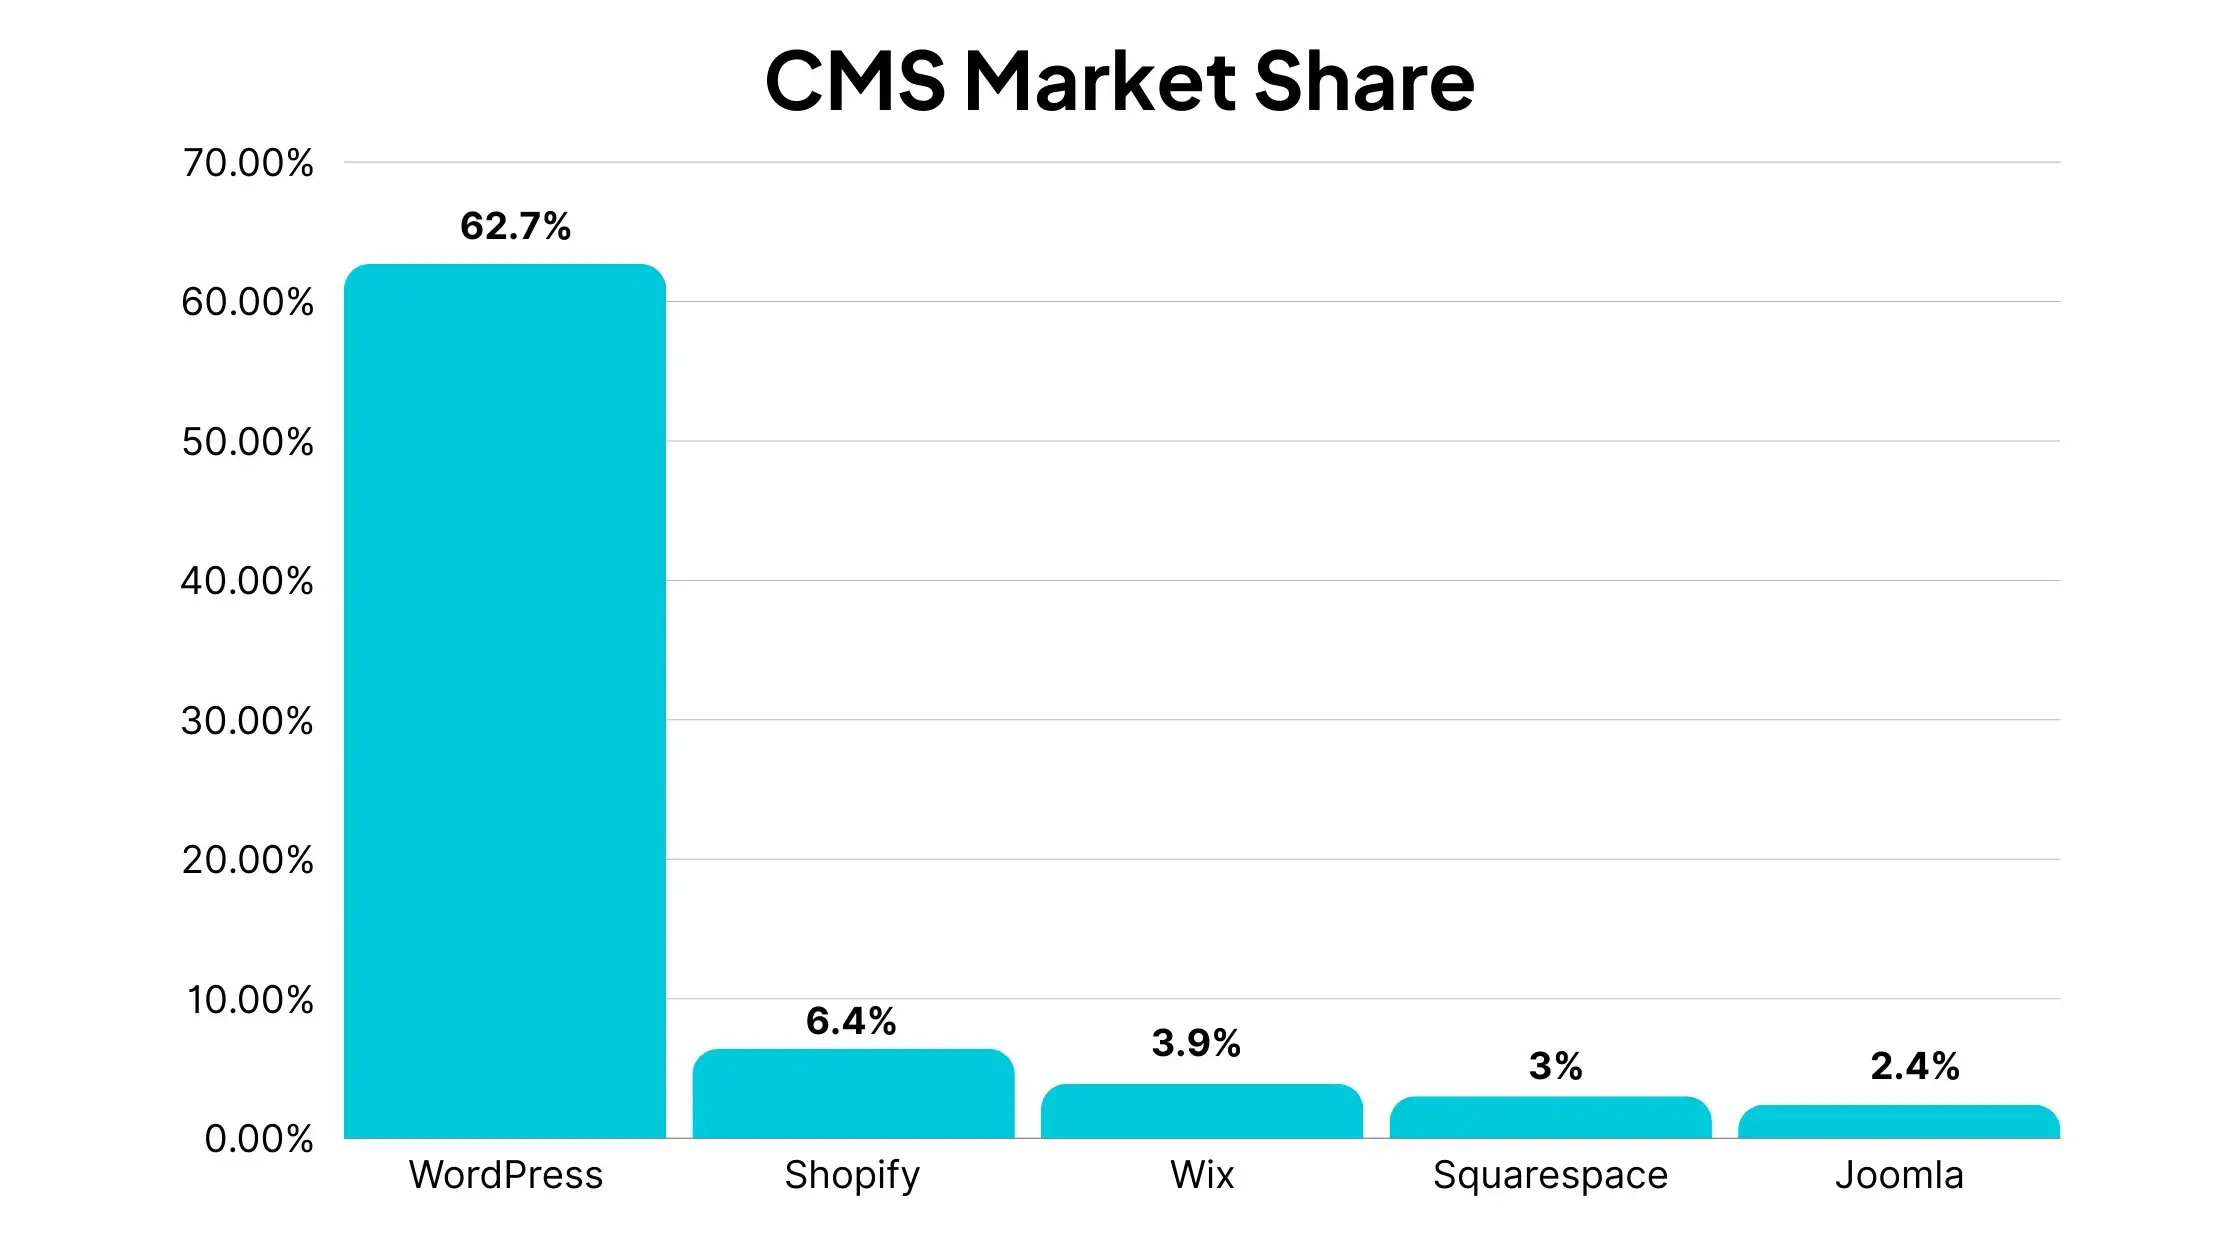
There are more than 78 million live websites today across the entire internet. Most are powered by a content management system, or CMS.
A CMS is an easy and convenient way to manage a website’s content, without having to interact directly with the website’s source code. They often come with a large ecosystem of themes, plugins and third-party tools. which website owners can use to add extra functionality, regardless of their technical expertise.
From WordPress to Shopify to Joomla, these platforms are the infrastructure behind the internet as we know it today. Keep reading to learn the top content management systems by market share in 2026.
What Are the Most Popular CMS Platforms by Market Share?
WordPress is the number one platform in the CMS market, with 62.7% market share, putting it far and away more popular than any other CMS platform.
Shopify is the only other CMS platform with over 5% market share. Wix, Squarespace and Joomla are the other CMS platforms in the top five, with market shares ranging from 2.4% to 3.9%.
Here’s the full list of the top five content management systems in the world today:
The data above covers only websites with a CMS installed. There are millions more websites that don’t use a CMS (websites hard-coded with HTML or other web technologies).
If these websites are included, WordPress holds 43.3% market share, compared to 31% for websites with no CMS.
Let’s look a little closer at the most popular content management systems.
WordPress
— WordPress market share: 62.7% —
WordPress is, and has been for a long time, the internet’s most popular CMS platform. It’s free, open-source, and maintained by a huge community of developers.
WordPress is a powerful, scalable and flexible CMS, with a low learning curve. Yet many of the world’s biggest websites use WordPress, showing that it’s suitable for anyone, regardless of technical ability or scale.
The huge range of WordPress plugins, themes and more tools built by third-party developers assist you in building a powerful, professional website. And if you have coding knowledge, you can also customize your site using code (e.g. HTML, CSS, JavaScript) to tweak every pixel of your site.
Websites using WordPress range from small sites with just a few web pages, to eCommerce sites to news sites to business websites, including sites as high-profile as Microsoft News, TechCrunch and TIME.
Shopify is one of the newer players on the CMS market, relatively speaking. Though it was founded in 2006, just a few years after WordPress, it’s only really taken off with the boom in eCommerce of the last 5-10 years.
Today it’s the most popular CMS for eCommerce websites. Like WordPress, it makes it easy for non-technical people to build a professional and functional website. However, it does so with a specific focus on the tools needed to run online stores.
Millions of eCommerce websites across 175 countries use Shopify, due to the way the platform holds your hand through building an online store. Things like product collections, blogging features, and the backend tools you need to manage orders are all built in to the platform.
Like WordPress, Shopify also has an extensive range of third-party apps, plugins and themes that allow anyone to publish a powerful website, while also allowing you to make edits to your site’s code should you want or need to.
Wix is a website builder that’s positioned more towards beginner site owners. It comes with a drag and drop editor to use to design the front-end of your site, along with built-in templates and modules that you just fill in with your website content.
Compared to WordPress, Wix has a shorter learning curve, and does more to help you get set up. You don’t need to figure out how to host your site, how to connect a domain to your site, find the right themes or plugins, or spend as long customizing your site design within your chosen theme.
Everything’s baked into the platform, including web hosting, and it comes with templates that let you get started much quicker.
The payoff is you don’t have the flexibility you would have with open-source content management systems like WordPress (or Joomla), so you may run into issues when scaling your website. Wix is also a paid CMS, with plans ranging from $4.50 to $35 per month.
Squarespace is another beginner-focused website builder along the same lines as Wix. It’s template-based, with visual website building tools and built-in functionality to let you build and publish a website in minutes.
Squarespace has a lot of the same pros and cons as all website builders. Compared to Wix, it’s a bit more feature-rich. It’s more expensive than Wix as well, and caters more towards professional websites, whereas Wix tends to be a better fit for individuals, small eCommerce businesses, and personal blogs.
The final member of the top five CMS market share is Joomla.
Like WordPress, Joomla is an open-source CMS, completely free to use. It’s been around for a long time, first released in 2005, and has been one of the most popular CMS platforms by market share for much of this time.
Joomla offers a ton of flexibility, and scalability. Compared to WordPress – its most direct competitor – Joomla is a little more complicated, and takes some time to get your head around on the back end. It also doesn’t boast the same breadth of plugins, themes and third-party tools that WordPress does.
There are still a number of extensions, templates and more tools built for Joomla, albeit not on the scale of WordPress. This may be enough for those who prefer the experience and community that Joomla offers, over that of WordPress.
Let’s look at some key takeaways from the CMS market share numbers of the last 10 years.
WordPress’ Market Share Continues to Grow
There continues to be one big winner in the CMS market share: WordPress.
While there are other platforms that have grown over the last 10 years, none have captured as much additional market share as WordPress.
It remains the best all-round platform to build a website with. While there is a slight learning curve, and it’s a little more time and effort-intensive than website builders like Wix and Squarespace, the pros of WordPress far outweigh the cons.
It’s also due to the community-driven nature of WordPress that it continues to grow. As more people pile into the community, and more resources go into it, it’s hard to justify the choice to go with other similar CMS platforms. Hence why it’s really the only open source CMS people use today.
With so much value delivered from these plugins, themes, and WordPress tools – from website builder plugins like Elementor, to tools that let you convert your site to mobile apps – it appears that WordPress’ dominance is just going to continue.
New Players
Despite WordPress controlling approximately ⅔ of the total CMS market share, there is room for new players, the data says.
Shopify is the most notable one, coming from virtually nowhere 10 years ago, to now be the #2 CMS by market share. Squarespace and Wix have also come from very little usage, to now take places in the top five.
That these three are the biggest movers, outside of WordPress, shows there is demand for more template-based website builders, catered more towards beginners who want to build a site quick and easy. A number of other similar tools come just outside the top 10 in CMS market share as well, such as Weebly and GoDaddy website builder.
It also shows the rise of eCommerce sites, particularly in the case of Shopify’s emergence on the scene.
Whether these platforms will continue to gain ground is up for debate, however. They have competition from a number of WordPress website builders, such as Elementor, WP Bakery and Divi, as well as WordPress themes that offer visual site-building capabilities. These tools offer a lot of what you get with Wix and Squarespace, with fewer limitations.
Decline of Joomla and Drupal
The biggest “losers” in market share are Joomla and Drupal, which collectively held around 17% market share a decade ago. Now, they make up less than 5%.
Both are free, community-driven, open-source CMS platforms, in the same vein as WordPress. With that knowledge, it’s not hard to see the reason for their decline. These platforms are only as strong as the community behind them, and the resources the community puts into maintaining the platform and building out additional resources.
It’s difficult to see a recovery for content management systems like Drupal and Joomla. As the WordPress community grows, its value over these platforms will continue to grow as well, and very soon there may be seldom few websites remaining that operate on a non-WordPress CMS.
The Rise of the CMS as a Whole
Another piece of data we can look at is the historical trends of CMS platforms and websites running with no CMS or website builder.
This data shows that non-CMS sites also happen to be dying out. A decade ago, over 70% of all the websites online had no CMS. These would have been websites completely written in code, with all content uploaded directly to the hosting server, rather than uploaded through a content management system.
Even for skilled developers, building your whole site this way (especially if it requires constant updates, such as with a blog, news site or eCommerce site), is a huge, unnecessary time-sink. Hence the rise of the CMS.
Today, approximately 33% of websites still run with no CMS. But that number is now less than WordPress’ overall market share (43%), and a sharp decline from where it was 10 years prior.
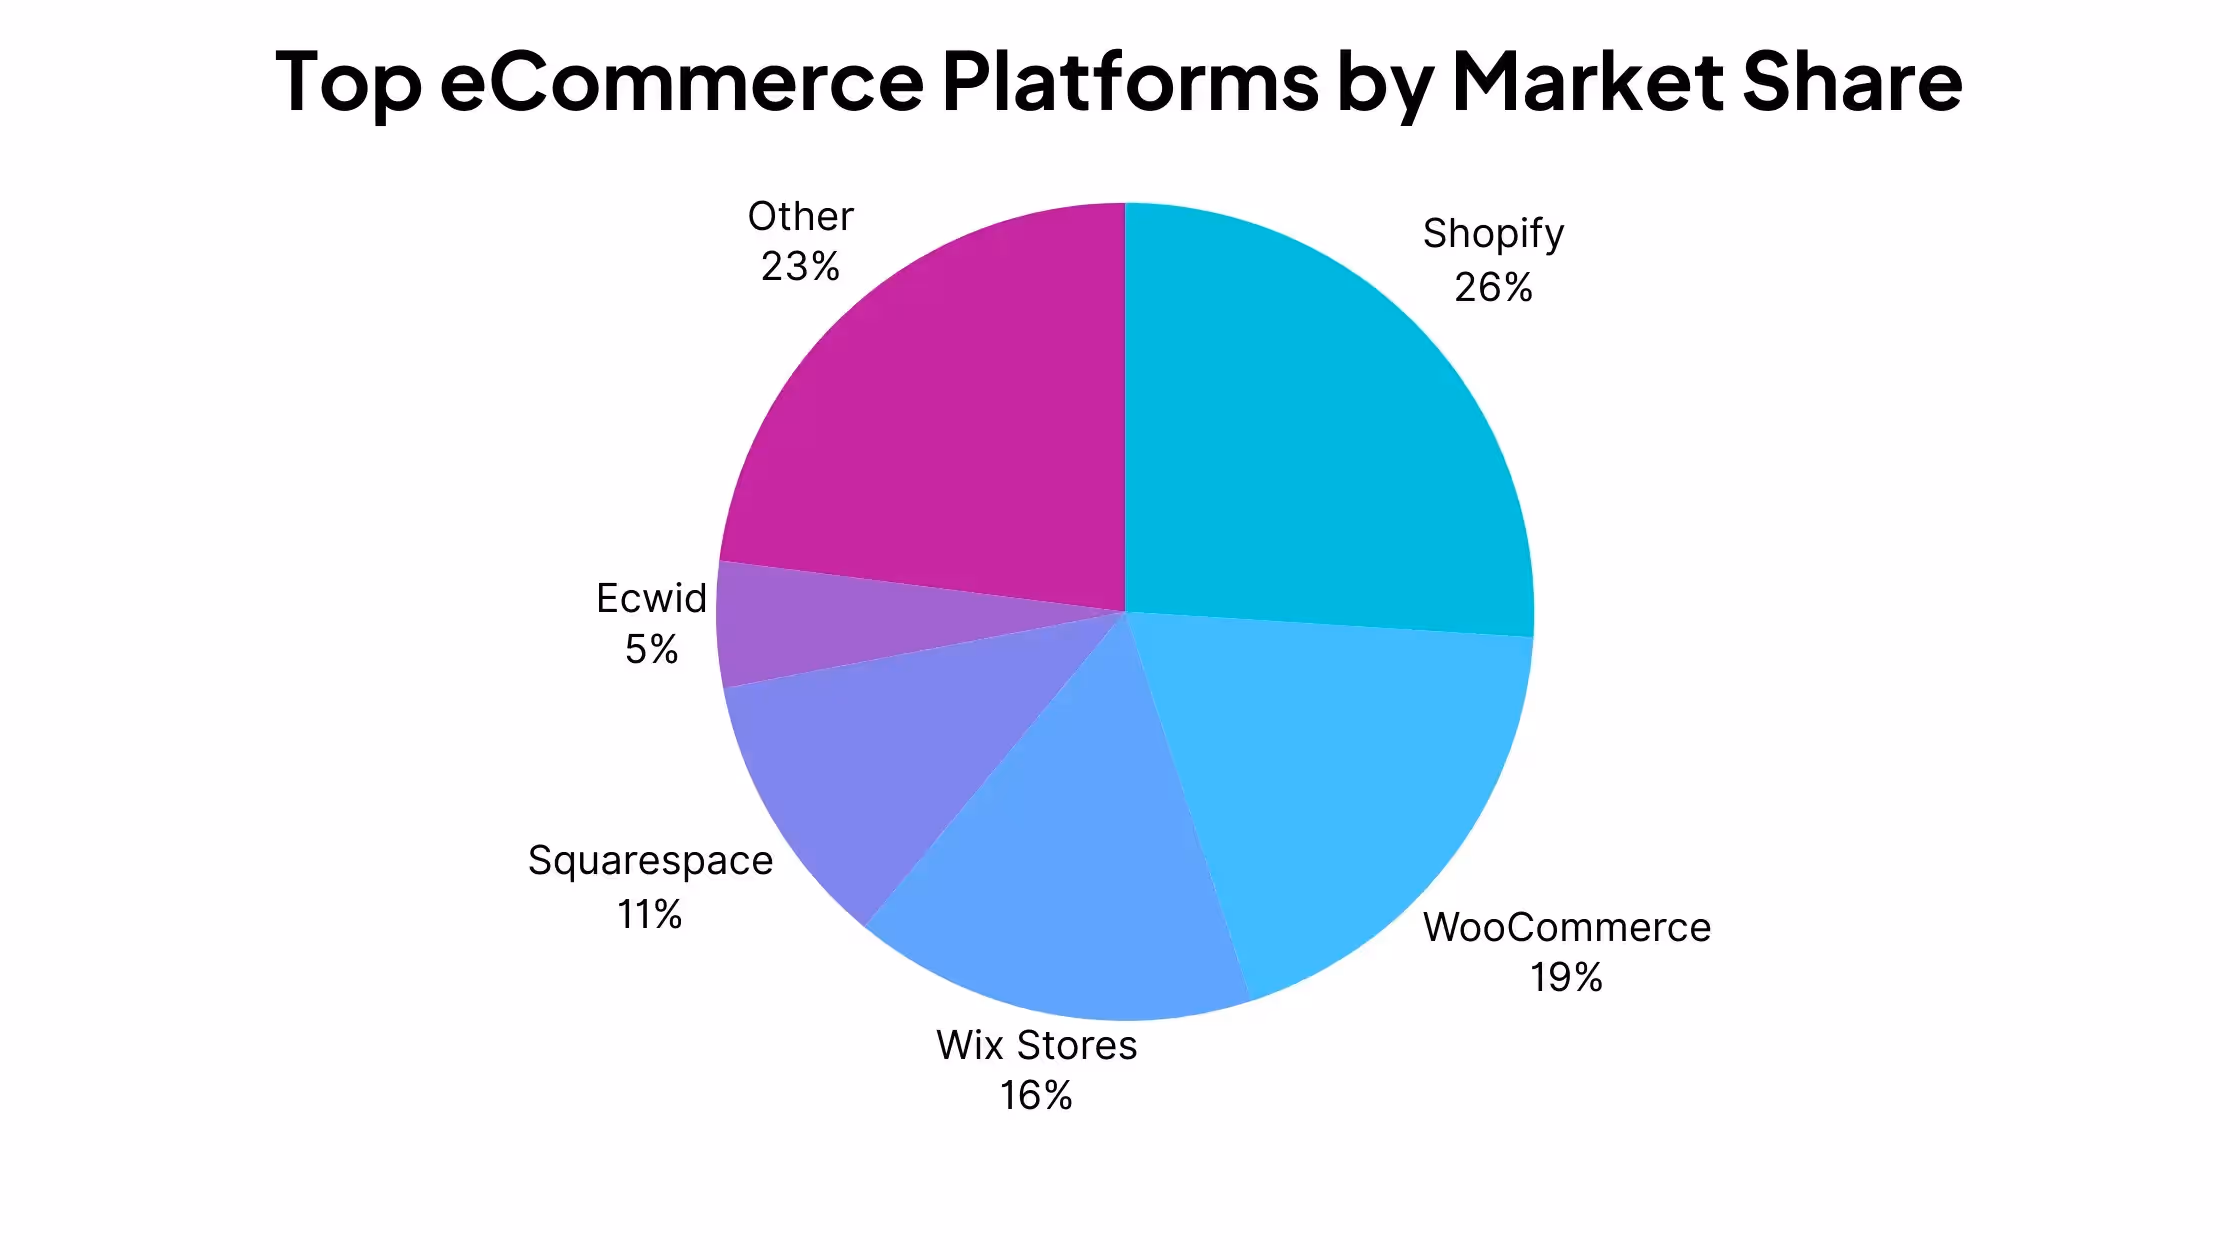
eCommerce Market Share
One more angle we can look at is the CMS market share for online stores.
While the overall CMS market share is dominated by a single player, the eCommerce space is a lot more even. See the top players below:
If you’re planning to launch a website, you’re probably going to want to use a content management system, or CMS. It’s fair to say the CMS market has revolutionized the internet, in letting just about anyone launch and run a website, without writing a single line of code.
WordPress has held the largest CMS market share basically the entire time that content management systems have been around, and this does not look like changing any time soon.
The ease of use, flexibility and community behind WordPress makes it hard to justify many of the competitors.
However, site builders such as Wix and Squarespace, and eCommerce powerhouse Shopify, continue to hang around and offer alternatives to WordPress.
More than 77 million websites use a content management system, or CMS, to easily handle editing, publishing and general management of the content that will be shown to external visitors.
If you’re about to launch an app, you may be wondering if there’s a CMS for mobile apps which can offer the same convenience and functionality that website owners enjoy. Perhaps you’re aware that this is possible, but want to know which mobile app CMS is the best choice for your project.
Whichever camp you’re in, this article is here to help. We’ll give you everything you need to know to choose your mobile app CMS, including nine recommendations to suit different types of apps.
CMS For Mobile Apps: A Quick Overview
Using a CMS for your mobile app means less of a barrier involved in publishing or updating new content.
Content management systems allow non-technical users to publish content, without writing code and without interacting directly with your app’s code base. It’s essentially a more user-friendly interface with the backend of your app or website (or both).
A CMS is definitely the way to go for businesses such as publishers and eCommerce stores, where it’s likely you’ll have non-developers working on your digital platforms. Having everything go through a developer when you want to make an update is overkill. It’s also going to cost a lot (if you’re paying hourly rates to developers), or sap the productivity of the developers you’re already paying.
Quick Tips for Choosing a CMS for Mobile Apps
We’ll give you some more in-depth recommendations shortly, but here are a few quick tips on choosing your mobile CMS to get you started.
Make sure it’s a CMS that your team is comfortable with – especially those who are going to be interacting with it on a daily basis, such as content writers or editors.
Obviously you need to choose a CMS that works with the tech stack of your mobile app. However, it’s even better if the CMS is framework-agnostic, so you don’t have to migrate to a whole new CMS if you end up using a new programming language in the future.
Stability is key – you don’t want an untested CMS that goes down as soon as your app starts getting a decent amount of activity.
Consider the current makeup of your team when deciding how technical to go with your CMS. Some platforms are more technical, requiring more work from developers to implement and maintain. This could make life hard if you’ve got a limited in-house development team.
Most businesses should think omnichannel when choosing their CMS. Unless your app is mobile-specific with no need for a website at all, you’re going to want to be available on multiple platforms. Ideally, that means one CMS to manage content for web, iOS and Android.
Regular vs Headless CMS
One of the big decisions you’re going to make in choosing a mobile content management system is whether to go with a regular or “headless” CMS.
If you’re new to the concept, let us explain. A regular CMS couples the back end and front end. What you enter into the back end (such as the post editor on a website) comes out looking a certain way on the front end (the customer-facing web page).
Regular content management systems are a template-based system, with a structured approach to publishing and managing content.
A headless CMS decouples the back end from the front end (sometimes referred to as a decoupled CMS for this reason). After users enter content on the back end, you can use APIs to serve that content to different places, to appear in different ways.
Essentially, headless content management systems are more flexible and less structured, which has certain pros and cons (especially when we’re dealing with mobile apps).
Pros and Cons of Using a Headless CMS for Your Mobile App
Some will tell you that headless is always the way to go if you’re choosing a CMS for mobile apps.
These people have a point, but it’s not quite so straightforward. Let’s look at some pros and cons now.
Pros
Flexibility to make content appear exactly the way you want it.
Content is easier to reuse and craft specific for different platforms (e.g. website and mobile app).
Easier to set up custom integrations and features.
Headless CMS also make it easier to implement the same content with different front end frameworks.
Cons
Higher development load required to set up and manage.
Can be more difficult for non-technical content managers/writers/editors, particularly in formatting content.
Headless CMS tend to be more complex and more costly as a result, in terms of paying developers to manage them as well as the cost of using the CMS itself.
Though it’s impossible to give a one-size-fits-all answer as to which type of CMS is best, we’d generally say that a headless content management system is best if your business is strongly app-centric (i.e. your mobile app is the primary way users see your business, or the only way). This is also best if you already have a strong in-house development team.
For smaller businesses, perhaps with a very limited development team, and who get more traffic to their website than their app, a classic or traditional CMS may be a better fit.
You trade some flexibility, but as we’ll explain later, depending on the way you build your app, the CMS may not actually matter as much as you think.
Best Options for Your Mobile App’s CMS
Now we’ll run through our recommendations for choosing a content management system for mobile apps.
Of course, no two apps or businesses are the same. That’s why we’ve got a few different recommendations depending on your needs, such as content management systems for eCommerce apps, for those who want more flexibility, and simpler, general-purpose content management systems.
Best Overall: WordPress
With all the hype around headless CMS and platforms built specifically for mobile, we still feel the best CMS for mobile apps is WordPress.
WordPress powers 43% of all websites on the internet. Of all websites with a CMS, 64.3% run on WordPress.
The internet today is vastly different than it was 10, or even five years ago. Today, optimizing for mobile devices is a must for any website, and the standard for mobile responsive websites has risen so that they’re not that different in UI and UX from mobile apps.
Unless you want to do some really complex things in your app, you’ll probably be able to do everything you need with WordPress, optimizing your mobile theme so that everything looks good in your mobile app.
The benefit is that you get to use WordPress’ intuitive post editor, the vast array of great themes and plugins for WordPress, and you make it super easy (with minimal development work) to maintain a great-looking website alongside your mobile apps.
Best for eCommerce: Shopify
If you’re running an ecommerce app, much of what we said about WordPress still applies.
You don’t need anything super complex for your CMS. In most cases, the best choice is to keep it simple and use the most popular CMS for eCommerce websites, Shopify.
Shopify powers 28% of all eCommerce websites, with most businesses choosing it because of how easy it is to build a fast, powerful and professional online store.
It also offers everything you need to optimize your store for mobile devices, and after building your store for the web, you can convert your store into an app using one of a number of Shopify Mobile App Builders available on the market today.
This lets you manage your store – both website and mobile app – from the intuitive Shopify back end.
For eCommerce apps, there’s little reason to use a headless CMS. The flexibility of these platforms is overkill for what your app needs to be, and eCommerce stores are unlikely to have much of an in-house development team, which means trying to set up and manage your store on a more technical platform can present a huge headache.
Don’t make managing your business more complex than it needs to be. Save yourself the trouble and stick with Shopify.
Alternatives for eCommerce Apps
Shopify isn’t the only game in town when it comes to ecommerce. You can build a great eCommerce store (and app) with a number of other platforms. Here are a couple that are also good fits to serve as the back end of your ecommerce mobile app.
WooCommerce (WordPress)
WooCommerce is neck and neck with Shopify for the most popular eCommerce platform today. Though it doesn’t have as many powerful tools and apps built for it as Shopify does, it’s still a very user-friendly way to build an online store.
WooCommerce itself isn’t a CMS, but an extension of the WordPress platform. So all the positives we said about WordPress apply here as well. It’s a great way to build a lightweight, fast and professional site, which is easy for your team to manage while also being mobile-friendly.
Squarespace
If you prefer a more structured way to build your website and app, Squarespace is a solid option.
More than 1.5 million eCommerce sites in the US run on Squarespace, enjoying how simple it is to design and launch a website using Squarespace’s visual site builder.
The platform has been doubling down on its eCommerce capabilities of late as well, making it a bigger and bigger player for new online stores.
Squarespace is a good alternative to Shopify and WooCommerce if you want to minimize the need for developers, though if you have a web development team on staff already, you’ll probably be better off with the increased flexibility of the previous two platforms.
Best Regular CMS for Design Flexibility: Webflow
If you’re looking for a regular CMS, but one that comes a little closer to the flexible “headless” experience, Webflow might be the one for you.
Webflow is a low-code website builder, similar to platforms like Squarespace and Wix, but with a little more technical flexibility, where you can play around with your site’s code to get everything perfect.
Webflow offers a great way to build visually-stunning mobile websites, with less development load than coding from scratch. You can also use it as the base for building mobile apps – just design your mobile interface in Webflow, then use a tool to convert your mobile website into an app.
Webflow also offers CMS and eCommerce functionality, allowing you to use it as your back end if you’re running a content site, online store, or many other types of online business.
Purely as a CMS, Webflow is a bit harder to use than platforms like WordPress and Shopify. But it’s a great fit if the visual appearance of your app is one of your highest priorities.
Best Headless CMS for Mobile Apps: Contentful
If you prefer to go headless, check out Contentful.
Contentful is an API-first headless CMS, which basically organizes your content in the back end of your website for easy reuse wherever you need it – such as your app, website, web app, etc.
Contentful is highly regarded in the industry, and offers everything you’d want from a flexible, scalable headless CMS.
The downsides? As mentioned when we discussed regular vs headless for your CMS, using a platform like Contentful requires more development effort to build and manage.
This is going to cost you, and so is the platform itself – you’ll likely need to pay at least $300 per month for their Basic subscription level (though they have a free plan under that, which you may be able to stick with if your team is small).
Contentful’s customers include BMW, Shiseido, Notion and the Milwaukee Bucks. This gives you an idea of the type of user it’s best suited for – larger organizations who aren’t concerned about the extra development work and cost of using this platform to power their app and website.
Alternative Options for a Headless CMS
If you’re looking for a headless CMS but want to consider some other options, here are a few more to choose from.
WordPress VIP
Though most people know about the open-source WordPress.org and the self-contained blogging platform WordPress.com, there’s also WordPress VIP, the company’s enterprise product, which includes headless functionality.
It’s used by some big names in the online space, such as Facebook, Salesforce and the New York Post.
WordPress VIP allows businesses to take advantage of the WordPress ecosystem, while still having ultimate freedom and flexibility with their digital assets.
Of course, one thing to note is that the platform is advertised as a platform for enterprises, and the cost goes along with that. Plans start at $25,000 per year, so it’s not a fit for everyone.
Ghost
Ghost is a more affordable option, suitable for independent publishers. It’s an open-source, headless platform that is kind of a mix between Substack and Webflow.
Ghost is built primarily for creators, allowing you to build and manage a subscriber base and regularly publish content via newsletter, website, and integrations with a raft of other platforms.
Yet it’s not just for solo writers running a weekly newsletter – Unsplash, Mozilla, Cloudflare, Revolut and Duolingo all use Ghost to power their content marketing.
It’s still largely content-driven, so not a good fit for more interactive mobile apps, but may be a good (and affordable) fit for content sites looking to reach people via email, social, web and app.
Strapi
Another headless CMS to consider is Strapi. Strapi is a JavaScript-based platform, open-source, flexible and fully customizable.
It provides the choice between self-hosting and cloud hosting via Strapi’s servers. Self-hosting is free, while cloud plans start at $99 per month.
IBM, Discovery Channel, and ASOS are just a few examples of real businesses using Strapi as their CMS.
Go with Strapi over Contentful, WordPress VIP and Ghost if you’re a mid-sized business, looking for ultimate flexibility with an open-source tool that’s fast, scalable and user-friendly, but doesn’t take up your entire development budget on its own.
Does Your Mobile App’s CMS Really Matter?
So we’ve gone over some recommendations for content management systems for mobile apps, and given you some tips on why you’d want to use a CMS and what you should look for in a mobile CMS.
But – and this may be controversial – it doesn’t really matter which CMS you use.
Of course, it does matter that your CMS is reliable, secure, bug-free, and that your team is comfortable using it. But it doesn’t really matter as it pertains to your mobile app.
The best way to build apps today is with a Webview-based approach, building hybrid apps that use the same back end as your website.
Instead of coding a custom mobile app from scratch, it makes more sense to build a mobile-optimized website that syncs with your mobile app, showing the same content and largely the same UI.
Unless you need the app to do something drastically different to your website, this is the best approach. You’ll save a ton of effort (and cost) designing your app, building it, maintaining it and updating it.
And with the hybrid app platforms available today, you’ll see little to no difference compared to custom-coded native mobile apps.
It works exactly as explained before, taking your mobile website and seamlessly fitting it into a mobile container, allowing you to go to market with an app quickly and affordably, while having only one code base to manage.
Best of all it gives you complete flexibility over the CMS you prefer to use. It doesn’t matter if you prefer WordPress, Shopify, Webflow, a headless CMS like Contentful, or website builders like Wix and Squarespace – you can build an incredible mobile app with any back end platform.
Vendrux is full-service, including setting up and deploying your app, submitting it to the app stores, and even keeping your app regularly maintained and up to date.
That means you don’t need to know anything technical to launch your app, or to manage, update and publish new content to your app.
It also means you can launch an app for a fraction of the investment it usually takes to build native apps.
Your checkout flow is a critical part of your overall customer experience.
The global cart abandonment rate stands at a staggering 69% – and the majority of abandoned carts happen during checkout.
The checkout is the money page. The key, make or break moment where you either get paid or the customer abandons their cart.
Reducing the bounce rate here by just a few % can mean hundreds of thousands or even millions on the bottom line.
Luckily, it isn’t rocket science.
There are a few logical factors that are proven to improve the checkout experience due to the basic facts of human psychology.
By following best practices, measuring the results, and continuously tweaking things over time – you’ll have a perfectly optimised checkout and make more money.
So, if you’re ready to take your checkout process from good to great, you’re in the right place.
Read on and let’s cover the strategies that will help you keep your customers happy and your sales soaring.
Understanding Checkout Optimization
On a high level: our goal is to streamline the process as much as possible, removing friction where we can, while making the customer’s experience as smooth and efficient as possible.
Fundamentally, most checkout problems are caused by unnecessary friction, over-complication, and a lack of upfront transparency.
Common Checkout Challenges
More specifically, these common culprits can ruin checkout UX, leading to customers getting frustrated and putting their credit cards back in their wallets:
Confusing navigation or complex processes that frustrate shoppers
Lack of transparent pricing or unexpected costs added during checkout
Insufficient payment options that don’t meet customer needs
Security concerns and lack of trust
These tend to be the core problems. In a later section, we’ll cover all the ways these crop up in much more detail.
Fogg’s Behavior Model
B.J. Fogg, psychologist and behavior scientist at Stanford, is famous for creating the Fogg Behavior Model.
The model is useful as an overall north star for our checkout flow optimization.
Fogg’s model essentially states that the likelihood of a specific behavior is determined by three elements converging at the same moment:
Motivation
Ability
A prompt
Put another way, you need to make it easy for someone to do something, make them want to do it, and then trigger them to take the action.
The prompt must come when motivation and ability is high. Otherwise it will be perceived as irritating and will be less effective.
As you read through the advice in this article, think about how it ties into Fogg’s model – everything we do will be somehow increasing motivation and ability.
What Makes a good Checkout Flow
So, given what we’ve learned, what makes a checkout experience good?
On a high level: simplicity, clarity, and speed.
Well optimised checkouts tend to have:
Clear Navigation: guiding customers through the process with intuitive design and clear instructions
Transparency: disclosure of all costs upfront, including shipping and taxes, to avoid unwelcome surprises for customers
Multiple Payment Options: a variety of payment methods for different preferences
Mobile Optimization: a smooth UX process on mobile devices, where a significant % of transactions occur
Security & trust Features: display security badges and trust signals to reassure customers that their information is safe
We want to inspire confidence in the customer, and trust in our brand, while respecting their limited time, privacy and attention span.
In Fogg’s terms, we want to maximise their motivation and ability to complete the checkout while prompting them to do so optimally.
8 Checkout Optimization Best Practices
Let’s get more granular with 14 specific, actionable tips.
In CRO, best practices are not to be blindly followed, but they are to be used as a starting point if you’re getting subpar results.
Once we have all the best practices covered, then we can establish a useful baseline from which to test, measure and tweak in a continuous process of optimisation.
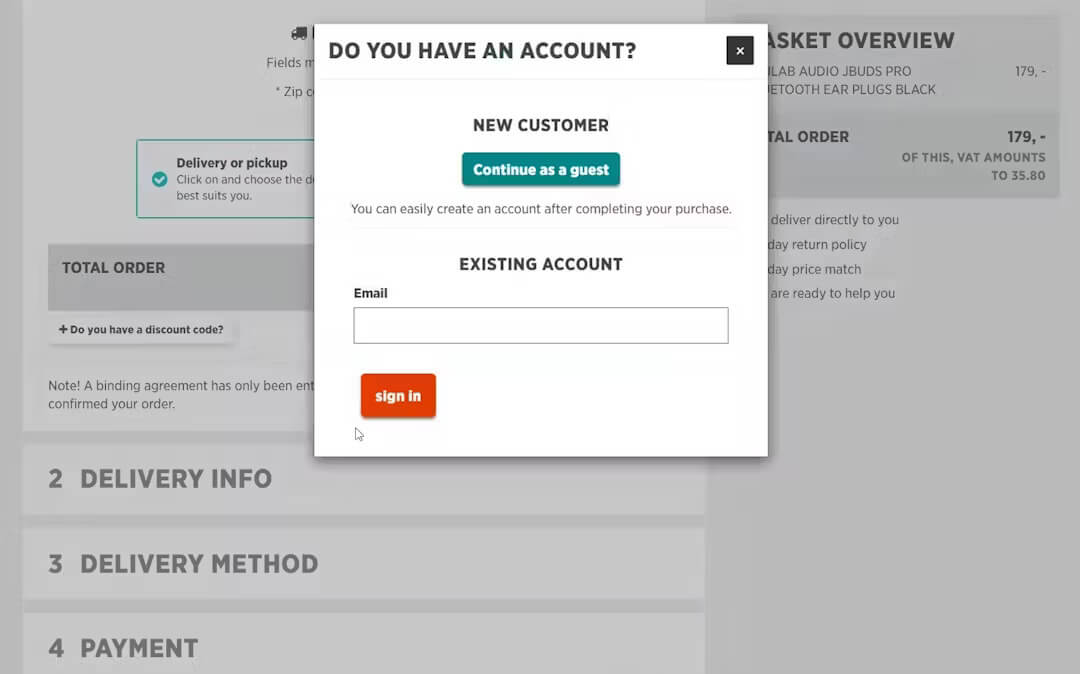
1. Allow Guest Checkout
If there’s one thing you take from this article: allow guest checkout.
This is an absolute must for reducing bounce rates and abandoned carts. One ecommerce brand made an additional 300 million dollars simply by ditching forced registration and allowing guest checkout.
If you don’t need them to create an account or even log in to order, why would you make them?
You’re adding friction and decreasing the customer’s ability to make complete the checkout, therefore making it less likely.
Don’t be needy, don’t be greedy for information for your CRM. Respect their time and privacy, and give the option to check out as a guest if you can.
Of course, you can and should incentivise account creation too. You can do this with a simple message like this, lifted from the $300m example above:
“You do not need to create an account to make purchases on our site. Simply click Continue to proceed to checkout. To make your future purchases even faster, you can create an account during checkout.”
The average checkout flow today is 5.2 steps long and has 11.8 form fields….. This unnecessarily increases the perceived and actual complexity of a checkout for the end user
They also found that 26% of users have abandoned purchases during the checkout solely because it was too long or complex.
For most sites, the form fields can be reduced to 8, so this is a good target to aim for.
Baymard have a few suggestions for reducing form fields and simplifying the process for customers:
Opt for a single “Name” field rather than separate first and last name fields
Consider hiding unnecessary fields like “Address Line 2”, “Company”, and “Coupon Code” to simplify the form
Implement zip/postal code autodetection to streamline the address input process
Hide “Billing Address” fields when possible, assuming it’s the same as the shipping address
Allow users to delay account creation until after the checkout process is completed
Reducing the overall number of form fields only to the essentials reduces the cognitive load on shoppers, making it much easier to complete purchases.
You should also try to pre-fill forms wherever possible to reduce friction further.
For a deeper dive, check out:
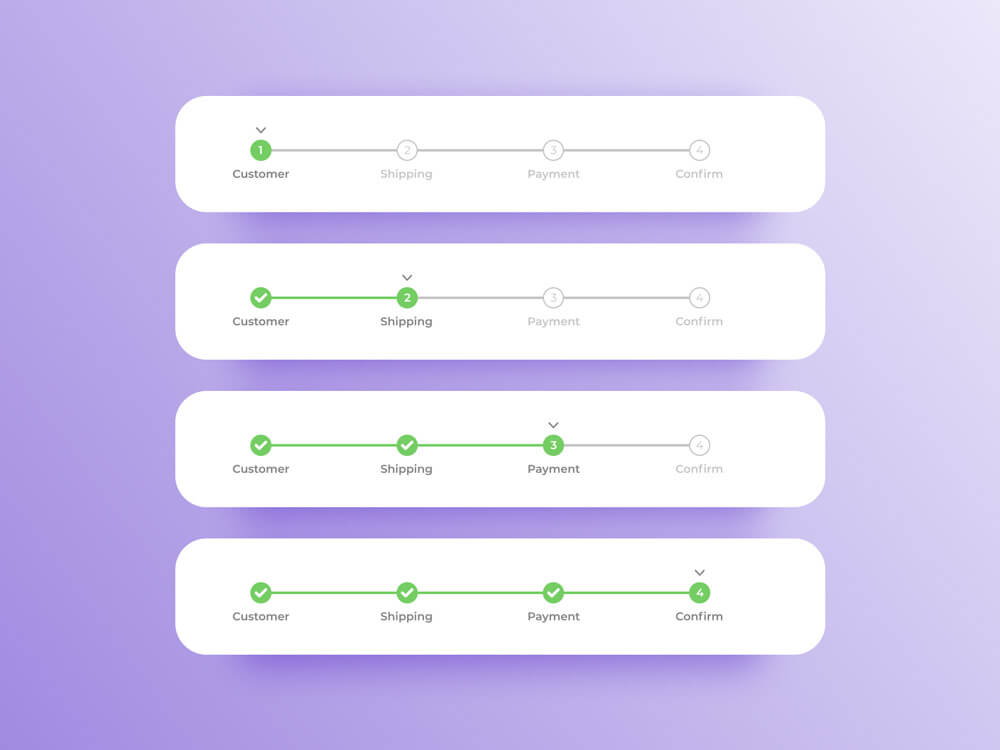
3. Use Progress Indicators
Progress indicators guide users through the checkout, offering a visual cue of their completion status.
It’s a way to reassure customers that they’re making progress, and that the end is in sight. This can reduce the chances of them becoming frustrated and quitting.
Make the progress indicators:
Visually prominent
Simple and understandable
In keeping with your brand
This can significantly enhance user experience by setting clear expectations.
4. Add Trust Signals
Remember that you’re asking people to hand over important personal information and money. You really need to make sure that a lack of trust doesn’t put them off at the last moment.
Research also suggests that a customer’s perception of the security of the checkout is driven by “gut feeling” and that they make an evaluation very quickly. Some ways you can nail this:
Use well-known trust signals like SSL certificates and trust badges
Confirm that you offer secure payment options
Explicitly explain what “SSL” means if you have non technical customers
Visually highlight the credit card field (more later on)
According to more research by Baymard Institute, the actual specific certificate you use doesn’t seem to matter much, with completely “made up” certificates with padlock logos performing better than the majority of official badges.
The important thing is that it “looks” like a secure checkout should look in the customer’s mind.
5. Offer Free Shipping & Remove Additional Costs
Unexpected costs are the number one reason for cart abandonment.
The customer getting to the checkout and seeing that the real price is 20% higher than they were expecting is a sure way to have them close the tab. Nobody likes “surprises” of this nature.
That’s why free shipping is offered by a ton of the top brands today. According to Invesp:
“9 out of 10 consumers say free shipping is the top most incentive to shop online more and orders with free shipping average around 30% higher in value. 93% of online buyers are encouraged to buy more products if free shipping options are available whereas 58% of consumers add more items to cart to qualify for free shipping”
There are many ways you can go about this.
For a start, be upfront on the product pages about any shipping costs you have and make customers aware of the price inclusive of taxes.
When it comes to offering free shipping, its something you need to think about how it makes sense for your business.
For example you could offer it for all items, over a certain order threshold, or to members or repeat customers.
A popular one is to offer it over a certain threshold, for example 10% higher than your average order value. This could actually increase AOV itself, interesting research by UPS found that ~40% of customers will often increase their order to get free shipping when available.
6. Offer Multiple Payment Options
According to the Baymard Institute, 21% of all online stores fail to offer more than one payment option.
These days, that isn’t enough.
According to Statista, the traditional credit and debit card payments are still popular, making up ~30% of ecommerce transaction volume in recent years.
Digital wallets though have emerged as the #1 option though in recent years, driving more than half of all transactions and predicted to rise to 56% by 2026.
Other payment methods are also growing in popularity, albeit more slowly.
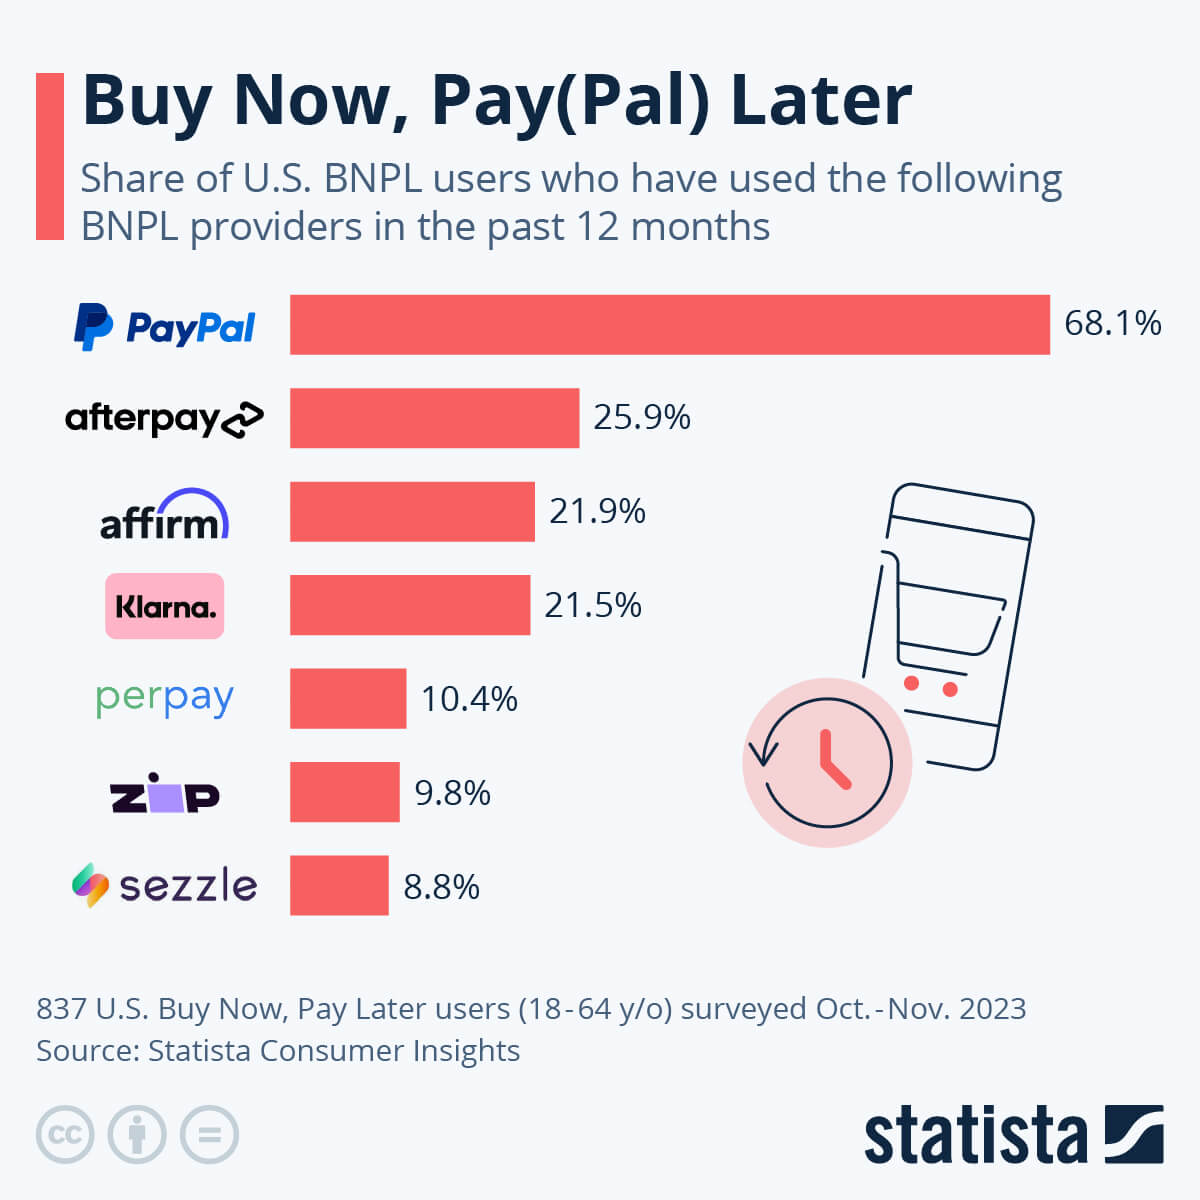
A growing segment of customers appreciate buy now, pay later (BNPL) services. According again to Statista:
BNPL accounted for 5 percent of global e-commerce transaction volume last year and is expected to grow at a CAGR of 16 percent between 2022 and 2026.
BNPL platforms are lead by PayPal currently, with dedicated services like Klarna, Affirm and Afterpay capturing decent slice of the market.
Depending on your niche – you may also want to consider other options like cash on delivery or crypto payments.
So the bottom line: make sure you offer the option to pay by digital wallet, credit and debit card, and BNPL if appropriate. You’ll make more sales and your customers will be happy to have their preferred option available.
According to Statista – in 2023 $2.2 trillionof ecommerce sales occurred on mobile. That’s 60% of total sales worldwide.
So having a great mobile checkout UX is crucial.
The first thing is to make sure everything loads fast.
Google research way back in 2015 found that consumers are more impatient on mobile, and since then they’ve come to expect an even better and faster experience as web and mobile technology have both improved dramatically.
This is something to task your web developers with. If you think your checkout might be too slow on mobile – optimizing images, using browser caching, and cutting out any heavy scripts are all potential improvements.
When it comes to the general UX, less is more. Make sure you minimize the number of steps and form fields required to complete the purchase, leveraging autofill and stored payment information whenever possible.
8. Make your Cart Persistent
This isn’t exactly a checkout optimization tip, but it’s closely related.
A persistent cart saves the items a customer has added. Even when they abandon their cart and “bounce” from the site, when they return later, the cart will still have the same items in it so you have a second chance at getting them to complete the checkout.
Persistent carts generally rely on cookies for guest users, and user data for customers who are signed in to your store.
Persistent carts should be used alongside abandoned cart notifications – email, SMS and mobile push notifications that remind customers of the items in their cart and nudge them to return and complete the purchase.
This is very effective.
You can use a service like Mailchimp, Klaviyo, or OnmiSend for email and SMS notifications.
For abandoned cart push notifications – more effective than both email and SMS – building apps with Vendrux is the best option. We built a custom feature that sends abandoned cart notifications on autopilot (more on that later).
Testing and Analyzing Checkout Performance
Once you’ve implemented the above you’ll have a good starting point for the optimal checkout experience.
As we said though, best practices aren’t to be blindly followed in all cases. They’re best seen as a starting point for further testing and optimization.
Let’s look at how to use A/B testing to analyze your checkout data so we can continuously refine and improve.
A/B Testing Checkout Elements
A/B testing, also known as split testing, involves comparing two versions of your checkout page to determine which one performs better.
This allows you to make data-driven decisions and improve your checkout.
To get started:
Identify important variables: pinpoint elements on your checkout page that might affect the buyer’s decision. These could range from the layout, call-to-action (CTA) buttons, form fields, different trust badges, and copy
Create variants: Develop alternate versions of your checkout page. Change one element at a time to isolate its effect on the conversion rate.
Test Simultaneously: Launch both versions of your checkout page at the same time to a similar audience, so that external factors don’t skew your results.
Analyze Results: Use analytics tools to measure which version leads to higher conversion rates. The key is to focus on statistically significant data to guide your decisions.
Remember, A/B testing is an ongoing process. Continuously test and update your checkout page to adapt to what your customers are telling you.
You can get a thorough guide to A/B testing here.
Analyzing Checkout Conversion Rates
Whatever tool you use to test and gather data on your checkout, there are a few common pointers to keep in mind.
Track the Right Metrics: Focus on metrics that directly impact conversions such as cart abandonment rate, average order value, drop off points, and dwell time.
Customer Journeys: map out the customer’s path to purchase to pinpoint where you’re losing potential sales. Tools like heatmaps, session recordings, and form analytics can give insights.
Segmentation: Break down your data by customer segment (e.g., new vs. returning customers, mobile vs. desktop users) to uncover specific patterns.
Performance Benchmarks: Compare your metrics against industry benchmarks to set realistic targets for improvement. Also establish your own benchmarks to track future improvements and optimization.
By implementing the 8 best practices we outlined above – and by continuously testing and tweaking – you’ll be well on your way to an optimized checkout.
How to Deal with Abandoned Carts
One key point we made was the importance of a persistent cart.
Unfortunately, even with a perfectly optimized checkout you’ll still get abandoned carts. Life happens, people get distracted suddenly, anything can happen.
What you do after they abandon their cart is just as crucial. Effective cart abandonment strategies can transform lost opportunities into conversions.
Here are a few important tactics:
Act Quickly with Email Reminders: send abandoned cart reminders by email, SMS and push within 24-48 hours. Highlight key incentives like free shipping and returns, and ensure the call-to-action (CTA) navigates directly back to the checkout (with their items saved)
Personalize the Recovery Experience: Tailor your messages to display the specific products left behind. Personalization increases the relevance and urgency of the message, making it more effective
Offer Incentives: Sometimes a small nudge is all that’s needed to convert an abandoned cart into a sale. Consider offering a limited-time discount or free shipping to entice customers back to their carts.
There are plenty of platforms for sending email and SMS notifications to customers.
Push notifications are in a league of their own though, but you can only send them through native ecommerce apps for iOS and Android.
Native ecommerce apps usually take months to build though, and cost hundreds of thousands of dollars.
This is where Vendrux comes in. We build apps for you, in just weeks for a fraction of the usual price. We do this by converting your existing web store into iOS and Android apps. These apps are high-end, feature rich, and worthy of a multibillion dollar brand.
The great thing about this is that you can reuse everything from your existing web store. That includes your now well-optimized checkout experience.
Everything we’ve previously recommended – from multiple payment options and trust signals to progress indicators and guest checkout – will work in your apps just like it does on the web.
That means you can just focus on creating a great mobile UX for your web store, and the apps will take care of themselves because they update automatically and sync directly with your site.
We give you unlimited push notifications – you can send out targeted, customized push messages how you want, when you want.
And we built a specialfeature for abandoned cart notifications too. It uses local notifications, and detects when a user has closed your app with items still in their cart. This triggers a notification sequence designed by our team to entice users back into the app and close the sale.
It’s everything you need to give users the best possible experience on mobile, boost sales and conversions, and maximize cart recovery.
Check out some of our example apps, and get in touch with one of our team to learn more.
In this article, we’re going to share the latest and most insightful cart abandonment statistics, including:
Average cart abandonment rate
Cart abandonment rate by device
Cart abandonment rate by traffic source
Yearly cart abandonment trends
Cart abandonment by product category
Why people abandon carts
… and more.
Read on as we share everything you’ll ever need to know about shopping cart abandonment, followed by some quick tips on how to improve cart abandonment rate for your business.
Cart abandonment is when a user adds a product to their cart, but doesn’t complete the checkout process and pay. Cart abandonment is a large cause of lost revenue for eCommerce stores, and improving this metric is one of the most direct ways to increase your store’s income.
What is the Average Cart Abandonment Rate?
The average cart abandonment rate across all eCommerce sites is 70.19%, according to Baymard Institute.
This number is an average taken from 59 different studies on shopping cart abandonment. The averages from these studies range from 56-84%.
With 70% of eCommerce shopping carts abandoned, that means for every 10 customers who add a product to their cart, only 3 will go through and complete their purchase.
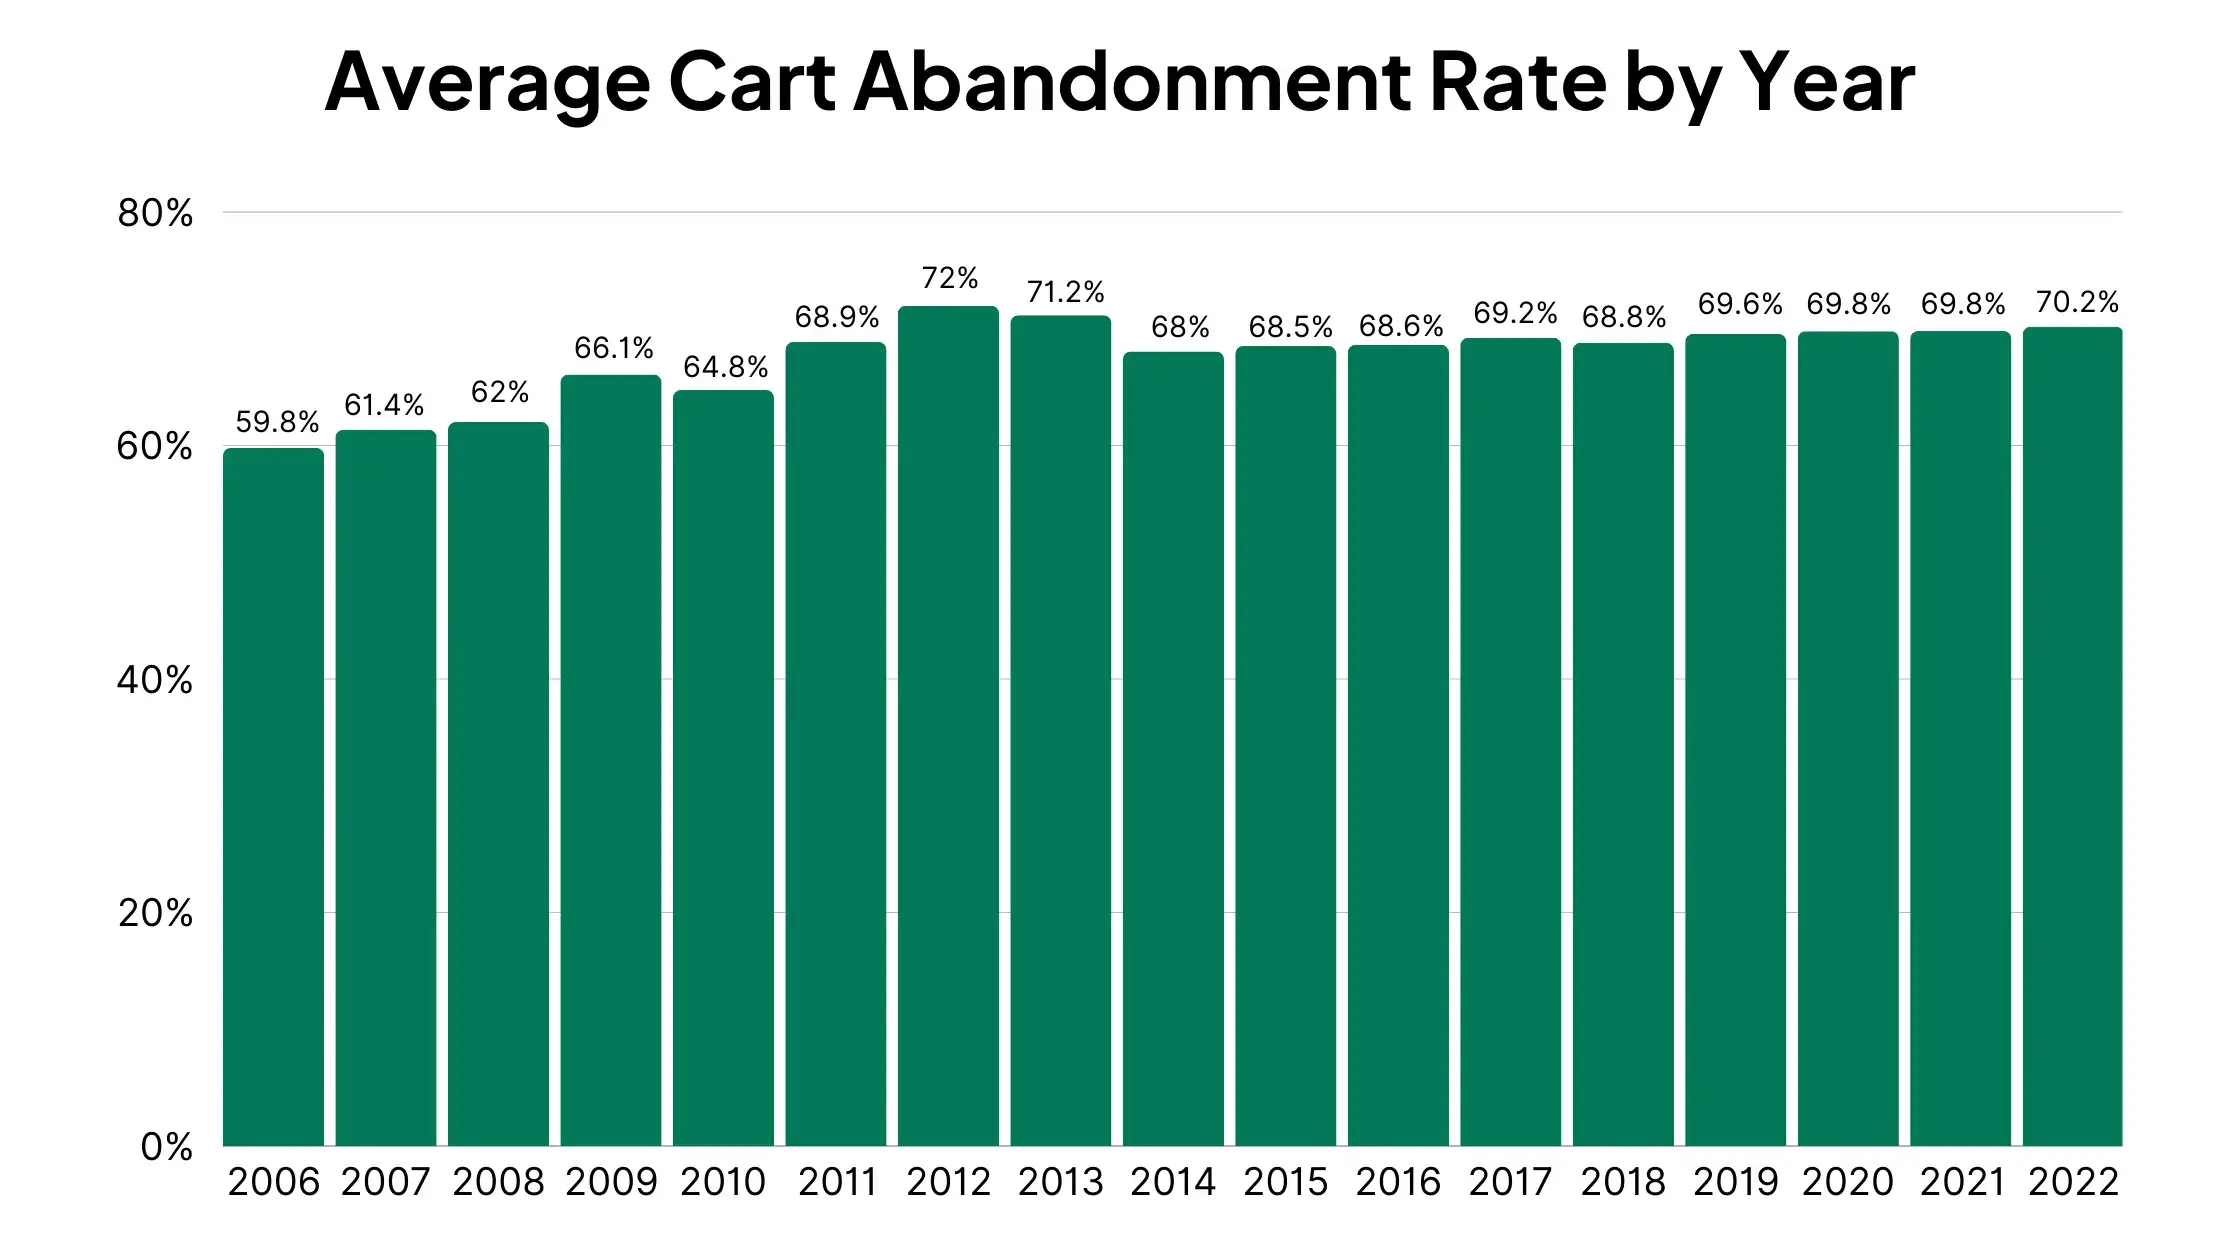
Cart Abandonment Trends
Since 2006, the average shopping cart abandonment rate has increased from 59.8%, to approximately 70% as it stands now.
Cart abandonment peaks at 72% in 2012, before dropping slightly, though has been steadily increasing since 2014.
Here are the yearly average cart abandonment rate each year since 2006:
Shopping Cart Abandonment Statistics
Now let’s run through some more insightful data surrounding shopping cart abandonment, so you can get a complete understanding of how different user attributes (such as location, demographics, device and traffic source) affect how likely it is for someone to leave your site without completing the checkout process.
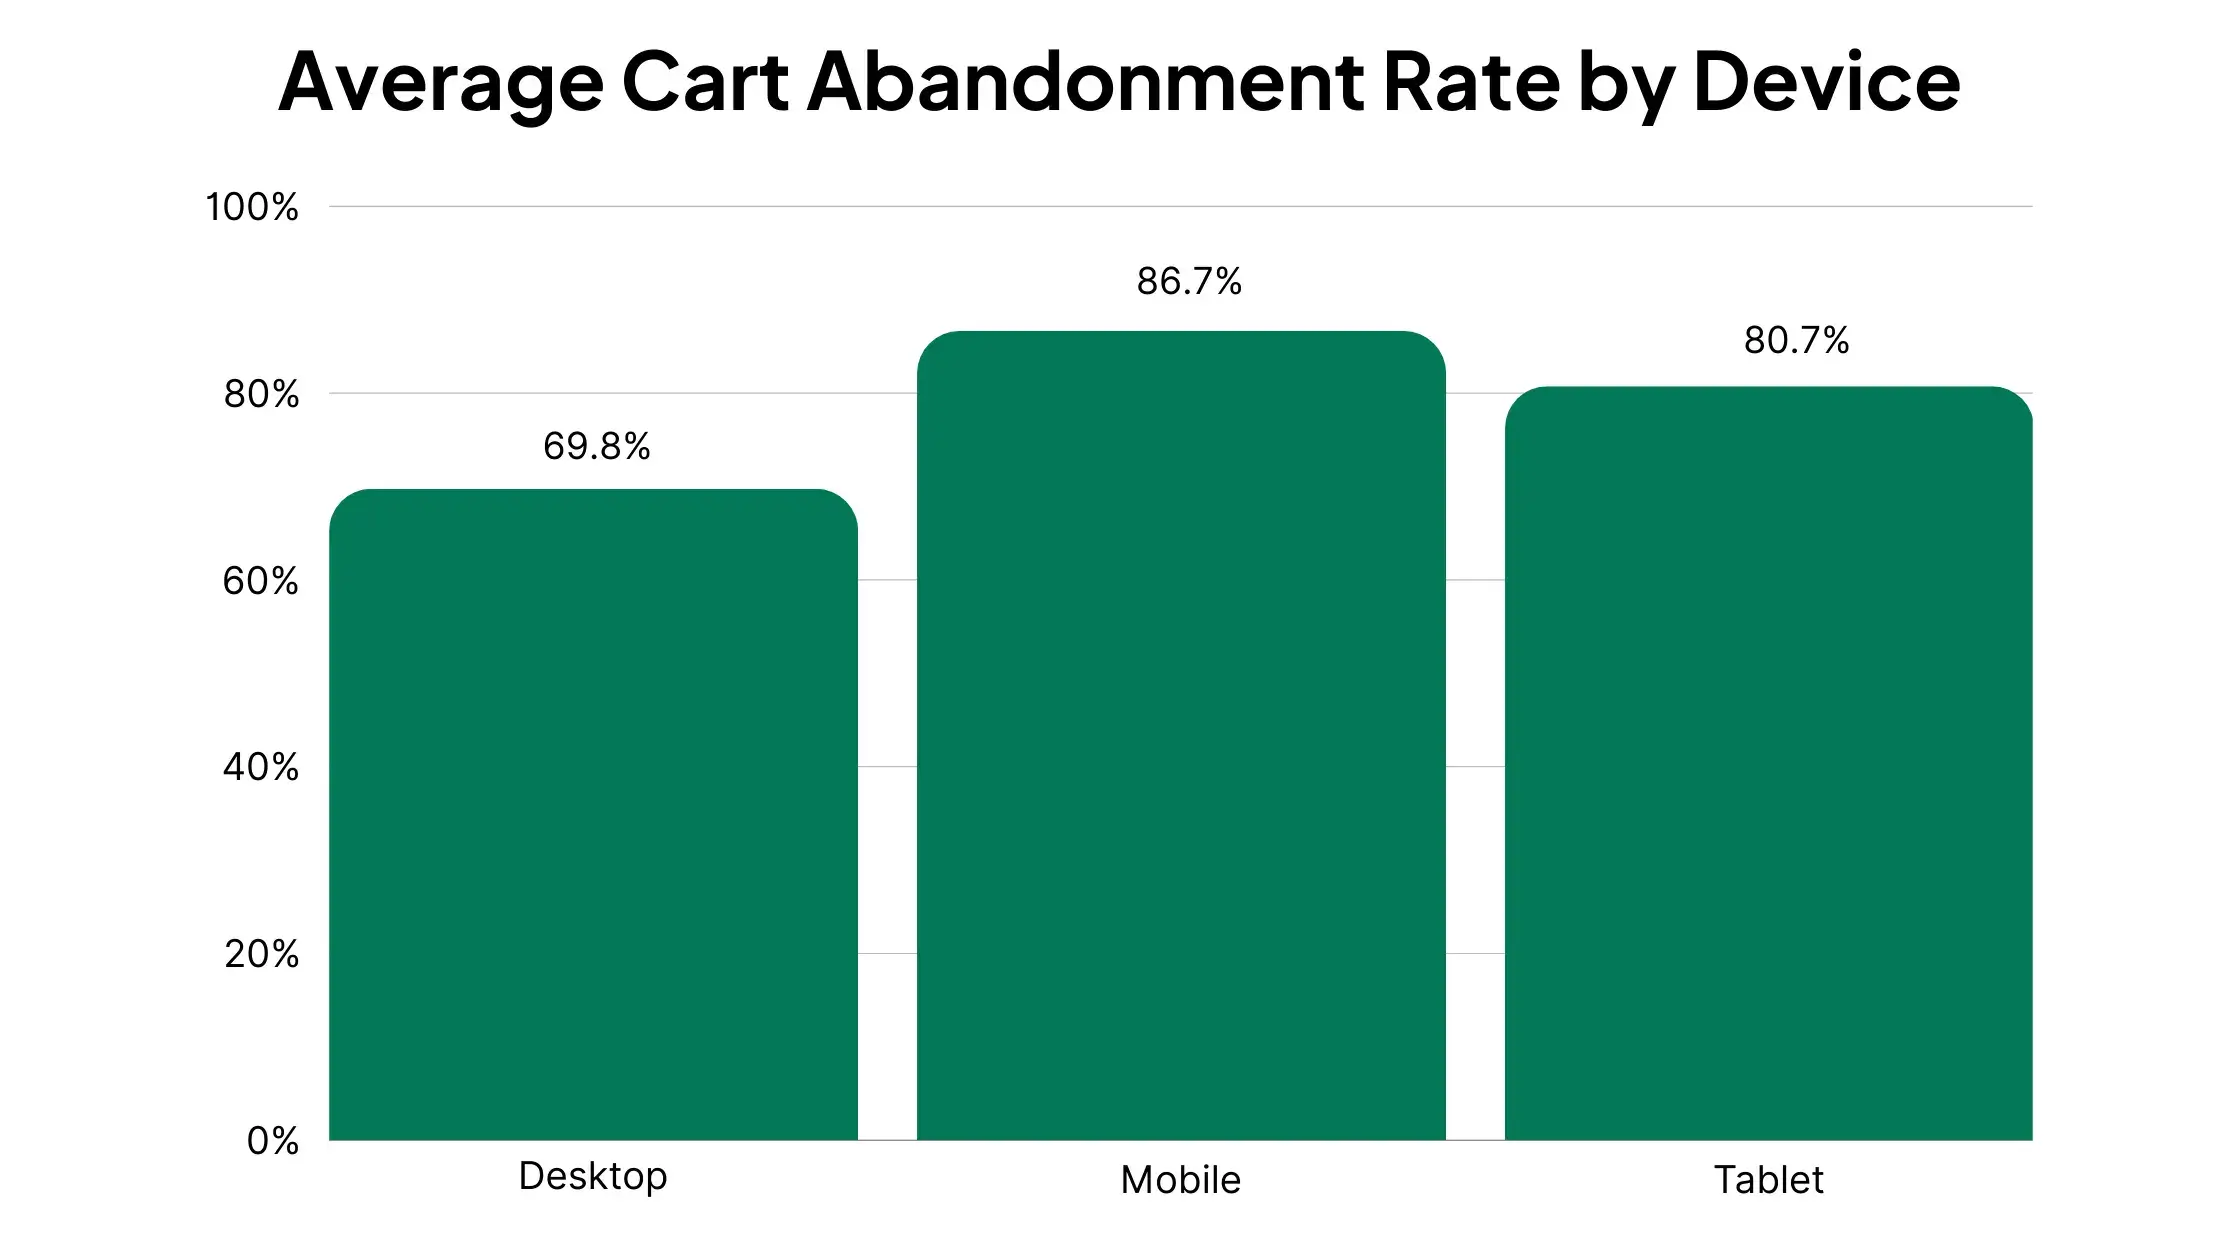
Shopping Cart Abandonment Rate by Device
Here is the online shopping cart abandonment rate for desktop, mobile and tablet respectively:
The data shows that desktop users are significantly more likely to complete their checkout than tablet and mobile users.
This implies a huge opportunity to decrease cart abandonment rate, and thus increase your online sales, by making improvements to your checkout flow on mobile.
Which Categories Have the Highest Cart Abandonment Rates?
According to SaleCycle, Telco, Home Furnishings and Automotive are the categories with the highest rates of cart abandonment.
On the other end of the scale, Groceries and Electronics have significantly lower rates of cart abandonment, meaning shoppers are a lot more likely to complete their purchases with these product categories.
Check out the full data below:
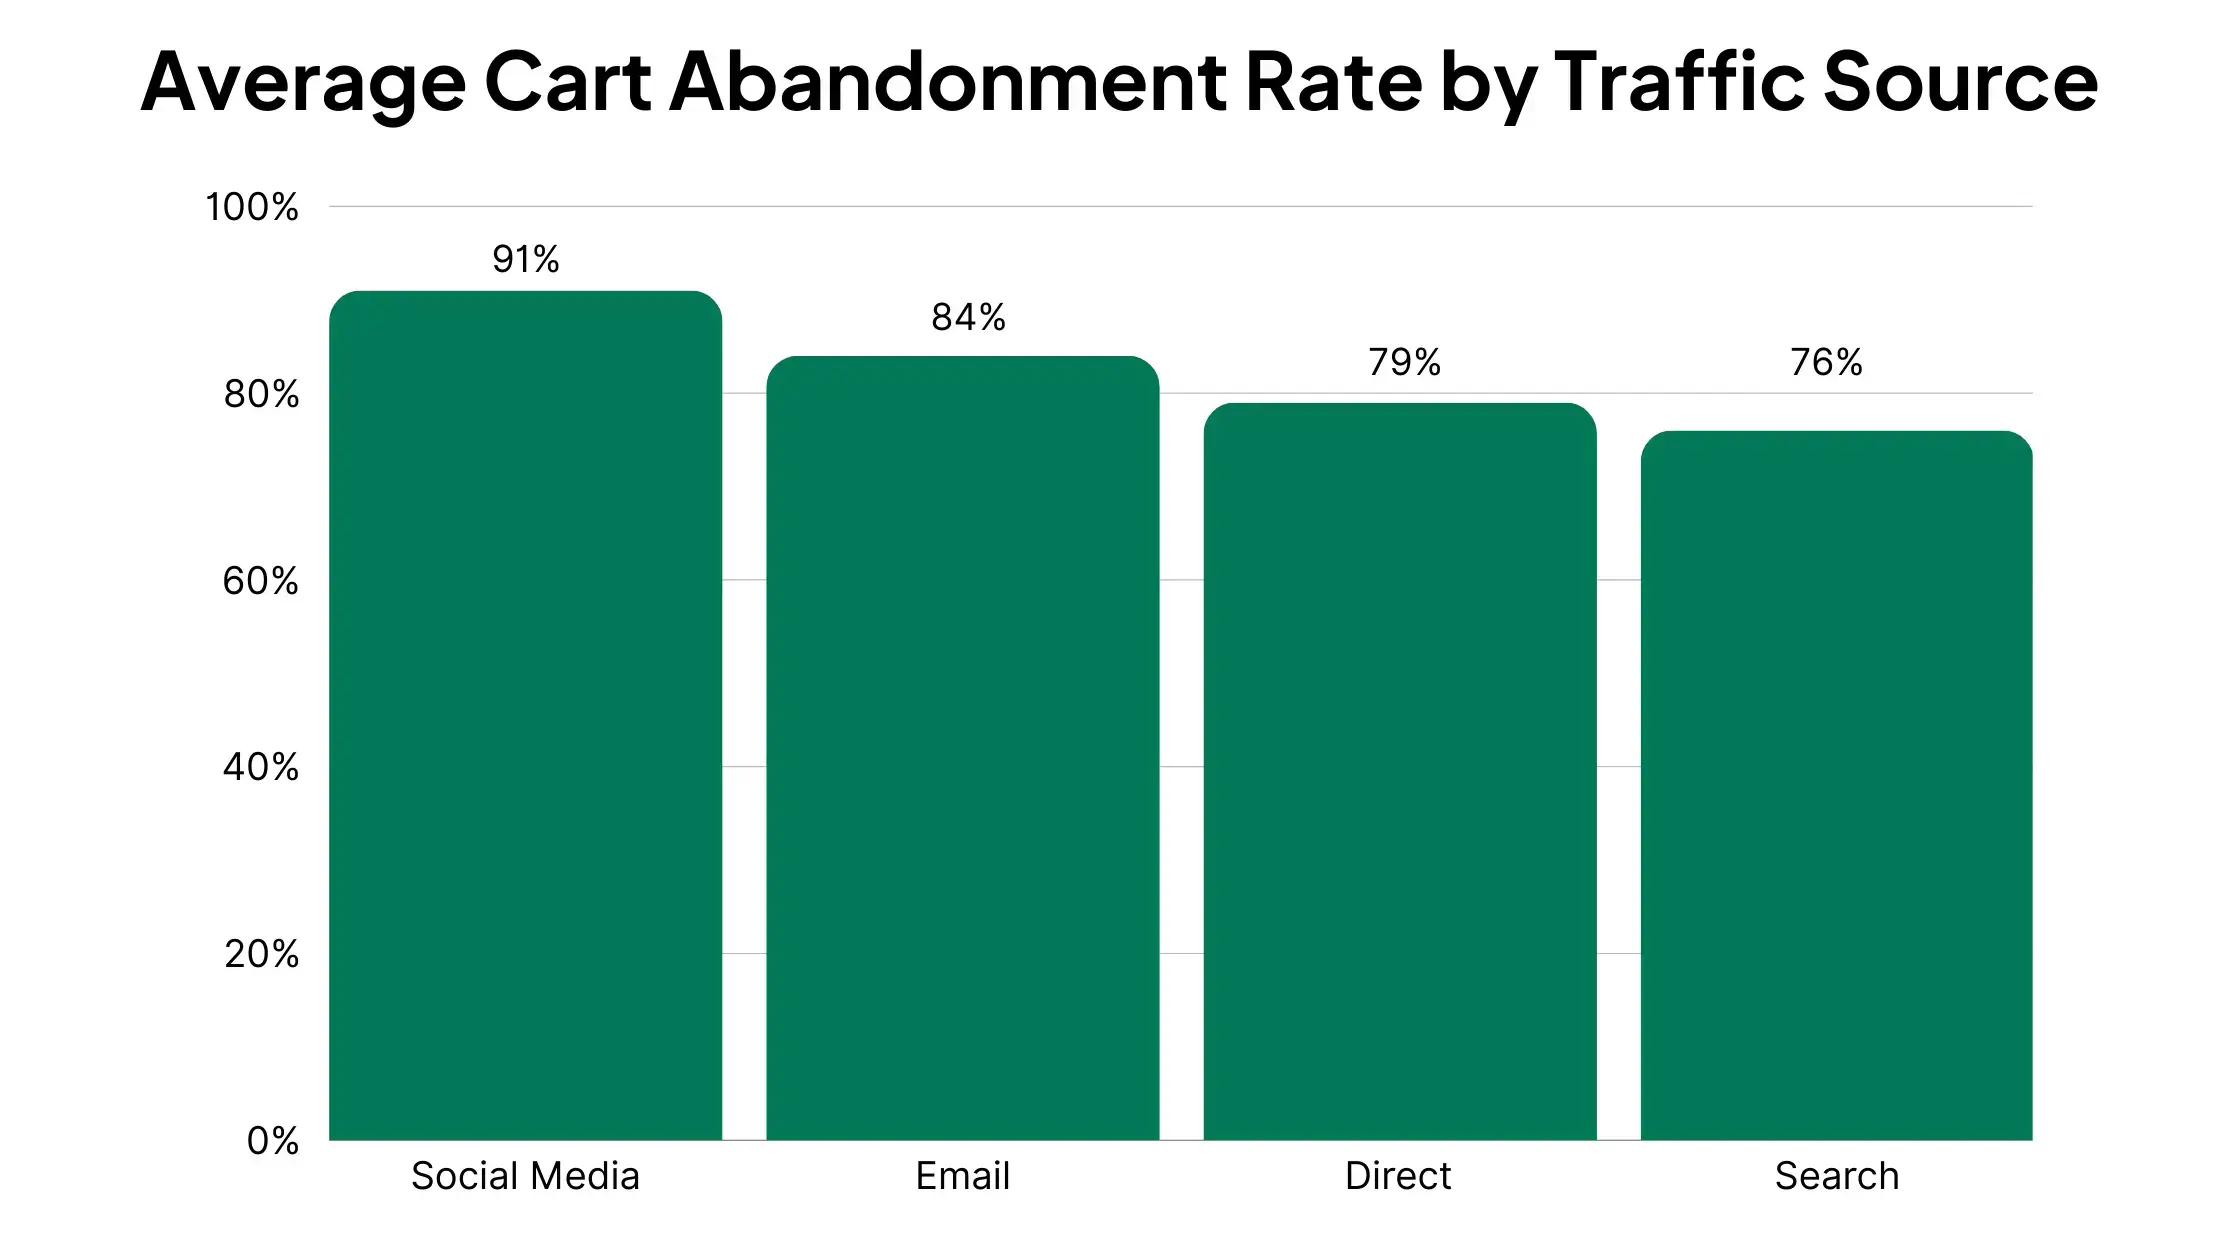
Cart Abandonment by Traffic Source
Traffic source makes a big difference in how many customers abandon online shopping carts.
Data shows users from social media are most likely to abandon their carts, at a huge 91%. On the lower end, search traffic users are the least likely to result in an abandoned cart.
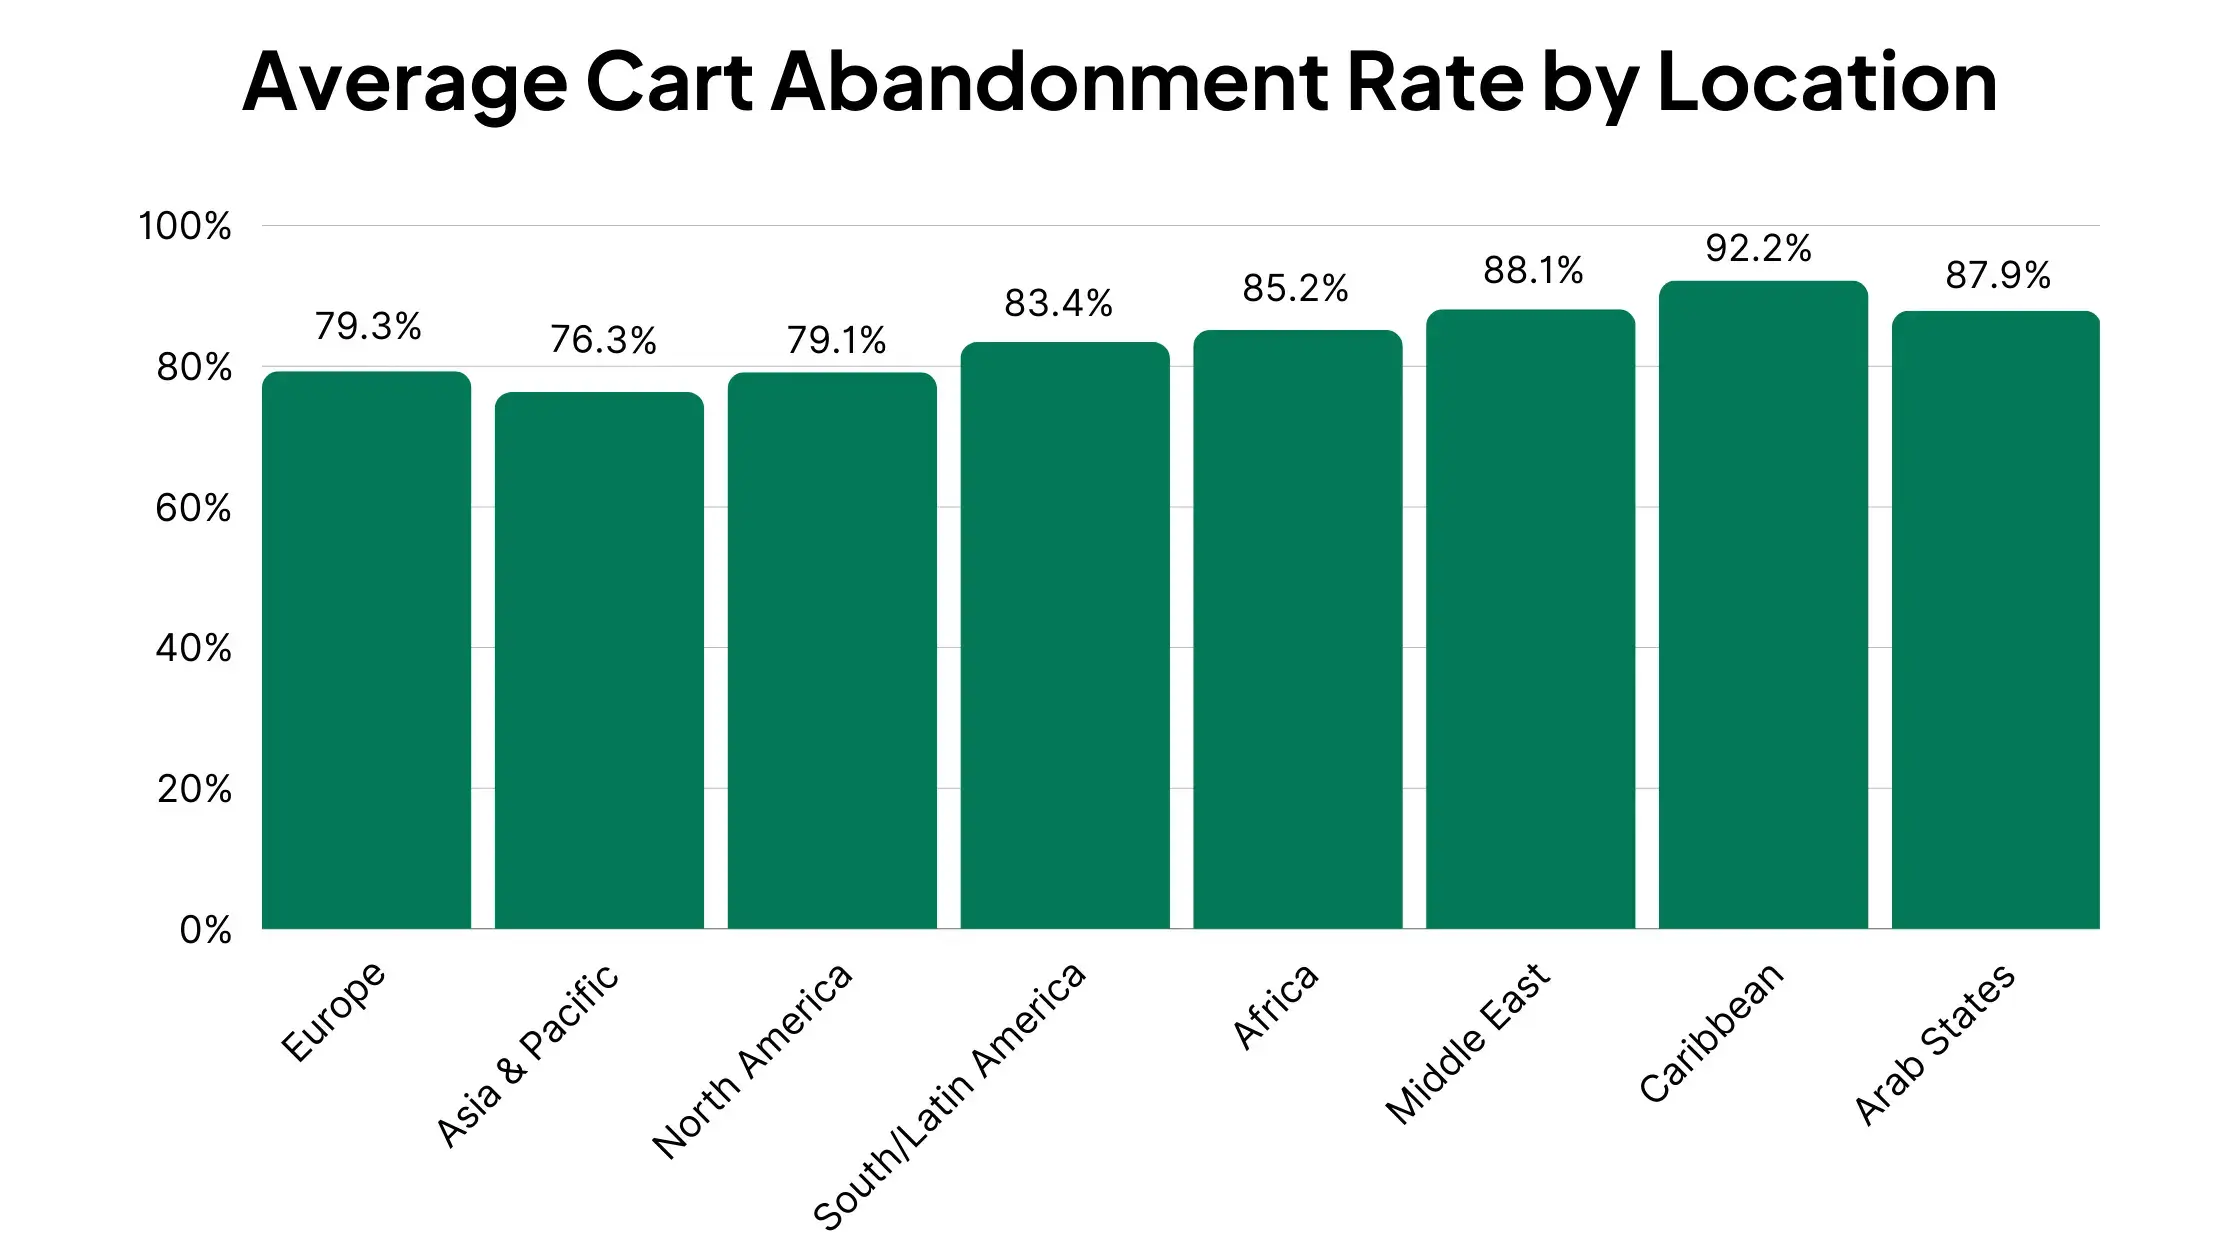
Cart Abandonment Rates Around the World
Cart abandonment is more or less common in different areas of the world.
According to SaleCycle data published in Statista, users in the Caribbean have the highest average abandonment rate, while Asia & Pacific consumers have the lowest.
Europe and North American shoppers come in on the lower end of the scale as well.
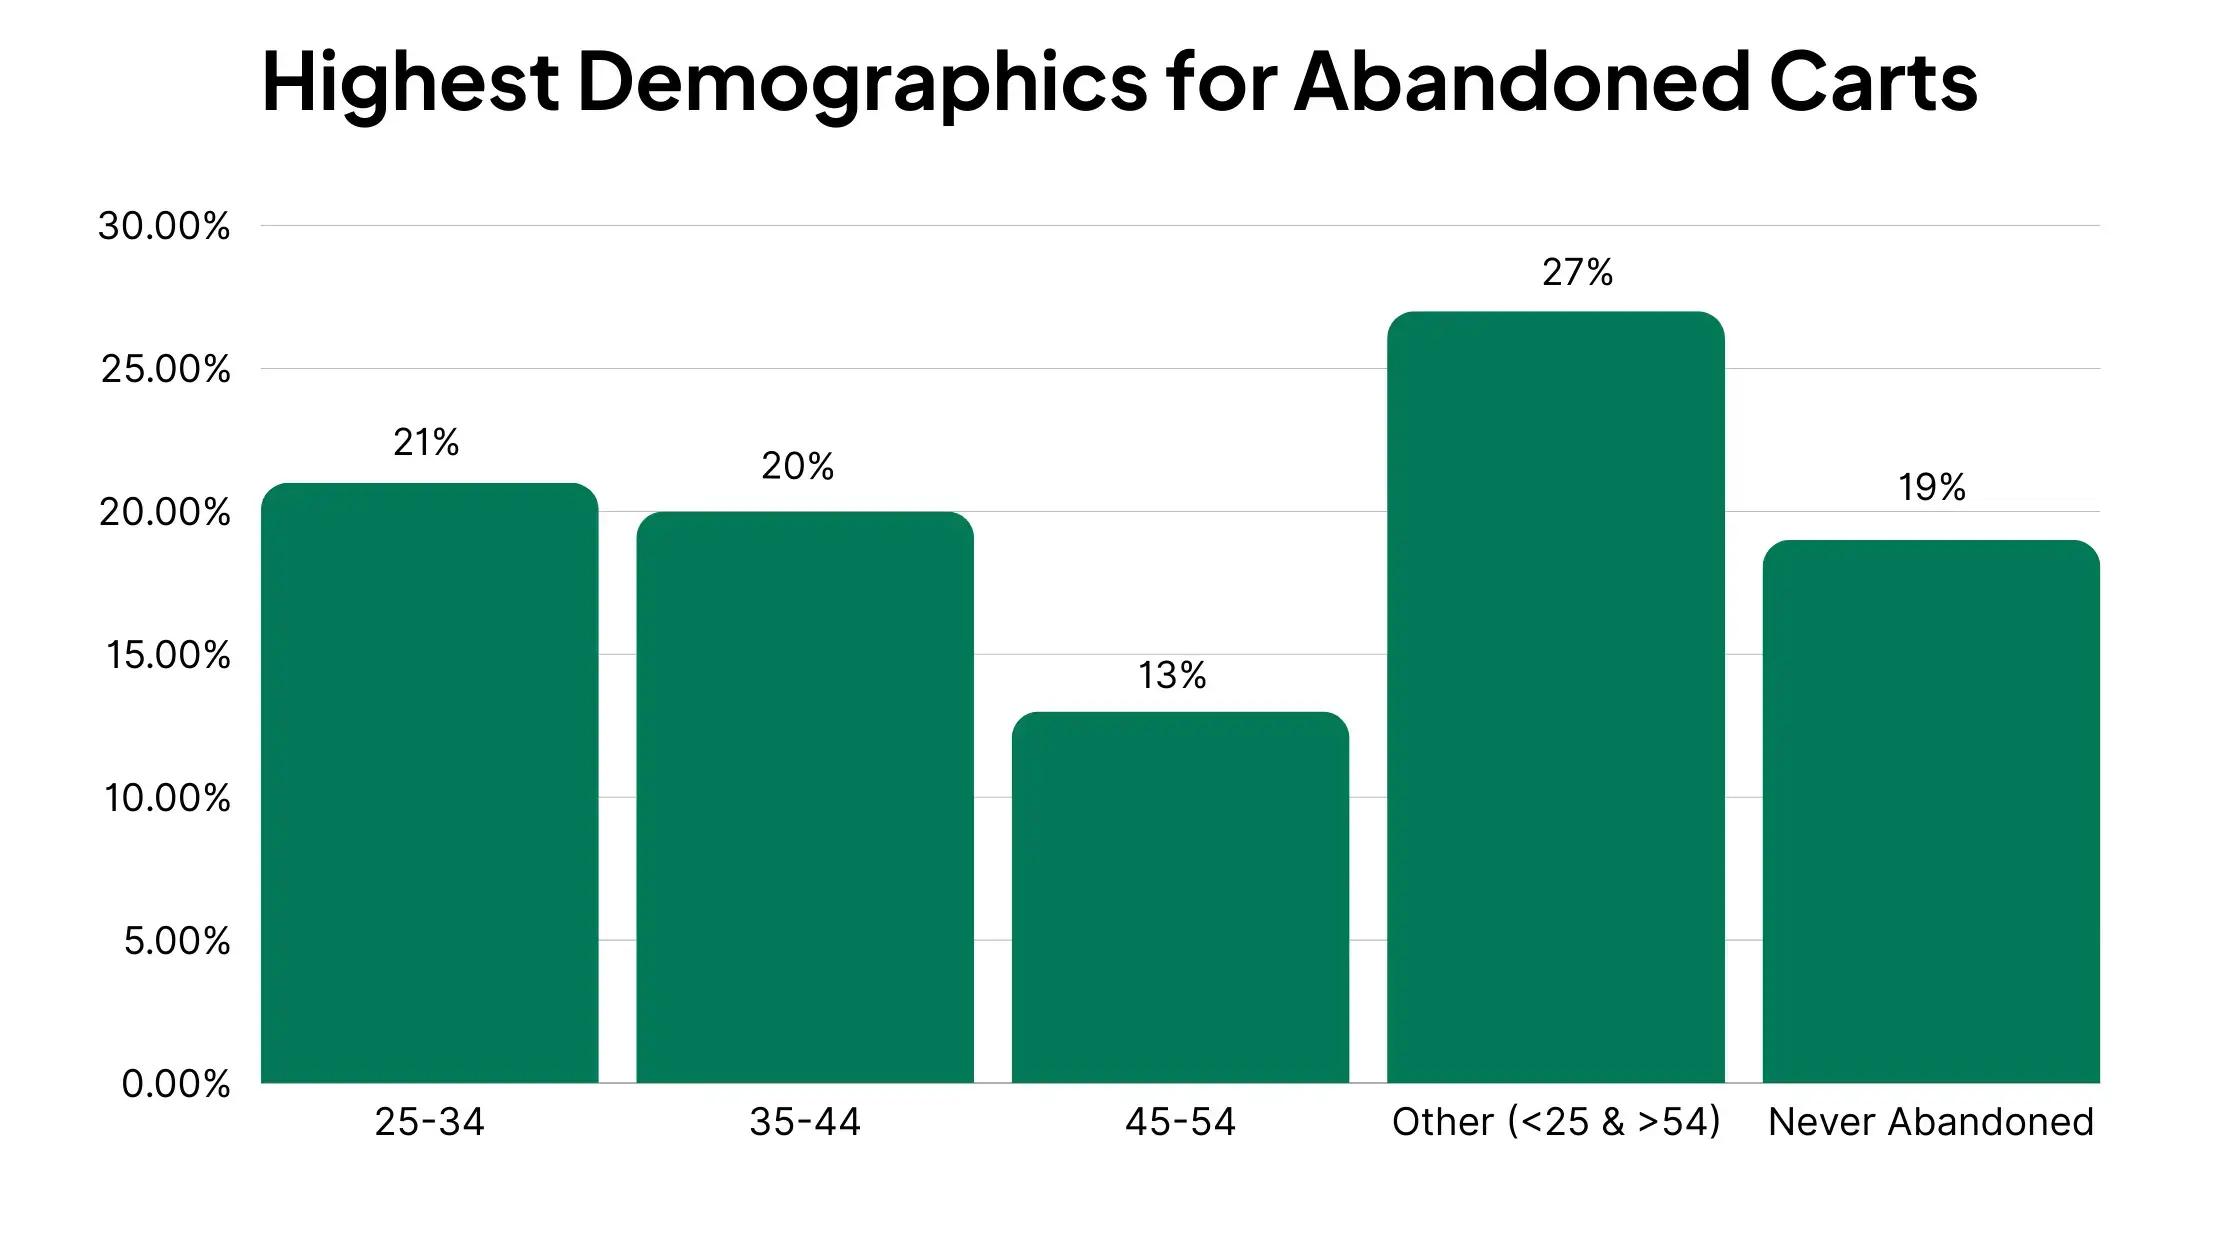
Cart Abandonment Demographics
A study by Contentsquare found that the 25-34 age group is most likely to result in an abandoned cart.
Their study found that 21% of 25-34 year olds had abandoned a cart at least once. The next most common were 35-44 (20%) and 45-54 (13%).
Overall, 81% of their respondents reported abandoning a cart at least once.
Why Do Shoppers Abandon Carts?
The shopping cart abandonment statistics above give some interesting insight into what kind of online shoppers are more or less likely to leave their cart abandoned. But there’s not a lot you can action from that data, other than adjusting your expectations for users from different age groups, traffic sources, etc.
More importantly, you want to know why online shoppers abandon their carts. With this information, you can start crafting strategies to reduce card abandonment and capture more revenue that would otherwise be lost.
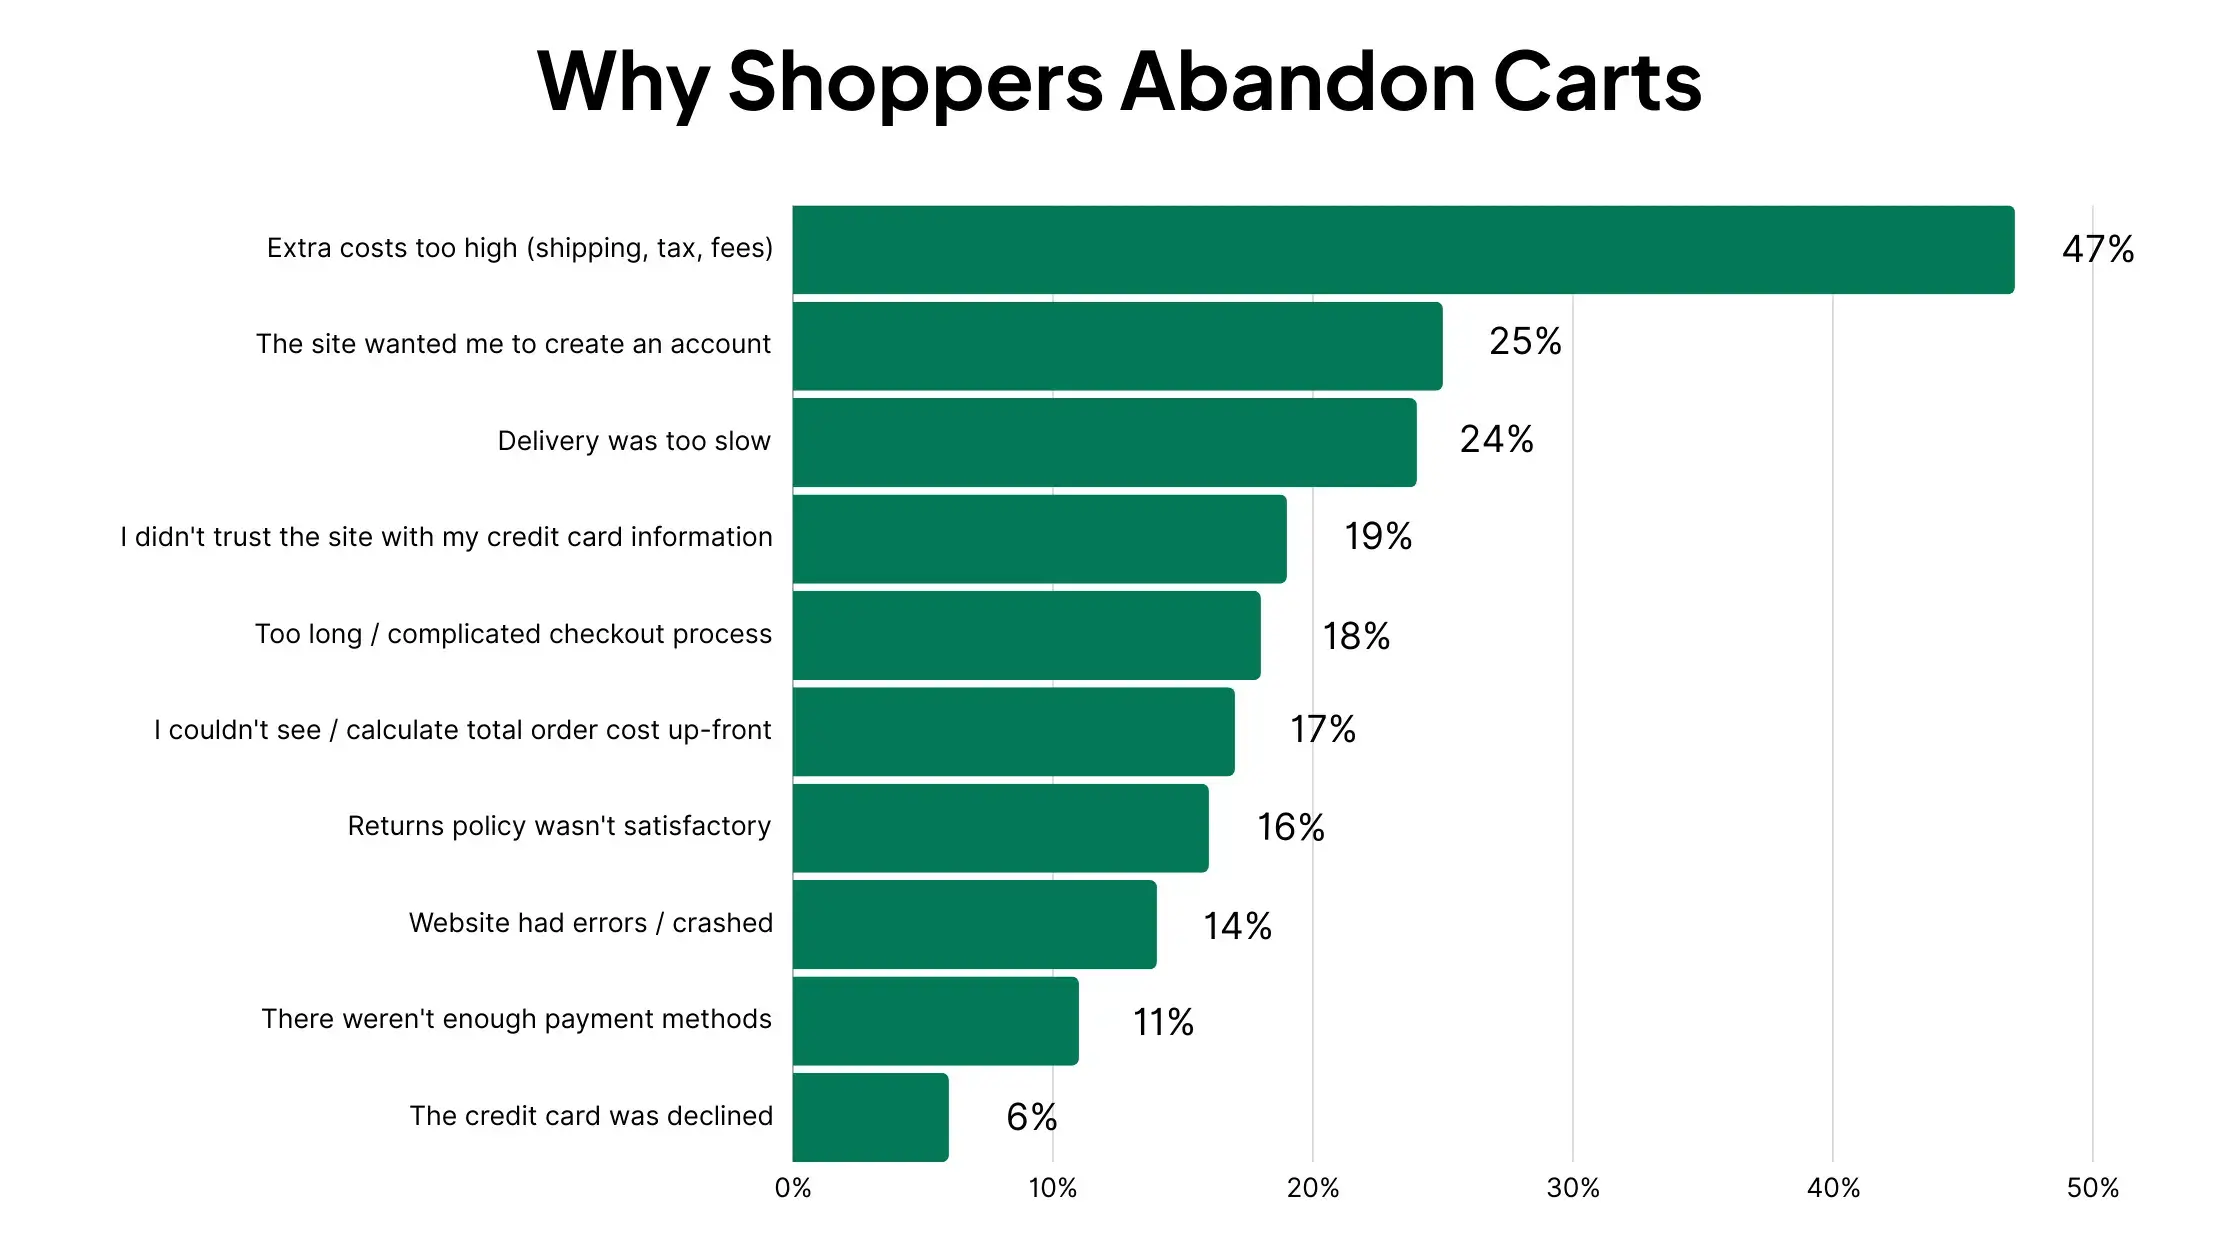
According to a survey from Baymard Institute, far and away the most common reason shoppers abandon their cart is due to extra costs that appear during checkout, such as shipping costs, taxes or other fees.
In their study, 47% of respondents said they had abandoned a cart for this reason.
Distant second and third place reasons were that the site wanted the customer to create an account (25% of respondents) and slow delivery (24%).
See the full results below:
The Impact of Abandoned Carts
If you’re not yet convinced that shopping cart abandonment is a big deal, let the data convince you.
Customer engagement platform Swrve suggests that $4 trillion worth of products will be left abandoned in carts this year alone.
Some of this “lost” revenue will come back, if you implement smart abandoned cart email and retargeting campaigns. Some will be gone forever.
In the worst case scenario, a shopper who abandons their cart in your online store will turn around and buy the item(s) they were looking at from a different retailer.
A study in the UK found approximately 26% of abandoned carts resulted in the shopper buying from a different store – a clear sign that there were solvable issues with the original store that turned them off from making a purchase.
If you don’t address the issue of cart abandonment, not only are you leaving revenue on the table, you’re providing a platform for consumers to research products in your store, but complete their purchase with your competition.
Abandoned Cart Recovery Statistics
The good news for retailers is that revenue left in an abandoned cart is not necessarily gone forever. Experts estimate that $260 billion in abandoned revenue is recoverable.
Retargeting ads and direct messaging channels are commonly used and effective ways to recapture users who abandoned their cart in your store.
Abandoned Cart Retargeting Ads
According to MotoCMS, retargeting ads reduce cart abandonment by 6.5%, and have the potential to increase sales by 20%. Yet only 27% of the retail industry utilizes retargeting ads for abandoned carts.
Abandoned Cart Emails
When it comes to emails, a Moosend survey found that 40-45% of abandoned cart emails are opened, a significantly higher rate than the baseline average for eCommerce marketing emails.
In addition, these emails have a 21% click-through rate, and 50% of users who engaged with an abandoned cart email converted into a sale.
Klaviyo reports that abandoned cart emails deliver $5.81 in revenue per recipient.
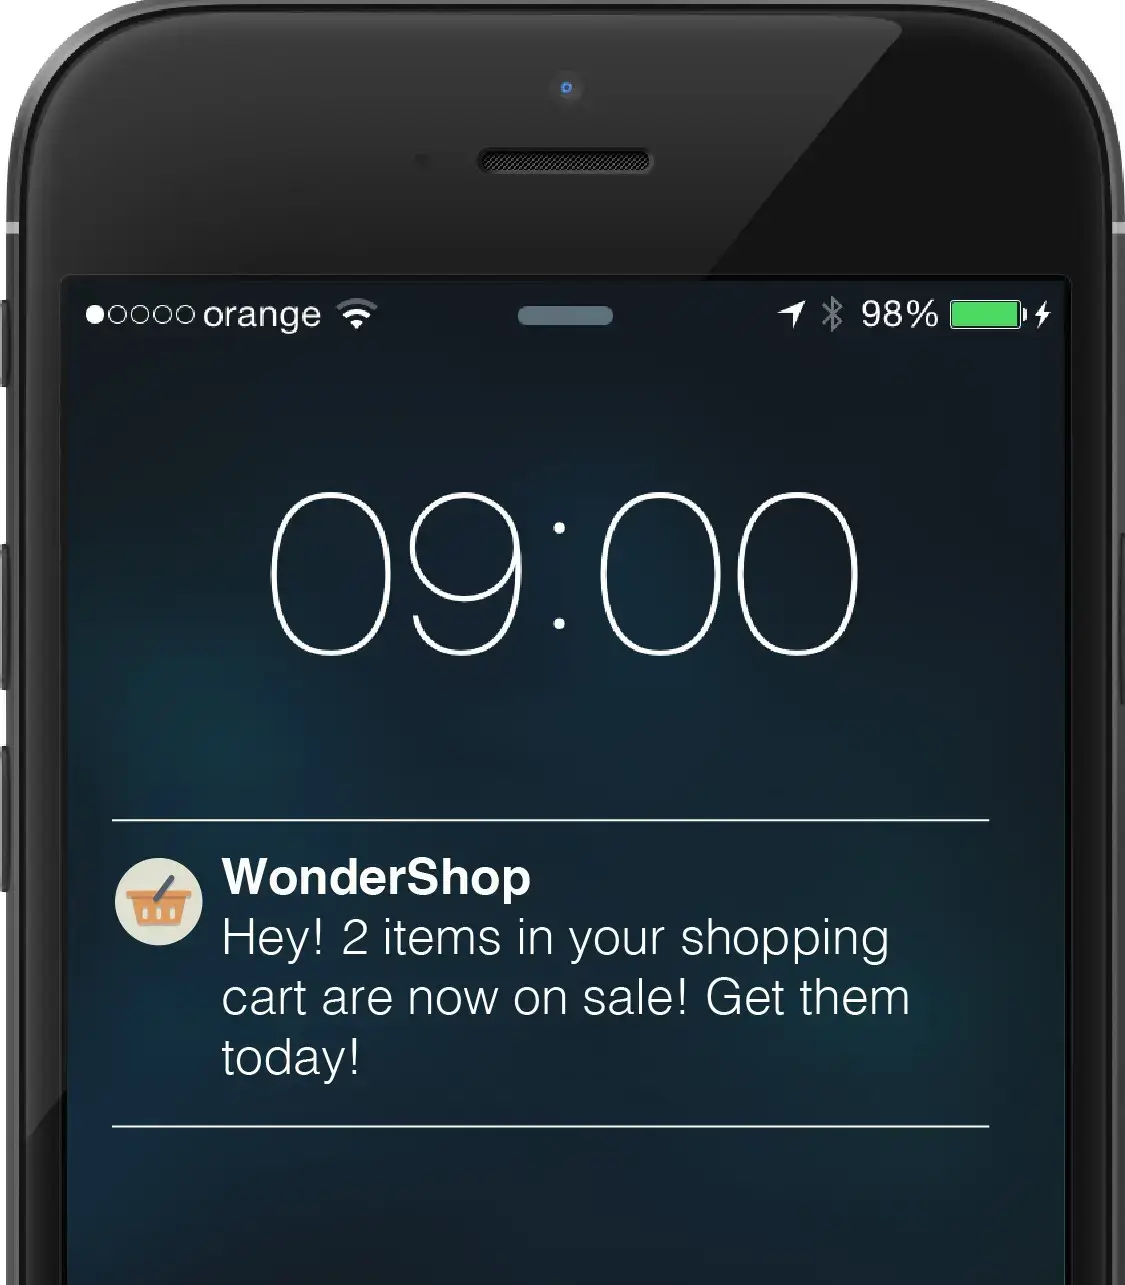
Push Notifications for Abandoned Carts
While email and retargeting ads are the most common ways for retailers to recapture abandoned carts, push notifications are another option, and may be the most effective of them all.
With the significantly higher open rates and engagement rates for push notifications (50% average open rate and 10% average click-through rate), it stands to reason that push is be the best way to remind shoppers to return to your store and complete their purchase.
There’s little data available on the effectiveness of push notifications for abandoned cart retargeting yet, which just means that this channel is underutilized, and offers a huge opportunity for you to get a leg up on your competition.
How to Recapture Lost Revenue from Abandoned Carts
Using the insights gained from these shopping cart abandonment statistics, here are seven tips to help you reduce cart abandonment and capture more lost sales.
Simplify Your Checkout
A simple, smooth checkout experience will result in significantly fewer abandoned carts.
Of the top five most common reasons for people to abandon their cart, two are related to checkout processes with too much friction. A long and complicated checkout process is a surefire way to make excited customers turn around, give up and go somewhere else.
Make your checkout flow fast, requiring as few clicks and form submissions as possible (particularly on mobile).
Offer Guest Checkout
It’s understandable that you want to capture customer information when they make a purchase, as this is a powerful asset you have to incentivize repeat purchases.
But some shoppers don’t want their information stored by every company they purchase from online. 25% of shoppers have abandoned their cart for this very reason.
Giving the option for people to check out as a guest will result in a higher percentage of users completing their purchase.
Provide Fast and Cheap Delivery
Of the top five cart abandonment reasons, two relate to delivery.
You can put a damper on your customers’ excitement to buy when they get to checkout and see exorbitant shipping prices, or see that they’ll be waiting a long time until they get their product.
We want fast shipping, and we want it cheap (ideally free). Give that to shoppers and fewer of them will dump their cart before buying.
Build Trust Signals
Trust is a significant barrier between online retailers and potential customers. Online stores need to break through this barrier with multiple trust signals, to make customers feel comfortable about making a purchase.
This means giving shoppers the confidence that they’re buying a high-quality product, and that information they enter into this website will be safe.
Build signals to overcome the barrier of trust, such as customer reviews and testimonials, integrations with trusted payment gateways, and consumer guarantees.
Make Sure Your Website is Fast and Bug-Free
Avoid any technical issues that are going to result in shoppers abandoning their carts.
Slow load speed or bugs with your website make for a frustrating user experience, as well as a negative trust signal.
If a potential customer has to wait around for a number of seconds for the checkout page to load, that’s a big point of friction, which is often going to result in shoppers giving up and finding another place to shop.
Improve Mobile Usability
Data shows that mobile users abandon their carts significantly more than those on desktop. That’s because the checkout experience is generally a lot less intuitive on mobile devices.
Some sites are poorly optimized for mobile, but even those that are mobile-friendly tend to present more friction in checking out, specifically when it comes to entering forms and filling out delivery/payment information.
Mobile commerce currently makes up 38% of all digital spending in the US, which means there’s a lot of potential revenue out there for online stores that embrace mobile shoppers.
Making sure your site is responsive on mobile comes first. On top of that, make it as easy as possible for users to get through the checkout when they’re on mobile, by reducing form submissions, saving customer details for easy checkout, and integrating with mobile payment solutions.
Follow Up with Abandoned Carts
With the simple, cost-effective methods available to reach out to customers and recapture lost revenue from abandoned carts, there’s no excuse not to put this to use.
Set up abandoned cart campaigns with email and retargeting ads and, if you have the ability, push notifications too.
For more tips on how to reduce cart abandonment, plus a deep dive into the cart abandonment topic, check out this post.
Reduce Abandoned Carts with Your Own Mobile App
One of the best things you can do to improve your abandoned cart rate is to launch your own mobile app.
Mobile apps provide a more contained shopping experience, free from the distractions of other browser tabs, which often pull users’ attention away from completing their purchase.
They also provide a smooth shopping experience on mobile, make it easy to save your user’s information for frictionless checkout, and act as a positive trust signal.
Possibly the best thing about mobile apps when it comes to cart abandonment is that they give you the full power of mobile push notifications, the most effective tool to reach out and recapture abandoned carts.
Vendrux lets any eCommerce store launch their own app, without the need to pay for and manage a complicated and expensive development team. Vendrux does it all for you, from converting your website to mobile apps, to submitting your app to the app stores, and even keeping your app up-to-date and bug-free moving forward.
Sample eCommerce Apps Built With Vendrux
You can go live with an app in less than a month, for under four figures upfront – a far cry from the hundreds of thousands of dollars it usually takes to develop an app.
Launching your own shopping app is a great way to boost average order value, conversion rate, retention rate, reduce abandoned carts, and position yourself as an authoritative and trustworthy brand. And for what it costs you to launch an app with Vendrux, it’s hard not to come out with a positive ROI.
If you’re looking to start a new app development project, you’re probably looking into frameworks that can provide you with native functionality, a modern development workflow and great app performance. Two great mobile development choices are Capacitor and Cordova.
Today, we take a look at both app development frameworks to find their key differences and similarities and determine which one is better for your next mobile app project.
What is Capacitor?
Developed in 2018, Capacitor is an open-source project for mobile apps that helps devs build native projects on Android, iOS, Electron, and the web (through PWA). Capacitor gives developers native API access, helping them build once and deploy on multiple platforms, allowing them to do true cross-platform development.
What is Cordova?
Apache Cordova is an open-source project that is used to build web apps across different platforms, all with native device features. Cordova was released in 2009 and while it has been the industry standard for many mobile developers, it’s starting to show its age through the lack of modern features.
PS. if you have a website that you want to turn into a mobile app, you may not need Capacitor or Cordova. Simply use Vendrux instead. See what your app would look like here.
Capacitor vs Cordova – key differences
Apache Cordova is one of the most popular choices for cross-platform mobile applications for years now, but it’s slowly declining in popularity. Capacitor by Ionic is the new alternative that may be a better choice. But let’s compare them in detail and see where they differ.
The native bridge
The Apache Cordova framework uses WebView to render the user interface of the application you’re developing. This is a bridge that communicates between the code you’re writing in Javascript and the native features of the device, through the use of plugins.
On the other hand, Capacitor uses WebView too, but with a few small differences. The native bridge is more modern and as a result, you get better performance and there is more flexibility on how native APIs are accessed.
If you want to mimic native code more quickly and accurately for any device, Capacitor is probably the better choice.
The development environment
Cordova has been around for a while and it’s evident by the multitude of choices of integrated development environments for developers. They can choose from Cordova CLI, Visual Studio and many others.
On the other hand, Capacitor is run by people from Ionic, which means that you’re going to be working in Ionic tools and their development workflow.
Cordova takes the cake here because there is a strong chance that your developer team has worked in some of these IDEs before. On the other hand, only an Ionic team of developers or someone specializing in Capacitor is the kind of person to work in Ionic before.
The plugin ecosystem
Cordova is known for its huge choice of third-party plugins for just about any kind of hybrid app development. If you need to use plugin source code for the camera, geolocation, file system and more, it’s all readily available.
Capacitor can use all of the Cordova plugins but it also has its ecosystem with Capacitor plugins. These provide a seamless integration with the Capacitor bridge, letting you take a modern approach to mobile app development.
It’s hard to pick the better alternative here, but if you’re into modern development practices, the Ionic framework is probably the better choice.
Community support
If you get stuck while building a native application in Apache Cordova, it’s not a huge deal. As it’s been around for a good while, there are many resources out there such as tutorials, guides, forums and more. In general, there is a larger community of long-time Cordova users.
On the flip side, Capacitor is younger and does not have as many materials available online. But it’s not all that bad, Ionic is one of the more popular modern web technologies and you can get help in Ionic communities.
In this category, Apache Cordova wins by a hair.
Javascript and tooling
Being more seasoned is not always an advantage. Cordova does not always support the most recent Javascript features and it may not have the most modern tooling you’d expect from an IDE.
Capacitor is built with support for modern JavaScipt and Typescript, which gets you access to features such as hot reloading, and you can benefit from Typescript support.
In this sense, Capacitor is probably the choice that will get you more love from your development team.
Which one should you choose for your next app?
If you don’t see a major difference between Capacitor and Cordova, let’s break it down for you.
Choose Apache Cordova if:
You need access to a large library of plugins
You need to troubleshoot often and want to find answers easily online
You don’t mind the older WebView and its lackluster performance
You don’t need direct native APi access
You’re okay with writing some additional code if you have platform-specific issues
Choose Ionic Capacitor if:
You need access to the most modern web technologies, including JavaScript, HTML and CSS
You need direct access to native APIs, giving you access to custom native features without using plugins
You need support for progressive web apps (PWA), allowing you to build both for apps and the web
You don’t mind troubleshooting on your own because there is no well-established community
You don’t have extensive requirements in terms of plugins
Or simply, choose the third option
Do you already have an existing website that you want to turn into a mobile app? You don’t need to choose Capacitor or Cordova, because there’s a simpler solution to the problem.
With MobilLoud, you can convert your website into a mobile app that automatically updates with your site. Make changes once and have them reflect both on your website and your app, all while keeping all of your unique website features and your design.
No need to spend time debating development frameworks or pay thousands every month to expensive developers.
Bottom Line: Building a mobile app can be a long and expensive process. From design through development, testing and publishing, it typically takes at least 6 months, and over $100K to launch a high-quality mobile app. A better alternative (for businesses with a working website already) is Vendrux: a managed website to app service, which lets you build and publish your mobile app in weeks, not months.
Building a mobile app can feel overwhelming for non-technical entrepreneurs and small business owners.
Fortunately, you don’t need to be a programmer to bring your app idea to life.
This guide will walk you through two paths to create a mobile app, covering everything from initial planning to post-launch growth. Whether you’re starting from scratch or turning an existing website into a companion app, we’ll break down each phase in simple terms.
Overview: Vendrux’s Mobile App Development Guide
Since 2013, we’ve helped build and launch thousands of apps. In doing so, we’ve learned all there is to know about building mobile apps, including common mistakes, the time and cost you can expect, and the best approach for different kinds of projects.
With that experience, we’ve put together a comprehensive guide for anyone looking to make an app.
Our guide will look at two main paths:
Path 1: Building a Mobile App from Scratch – Ideal if you have a new app idea or a service that isn’t already on a website. We’ll cover ideation, design, development options (including no-code tools), testing, launch, and maintenance for a brand-new app.
Path 2: Creating a Mobile App as a Website Companion – Perfect if you already have a website (like an ecommerce store, news site, or online community) and want a mobile app to enhance your reach. We’ll discuss auditing your site’s content, choosing between a Progressive Web App (PWA), hybrid app, or a custom native app, implementation details, and syncing your app with your website.
By the end of this guide, you’ll have a clear roadmap to create a mobile app, tailored to your resources and needs.
Let’s dive in.
Path 1: How to Build a Mobile App from Scratch
If you’re starting with just an idea (not an existing website or platform), Path 1 will guide you through bringing that idea to reality.
This path is common for entrepreneurs building a new product or business via a mobile app.
Here’s what the mobile app building process will look like:
Ideation & Planning Phase
Every successful app begins with careful planning. In this phase, you’ll refine your idea, research the market, define your target users, plan your Minimum Viable Product (MVP), and consider how the app might generate value or revenue.
Here’s what you need to cover:
Define the Problem and Solution
Clearly identify what problem your app solves. Ask: “What specific value does my app offer users?” Understand existing solutions and how your app improves upon them.
Market Research
Examine similar apps: downloads, active users, user reviews. Identify gaps your app could fill. Confirm real market demand (this ensures you’re building something valuable).
Identify Target Users (User Personas)
Define who will use your app. Busy parents? Students? Professionals?
Create user personas (e.g., “Alice, 30, marketing manager seeking quick workouts”). Personas help align design and features with user needs.
Outline Core Features & MVP
Focus on an MVP, which should include only the essential features delivering core value. List desired features, prioritize them, and select only critical ones for launch.
Avoid feature creep by asking, “What does my app absolutely need to function?” This keeps development manageable in cost and timeline.
Monetization Strategy
Assuming your mobile app is a commercial project (designed to make money), decide your monetization model early:
Free with Ads: Ad revenue, no user fees.
Freemium: Basic features free; premium features via subscription or purchase.
Paid App: Users pay upfront (less common today).
In-App Purchases: Sell virtual or physical goods in the app.
Subscription: Recurring fees for ongoing access.
Indirect Monetization: Free app driving sales or leads to another business.
Choose based on app type and audience’s willingness to pay.
Success Metrics & Goals
Define clear goals or KPIs, such as downloads, revenue, or user engagement. This clarifies your objectives and helps measure success (e.g., “Increase customer retention by 20% via app”).
By the end of this phase, summarize your plan:
App purpose
Target users
MVP
Monetization plan
This outline will guide the rest of your project, and assist with clear communication with designers and developers.
Design Phase (UI/UX Design)
With a solid plan in hand, the next step is designing how your app will look and feel, in terms of the UI and UX.
UI (User Interface) design is about the visuals (layout, colors, typography, etc.), while UX (User Experience) design is about the usability and flow (making the app intuitive and pleasant to use).
As a non-designer, you can still create an effective design by following basic principles and using the right tools.
Here are five steps to designing a mobile app:
1. Sketch User Flows and Wireframes
Start with basic wireframes; simple sketches mapping your app’s screens and navigation.
Focus on logical user flows, like “User opens app → Home screen → Menu → Profile.”
Tools such as Balsamiq, Moqups, or Wireframe.cc are great for non-designers, helping you clarify structure without visual distractions.
A screen-by-screen wireframe for a mobile app [Source]
2. Mobile UX Best Practices
While designing, keep some core UX principles in mind:
Simplicity: Each screen should have one clear purpose. Avoid clutter; use clear labels and intuitive icons.
Consistency: Maintain uniform colors, fonts, and button styles. This makes the app intuitive and cohesive.
Navigation: Choose clear navigation patterns; tab bars for simple apps, hamburger menus for complex ones. Ensure key functions are easy to find.
Accessibility: Use readable fonts (14sp+), high color contrast, and large tap targets (~7mm). Accessibility broadens your audience and helps comply with regulations.
A storyboard, showing the UX journey, step-by-step [Source]
3. Visual Design (UI)
Refine wireframes into polished designs:
Use Templates: UI kits (Google Material Design, Apple Human Interface Guidelines) save time and ensure professional results.
Design Tools: Tools like Figma, Adobe XD, or Sketch let you create detailed screens. Figma is beginner-friendly and offers free community resources. For simpler solutions, Canva or Visily offer easy drag-and-drop interfaces.
Mobile-First Approach: Design initially for smartphone screens (5.5″-6″). Tablet layouts can follow once the primary phone layout is solid.
4. Iterate and Get Feedback
Share designs with others for feedback. Test prototypes with real users to uncover and fix usability issues early.
5. Leverage Design Experts (Optional)
If budget permits, hiring freelance UI/UX designers (Upwork, Fiverr) or using platforms like 99designs can elevate your design.
Once your app’s design is set, the next step is development.
Even if you don’t have any technical skills, there are several practical options to allow you bring your app idea and design to life, from putting together a development team to using a rapid app development tool.
1. No-Code App Builders
No-code platforms use visual drag-and-drop interfaces, ideal for straightforward apps and MVPs.
Popular choices include:
Bubble: Flexible, powerful web and mobile web apps (from ~$29/month).
Adalo: Mobile-focused, simple apps and prototypes (~$45/month).
AppGyver: Strong logic capabilities, free for basic usage.
Glide: Quickly turns Google Sheets into mobile apps.
Thunkable: Visual blocks-based tool for native apps.
Pros:
Quick and cost-effective development.
Minimal tech maintenance.
Deployment often simplified or automated.
Cons:
Limited to predefined components; less flexibility for advanced features.
Tips: Start from templates, configure data, design screens visually, and use built-in logic tools. Expect a small learning curve but benefit from extensive tutorials and community support.
2. Pre-Built App Templates
Another option is to start from a template specific to your type of app:
You’ll purchase existing app code (e.g., from CodeCanyon, ~$50-$300) and hire developers for customization.
Pros: Less coding needed; saves significant time.
Cons: Requires developer assistance for customization and maintenance. End result will likely be lower quality, less unique.
3. Hiring Developers
The other choice is to hire freelancers, a mobile app development company, build an in-house development team or partner with a technical co-founder.
Freelancers: Cost-effective ($20-$100/hour); find on platforms like Upwork, Fiverr.
Development Agencies: Full-service, comprehensive support (costs can range from $10k-$250k depending on complexity).
Tech Partners: Equity-based arrangement, ideal for startups needing long-term commitment.
Using cross-platform frameworks (e.g., React Native, Flutter) can reduce cost and development time significantly.
Tips: Clearly define your app requirements to receive accurate estimates. Evaluate candidates through past work, testimonials, and initial trial tasks.
Cost & Decision Factors
Choosing between no-code tools and hiring developers largely depends on the budget, desired timeframe, your technical skills, and the complexity and type of app you want to build.
Budget
No-code solutions typically cost around $12-$60 monthly, totaling a few hundred dollars annually.
Custom development, on the other hand, involves significant upfront costs (often tens of thousands of dollars) plus ongoing expenses for updates and maintenance.
If budget constraints are tight, starting with no-code can be highly cost-effective. Many businesses initially use no-code to validate their concept and/or build an MVP, and switch to custom coding only after achieving growth and stability.
Time to Market
No-code platforms can accelerate your app’s launch significantly, often reducing development from months to just weeks.
The custom app development process typically takes longer, often 4-6 months for a fully functional MVP.
If quick market entry is crucial due to immediate business opportunities or competition, no-code or hybrid development approaches can provide a significant advantage.
Technical Ability
If you’re comfortable learning and managing tech tools, no-code platforms can provide substantial control and flexibility.
However, if managing technology feels overwhelming or detracts from other critical business activities, hiring developers can free up your time, allowing you to focus on strategic business growth.
Scalability & Flexibility
Consider your long-term goals and potential scalability needs. While no-code platforms have improved greatly, they still have limitations – especially if your app needs advanced computations, custom integrations, or handling millions of users simultaneously.
Complex features like augmented reality or sophisticated algorithms typically require custom development.
Conversely, no-code solutions often suffice for simpler, content-driven, or ecommerce apps, particularly if these platforms continuously enhance their capabilities.
Hybrid Approach
You don’t need to exclusively commit to one method. Many businesses first use no-code to quickly and affordably validate their idea.
After gaining traction and generating revenue, they reinvest in professional custom development to refine functionality and enhance user experience.
Alternatively, using a no-code prototype as a specification for developers can reduce misunderstandings, save costs, and streamline the development process.
Testing & Quality Assurance (QA)
The game isn’t over once you’ve got a working version of your app.
Testing your app thoroughly ensures reliability and a positive user experience. Proper QA helps prevent launching a buggy app that can lead to negative reviews and frustrated users.
Here’s what to consider as part of the testing process:
1. Test on Real Devices
Use actual devices, not just simulators, as behaviors can differ. Include various screen sizes (small and large phones, tablets), operating systems (iOS and Android), and different OS versions (older and newer).
Ensure layouts, interactions, and visual elements appear correctly in both portrait and landscape orientations.
2. Create a Test Checklist
Approach testing systematically with a clear checklist:
Confirm each screen loads without crashing.
Verify all buttons, forms, and links function correctly.
Test edge cases: long inputs, special characters, empty required fields.
Test data handling: scenarios with no data, typical data, and extensive data.
Check offline behavior: ensure your app handles no network gracefully.
Observe user experience issues: unclear labels, confusing steps.
Gather feedback from friends, colleagues, or potential users to identify usability issues you might have overlooked.
3. Beta Testing
Consider structured beta testing before the full launch:
iOS (TestFlight): Apple’s platform allows up to 10,000 beta testers. You’ll need to upload a beta build for testers who provide feedback.
Android (Google Play): Offers closed testing tracks or open beta via Google Play Developer Console. Easy to manage testers through email invitations or public links.
Encourage beta testers to report bugs or suggestions clearly through forms, emails, or in-app feedback mechanisms. Limit beta groups to 20–50 users initially for manageable, actionable feedback, and fix critical issues identified during this phase before your official launch.
Launch & Distribution
Once your app is working, and thoroughly tested for bugs and usability issues, it’s ready to launch.
This phase is about preparing your app for release, submitting it to the app stores (for native apps), and optimizing your app listing so that users can discover and download it.
Here’s what to account for:
1. Developer Accounts Setup
Apple (iOS): Enroll in the Apple Developer Program ($99/year). Approval usually takes a few days.
Google Play (Android): Create a Google Play Developer account (one-time $25 fee).
2. Prepare App Store Assets (ASO)
App Name: Clear, descriptive, unique (Apple ~30 chars, Google Play ~50 chars).
Icon: Simple, recognizable (required sizes, e.g., Apple 1024×1024 px).
Screenshots/Videos: High-quality, highlighting key features. Apple requires at least 4 screenshots per device type; Google requires 2 minimum. Optional short app preview videos recommended.
Description: Engaging, clearly describes core functionality. Include keywords naturally (Google) or separately (Apple).
Category & Tags: Choose relevant category; Google allows additional tags.
Privacy & Compliance: Complete content rating questionnaires; provide a privacy policy URL.
3. App Store Submission
Apple: Submit via App Store Connect, review typically takes 1–3 days. Address any feedback or rejection promptly.
Google Play: Upload via Google Play Console, usually approved within 24 hours.
4. App Store Optimization & Marketing Prep
Choose keyword-rich titles and compelling descriptions.
Utilize short and promotional texts effectively.
Consider localization for international audiences.
Path 2: How to Make a Mobile App (When You Already Have a Website)
This path is for those with established websites – such as ecommerce stores, news sites, online communities, marketplaces, or SaaS applications – build a complementary mobile app for their website.
Instead of starting from scratch, you’ll leverage your current website’s content, user base, and functionality.
By taking a web to app approach, you’ll save a lot of time and cost on the initial build, as well as cutting ongoing costs and complexity.
Assessment Phase: Audit Your Website and Define the App’s Purpose
Before diving into any app-building for your website, step back and evaluate what your mobile app should achieve and how it will integrate with your existing web ecosystem.
Audit Your Website’s Content and Features
Make a list of all the key features and sections of your website:
What content do you provide? (e.g., blog articles, product listings, user profiles, forums, etc.)
What user interactions exist? (e.g., user login, commenting, purchasing, posting content, etc.)
What integrations or systems does your website use? (e.g., payment gateways, maps, analytics, advertising networks, etc.)
This audit helps you identify which parts of the site need to be present or work in the app.
For instance, if you run a news site with an email newsletter signup form and a comments section, you’ll note those as elements to consider in the app (how will users sign up for newsletter in-app? Will commenting be possible in-app?).
Push Notifications: Direct communication to boost engagement
Offline Access: Content caching for offline usability
Device Features: Camera, GPS, biometrics
Brand Loyalty: Enhances credibility, repeated user engagement
Clearly state your app’s primary user benefit, e.g.:
“Our app simplifies product browsing and purchasing with faster checkout and push notifications for new arrivals.”
Identify Integration and Sync Needs
Determine how the app will synchronize with your website:
User Accounts: Ensure users log in with existing credentials and access synchronized data (order history, saved items).
Content Management: New website content must seamlessly appear in the app via APIs or webviews.
Transactions and Updates: Decide which user actions (comments, purchases, form submissions) the app will support.
Third-Party Systems: Identify complex integrations (e.g., payment gateways like Stripe, forum tools like Disqus) and plan appropriate solutions (native SDKs, webviews).
Assess Your Mobile Web Analytics
Check the mobile usage stats on your website.
Are a lot of your users already coming from mobile browsers? How is their engagement compared to desktop users?
If mobile web users have lower conversion or engagement, an app could aim to improve that (for example, maybe mobile web cart abandonment is high on your store – an app with saved login and Apple Pay/Google Pay could improve mobile checkout rates, and abandoned cart push notifications can recover revenue from those who slip through).
Also, see which pages or features mobile users access most – those should be front-and-center in the app.
Prioritize App Features
Not all website features are necessary in an app. Focus on essential mobile user tasks:
News apps: Articles, search, bookmarks (omit less critical pages like careers).
Community forums: Threads, messaging (skip complex admin settings).
Prioritize clearly to deliver a focused, streamlined mobile experience.
—
By the end of the assessment phase, you should have:
A clear statement of what your app will offer and why it’s beneficial to users (compared to or in addition to your mobile website).
A list of website features/data that need to be integrated into the app.
An understanding of the technical landscape (user accounts, content sync, etc.) you’ll need to support.
This groundwork ensures that when you move to the next steps, you won’t inadvertently leave out something critical or build something misaligned with your site’s value.
You’re ensuring the app is an extension of your existing business/site and not a completely separate silo.
Strategic Options: PWA, Hybrid, or Native Wrapper?
When turning a website into a mobile app, choose among three main strategies: Progressive Web Apps (PWA), Hybrid/Webview Wrapper apps, or Native apps integrated with your site’s backend.
Your decision should consider goals, budget, and user experience.
Option A: Progressive Web App (PWA)
A PWA enhances your website with app-like features accessed through browsers. Users install it via “Add to Home Screen,” enabling offline use and push notifications. Crucially, however, a PWA is not a “real” mobile app – just a cheaper and faster alternative.
Pros:
Single, unified website codebase.
Cross-platform compatibility (browsers on iOS, Android, desktop).
Instant updates without app store delays.
Cost-effective, no app store fees or separate maintenance.
Discoverable via web searches.
Cons:
Limited presence and trust compared to app stores.
Restricted access to certain native features (e.g., advanced sensors, Bluetooth).
Performance can lag for intensive apps.
Some iOS limitations persist despite improvements (push notifications require manual home screen addition).
Best for: Quick, cost-effective improvements to mobile experience, particularly for content-heavy sites needing broad accessibility.
Option B: Hybrid Apps / Webview Wrappers
Hybrid apps place your existing website inside a native app shell, combining web technologies with native components like navigation and push notifications.
This is a real mobile app. Users can download it from the app stores, it can send push notifications, and modern web to app tools like Vendrux let you create a mobile app that’s virtually indistinguishable from a custom native app.
Pros:
Quick deployment and minimal UI redevelopment.
Full reuse of existing web content and plugins.
Native app store presence (App Store, Google Play Store).
Access to native features (push notifications, camera).
Lower ongoing maintenance costs (updates reflected instantly from website).
Cons:
Dependent on website performance.
App Store guidelines may require additional native enhancements.
UI/UX may need adjustments for optimal mobile experience.
Occasional platform updates and maintenance of app binaries.
Best for: Businesses with a mobile web experience that already works well, wanting to make a mobile app for their store, without extensive redevelopment or large ongoing expense.
Option C: Native App with API Integration
This option is basically Path 1 (building an app from scratch) but using your existing website’s backend/database.
Instead of showing web content in a webview, you recreate the UI natively for iOS and/or Android and pull data from your website via APIs. You might use your website platform’s API (e.g. Shopify’s storefront API), or build custom API endpoints.
Pros:
Optimal performance and native user experience.
Flexible design tailored specifically for mobile interactions.
Continuous effort required for feature parity with your website.
Extensive API and backend integration work.
Slowest to market compared to PWA and Hybrid.
Best for: Businesses aiming for the highest-quality user experience and distinct differentiation, with adequate resources for long-term maintenance and development.
Vendrux’s comprehensive, streamlined solution is the best mix of speed, affordability, and robust app functionality without extensive overhead.
If your website already runs well and looks good on mobile, Vendrux can get you an end result on the same level as fully native development, for less than 5% of the time and cost.
Why Vendrux?
Vendrux efficiently converts your website into high-quality native apps (iOS and Android) using your existing content and tech stack.
It leverages your current website for the app, allowing seamless continuity between your site and the app.
A perfect example of the website to app conversion process with Vendrux
With Vendrux, you get:
Rapid Deployment: Apps are typically launched within weeks, significantly faster than custom native development.
Cost Efficiency: Substantially lower costs compared to fully custom app builds, often saving hundreds of thousands in development expenses.
Minimal Overhead: No separate app management required; content updates on your website are instantly reflected in the app.
Complete Feature Integration: Full utilization of your site’s existing features, plugins, and technology stack without additional integration work or API limitations.
Expert Support: Vendrux manages complex tasks, including native feature integration (like push notifications), app customization, and app store submissions, greatly reducing the risk of rejection and ensuring a smooth approval process.
Ideal Use Cases for Vendrux:
Content-rich sites (blogs, news, magazines)
Ecommerce stores (Shopify, WooCommerce, BigCommerce, as well as sites on any other platform – including custom ecommerce sites)
Online marketplaces
Mobile-friendly SaaS apps
Online communities and forums
Vendrux provides the optimal balance of speed, cost-effectiveness, and quality, making it the ideal solution for businesses aiming to rapidly establish a professional and feature-rich mobile app presence without the heavy investment and complexity of fully custom development.
Ready to see what your website will look like as an app? Get a free preview now – all you need is your website’s URL.
Implementation Guide: From CMS to Mobile App
Here’s a simplified guide for implementing your mobile app strategy, focusing on common platforms and synchronization between your website and app.
1. Implementing a Progressive Web App (PWA)
Essential Steps:
Enable HTTPS: Ensure your site uses HTTPS as it’s mandatory for PWAs.
Web App Manifest: Add a manifest.json file defining your app’s name, icons, colors, and launch settings. Plugins (e.g., Super Progressive Web Apps for WordPress) simplify this.
Service Worker: Implement JavaScript for caching assets to enable offline usage. Use plugins (WordPress) or libraries like Workbox for easy setup.
Testing: Use Chrome DevTools to verify your manifest, service worker, and offline functionality. Test adding to homescreen manually on Android (Chrome) and iOS (Safari).
Push Notifications: Integrate a push service (e.g., OneSignal) for web push notifications. Setup is straightforward on Android but more complex on iOS.
Promoting Your PWA: Encourage installation via banners or prompts for mobile visitors, improving user retention and engagement.
2. Creating a Hybrid/App (Website-to-App) with Vendrux:
If you go this route, almost all of the implementation steps are done by the Vendrux team.
Here’s a streamlined overview of what’s involved:
Set up and configure mobile app:
Add custom mobile navigation UI.
Customize app (if applicable) by selecting specific pages for inclusion.
Brand your app (loading screen, header colors, etc.).
Integrate push notifications.
Adjust external link handling (e.g., open external links in an in-app browser).
Working with the Vendrux Team
Collaborate closely on requirements and app customization.
Provide necessary app store credentials or invite their team as users on App Store Connect.
Review and test app previews provided by the Vendrux team on your own mobile device.
DIY Approach (Optional)
It’s possible to do a hybrid/webview approach without a service provider, using your own in-house devs (or hired freelancers).
If implementing yourself (e.g., with a tool like Cordova/Capacitor):
Set up Cordova with appropriate plugins (webview, push notifications).
Inject custom CSS to hide redundant website elements in-app.
Include expected mobile app behaviors (e.g., pull-to-refresh).
Prepare for technical complexity and maintenance overhead.
Testing & Publishing
Test thoroughly:
Check login persistence, navigation flow, and overall UX.
Include demo credentials if login is required for review.
Ensure a privacy policy URL is provided.
Clearly explain push notification permissions to users for better opt-in rates.
3. Building a Native App
If you’re building a fully native app integrated with your website, the process is similar to what we laid out earlier in the first section.
The main thing you need to consider (other than the framework of the app itself) is how user accounts and data from your website are synced and authorized across platforms.
A few things to understand:
Native apps typically require API-based authentication (OAuth, JWT).
Webview apps maintain login sessions within the app context but do not share cookies with mobile browsers.
Social logins (Google/Facebook) offer convenient cross-platform login.
You’ll need an API to connect website and app. APIs enable secure operations such as retrieving content, user-specific data, and ecommerce transactions. A stable and secure API is crucial to ensure a seamless user experience for both web and app users.
Some web platforms (e.g. Shopify, WordPress) have their own APIs already set up that you can tap into; otherwise, your development team will need to build custom endpoints.
You’ll also want to set up a system to sync content across web and mobile app (so one platform isn’t constantly lagging behind the other).
You could implement real-time updates through AJAX, periodic refreshes, or WebSocket connections for dynamic content.
Beta Testing & Soft Launch
Before launching, thoroughly test your app internally via TestFlight (iOS) or Google closed testing (Android).
Verify essential features such as login, transactions, and push notifications. Check edge cases, especially simultaneous web and app actions, ensuring smooth server-side synchronization.
Rolling Out and Cross-Promotion
Here are a few tips for once you start to onboard users:
Website Promotion:
Use smart banners (iOS meta tag, Android equivalents) to promote app installations.
Email existing users highlighting app benefits and provide incentives (e.g., discounts).
Cross-Platform Linking:
Include deep links to specific website pages from the app if necessary for advanced functionalities.
Syncing User Accounts
If you’ve already got users set up on your website, it’s vital to ensure seamless synchronization for users active on both platforms.
Examples include logins on an ecommerce site, or an account on a forum or social media site.
Here are some technical tips for managing this:
Server-side management typically ensures consistent states across web and app.
Confirm synchronization of user interactions (e.g., message status, profile updates).
If using offline modes, implement robust synchronization mechanisms to prevent data discrepancies. Webview wrappers naturally handle live synchronization, minimizing this concern.
Performance Monitoring
Regularly track and optimize app performance:
Monitor app store crash logs and promptly address any issues.
Keep an eye on web performance, as it directly impacts app responsiveness.
Analyze app-specific user behaviors and interactions through analytics tools to guide optimizations.
Summary: Converting a Website to an App
Creating an app for your website is largely about integrating, not reinventing.
Use the ecosystem you already have (CMS, database, etc.) and connect it to mobile delivery channels (either via a direct wrapper or via APIs for a native app). There will be some configuration and adjustments to optimize the experience, but you won’t be duplicating your core business logic, which is the biggest win.
This approach drastically reduces development and maintenance overhead compared to building separate systems.
With a companion app in place, you’ll manage your content, products, and users mostly as you always have on your website/CMS. The app becomes another presentation layer, one that can improve engagement and convenience for your mobile audience.
Business Considerations
A mobile app is not just a technical project. It’s a business.
Here’s how to think about the business side of your app.
Cost Analysis and Budgeting for Your Mobile App
Creating and running a mobile app involves various costs. It’s crucial to budget properly so you’re not caught off-guard by expenses.
Let’s break down potential costs and how to manage them:
1. Upfront Development Costs:
This is the money spent to actually build the app (or configure it, in the case of no-code). It can vary wildly:
No-Code/DIY Platforms
These might range from free (for very limited versions) to maybe $30-$100 per month for a decent plan.
Some no-code tools also have one-time fees or addon costs for certain features. For instance, a platform might charge $50/month for the app builder itself, plus $20 extra if you need more database rows, etc.
Overall, no-code is the most budget-friendly upfront. You might spend a few hundred dollars and your own time – but the key factor to consider is the value of your (or your team’s) time.
Often, “saving” money with a DIY platform might actually be costing you more, because of the extra time spent compiling and managing your mobile app.
Service-Based App Builders (like Vendrux)
App builders with a service-based approach use a subscription model as well, typically a little higher than a DIY platform (which make sense because of the extra value you get from the service element).
Vendrux’s pricing starts at $1,499 per month, with a one-time setup fee starting at $5,000.
It’s more expensive than a basic no-code tool; but that reflects the hands-on service you get (which also means much less staff hours spent on your app).
Compared to custom dev, it’s significantly more affordable.
Custom Development Cost (Freelancers or Agencies)
A simple app, custom-built, could be $5k-$15k, mid complexity $30k-$50k, and complex ones $100k+. Agencies might charge more (because they provide full service including project management, QA, etc.).
An average range for a business-oriented app is $20k-$100k, so it’s a serious investment. However, you get a tailored product.
For most small businesses with limited budgets, this is often too high unless the app is absolutely central to their revenue.
Certain features may add cost. E.g., adding a payment system might incur extra dev hours or require paying for a payments SDK, implementing augmented reality or custom animations might bump cost.
Always ask for cost breakdowns by feature to decide what’s essential.
2. Ongoing Maintenance Costs:
Apps aren’t a one-and-done expense.
Plan for continuous costs such as:
Hosting and Server Costs: If your app’s usage grows, you might need to upgrade your website/server hosting to handle increased traffic from app users. Basic hosting might be $20/mo, but a high-traffic app could push you to $100+/mo plans or even dedicated servers (if you have tens of thousands of users).
No-Code/Service Subscription: If you used a platform or service, the subscription is ongoing. Ensure you factor the annual cost. E.g., $50/mo is $600/year. Over 3 years, $1,800. It can still be far less than paying a dev team, but it’s recurring.
Developer Retainer or Updates: If you hired out development, you should budget about 15-25% of the initial cost per year for updates and maintenance. For example, if development cost $50k, plan $7.5k–$12.5k per year on maintenance. This would cover tasks like OS updates, small feature tweaks, server maintenance, and bug fixes. Some years you may spend less, but one major OS update can require a few weeks of developer work.
App Store Fees: Apple has that $99/year account fee. Google’s $25 is one-time. These are necessary costs, but negligible in the overall scope of your project. If you plan to use any paid app store promotions or ads, that’s extra (optional).
Third-party Services: Do you use any paid APIs or SDKs? For instance, maybe you integrate a maps API that charges after X free usage, or a push notification service that costs money at scale, or an analytics tool with a premium plan. Many have free tiers for small usage, but keep an eye as you grow.
Marketing: This isn’t maintenance of the app itself, but maintaining an app audience often requires marketing spend (Facebook ads, etc.). We’ll count that separately in ROI, but don’t forget it in overall app budget if needed.
Unexpected fixes: Bug fixes are part of maintenance, but note that a bug discovered post-launch might require immediate attention. If you don’t have an internal dev, you may need to hire one ad-hoc. It’s good to have a contingency fund (maybe 10% of project cost) set aside for emergency fixes or quick improvements based on user feedback.
3. Hidden and Indirect Costs:
Some costs aren’t obvious line items, but you should consider them:
Your Time: If you as the owner are spending time testing, inputting content, handling app-specific customer support, that is a resource cost. It might replace some website tasks, but initially it might be additional work. If you have staff, maybe someone will have a partial role as “app community manager” or such.
Opportunity Cost: Money spent on app dev is money not spent elsewhere in your business. But conversely, an app can open new revenue streams. Weigh the potential return (more on ROI next).
User Acquisition Cost (CAC): If you choose to do paid campaigns to get app users, that’s a cost per user. For example, if an install via advertising costs $2 and those users do X in sales, is it worth it? Keep an eye on this once you do marketing.
App Store Commission: If you sell digital goods or subscriptions through the app and use Apple/Google in-app purchases, they take ~15-30%. For physical goods or services, they don’t take a cut, but consider that if your monetization is subscription-based (like a premium content subscription via iOS app, Apple will take their share). This is not a direct cost you pay out of pocket, but it’s revenue you don’t get to keep. Factor it into pricing. (E.g., maybe price to account for that if needed, or direct users to pay on web if allowed – careful with Apple’s rules on that).
4. Budgeting Tools & Techniques:
With any software project (particularly one as complex as a mobile app), costs can easily spiral if you’re not careful.
Here are some tips to help keep the cost of your app under control:
Create a simple spreadsheet listing all expected costs: one-time (dev, setup fees) and recurring (monthly subs, yearly fees). This will give you a yearly budget view.
Incorporate optimistic and pessimistic scenarios. E.g., if usage doubles, server costs might double – include that scenario to see if you’d still be profitable.
Track expenses as you go. It’s easy to forget a service you signed up for – keep a list of all subscriptions related to the app.
Use ROI framework (next section) to justify costs: for instance, if maintaining the app costs $5k/year, what amount of revenue or savings will make it worthwhile? Set targets (like “We need at least 500 more orders via the app per year to cover costs”).
Consider phased investment: You don’t have to implement everything at once. If budget is tight, launch with core features, and add less critical ones in a later update when perhaps the app is already bringing some income. This iterative approach prevents over-investing upfront. (Basically an agile approach to budgeting – spend a bit, validate, then decide next spend).
Look for cost-saving opportunities: e.g., use open-source libraries instead of paid components, negotiate with freelancers for a fixed package, use community-driven support resources for troubleshooting to avoid hiring for every small issue, etc. Also, if you do web and app together, sometimes you can kill two birds with one stone (e.g., redesign the website and app with the same new style in one project, possibly cheaper than separate efforts).
How to Track ROI From Your Mobile App
An app is an investment. Over time, you want a return either via direct revenue or indirect benefits.
To measure ROI, use the basic ROI formula: ROI (%) = (Net Profit from App (Gain – Cost)) / Cost × 100.
For example, if you spend $10,000 on the app in a year and it brings $15,000 of profit (maybe via sales or cost savings), that’s (15k-10k)/10k = 0.5, i.e., 50% ROI – meaning you got 1.5x return.
You want a positive ROI within a reasonable time frame (commonly, businesses look for ROI within 1-3 years on tech investments).
To get the clearest idea of the ROI of your app, you need to quantify your gains.
Gains can be:
Revenue Gains: more sales, new customers, higher conversion rates, the ability to sell ads or premium features on the app.
Customer Lifetime Value increase: If the app increases how often customers purchase or engage, they might stay customers longer or spend more (thus increasing LTV).
Cost Savings: Maybe the app reduces support costs (customers can self-serve easier than calling support). Or if it improves efficiency (e.g., if it’s an internal app, it might cut labor hours; not our focus here as we avoided internal tools).
Intangible or Strategic ROI: some ROI is harder to put numbers on immediately—like improved brand loyalty, better data collection on user behavior, or staying competitive because your competitors have apps (which might protect future revenue). You can acknowledge these, but focus on what you can measure for actual ROI calculation.
After launch, track key financial metrics:
Sales via app vs web.
Number of new customers acquired through app marketing vs other channels.
Engagement metrics that correlate to revenue (like if a user uses the app 3x a week, how much do they spend vs a web-only user? For instance, Starbucks found that app users transacted more frequently).
If your app has monetization (ads, subscription), track that revenue separately.
Many companies consider an app a success not just in raw dollars but in strategic positioning (like staying relevant to mobile-first consumers). So, consider ROI not purely short-term profit but also long-term customer retention and growth.
One of the key benefits of Vendrux is that we don’t just hand you an app and let you run with it. We actively help you get a positive ROI from your app, with guidance on acquisition and engagement strategy. To learn more about our process, and how we can help you launch the perfect mobile app, get a free consultation now.
Timeline Considerations (How Long Does it Take to Create a Mobile App?)
Understanding how long it takes to build your mobile app is critical for effective planning, budgeting, and aligning expectations.
Here’s a concise overview of typical timelines for different development approaches:
Testing & Feedback: 1-2 weeks (internal testing, resolving initial issues, and refining user experience).
App Store Submission: Approximately 1 week (including app store review process – Google Play: 1-2 days; Apple App Store: 1-3 days, potentially longer if revisions are needed).
Total Timeframe:4-6 weeks from initiation to app store launch, assuming content and assets are ready.
Key insight: many no-code app builders claim to allow you to build an app in minutes. While technically this may be true, if you’re building a serious app, aimed at driving serious business results, it will likely take a lot longer to compile and publish an app you’re happy with (especially if they provide minimal support).
Launch & Approval: 1-2 weeks (final refinements, store submission, and approval processes).
Total Timeframe: Approximately 6-9 months for a fully custom native solution, longer if complexity increases.
Key insight: Cross-platform apps may take less time to launch; but will not cut development time in half, as some believe.
Recommendations for Timeline Management
Here are some tips to limit timeline creep, and get your app onto users’ mobile devices in less time.
Clearly define your app’s core functionality (MVP) to avoid feature creep and delays.
Allow buffer time in your schedule for unexpected issues or app store revisions.
Consider a phased rollout: quickly launch core features initially, then add enhancements based on user feedback.
Maintain consistent communication with your development team or service provider to minimize misunderstandings and streamline progress.
By setting realistic timeline expectations aligned with your chosen development path, you ensure smoother project execution and better strategic alignment with your business objectives.
Conclusion: Bringing Your Mobile App to Life
Creating a mobile app may seem daunting at first, but with the right approach, it’s absolutely achievable for non-technical entrepreneurs and small business owners.
Whether you choose to build a mobile app from scratch, or build on your existing website, today’s tools and services make app development more accessible than ever.
If your business already has a website, there’s no need for extra cost and complexity rebuilding what you already have.
Vendrux is the fastest and most effective way to launch mobile apps for iOS & Android.
Instead of rebuilding your site or managing a second platform, Vendrux takes your existing website and turns it into a powerful, fully branded mobile app.
You’ll get all the benefits of having a mobile app (home screen presence, App Store visibility, and push notifications) without the cost, complexity, or duplication of effort that come with custom mobile app development or DIY app builders.
What sets Vendrux apart:
Fully managed, done-for-you service: We handle the entire process, from setup and customization to app store approval and post-launch growth.
No need to rebuild your site: Your current tech stack, features, and plugins all carry over into the app.
Launch in under 30 days: Our proven process gets you live fast, with expert QA and store submission support included.
Proven ROI: Customers see results like 3x more visits per user, 15% higher average order value, and 7x higher customer lifetime value.
Strategic support that drives results: We go beyond launch with ongoing push notification management, analytics consulting, and marketing support to ensure your app delivers real business outcomes.
Trusted by leading brands like Jack & Jones, buybuy BABY, John Varvatos, and many more, Vendrux is the partner of choice for businesses that want an app that works – and delivers real business results (without the operational overhead).
Want to see what your app could look like?
Request a free preview and we’ll show you exactly how your site would work as a mobile app – no strings attached.
Building a mobile app for both iOS and Android used to mean building two completely separate apps, with two codebases, two development teams, and roughly double the cost.
Cross-platform development changed that. It lets you build one app that works on both operating systems, whether that means writing shared code in a framework like Flutter or React Native, or using other app development tools that take a similar approach.
This guide covers all the basic strokes you need to know about building cross-platform mobile apps, along with the business case for going cross-platform, and alternatives to traditional cross-platform frameworks that could save you hundreds of thousands of dollars and six months of dev work.
What Is Cross-Platform App Development?
Cross-platform app development can be broadly defined as any approach that lets you create a single app (or a single codebase) that runs on both iOS and Android. Instead of writing one app in Swift for iPhone and a separate app in Kotlin for Android, you write once and deploy to both.
Of course, this is not a scientific definition. The term covers a wide range of development approaches and frameworks. The most common cross-platform approaches are frameworks like React Native and Flutter, which let developers write shared code that compiles to native components.
Outside of these frameworks, cross-platform can also include hybrid frameworks like Ionic, which combine web technologies (HTML, CSS, JavaScript) with native mobile APIs, as well as no-code tools and services like Vendrux, which convert websites into native apps for Android and iOS.
The broad idea: building once, shipping on multiple platforms.
Cross-Platform vs Native
Before cross-platform frameworks existed, building a mobile app meant going fully native. Native development is when you build an app specifically for one operating system, in the language and framework designed for that OS.
On iOS, that means Swift or Objective-C, Xcode, and Apple’s UIKit or SwiftUI frameworks.
On Android, it means Kotlin or Java, Android Studio, and Jetpack Compose.
A simple way to understand the difference between cross-platform and native app development
The advantage of native is that you’re building in the OS’s native language, using its own UI toolkit, with direct access to every hardware feature the device offers. This means performance is as good as it gets. Animations are buttery, transitions feel right, and anything the phone can do, your app can do too.
The downside: you’re building (and maintaining) two totally separate apps. Two codebases, two skill sets, two bug lists, two release cycles. That means more cost, more code to maintain.
Cross-platform development is the response to that problem. Rather than maintaining two parallel apps, you write shared code (or share an underlying web layer, or use a builder) and deploy to both platforms.
You give up some of the raw performance and hardware flexibility of native, but in exchange you cut development costs, speed up timelines, and get a single team that can ship to both app stores.
Native
Cross-Platform
Codebase
Separate per platform
Shared (one codebase)
Dev cost
$150K-$500K+
$50K-$250K
Time to launch
6-12+ months
3-6 months
Performance
Best possible
Near-native (good enough for most apps)
Hardware access
Full (Bluetooth, AR, sensors)
Most features; some gaps
Maintenance
Two teams, two update cycles
One team, one update cycle
Best for
Complex hardware, games, AR
Business, ecommerce, content, SaaS
For most modern apps, cross-platform is just a better way to build. The trade-offs in performance are usually barely noticeable, if at all. The advantages in terms of speed, agility, and maintainability are very real, though.
4 Different Ways to Build Cross-Platform Mobile Apps
Most of the time, when the term “cross-platform” is invoked, it’s referring to React Native/Flutter (or similar frameworks, like Kotlin Multiplatform).
However, using the broader definition of cross-platform, there are actually many different ways to build a cross-platform app, with stark differences in functionality, difficulty and cost.
Let’s run through the different types of cross-platform development now.
Cross-platform frameworks
The most common route to a cross-platform app is through a framework designed specifically for it.
The most widely used are:
Flutter, built and maintained by Google, which uses the Dart language and renders every pixel of the app through its own graphics engine (this is why apps built with Flutter tend to look pixel-identical across iOS and Android).
React Native, Meta’s framework, which takes a different approach: developers write in JavaScript or TypeScript, and the framework bridges to the real native UI components on each platform.
Kotlin Multiplatform, backed by JetBrains. This sits somewhere in between, letting you share business logic across iOS and Android while writing the UI natively in each platform’s preferred stack.
These frameworks power apps at Discord, Shopify, BMW, Alibaba, and plenty of other well-known brands. They give you close-to-native performance, a single codebase, and the full flexibility of custom code.
The trade-offs are that you still need experienced developers, timelines typically run three to nine months, and anything touching deep native features (Bluetooth, advanced camera APIs, background processing) often requires writing platform-specific code on top of the shared layer.
Hybrid frameworks
Hybrid frameworks take a different route. Instead of compiling to native UI or rendering through a custom engine, they use web technologies (HTML, CSS, JavaScript) packaged as a native app, with a bridge that lets the web code call native device APIs.
Ionic is the best-known name in this space, typically paired with Capacitor (or the older Cordova) to handle the native bridge.
Cordova, PhoneGap, and NativeScript all sit in adjacent territory.
The appeal of hybrid development is efficiency for web-first teams. If your developers already work in React, Angular, or Vue, they can apply those skills directly to mobile without learning Swift, Kotlin, or Dart. Apps ship fast, and the web stack you already know keeps working.
The trade-off is that hybrid apps tend to feel more “web-like” than their framework-based counterparts, which is fine for content, dashboards, and internal tools, but can be noticeable in high-polish consumer apps where every interaction matters.
No-code and low-code builders are the fastest way to get something onto an iPhone without a development team.
Platforms like Adalo, FlutterFlow, Glide, Bubble, and Thunkable let you build an app by dragging and dropping components, wiring up data sources, and configuring logic visually.
FlutterFlow generates real Flutter code you can export, which softens the lock-in; most of the others don’t.
These tools shine for prototypes, internal tools, MVPs, and simple utility apps. They’re useful when you need to validate an idea before committing to a full build.
The ceiling, though, is real: customization options run out eventually, subscription fees climb as you scale users, and moving to a different platform usually means starting over.
No everyone would consider these in the same bucket as cross-platform app frameworks; but
Website-to-app conversion services (Vendrux)
Another cross-platform development approach is a managed website to app service like ours – Vendrux.
This is something that sits somewhere in between low-code/no-code tools and hybrid frameworks. Vendrux is made to convert existing websites into Android and iOS apps – particularly custom and bespoke ecommerce sites, built on platforms like Shopify Plus, BigCommerce, Magento and Salesforce Commerce Cloud.
You manage virtually everything about the user experience via your website, and the app reflects what’s on your site – same features, content, design, etc, with a native layer on top.
It’s a very different approach to building a cross-platform app with React Native, or even building in a no-code app builder. Yet the end goal is the same – essentially one codebase, shipping to multiple platforms (web, Android, iOS).
What’s the Right Approach for Your App?
The right approach depends on what you’re building. There’s a huge difference in the requirements between a note-taking app, a shopping app, and a gaming app, for example.
It also depends on other factors, such as how much you’re willing to invest in your app, and what kind of resources you have (such as technical talent in-house).
Here’s a rough idea of what kind of development approaches are best for different types of apps.
Ecommerce brands are usually best served by Vendrux’s website-to-app conversion approach. Your website already does the majority of what a mobile app needs to do. Vendrux gets you from website to app far quicker and significantly more affordably than rebuilding everything in React Native or Flutter, and the end result is more or less the same (with much less work required to maintain it).
Custom consumer apps that don’t have a web counterpart (think social apps, fintech tools, travel apps, new categories of product) are the natural home of Flutter and React Native. You’re building something from scratch, the UX is central to the product, and you need full control over every screen. The three-to-nine-month timeline is worth the investment because the app is the product.
SaaS and B2B dashboards that already exist as web apps can go either way. If your web app is responsive and mobile-friendly, Vendrux is a straightforward way to get it into the app stores and unlock native features like push notifications. If mobile is a top-priority channel and you want a differentiated mobile UX, a framework build makes sense.
Games, AR experiences, and hardware-heavy apps typically need to go native. Cross-platform frameworks have improved dramatically, but graphics-intensive games and apps that rely on Bluetooth, complex sensors, or real-time video processing still benefit from direct access to each platform’s native APIs.
Internal tools, event apps, and MVPs are a good fit for no-code builders. If the app is meant to be used by a small audience, doesn’t need to scale, and has to be live next week, platforms like Adalo or FlutterFlow get you there faster than any other approach.
Web-first dev teams building a simple public-facing app can get good mileage out of Ionic. If your team is experienced in React or Angular and the app doesn’t need polished native animations, hybrid development avoids the cost of hiring specialist mobile engineers.
How to Build a Cross-Platform App
Once you’ve settled on an approach, the actual process of getting an app live follows a fairly consistent arc. Here’s what to expect.
Scoping the app
The first phase is about getting clarity on what the app actually does. Who uses it, what screens it has, what features matter on day one, and what can wait for v2. A short feature list and rough wireframes are enough to start. The biggest mistakes at this stage are scope creep (shipping “everything” instead of a focused v1) and skipping wireframes (jumping to development without a clear picture of the user journey).
(If you’re going the Vendrux route, scoping is mostly about settling on what small tweaks you need to make to the app’s UX, compared to your website. The core functionality is already built, and already works – on your website).
Design and user experience
Design covers both visual design (how it looks) and UX (how it feels to use). For cross-platform apps, this also means deciding how platform-specific you want to be. iOS users expect a bottom tab bar, swipe-back gestures, and Apple’s visual conventions. Android users expect different patterns. Flutter lets you render identical UIs across platforms, which some teams prefer for brand consistency. React Native uses each platform’s native components, which gives each OS its natural feel.
Expect anywhere from two to six weeks of design work for a custom framework build, plus time for stakeholder feedback and revisions.
Development
This is the longest phase and the one where cost and timeline diverge most dramatically across approaches.
A framework build (Flutter, React Native) typically runs three to nine months with a small team.
A hybrid Ionic build is usually faster, but still may take a number of months.
A no-code app can be built in days.
Vendrux launches in roughly 30 days end-to-end, including design, build, and app store submission.
During development, you’ll want to see builds regularly, not just at the end. Most teams run on two-week sprints with demos at the end of each, so you can catch misunderstandings early and steer the product as it comes together.
Testing and QA
Cross-platform apps need to be tested on real devices, not just simulators. Android fragmentation is the biggest pitfall: your app might run perfectly on a Pixel 8 and crash on a three-year-old Samsung. Plan for testing on a range of devices, screen sizes, and OS versions, and budget time for fixing platform-specific bugs that only show up once you’re on actual hardware.
This is also the phase where you catch performance problems. Cross-platform frameworks are fast, but janky animations, slow list scrolling, and laggy transitions are common if the app isn’t optimized. Good QA finds these before users do.
App store submission
Both the Apple App Store and Google Play have review processes your app needs to clear. Apple is stricter: reviews typically take one to three days, and rejections are common for first-time submissions. Common reasons include incomplete metadata, broken login flows, missing privacy policies, misleading descriptions, and using non-standard payment flows in categories where Apple requires in-app purchases. Google Play is generally faster and more lenient, though its policy changes (especially around data privacy) have gotten stricter over the past few years.
If you’re working with Vendrux, submission is handled for you, including navigating rejection feedback and re-submitting.
Launch and ongoing maintenance
Shipping the app is the start, not the finish. Every year, both Apple and Google release new OS versions that can affect how your app behaves. Libraries you depend on get updates. Bugs surface from users. Features get added. Plan for ongoing development after launch: at a minimum, you’ll want to ship regular updates for OS compatibility, bug fixes, and performance improvements. At a maximum, your app becomes a living product you keep expanding on indefinitely.
One of the underrated benefits of cross-platform is that maintenance is simpler. Instead of updating two separate codebases, one team ships one update to both stores.
Turning Your Site into iOS and Android Apps with Vendrux
For any brand that already has a working, successful, mobile-friendly website, there’s a strong argument that the traditional cross-platform framework route (React Native, Flutter) is the wrong place to start.
Those frameworks are designed for teams building a new app from scratch. If you’re a business on Shopify, BigCommerce, Magento, or with a custom web stack, then it’s a backwards step to go and rebuild all of this in a new language.
Vendrux turns your existing website into native iOS and Android apps. Not a simplified version of your site. Not a cut-down mobile experience. Your full website, with all its features, design, integrations, user accounts, and checkout, packaged as real native apps in the App Store and Google Play.
What Vendrux adds on top of your website
Native push notifications that reach customers on their lock screen with no per-message cost, unlike SMS
Deep linking so marketing campaigns and emails open directly in the app
A persistent native navigation bar for a true app experience
App store presence so customers find you when they search the App Store or Google Play
A home screen icon that puts your brand next to Amazon, Uber, and Instagram on your customers’ phones
How it compares to building with React Native or Flutter
The biggest advantage of the Vendrux approach is that you keep your existing tech stack. Every integration you’ve set up, every piece of product data, every custom flow, every theme tweak: all of it already works. You don’t lose your conversion optimization work, your loyalty integration, your reviews widget, or your custom checkout logic. They all come along for the ride.
The second big advantage is speed of iteration. When you add a new product, change a page, run a promotion, or update your theme, those changes reflect in the app right away, because the app is running your website. There’s no need to ship a new app store release for every content change.
This not only means it’s faster to build and ship new features and changes across each of your channels, but it also means the total cost of ownership is significantly less, as you’re not juggling multiple codebases, trying to keep everything in sync.
“If we had unlimited time and money, we would probably go for a custom native app, but that is half a million to a million a year to maintain.” — David Cost, VP of Ecommerce at Rainbow Shops
How the Vendrux process works
Book a free strategy call. Vendrux’s team walks you through a free app preview of your site as an app, answers your questions, and breaks down the business case for a mobile app in your specific category.
Vendrux builds the app. Their team handles everything: design, configuration, native feature setup, QA, and submission to both app stores.
Go live . Your app launches on iOS and Android. Vendrux continues to handle all ongoing maintenance, OS compatibility, and app store compliance on your behalf.
Vendrux pricing starts from $1,499/month, with a one-time setup fee, and no revenue share moving forward.
Final Thoughts
Cross-platform app development is no longer the compromise it was a decade ago. Frameworks like Flutter and React Native have closed most of the gap to native performance. Hybrid tools like Ionic let web teams ship mobile apps with the skills they already have. No-code builders make it possible to launch an app without hiring developers at all. And for brands that already run on a website, website-to-app conversion with Vendrux is usually the fastest and most practical path of all.
The right choice depends on what you’re building. If your app doesn’t exist yet in any form, pick a framework that fits your team. If your app is essentially a mobile version of something you already have on the web, extend the website you’ve already built. The worst thing you can do is spend six months and $200K rebuilding a product that already works, just to put it on an iPhone.
If you want to see what’s possible with a managed website to app approach like Vendrux’s, get in touch and get a free preview now. You’ll see you’re already much closer to a native app than you think.
In this article, we’re going to explore some conversion rate optimization techniques for luxury ecommerce brands.
Taking the chic and elegant from beautifully designed in-store spaces and recreating them online is indeed a great challenge. Maybe that’s why it took luxury brands a little longer to make the digital shift. Luxury ecommerce is not just the product. It’s the experience, the mystery, and the personal touches that complete it. For those who did make the shift, statistics show online sales will contribute to 25% of their overall sales.
But how do we grow from there? With millions of ecommerce sellers online, there are products of every price range available side by side. Consumer trends have also changed over the years. Luxury buyers are not just millennials with overflowing pockets. It’s people from diverse income segments and age groups – a large portion of whom don’t mind thrifting or getting a look-a-like product from time to time.
With all these new factors in play, how can luxury ecommerce brands catch their attention and further, get their conversion rates up?
Conversion Rate Optimization Tips for Luxury Ecommerce Brands
Here are our top seven strategies to grow your luxury ecommerce conversion rate in 2026.
1. Deliver a luxury experience
From the design, layout, colors, personnel, and of course, the price tags in-store, you know luxury when you see it. Transcending this in-store experience in all of its glory to the online world, where users can experience it from the comfort of their homes, is surely going to be tricky.
Why is this important? The experience and uniqueness you provide each customer is what makes you stand apart from phony look-alike product pages. It holds up brand reputation and encourages brand loyalty. Moreover, your website can help you deliver key brand messages to your audience without sounding forced. The complete creative freedom over text and design can give you more flexibility to showcase who you are.
Again, the same aspects play a major role. Investing in a good UI/UX design for your ecommerce website will easily be one of the best decisions for your business. Make sure the design and colors you choose for your webpage reflect your customers’ ideal experience or even more.
Ensure that your website delivers the same experience on all screens. Not just desktop, but mobile too. Optimize your website and give users a seamless action flow- no crossroads or confusion. The best way to test this out is to run focus groups and user testing.
2. Stay true to your brand
Luxury brands have strong personalities and values which their audience looks up to. It can be expressed through their layout style, imagery, or web copy.
You can think of it this way- Whenever a customer sees your store- offline or online, they should be able to recognize, relate, and say ‘Hey, I’ve seen this place before!’.
However, you choose to express it, stay consistent. Use authentic images, and stick to your brand aesthetic. Understand how your audience searches. Constantly analyze website data and understand how shoppers shop at your digital store. Don’t be afraid to A/B test and find what works best for you.
3. Create a brand identity
We live in an era where customers expect more than just products from brands. Brand value and company missions are more than just a statement. They are words to live by.
Taking up digital initiatives with an inclusive approach gets your audiences’ attention. Several such campaigns like the #TurnYourBack challenge by Dove have received tons of positive responses. Use all your marketing channels like social media, blogs, websites, and even ads to support your campaign.
Once you get the momentum going, if your audience catches on, that’s tons of user-generated content, easy discoverability, and a proud moment for your luxury brand altogether.
4. Reassess your audience
The stereotypical luxury shopper would be a 28 year old woman in her chic outfit and high heels with a lot of branded shopping bags. Here’s a surprising fact for you- More than 50% of luxury shoppers are male. Research states that by 2025, millennials and Gen Z will be responsible for 45% of luxury product sales.
An ecommerce website opens up your brand to a wider range of audience. There’s a high chance of users discovering your brand when looking for similar products or doing their due diligence.
To understand who your online audience is, analyze your website traffic. Monitor user data and their journey through your page. You can use heatmaps, recorded user sessions, and run focus groups to identify what works great and what is not so great for your website. Understanding user behavior can, in turn, help build strategies to improve your luxury ecommerce conversion rate.
Here’s one more tip. Being humans, expectations change over time and generations. In identifying your specific audience segment, you can utilize demographic studies to understand them better. This might help you get a clearer picture of what ‘luxury’ means to them.
5. Integrate technology
Technology can be a great addition to your website to stand out from the competition and offer something unique for your audience. From AR filters, holograms, machine learning, and AI to 3D visualization of products, technology has come a long way in the retail space. Integrating them into your website can provide an additional dimension and encourage users to spend more time on your webpage.
Use your tech stack to give shoppers a personalized experience. Give them something to interact with and share. Make them feel like royalty even if they’re at home in their pajamas.
6. Develop customer loyalty programs
Introduce a customer loyalty program for your in-store shoppers. This encourages them to check out your online website and stay updated with your latest launch. You could build it as a points system, referrals-based, or simply, early access to product drops, discounts, and sales.
Additional features like same-day delivery, fast shipping, or in-store pickup can be equally enticing. Did you know that 22% drop out of an online shopping session because shipping is too slow?There are many softwares to help you build your brand’s loyalty program like Xoxoday Plum, LoyaltyLion, etc.
Additionally building loyalty programs can boost your re-targeting efforts for recurring customers. Same person or not, it doesn’t really matter if it improves the conversion rate for your luxury ecommerce brand, no?
7. Create a mobile app
Finally, if you haven’t already, you should consider launching your own branded mobile app.
Selling luxury products online is all about authority. You need to signal to customers that your brand is an authority, and that they can trust your brand to deliver on the promises of quality.
One of the best authority signals you can deliver is having your own mobile app. Apps – at least as most people perceive them – take a huge amount of time, effort and money to create. So when a customer sees you have a mobile app available, they’ll think you’re the real deal.
Luckily, it doesn’t actually take that much to create your own app today. With Vendrux, you can convert your website into a mobile app and leverage the customer experience you’ve already built for the web to launch a beautiful app quickly and affordably.
Just see these example case studies – which include numerous high-revenue ecommerce brands – to learn what’s possible. As long as your website is mobile-friendly, you could be live and in the app stores in as little as two weeks.
Whether you’ve got a luxury fashion brand, jewelry, or any other high-ticket ecommerce store, an app can have a huge impact on your conversion rate, as well as your overall revenue.
In a word – yes. Launching an app for your luxury brand is a great way to build a more immersive and contained shopping experience, which has a direct impact on conversion rates.
When someone shops on your app, they have fewer distractions to contend with. No browser tabs, no other sites contending for the customer’s attention. Just a smooth user experience purpose-built for mobile.
Besides conversion rates, mobile apps are a great way to boost revenue, full stop. Ecommerce app revenue saw an 8.1% increase in the last year alone.
Having an app increases your reach, boosts retention, boosts average order value, and increases the lifetime spend of each customer.
Your brand will be visible to more potential customers by being able to enter the app stores.
A mobile app is a natural retention engine; an icon on the user’s homescreen makes it more likely that they’ll come back and shop more than once.
A smoother, more contained, distraction-free shopping experience means shoppers will spend more time on your site and will likely purchase more.
Higher retention and AOV means a higher spend over the customer’s lifetime, especially when factoring in the power of push notifications to communicate with customers and boost engagement.
Bottom line, if you can build an app, and it’s not going to cost you hundreds of thousands of dollars, you should do it – especially for luxury ecommerce brands, where small increases in conversion rate, retention and AOV add up to a significant increase in profit at the end of the day.
Final Takeaways
Luxury brands should be dialed in to find any ways they can to increase conversion rate.
Even incremental improvements in conversion rate will have a huge impact on your bottom line when you’re selling high-ticket items.
One of the best ways to boost conversion rate, along with long-term revenue, is to launch your own app.
With Vendrux, you can launch an app in as little as two weeks, which replicates the luxury experience you’ve built on your website.
Unlike other no-code solutions, you can keep all the features and all the design from your website – you don’t need to rebuild anything. There’s also no work for you to do. It’s a fully managed service, including taking care of your app after launch. We do everything for you, with a white-glove service package for every user.
The cost of building an app with Vendrux is less than many luxury brands will make in just one sale – so if your app just gets you one or two extra sales per month, it could already provide a positive ROI.
With mobile commerce booming, and more and more people making mobile their preferred way to shop, you shouldn’t wait any longer to build and launch your own luxury ecommerce app.