Login to your OneSignal account, here: https://dashboard.onesignal.com/login
Select your app and go to “Settings > Keys & IDs” on your sidebar:
.avif)
On this page you will be able to find and copy your App ID and Rest API Key:
.avif)
Login to your OneSignal account, here: https://dashboard.onesignal.com/login
Select your app and go to “Settings > Keys & IDs” on your sidebar:
On this page you will be able to find and copy your App ID and Rest API Key:
If you are using Shopify and want your app users to receive push notifications for order and shipping updates, you will want to assign a common identifier to your users in your prefered push notifications platform.
To do this, we can use the Shopify user IDs, and a simple code snippet.
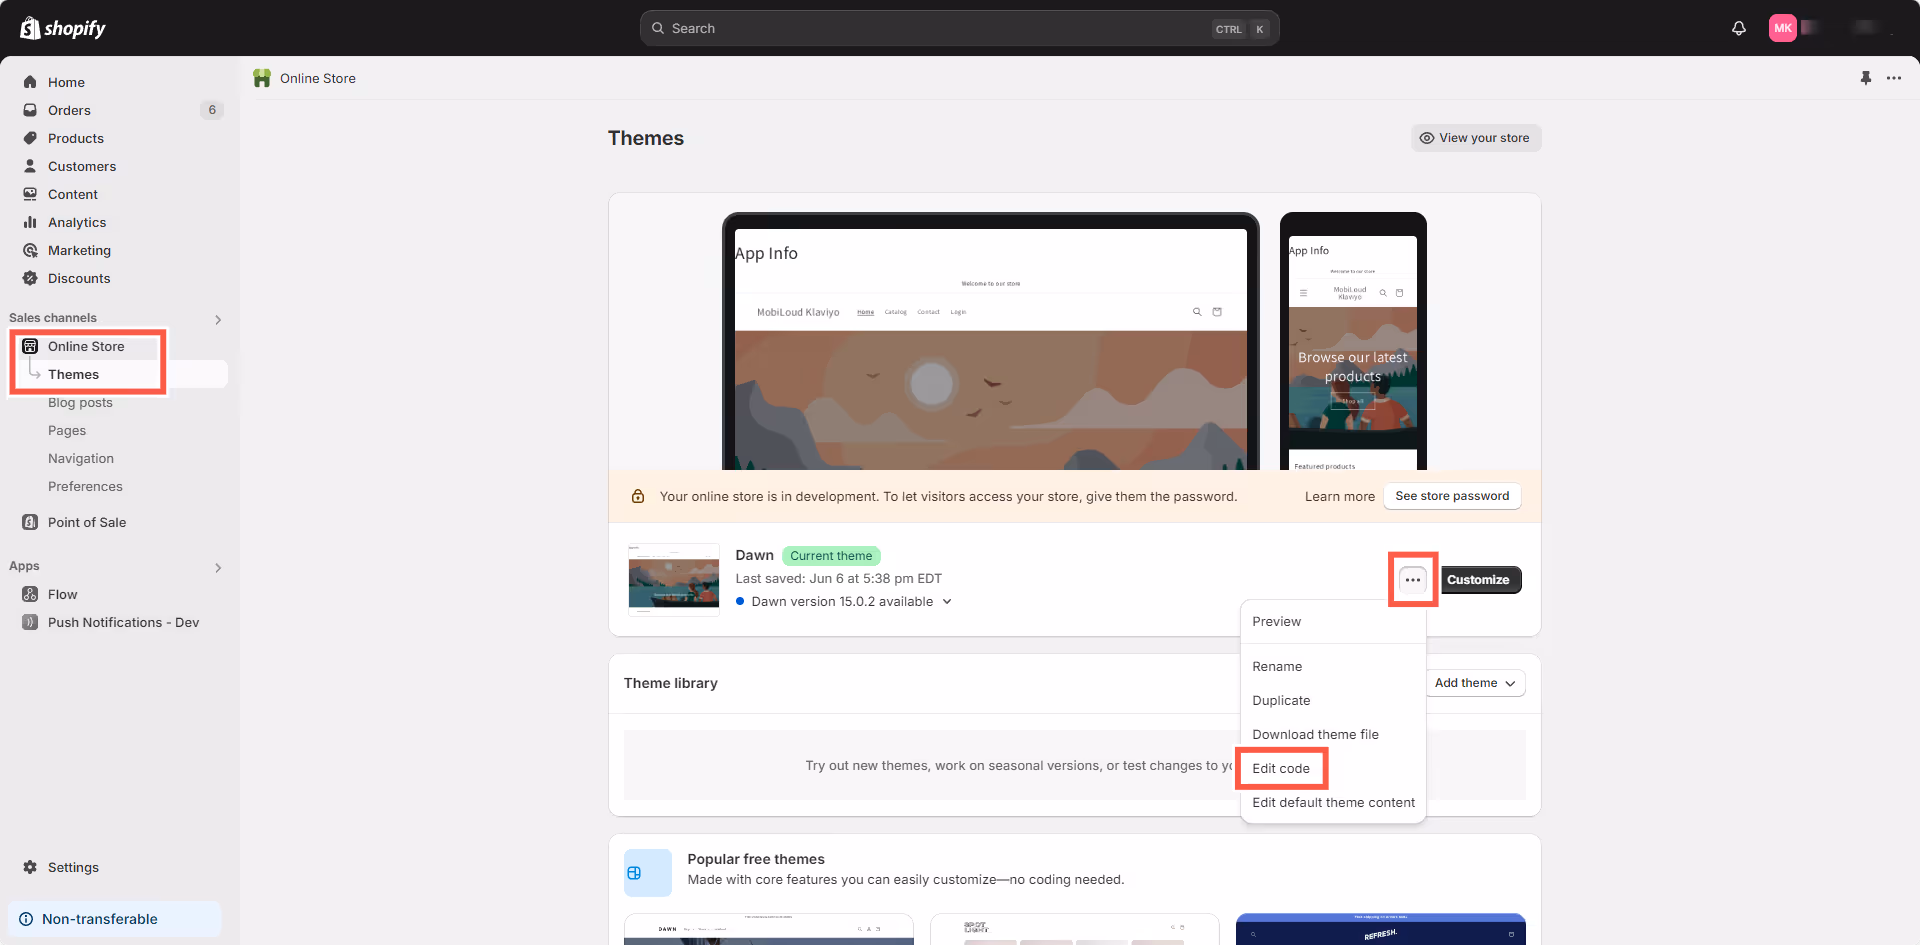
First, in your Shopify Dashboard go to “Online Store > Themes” then click the three dots and click “Edit Code”, as you can see below:
.avif)
Select the “theme.liquid” file on the left sidebar, and drop the code for your selected push platform right before the closing “” tag:
.avif)
  // Function to check if user agent contains "canvas"
  function mlCheckUserAgentForCanvas() {
    const userAgent = navigator.userAgent.toLowerCase();
    return userAgent.includes('canvas');
  }

  // If the user agent contains "canvas"
  if (mlCheckUserAgentForCanvas()) {
    {% if customer %}
      // If the user is logged in, set their Shopify user ID
      nativeFunctions.klaviyoSetExternalUserId("{{ customer.id }}");
    {% else %}
      // If the user is not logged in, set an empty value
      nativeFunctions.klaviyoSetExternalUserId('');
    {% endif %}
  }
  // Function to check if user agent contains "canvas"
  function mlCheckUserAgentForCanvas() {
    const userAgent = navigator.userAgent.toLowerCase();
    return userAgent.includes('canvas');
  }

  // If the user agent contains "canvas"
  if (mlCheckUserAgentForCanvas()) {
    {% if customer %}
      // If the user is logged in, set their Shopify user ID
      nativeFunctions.onesignalSetExternalUserId("{{ customer.id }}");
    {% else %}
      // If the user is not logged in, set an empty value
      nativeFunctions.onesignalSetExternalUserId('');
    {% endif %}
  }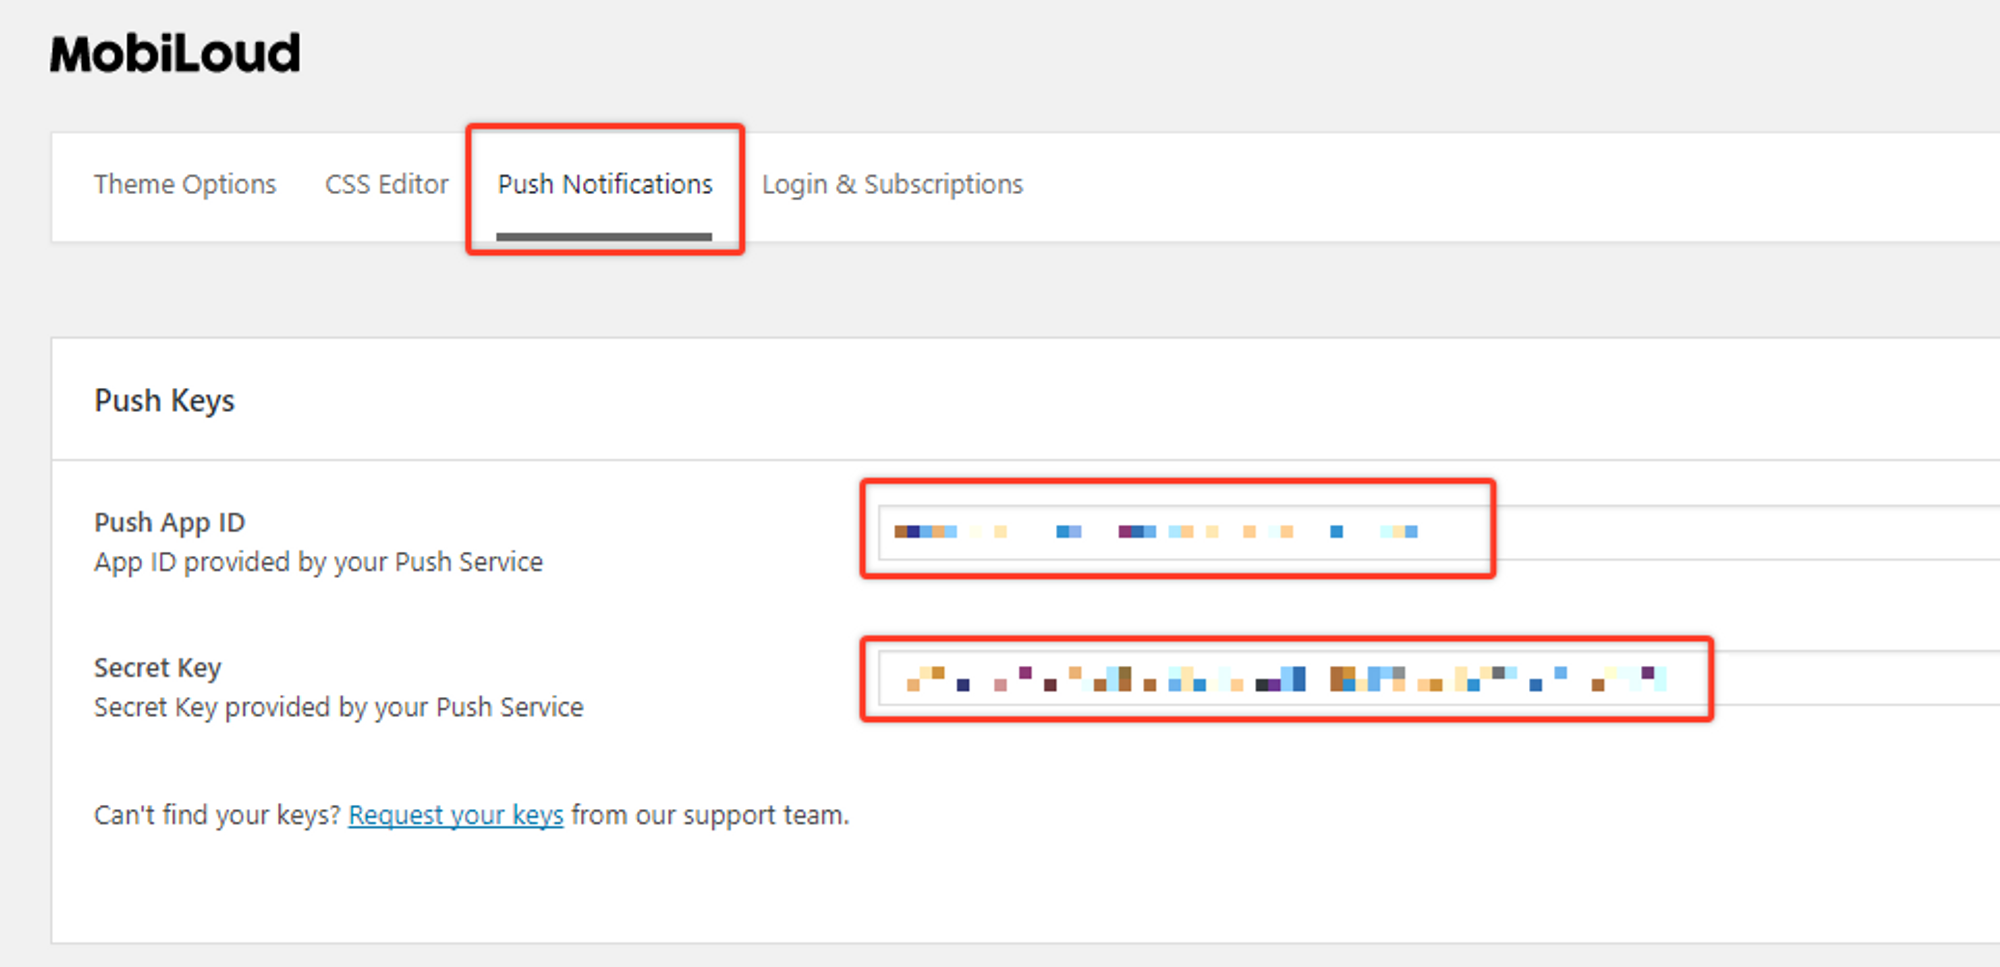
In order to start sending push notifications from your WordPress Dashboard you will need to fill the “Push App ID” and “Secret Key” fields, under the “Push Notifications” tab, with your OneSignal keys.
The mentioned fields can be found under “Vendrux > Configuration > Push Notifications” as you can see below:

These keys can be found in your OneSignal account, under the “Settings > Keys & Ids” area as you can see below:

Once you save your Push Notifications settings, a new section will be available, as you can see below:
The Push Notifications area will allow you to send manual notifications to your users and tracking information about previously sent notifications.

If you would like to send automatic notifications to your users when a new post is published on your website, you can enable this feature under “Vendrux > Configuration > Push Notifications”.
At the very bottom of the page you will find all the settings to configure notifications that will be automatically sent when a new post is published, as you can see here:

Tags will allow you and your users to segment the notifications they will receive.
In your app, if you have the “Alerts” tab enabled, users will be able to determine for which tags they will receive notifications, as you can see here:

In this case, Main Alerts, Jobs, Updates, and News are all tags that the user can enable or disable so that when a notification is sent with one of these tags assigned to it, only users that have that tag enabled will receive it.
You can create or edit the tags directly from your Vendrux Dashboard, keeping in mind that each tag will have two values assigned to it:
To clarify, “Main Alerts” would be the label and “main-alerts” the ID of this tag.
The Vendrux plugin gives you two options for tags, both explained below:
When you attach a post to your notification, you can mark this option to include the “category slugs” of that post as tags in the notification. If a post is assigned to the “Featured News” category, the “featured-news” tag will be assigned to your notification and only users that have that tag enabled will receive the notification.
Keep in mind that you will need to manually create this specific tag in your “Vendrux Dashboard”, like this:

If instead, you prefer to add tags to your notification manually you can use this option. You can simply add the IDs of your tags in the text field and those will be included in your notification.

Whenever a user enables or disables a specific tag, his profile in OneSignal will be updated with his selection, as you can see below:

The actual notification that you send, will include the necessary logic to ensure it only gets delivered to users that have the selected set of tags turned on:

After your app is live, you will want to send notifications to engage users and take them to your latest content in the app.
In this guide, we will cover the basics of sending notifications directly from your OneSignal Dashboard.
To get started access your OneSignal account through the following URL: https://app.onesignal.com/login
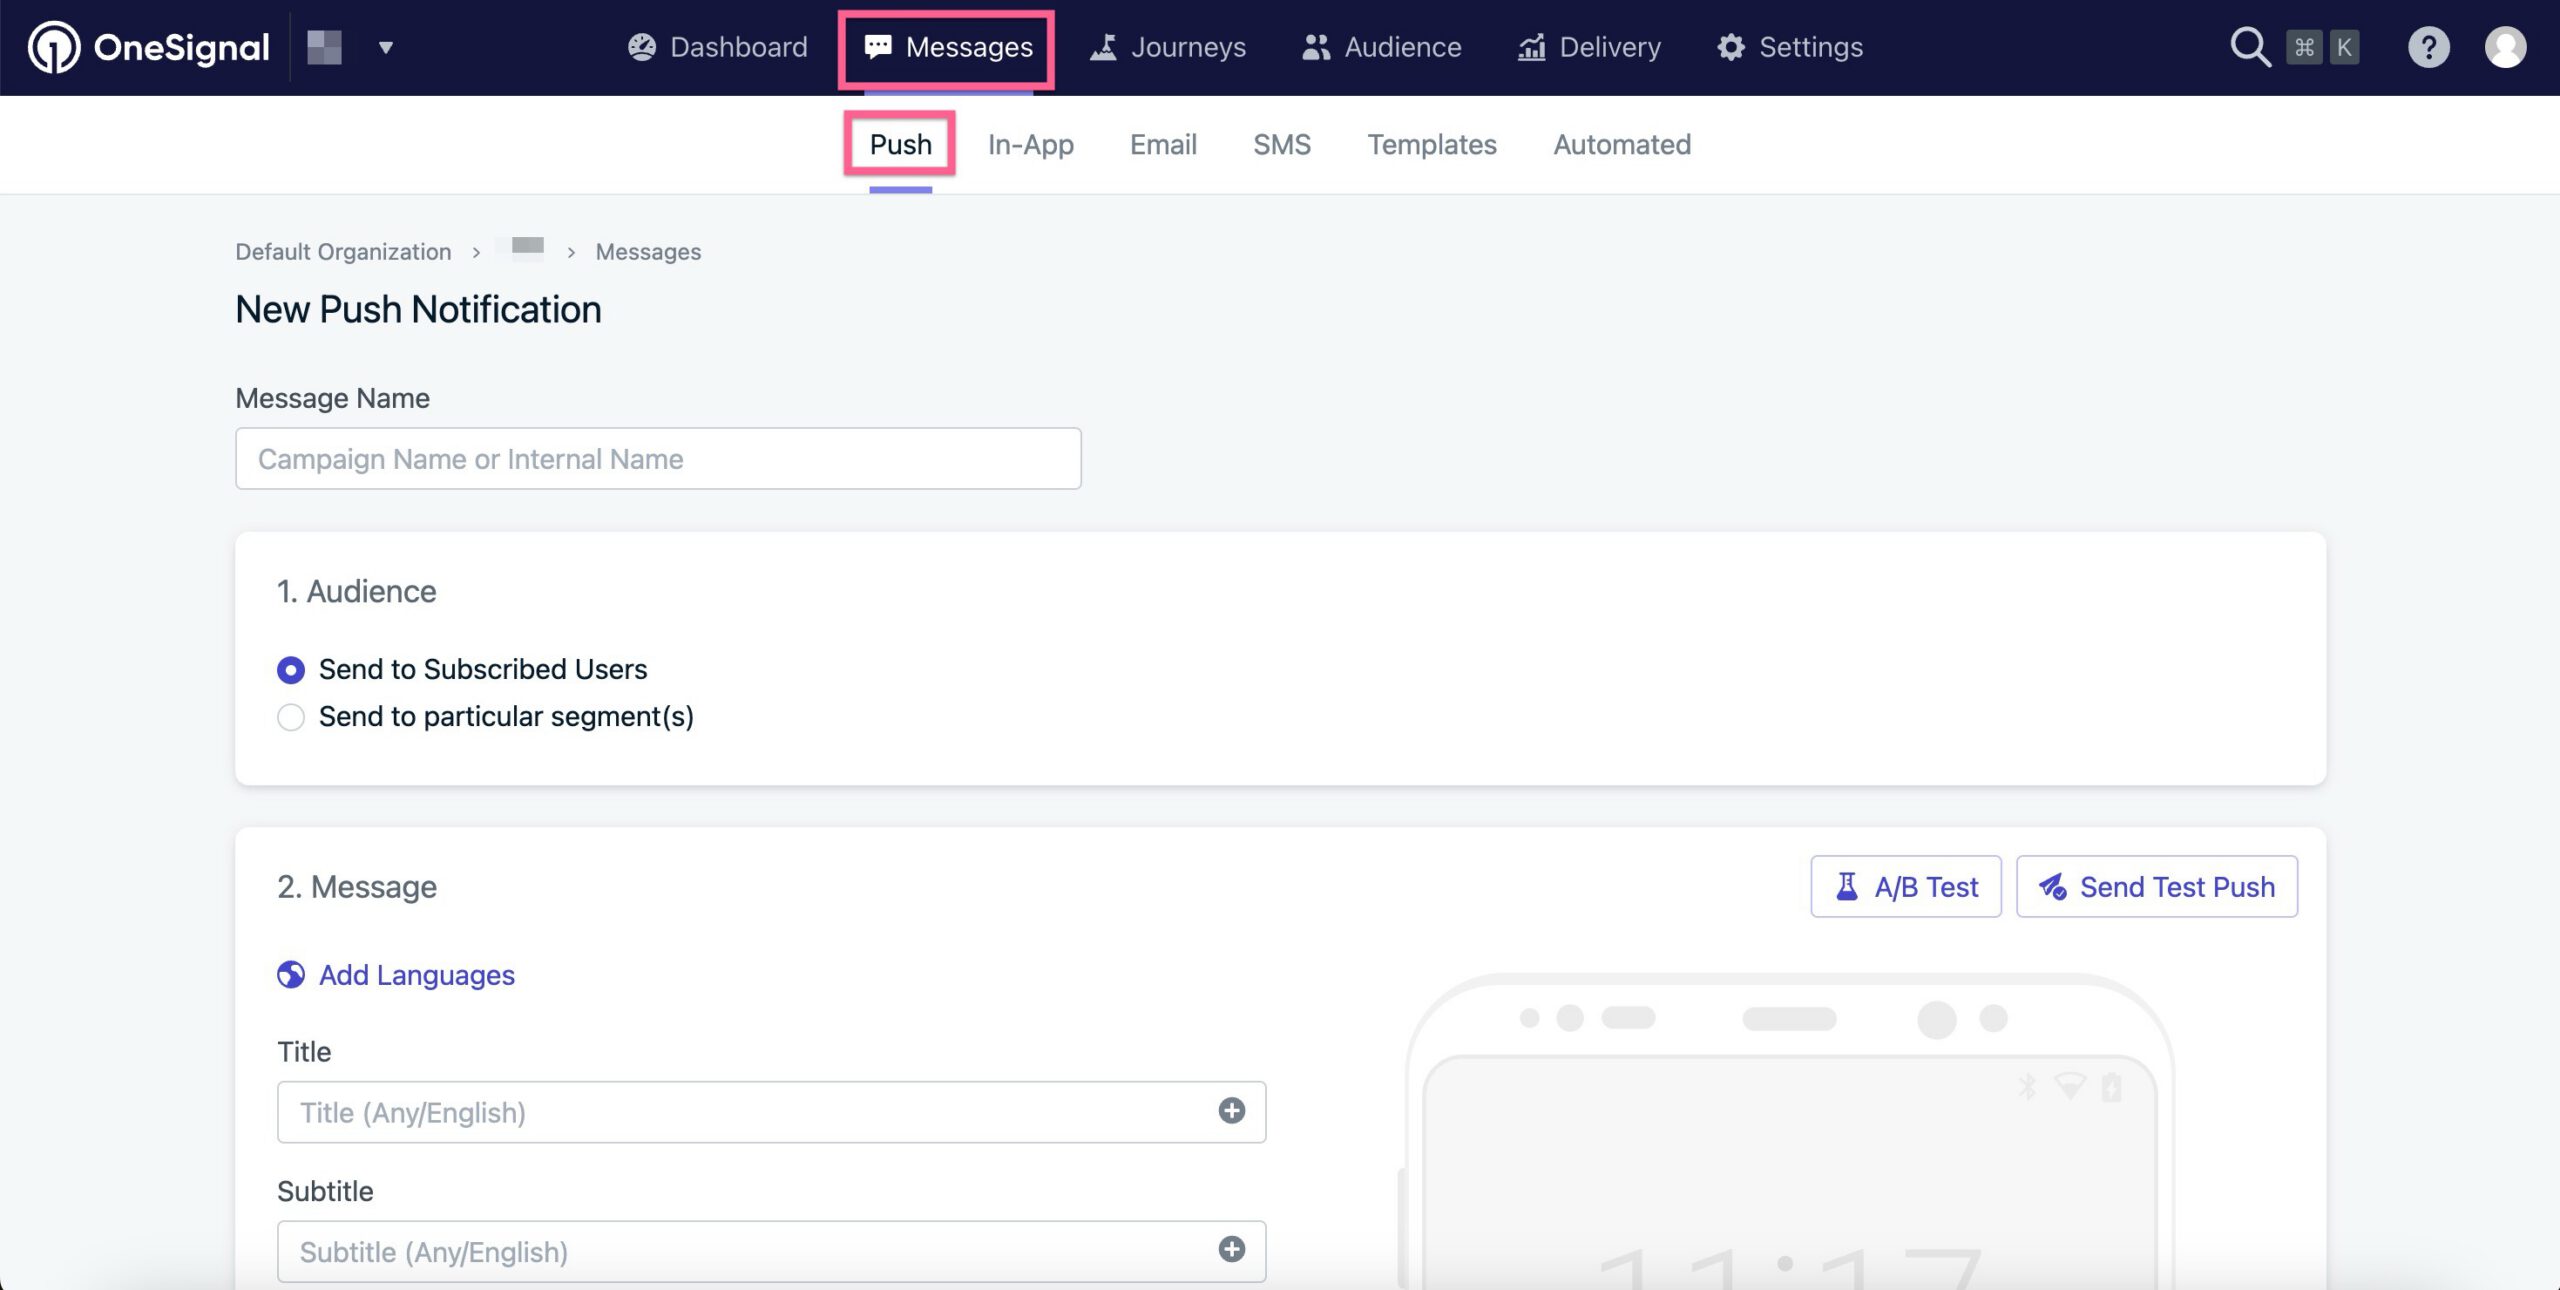
Now that you are in your account, make sure to select the Mobile App that you previously created, then access the “Messages” area and click on “New Push” as you can see below:

You will be presented with several options to customize your push notification, as well as a preview tool to see exactly how the notification looks on iOS and Android:

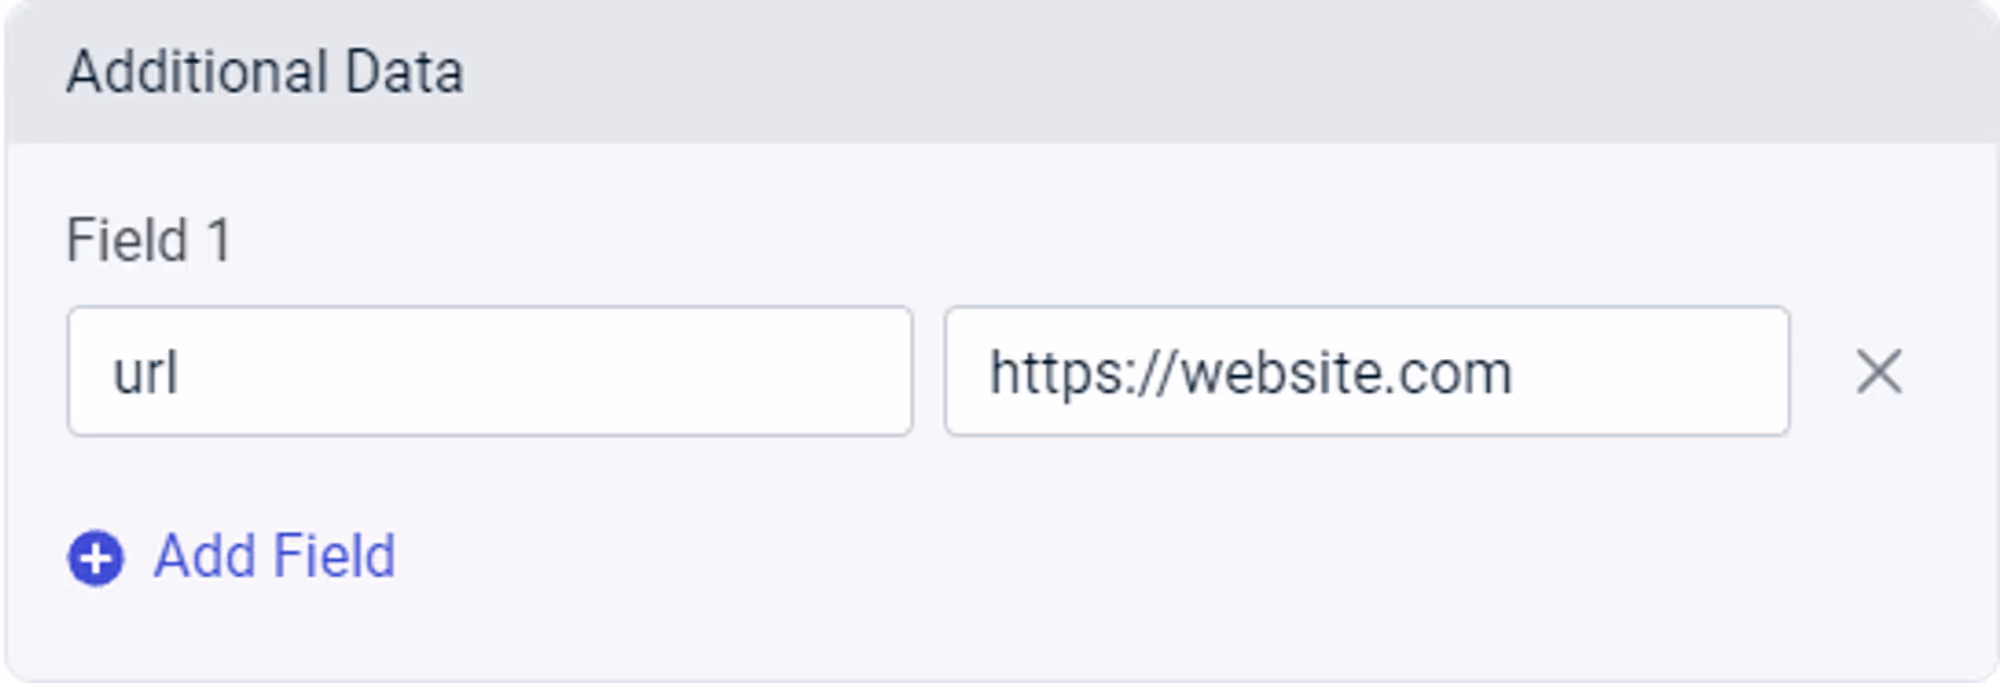
There is one key aspect when sending notifications from your OneSignal Dashboard to the Vendrux Platform, the “Launch URL” field must always be empty, and you must use the “Additional Data” area to specify the URL that must be opened when users click on the notification.
Under the “Additional Data” area you will have two fields, you will need to fill the “Key” field with “url” and the “Value” field with the URL that must be opened (e.g. https://yourwebsite.com):

You can now proceed with sending the notification, make sure to select the best sending method, if you are sending breaking news mark the “Send Immediately” option, otherwise, we’d recommend using the “Smart Delivery”.

Just press “Confirm” to start sending the notifications.
⚠️ The “Launch URL” field provided by OneSignal won’t work inside the app, you will need to use “Additional Data” in order to display a specific URL in the app when the notification is clicked.
When you create a push notification, either via the OneSignal Dashboard or the REST API, you can specify a URL to open when the notification is clicked.
To do so, you must include a field called “url” in the “Additional Data” area, with the URL that must be opened as the value.
Below you can see what that should look like:
.avif)
//OneSignal REST API

"included_segments": [
  "Subscribed Users"
],
"data": [
	'url' = 'https://website.com'
],
"contents": {
  "en": "Notification content",
}⚠️ This guide should not be used if you have a WordPress website.
There are many situations in which you will want to trigger push notifications to your users, here are some examples:
For all of these examples, the notification will need to target a specific user when a specific event happens on your website. In order to be able to send these notifications you will need the following implemented into your website’s code:
Keep in mind that this is not an implementation guide for the OneSignal REST API, each server and website is different and will require a developer to find the best approach for integrating the OneSignal REST API. The purpose of this guide is to give you a better understanding of how to integrate your website with the Vendrux platform for sending targeted, or transactional push notifications.
Let’s go through each one of the requirements:
Since Vendrux uses OneSignal for push notifications, you will need to use the OneSignal REST API to trigger the notifications.
Whenever a push notification is expected to be sent, you will need to make a call to the OneSignal REST API with the notification details (title, text, link, image, tags, etc), this call must be implemented on your website.
Here you can find the complete documentation for the OneSignal REST API: https://documentation.onesignal.com/reference/create-notification
Implementing the OneSignal REST API should be straightforward, but at some point, you will ask yourself “How do I target a specific user?”, and that’s where the Vendrux native functions come into play.
On your website, you are probably using a unique ID or even an email to identify your users, but in OneSignal that unique identifier is not available out of the box, so the idea here is to tell OneSignal to store the same unique user ID from your website into the OneSignal profile of that user.
To do this, we are going to trigger the following Javascript function as soon as the user has logged in:
// Check the user agent for the "canvas" string
const isApp = navigator.userAgent.toLowerCase().indexOf('canvas') > -1;
// Check if we are in the app
if (isApp) {
try {
// Set the external user ID
let externalUserId = 1;
// Trigger the native function to save to OneSignal
nativeFunctions.onesignalSetExternalUserId(externalUserId);
// Log the event in the console
console.log("External user ID set");
} catch (ex) {
console.log(ex.message);
}
}
We recommend adding the Javascript code inline rather than using a separate file, to avoid compatibility issues.
Fo more details on how to target users using the External User ID, you can refer to the OneSignal documentation here: https://documentation.onesignal.com/docs/external-user-ids
This guide shows you how to create a custom Shopify Flow that can be used to integrate Vendrux with your preferred loyalty program in Shopify.
The idea is simple, we will check if the user has a specific tag assigned to his Shopify profile once an order is placed, and if so, we will grant him extra points.
The tag is only assigned to his profile when he is using the app, so this means that if our check passes, the user placed the order while in the app.
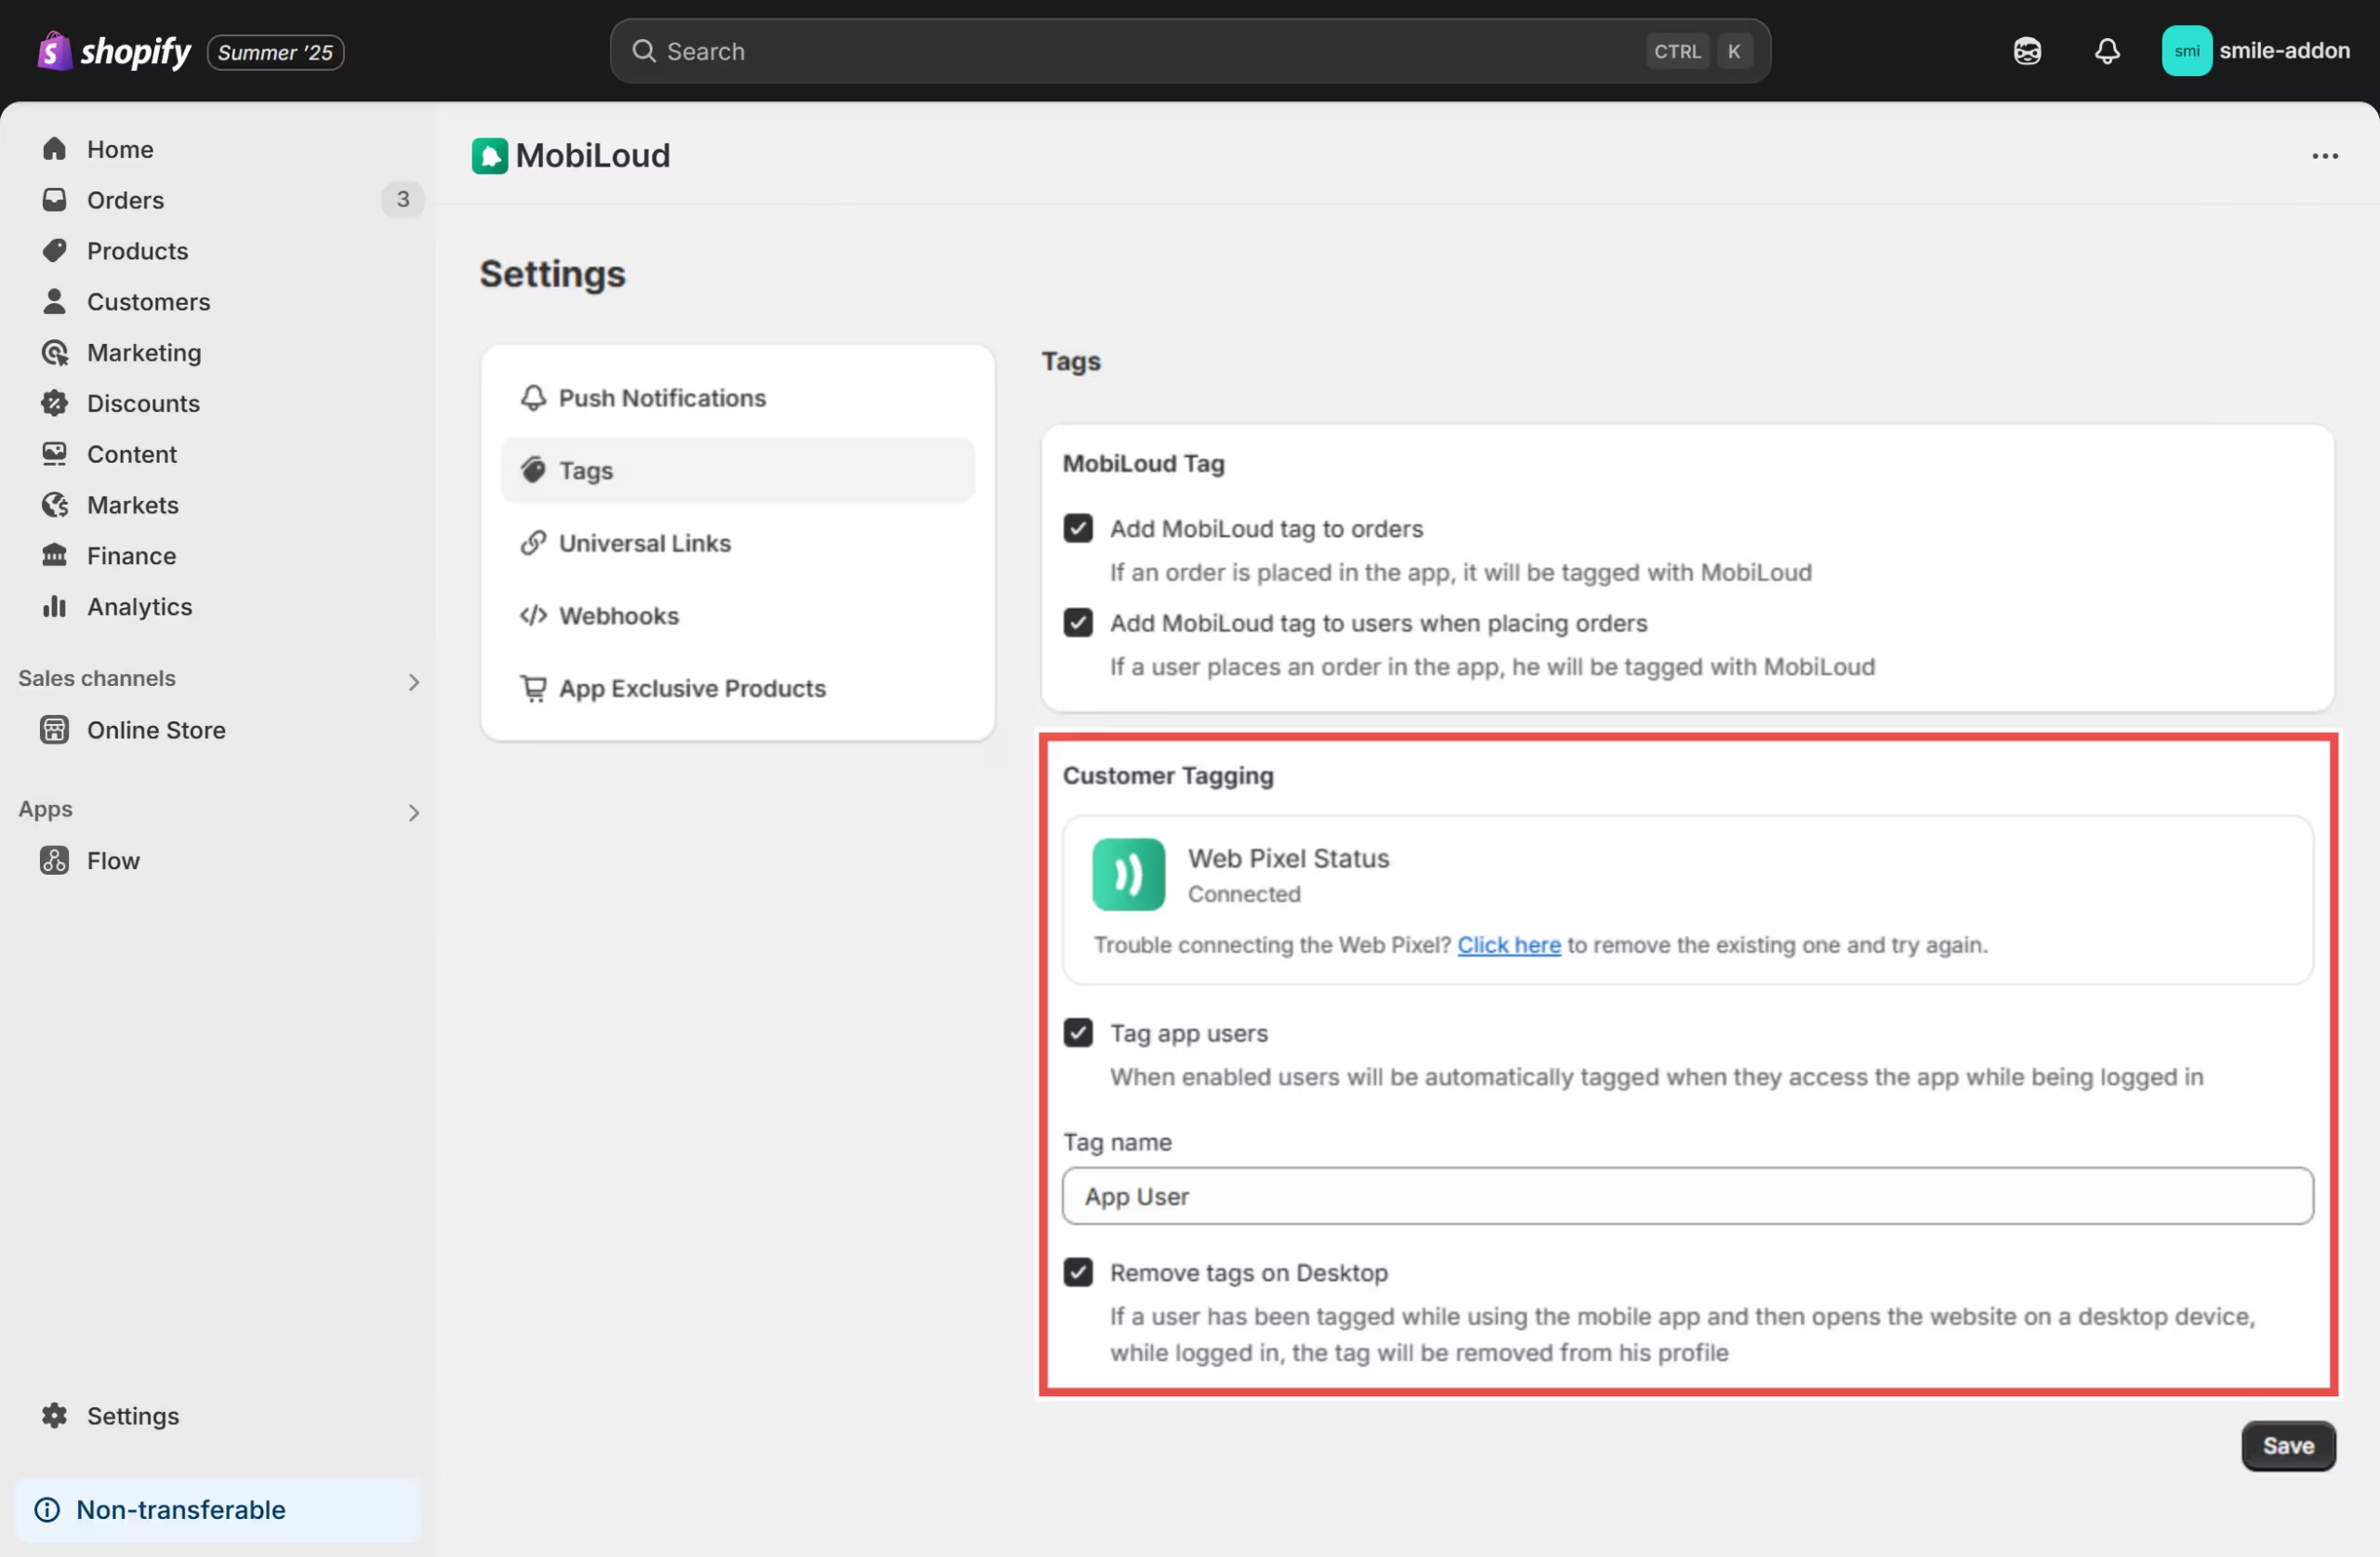
Before we jump into the Flow creation, make sure you have the Vendrux Shopify App installed with the tags configured as follows:
.avif)
This Flow action will:
Go to Apps > Flow in your Shopify admin
.avif)
Create a new Flow or edit an existing one, add a Run code action.
Configure the code action as follows:
query {
	order {
		id
		customer {
			id
			tags
		}
	}
}
Note: If your Flow is triggered by a customer event (not an order), use:
query {
	customer {
    	id
        tags
    }
}type Output {
hasCanvasTag: Boolean!
}export default function main(input) {
// Get customer from order (adjust path based on your trigger)
const customer = input.order?.customer;
const customerTags = customer?.tags || [];
// Tag to check for (case insensitive)
const targetTag = 'App User'; // Change this to your desired tag
// Check if customer has the target tag (case insensitive)
const hasTargetTag = customerTags.some(tag =>
tag.toLowerCase() === targetTag.toLowerCase()
);
// Return a plain object
const result = {
hasCanvasTag: hasTargetTag
};
return result;
}Your “Run Code” action will look like this:
.avif)
After the “Run Code” action is created, you can use the result in Flow conditions:
Add a Condition action after your code action, then search for the “Run Code” step you just created:
.avif)
Select the “hasCanvasTag” variable:
.avif)
Adjust the condition to “Equal to” “true”, as follows:
.avif)
The idea is to check if the user has the “App User” tag in his profile, and if that is the case, proceed with adding the extra points to his account.
The next steps will vary depending on your preferred loyalty program, but here are some guides from the most popular ones to assist with the final steps of the setup:
You might want to customize the URL that users get redirected to after a successful login in order to better integrate your login page with the Vendrux app. To do this, you can modify your theme code as follows:
Access the Theme Code:
Online Store > Themes.Actions > Edit Code.Locate the Login Form Code:
Sections or Templates, and the file might be named customers/login.liquid or something similar.Add a Form ID:
Locate the form tag for the customer login form. Add an id attribute to the form tag for easy reference in JavaScript. Your form tag should look something like this:
{%- form 'customer_login', novalidate: 'novalidate', id: 'customer_login_form' -%}Insert the JavaScript Snippet:
Add the following JavaScript code at the bottom of the same file. This script checks if the user’s user agent contains the string “canvas” (case insensitive) and updates the form action URL accordingly:
document.addEventListener('DOMContentLoaded', function() {
var form = document.getElementById('customer_login_form');
if (navigator.userAgent.toLowerCase().includes('canvas')) {
form.action += '?app_login=true';
}
});
After adding the JavaScript code, save the changes by clicking the Save button in the top-right corner of the theme editor.
This guide will walk you through the process of setting up app-exclusive products in your Shopify store using our app. By following these steps, you can ensure that certain products are only visible and purchasable within the mobile app.
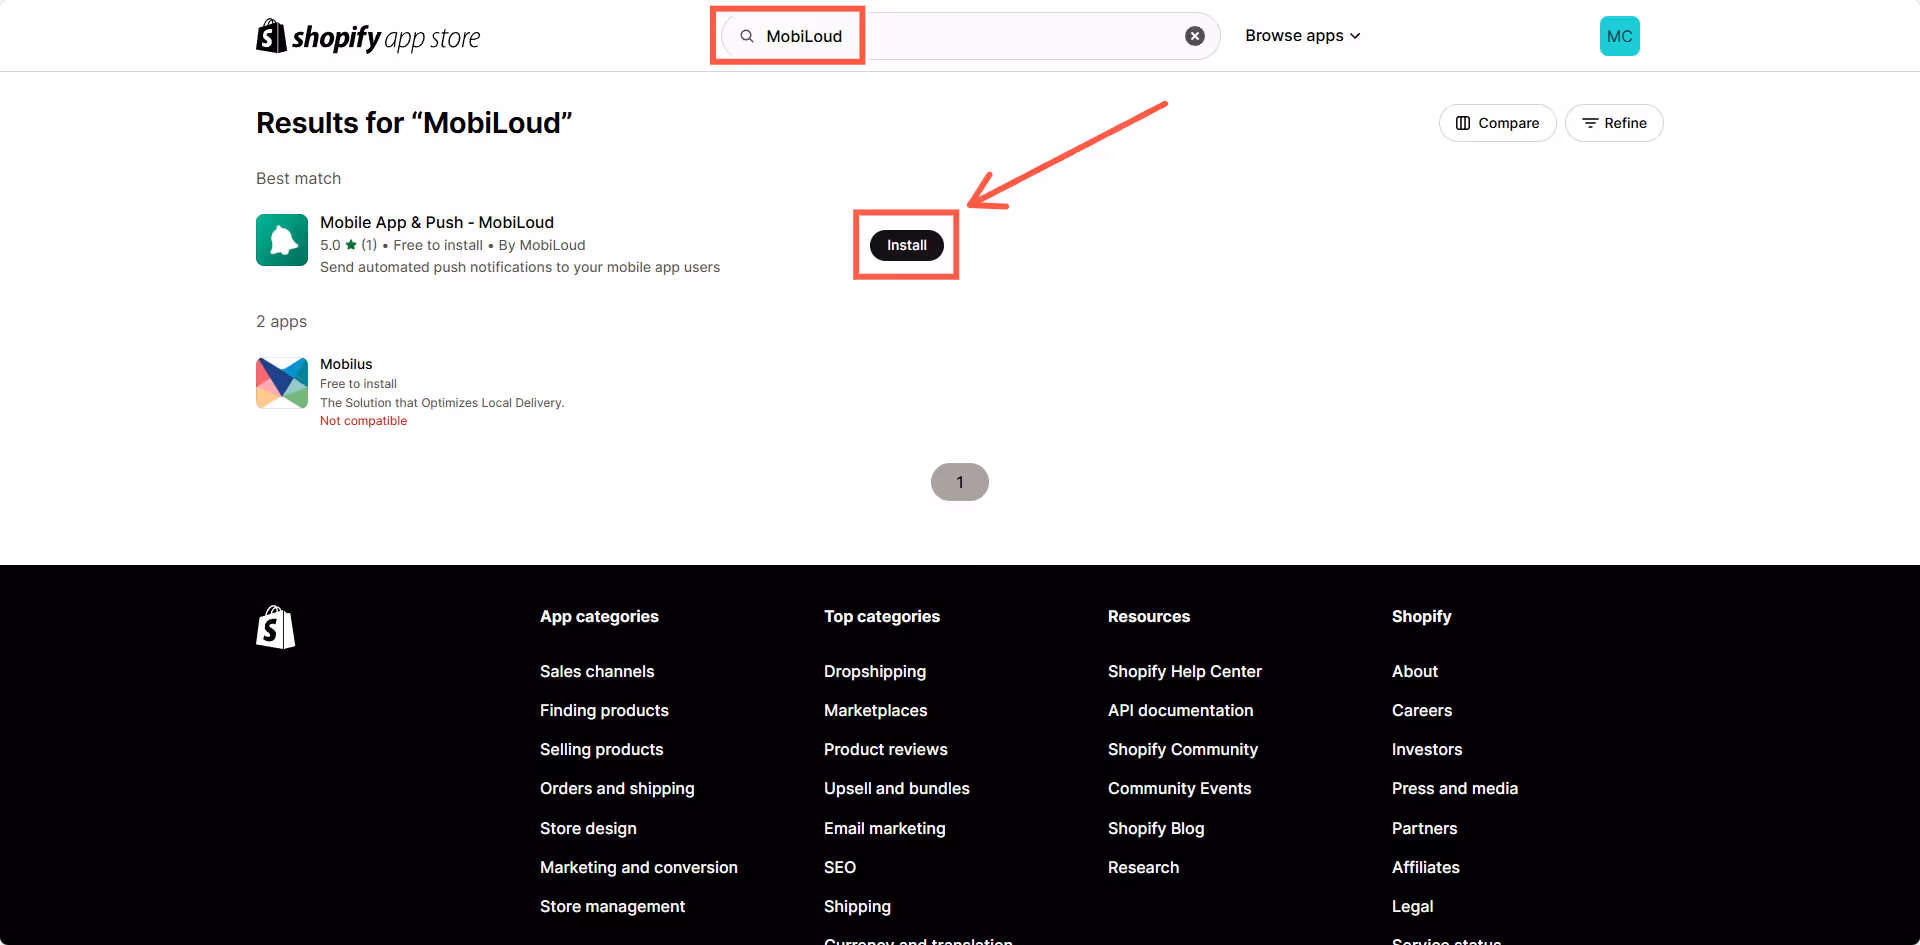
In your Shopify Admin Dashboard, install the Vendrux Shopify App, found here: https://apps.shopify.com/mobile-push-notifications
.avif)
To mark products as app-exclusive, you need to make sure the required metafield is created.
.avif)
Once this is set up, you will be able to assign specific products as app-only.
.avif)
To ensure app-exclusive products are hidden from the online store but visible in the app, you need to modify your Shopify theme.
.avif)
This is a more technical step, and if you are not familiar with your theme code, we suggest asking a web developer to implement these changes for you.
Vendrux is also available to help if needed, just let us know!
Now, you will need to find the “loop” where the products are being displayed, it will usually look like this:
{%- for product in collection.products -%}Inside that “loop”, you will need to find a “wrapper” element, which is usually an HTML tag that wraps all the product related elements, such as title, image, pricing, etc. In the “Dawn” theme, that wrapper looks like this:
li
  class="grid__item{% if settings.animations_reveal_on_scroll %} scroll-trigger animate--slide-in{% endif %}"
  {% if settings.animations_reveal_on_scroll %}
  	data-cascade
  	style="--animation-order: {{ forloop.index }};"
  {% endif %}
>
You will need to adjust the code that is inside the “class” attribute of that wrapper, adding the following right before the closing double quotes:
{% if product.metafields.vendrux.mobile_app_exclusive %} mobile-app-exclusive {% endif %}The final code will look like this:
li
	class="grid__item{% if settings.animations_reveal_on_scroll %} scroll-trigger animate--slide-in{% endif %}{% if product.metafields.vendrux.mobile_app_exclusive %} mobile-app-exclusive {% endif %}"
	{% if settings.animations_reveal_on_scroll %}
		data-cascade
		style="--animation-order: {{ forloop.index }};"
	{% endif %}
>.avif)
Once you’ve completed the setup, verify that the feature works as expected:
By following these steps, you ensure that certain products are only available in your mobile app, creating a unique shopping experience for your app users.
This feature uses HTML and CSS to hide products on your website; however, these products may still be accessible if a user navigates directly to the product URL.
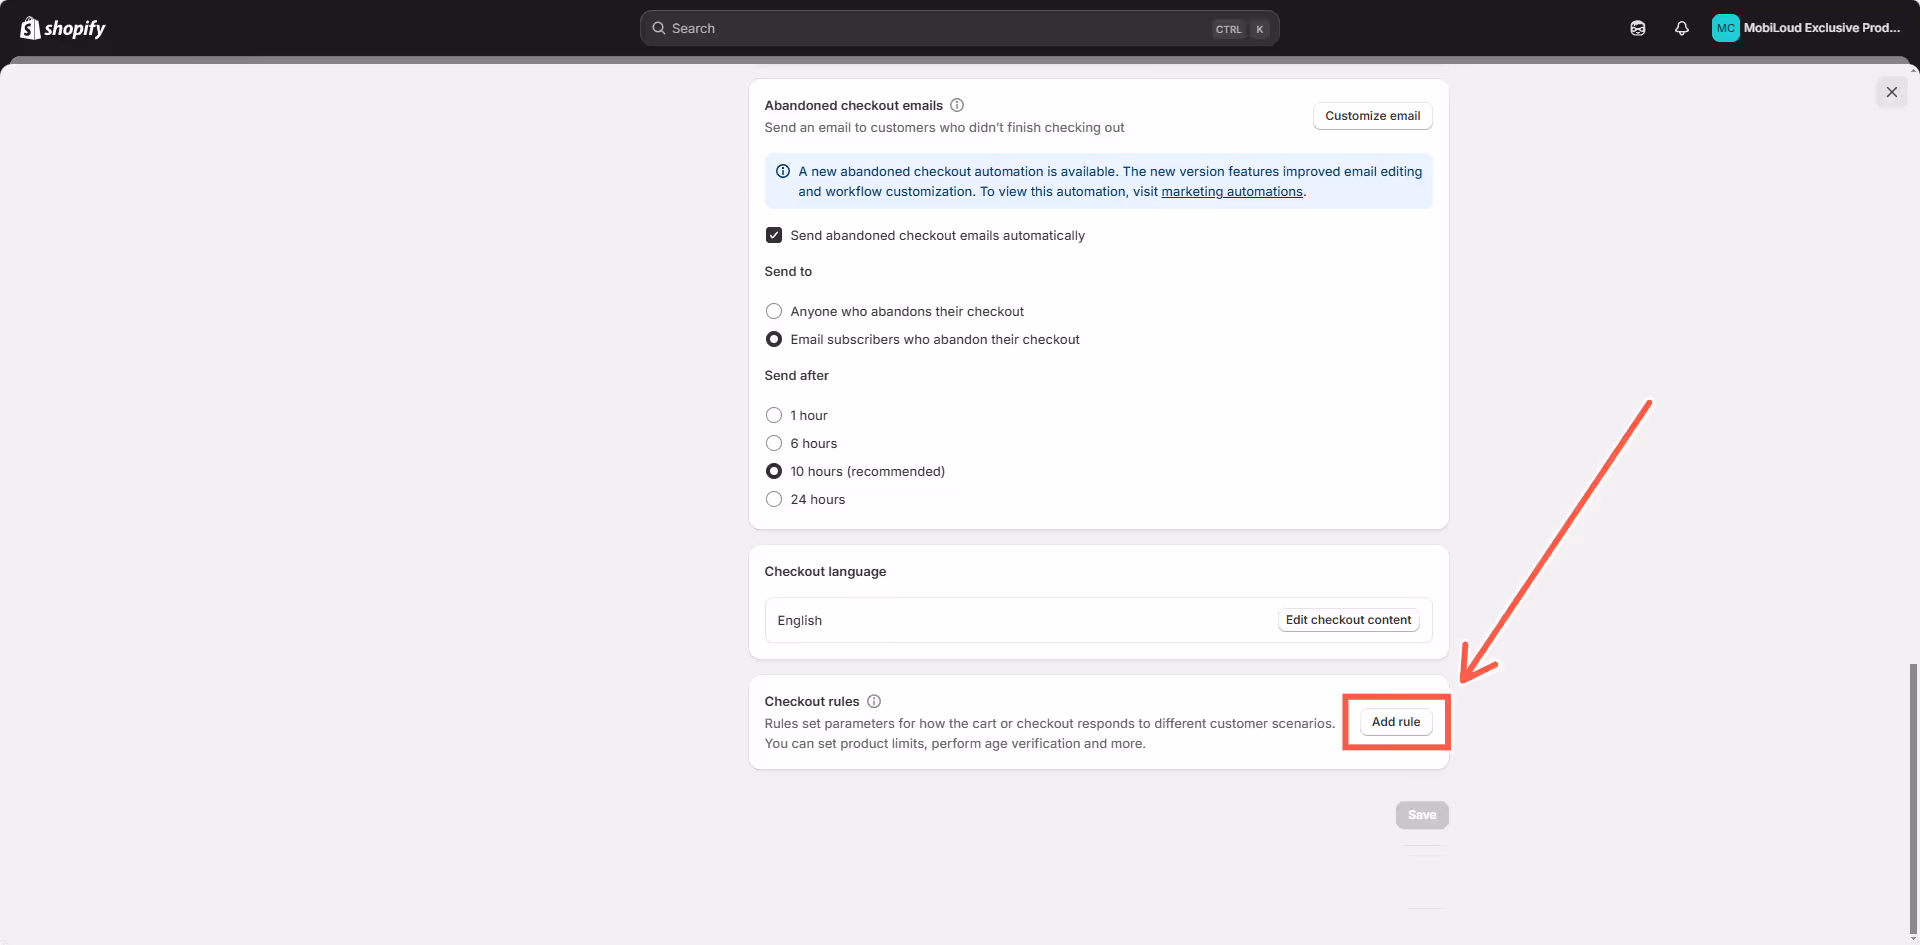
IMPORTANT! App Exclusive Discounts will only work for Shopify Plus stores.
This guide will walk you through the process of setting up app-exclusive discounts in your Shopify store using our app. By following these steps, you can ensure that certain discount codes are only valid within the mobile app.
In your Shopify Admin Dashboard, install the Vendrux Shopify App, found here: Vendrux Shopify App.
.avif)
.avif)
.avif)
.avif)
.avif)
Any discount coupon that contains “APP” in its code will automatically be restricted for use within the mobile app. To set this up, simply create a coupon with “APP” in its code, no additional configuration is needed.
Once the setup is complete, verify that app-exclusive discount codes function correctly.
By following these steps, you ensure that app-exclusive discount codes are correctly enforced, restricting their use to purchases made through your mobile app.