If you are using Shopify and want your app users to receive push notifications for order and shipping updates, you will want to assign a common identifier to your users in your prefered push notifications platform.
To do this, we can use the Shopify user IDs, and a simple code snippet.
First, in your Shopify Dashboard go to “Online Store > Themes” then click the three dots and click “Edit Code”, as you can see below:
Select the “theme.liquid” file on the left sidebar, and drop the code for your selected push platform right before the closing “” tag:
Klaviyo
  // Function to check if user agent contains "canvas"
  function mlCheckUserAgentForCanvas() {
    const userAgent = navigator.userAgent.toLowerCase();
    return userAgent.includes('canvas');
  }

  // If the user agent contains "canvas"
  if (mlCheckUserAgentForCanvas()) {
    {% if customer %}
      // If the user is logged in, set their Shopify user ID
      nativeFunctions.klaviyoSetExternalUserId("{{ customer.id }}");
    {% else %}
      // If the user is not logged in, set an empty value
      nativeFunctions.klaviyoSetExternalUserId('');
    {% endif %}
  }
OneSignal
  // Function to check if user agent contains "canvas"
  function mlCheckUserAgentForCanvas() {
    const userAgent = navigator.userAgent.toLowerCase();
    return userAgent.includes('canvas');
  }

  // If the user agent contains "canvas"
  if (mlCheckUserAgentForCanvas()) {
    {% if customer %}
      // If the user is logged in, set their Shopify user ID
      nativeFunctions.onesignalSetExternalUserId("{{ customer.id }}");
    {% else %}
      // If the user is not logged in, set an empty value
      nativeFunctions.onesignalSetExternalUserId('');
    {% endif %}
  }
This guide shows you how to create a custom Shopify Flow that can be used to integrate Vendrux with your preferred loyalty program in Shopify.
The idea is simple, we will check if the user has a specific tag assigned to his Shopify profile once an order is placed, and if so, we will grant him extra points.
The tag is only assigned to his profile when he is using the app, so this means that if our check passes, the user placed the order while in the app.
Before we Begin
Before we jump into the Flow creation, make sure you have the Vendrux Shopify App installed with the tags configured as follows:
Overview
This Flow action will:
Check if a customer has a specific tag
Return a boolean result that can be used in Flow conditions
Setup Steps
1. Create the Flow Action
Go to Apps >Flow in your Shopify admin
Create a new Flow or edit an existing one, add a Run code action.
Configure the code action as follows:
2. Input Schema (GraphQL)
query {
	order {
		id
		customer {
			id
			tags
		}
	}
}
Note: If your Flow is triggered by a customer event (not an order), use:
query {
	customer {
    	id
        tags
    }
}
3. Output Schema (SDL)
type Output {
	hasCanvasTag: Boolean!
}
4. JavaScript Code
exportdefaultfunctionmain(input) {
// Get customer from order (adjust path based on your trigger)const customer = input.order?.customer;
const customerTags = customer?.tags || [];
// Tag to check for (case insensitive)const targetTag = 'App User'; // Change this to your desired tag// Check if customer has the target tag (case insensitive)const hasTargetTag = customerTags.some(tag => tag.toLowerCase() === targetTag.toLowerCase()
);
// Return a plain objectconst result = {
hasCanvasTag: hasTargetTag
};
return result;
}
Your “Run Code” action will look like this:
Using the Result
After the “Run Code” action is created, you can use the result in Flow conditions:
Add a Condition action after your code action, then search for the “Run Code” step you just created:
Select the “hasCanvasTag” variable:
Adjust the condition to “Equal to” “true”, as follows:
The idea is to check if the user has the “App User” tag in his profile, and if that is the case, proceed with adding the extra points to his account.
The next steps will vary depending on your preferred loyalty program, but here are some guides from the most popular ones to assist with the final steps of the setup:
You might want to customize the URL that users get redirected to after a successful login in order to better integrate your login page with the Vendrux app. To do this, you can modify your theme code as follows:
Step-by-Step Tutorial
Access the Theme Code:
Log in to your Shopify admin panel.
Go to Online Store > Themes.
Find the theme you want to edit and click on Actions > Edit Code.
Locate the Login Form Code:
In the theme editor, find the file that contains the customer login form. This is usually located in Sections or Templates, and the file might be named customers/login.liquid or something similar.
Open the file to edit the code.
Add a Form ID:
Locate the form tag for the customer login form. Add an id attribute to the form tag for easy reference in JavaScript. Your form tag should look something like this:
{%- form 'customer_login', novalidate: 'novalidate', id: 'customer_login_form' -%}
Insert the JavaScript Snippet:
Add the following JavaScript code at the bottom of the same file. This script checks if the user’s user agent contains the string “canvas” (case insensitive) and updates the form action URL accordingly:
document.addEventListener('DOMContentLoaded', function() {
var form = document.getElementById('customer_login_form');
if (navigator.userAgent.toLowerCase().includes('canvas')) {
form.action += '?app_login=true';
}
});
After adding the JavaScript code, save the changes by clicking the Save button in the top-right corner of the theme editor.
This guide will walk you through the process of setting up app-exclusive products in your Shopify store using our app. By following these steps, you can ensure that certain products are only visible and purchasable within the mobile app.
To mark products as app-exclusive, you need to make sure the required metafield is created.
Open your Shopify admin panel.
Navigate to Apps > Vendrux
Under Settings, if the metafield is not already created, click Create Metafield.
Once this is set up, you will be able to assign specific products as app-only.
Step 3: Assign Products as App-Exclusive
Open the Products section in your Shopify admin.
Select a product you want to make available only in the app.
Scroll down until you find the “Metafield” area.
In the “Mobile App Exclusive” metafield, set the value to “true“
Step 4: Edit Your Theme
To ensure app-exclusive products are hidden from the online store but visible in the app, you need to modify your Shopify theme.
Enable the App Embed
Go to Online Store > Themes.
Click Customize.
Navigate to App Embeds.
Enable the Mobile App Products embed.
Save the settings.
Step 5: Modify the Theme Template File
This is a more technical step, and if you are not familiar with your theme code, we suggest asking a web developer to implement these changes for you.
Vendrux is also available to help if needed, just let us know!
In the Online Store > Themes section, click the 3 dots button, then Edit Code.
Locate the appropriate template file where products are listed.
In the default Dawn theme, this is found under Sections > main-collection-product-grid.liquid.
Now, you will need to find the “loop” where the products are being displayed, it will usually look like this:
{%- for product in collection.products -%}
Inside that “loop”, you will need to find a “wrapper” element, which is usually an HTML tag that wraps all the product related elements, such as title, image, pricing, etc. In the “Dawn” theme, that wrapper looks like this:
Once you’ve completed the setup, verify that the feature works as expected:
Open the store on a desktop browser.
The app-exclusive product should not appear.
Open the store in the mobile app.
The app-exclusive product should be visible.
By following these steps, you ensure that certain products are only available in your mobile app, creating a unique shopping experience for your app users.
Important
This feature uses HTML and CSS to hide products on your website; however, these products may still be accessible if a user navigates directly to the product URL.
IMPORTANT! App Exclusive Discounts will only work for Shopify Plus stores.
This guide will walk you through the process of setting up app-exclusive discounts in your Shopify store using our app. By following these steps, you can ensure that certain discount codes are only valid within the mobile app.
Step 1: Install the Vendrux Shopify App
In your Shopify Admin Dashboard, install the Vendrux Shopify App, found here: Vendrux Shopify App.
Step 2: Configure Checkout Rules
Open your Shopify Admin Dashboard.
Navigate to Settings.
Go to Checkout.
Scroll down to Checkout Rules.
Click Add Rule.
Locate Mobile Checkout Validation and deselect the Allow all customers to complete checkout option.
Click Save.
Once saved, turn on the Checkout Rule.
Step 3: Edit Checkout Configuration
In Settings, navigate to Checkout.
Click on the Customize button under Checkout Configuration.
In the left menu, go to Apps.
Select Mobile Checkout UI and add it to the checkout.
Enable the “Include app block in Shop Pay” option.
Click Save.
Step 4: Create an App-Exclusive Discount
Any discount coupon that contains “APP” in its code will automatically be restricted for use within the mobile app. To set this up, simply create a coupon with “APP” in its code, no additional configuration is needed.
Step 5: Test Your Coupon
Once the setup is complete, verify that app-exclusive discount codes function correctly.
Open your Shopify store on the web.
Proceed to checkout.
Try applying an app-only discount code.
You should receive an error stating that the discount is only valid on the mobile app.
Attempt to complete the checkout process.
The checkout should be blocked until all invalid discount codes are removed.
By following these steps, you ensure that app-exclusive discount codes are correctly enforced, restricting their use to purchases made through your mobile app.
An effective upsell strategy can be the difference between a Shopify store with the profits and cashflow needed to scale, and one just scraping by.
This is one of the most effective areas to leverage for increased revenue. A well-designed upsell flow converts at 10-20% post-purchase, with a documented 9.74% average AOV lift.
That’s free money – no new ad spend, no new channels, just additional revenue from people who you’ve already converted.
The brands seeing those numbers aren’t running a single offer in a single place. They’re running a coordinated set of offers across the customer journey, each tuned for the moment it appears in.
This guide covers how to build that system: the five moments where upsells work, the four levers that decide whether they convert, the mistakes that quietly tank performance, and the tech stack top Shopify brands use to run their upsell flows, in both website and app.
Want the latest insights into how 7, 8 and 9-figure brands are driving sustainable growth? That’s what you get with our weekly newsletter, The Retention Edge. Subscribe for free today.
The Five Moments Where Shopify Upsells Convert
The first part to getting an upsell right is choosing the right moment to sell.
Every offer lives at a specific moment in the customer journey, and what works at one moment could fall flat at another.
Each moment has its own buyer mindset, its own constraints, and its own conversion ceiling. Your goal is to match the right offer to the right moment. Do that, and you’ll see a meaningful lift in conversions.
Here are the key moments to look at.
On the product page (PDP)
The buyer is researching. They’ve narrowed in on a product but haven’t committed. This is the highest-relevance moment in the entire flow, because everything you suggest can be tied directly to the product they’re already looking at.
What works here: bundles (“buy this with X for $Y off”), frequently bought together recommendations, product variants and upgrades (size, warranty, gift wrap), and complementary add-ons.
This is the moment that’s likely made billions in revenue for Amazon over the years.
What doesn’t work here: discount-led offers (you’re undercutting the buyer’s commitment to the main product) or unrelated cross-sells (you’ll fragment their attention).
PDP upsells are the foundation of the flow. If you do nothing else, build these.
In the cart or cart drawer
The buyer has committed. They’ve crossed the line from “researching” to “buying.” That mindset shift is exactly why cart upsells convert: there’s no more deliberation, just optimization.
This is the right moment for low-friction add-ons (one click to add), free-shipping threshold nudges (“you’re $12 away from free shipping”), volume discounts (“add one more, save 20%”), and last-minute related items.
The risk in cart upsells is friction. A pop-up that interrupts checkout costs you orders. A slide-cart drawer with one or two relevant offers built in does not. Design accordingly.
At checkout
Shopify’s Checkout Extensibility, as well as various upsell apps, lets you show a single, tightly-relevant offer between cart and payment without breaking your conversion flow flow.
The keyword is single. Checkout is not the place for multiple offers. The buyer is one click from completing the order. One offer, one click to add, no friction. If you can’t keep it that clean, skip the moment entirely.
Post-purchase
This is where most of the headline AOV lift comes from. The order is placed, the payment is processed, and you can show an offer that adds to the same order with a single tap, no re-entry of payment info.
Because the friction is essentially zero and the buyer is in peak post-purchase mood, conversion rates here are dramatically higher than at any other moment. The 10-20% conversion stat almost always refers to this specific surface.
What works: an add-on directly relevant to the product they just bought, ideally with a “won’t see this again” framing. What doesn’t: a discount on a future order (that belongs in email), a generic “you might also like,” or anything that requires more than one tap.
On the thank you page
The order is complete. The job here isn’t to extract another order on the spot. It’s to set up the next one.
Thank you page slots that earn their keep: subscription opt-ins (“ship this every 30 days, save 15%”), referral program prompts, review collection, account creation, and SMS opt-in. These don’t show up in upsell conversion stats, but they’re the highest-leverage real estate in the entire flow for LTV.
The Four Levers That Decide Whether Your Upsells Convert
Across all five moments, conversion is decided by the same four levers. Most “the app didn’t work” stories are really one or more of these getting pulled wrong.
Relevance
The offer has to belong to the same outcome as the main purchase. Buying a tent? Offer a footprint, not socks. The closer the conceptual link, the higher the conversion rate. Random “you might also like” suggestions trained by a generic recommendation engine are noise.
Timing
Each moment has its own offer type, as covered above. Showing a post-purchase-style discount on the PDP cheapens the main product. Showing a PDP-style bundle at checkout adds friction. Match the offer to the moment.
Friction
Every additional click costs roughly 30% of conversions. One-click is the standard. If your post-purchase upsell makes the buyer re-enter payment details, you’ve already lost. If your cart upsell opens a modal that hides the checkout button, you’ve lost.
Perceived value
“Add this for $9.99” is weaker than “save $12 by adding this now,” which is weaker than “87% of customers also buy this.” Stack the value framing: discount + scarcity + social proof beats any single one alone.
Five Mistakes That Kill Conversions on Upsells
Unfortunately, successful upsells aren’t as easy as just saying “would you like fries with that” to every customer.
Most brands running low-converting upsell flows are making a few common mistakes (which, luckily, are easy to right).
These are the patterns we see most often when brands tell us their upsell app isn’t working.
Same offer everywhere. The same “add a warranty” pitch on the PDP, in the cart, at checkout, and post-purchase. By the fourth time, it reads as desperation. Customers tune out the entire flow.
Irrelevant cross-sells. The recommendation engine isn’t tuned, no manual override exists, and the “frequently bought together” widget is suggesting items nobody actually buys together. Audit the actual outputs, not just the install.
Discounting too early. Offering 10% off in the cart before the buyer has even checked out trains them to expect a discount on every order. Save the discount lever for post-purchase or future-order moments.
Stacking too many offers. Three upsell pop-ups in one session is zero conversions. Pick two moments to start. Add more once those are tuned.
Ignoring mobile. Most Shopify orders happen on phones. If your cart-drawer upsell is hidden behind a button on mobile, or your post-purchase offer renders as a fullscreen modal that’s hard to dismiss, your data is going to look terrible. Test the flow on a phone before you ship.
A note on attribution
Most upsell apps over-attribute. They count any incremental order or higher AOV as theirs, even when other factors moved it. Don’t trust the in-app dashboard alone. Look at store-wide AOV before and after a flow change, segmented by the moment you actually changed. That’s the number that matters.
The Tactical Upsell Playbook: Designing Your Flow
Theory aside, here’s the sequence we’d recommend a Shopify brand follow when building an upsell system from scratch.
Step 1: Map your highest-AOV products to natural pairings
Before you install anything, pull a spreadsheet. List your top 20 products by revenue. For each one, write down the two or three items that genuinely complement it.
If you can’t think of a natural pairing, that product probably doesn’t belong in your upsell flow yet. Skip it.
This is the work most brands skip, and it’s the reason their upsell app underperforms. The app can only suggest what you’ve told it to suggest.
Step 2: Pick two moments, not five
Don’t try to cover the full journey on day one. Start with the two moments that have the highest leverage for most Shopify stores:
PDP bundles (capture buyers while they’re researching)
Post-purchase one-click upsells (capture the highest-converting moment in the flow)
Get those two working at a meaningful conversion rate before you add cart upsells, checkout offers, or thank you page flows. Layering moments on top of an unproven base just multiplies the noise.
Step 3: Set guardrails before you launch
Three rules that prevent most upsell failures:
Minimum cart value before any cart upsell triggers (avoids upselling on tiny orders)
Exclusion rules for SKUs already on sale (no double-discounting)
Frequency cap per session (one upsell pop-up per visit, max)
Most apps support all three. Most stores don’t bother configuring them.
Step 4: Test the offer, not just the app
When something underperforms, the instinct is to swap apps. Almost every time, the problem is the offer, not the app.
A/B test the copy (“save $12” vs “free with order”), the discount depth (5% vs 15% vs no discount), and the product pairing itself. Most upsell apps include at least basic A/B testing now. Use it.
Step 5: Measure flow-level AOV, not app-level revenue
App dashboards report “revenue from upsells.” Store dashboards report AOV. Always trust the second one.
Look at AOV for the segment exposed to the new flow vs a control segment, before and after. That tells you whether the flow actually moved your business. App-attributed revenue tells you whether the app is justifying its monthly fee, which is a different and less interesting question.
Extending Your Upsell Flow Into Your Mobile App
Here’s something that catches most Shopify brands by surprise. You build a strong upsell flow on the web, it starts moving AOV, and then you launch a mobile app and that flow disappears.
That’s a huge miss. Your app users are your best customers. They’re the easiest to sell to, the easiest to push an upsell in front of. Stripping away your AOV upsells means losing money.
If your upsell stack is ReConvert + iCart + AfterSell, your mobile app probably runs none of them. You’ve got a dialed-in upsell flow on the web, but vanilla checkout in your app.
Vendrux takes a different approach. Vendrux extends your existing Shopify website into a native mobile app, with every third-party app on your store working exactly the same in your app.
The same ReConvert post-purchase offer that converts at 12% on web carries over to your app, with no re-implementation, no custom development, no feature gaps.
You get all your AOV-driving upsells working in front of your most engaged users – where they’re likely going to drive an even bigger lift than they do on the web.
Elevate your upsells and drive a stronger AOV lift.
Your team has tuned the flows, picked the apps, and ironed out the offers. The hard work is done. The question is whether all of that carries over to the channel where your best customers shop.
Vendrux extends your Shopify website into a native mobile app, with every upsell app you already use working out of the box, plus push notifications as a brand-new upsell surface.
The Tech Stack Top Shopify Brands Use to Run Upsell Flows
Part of what makes upsells such a low-hanging fruit opportunity is Shopify’s app ecosystem, and how many tools there are that make it easy to build cart drawer upsells, PDP recommendations, post-purchase upsells and more.
Here are some examples of apps powering the upsell flows of brands we work with:
ReConvert – A drag-and-drop post-purchase and thank you page builder. The most installed app in the post-purchase category, it also has a 4.9/5 rating and works for both Shopify and Shopify Plus. Website | Shopify App Store
Instant Section & Page Builder – Visual builder for custom PDPs, bundle layouts, and cart-drawer experiences when you want full design control. Website | Shopify App Store
AfterSell – Post-purchase upsells and thank you page customization, with a focus on one-click offers. Website | Shopify App Store
Zipify OneClickUpsell – Pre and post-purchase one-click funnels with built-in A/B testing, built specifically for AOV optimization. Website | Shopify App Store
iCart Cart Drawer – Slide-cart drawer with built-in upsells, free-shipping bars, and volume tiers. Website | Shopify App Store
Most brands don’t need all of these. A practical starting stack is one PDP/cart tool plus one post-purchase tool.
On top of these apps, Vendrux is the last piece of your upsell tech stack. Vendrux lets you extend your high-converting upsells to an app, where customers naturally convert higher and spend more already.
A Vendrux-powered app, running an optimized storefront with ReConvert/AfterSell/Zipify upsells, is the secret sauce behind an explosive boost in AOV.
Final Thoughts: Dialing In Your Upsell Strategy
The brands lifting AOV by 15% or more aren’t necessarily using better apps than anyone else, or doing anything magical.
They’re just running better flows, on more moments, on every device their customers shop on.
Your upsell stack should follow that order:
Map the moments. Five exist; pick two to start.
Build offers tuned to each moment, with relevance, timing, low friction, and stacked value.
Set guardrails so the system doesn’t fight itself.
Pick the apps that fit the moments you’ve chosen, not the other way around.
Carry the entire system across to mobile, where most of your orders are coming from.
If you do all five, the AOV lift compounds, and starts delivering the kind of growth you need to really scale your store.
Subscriptions are one of the most seductive ideas in ecommerce. Recurring revenue, predictable cash flow, customers who renew themselves while you sleep.
The economics of subscriptions are hard to argue with. The issue is that they’re not as easy to get right as you think.
Too many brands launch subscriptions, get strong sign-ups, then bleed customers faster than expected, and the recurring revenue line that looked like a hockey stick in the deck flattens by month four.
The brands that build subscription programs that compound do a few things right that the others skip. They start with a product that genuinely fits the model. They design the offer so customers want to stay. They build the systems that keep churn low. And they treat subscriptions as a real product, not just a checkbox or a silver bullet.
This guide walks the full playbook for doing subscriptions right: figuring out whether subscription is the right model for your product, designing the offer, controlling churn, the implementation work on your store, picking the right app, and how a mobile app complements the rest.
Want the latest insights into how 8 and 9-figure brands drive sustainable growth? Check out our weekly newsletter, The Retention Edge. Subscribe for free today.
Subscriptions Are Powerful, But Not a Silver Bullet
The pitch for subscriptions writes itself. You acquire a customer once and they keep paying.
CAC amortizes across many orders instead of one. Cash flow gets predictable. Inventory and forecasting get easier. Customer lifetime value goes up.
All of this can be true, when the underlying model is right. The problem is that “subscriptions” gets talked about as if it’s a feature you turn on, when it’s really a product decision that has to fit your category.
The product-fit test
Three questions decide whether subscriptions will work for what you sell:
Will the customer need this again? Coffee, supplements, pet food, beauty refills, household consumables: yes. Fashion, durable goods, occasional gifts: rarely.
On a predictable cadence? If consumption rate is roughly stable across customers, you can build frequency rules around it. If it varies wildly, your skip and pause volume will eat your operations team alive.
Is recurring delivery genuinely easier than reordering? This is the underrated question. If reordering takes 30 seconds and the customer thinks about the brand fondly each time, you’re competing against an emotional repurchase you might not want to remove. If reordering is annoying and the customer would rather it be automatic, subscription wins.
Categories where subscriptions consistently work are:
Consumables (coffee, vitamins, pet food, household goods)
Beauty refills
Replenishment-driven personal care
Curated discovery boxes
Subscriptions are a much larger struggle for categories like fashion (consumption is irregular and emotional), most durables (one purchase per year or per decade), pure gifting (one-off intent), and brands where the customer experience of choosing each time is part of the value.
All this said, it is possible to get creative with subscriptions, and make them work in non-standard categories. It’s just a lot harder, and requires an audacious vision to get it right.
The offer matters as much as the product
A great product wrapped in the wrong offer can easily fail. In subscriptions, the offer is the bundle of incentives, terms, and flexibility you build around the recurring purchase, and getting it wrong has the same effect as shoehorning a subscription onto a product that’s not the right fit.
Four elements of the offer need to be right:
Discount depth. Subscribe and save discounts of 10 to 15% are standard. Below 10%, the customer doesn’t feel a meaningful benefit. Above 20%, you’re training customers to subscribe purely for the discount, which inflates churn the moment they hit a payment failure or pause.
Frequency options. If you sell coffee and only offer monthly, customers who go through it in two weeks or six weeks won’t subscribe. Offer the cadences that match real consumption patterns, not the ones that are easiest to set up.
Lock-in vs flexibility. Annual prepaid plans look great on paper because they front-load revenue, but they also front-load expectations. Most successful programs lead with month-to-month and let the customer earn their way into annual, not the other way around.
Free shipping or gifts. Often the deciding factor for the marginal customer. Worth modeling: a free shipping offer can move conversion more than a deeper discount, with less long-term LTV erosion.
A subscription lives or dies on its first 90 days. If the product is wrong or the offer is wrong, no amount of dunning logic or push notifications will save it.
Athletic Brewing is a great example of a well-designed subscription offer
The Real Game Is Churn
Once the product and offer are right, the hard work of running a subscription product begins: keeping people subscribed.
This is where most subscriptions fail. It’s far more common than trying to do subscribe and save for jeans, or getting the initial offer wrong.
The truth is, many ecommerce brands are great at selling. But they’re not great at retention. They assume that subscriptions will handle this automatically, but they don’t.
A successful subscription product requires smart churn management. And that starts with understanding why customers churn.
Here are the different types of churn, and how to build a subscription that performs above average in each of these areas.
Involuntary churn: payment failures
The biggest churn category at most subscription brands isn’t customers leaving on purpose. It’s expired cards, declined transactions, and failed retries that quietly cancel customers who never wanted to leave.
The fix is unglamorous but high-leverage:
Smart dunning. Multiple retry attempts at staggered intervals, on different days of the week, before any cancellation triggers.
Card updater. Most major payment processors offer automatic card updates when a customer’s bank issues a new card. Make sure it’s enabled.
Pre-charge notifications. Email or push the customer two or three days before the charge so they can update payment if needed, instead of finding out after the failure.
Recovery emails for failed payments. Don’t make the customer log in to fix it. Send a one-click update link.
Brands with strong dunning recover a meaningful share of failed payments that would otherwise be lost. Brands without it cancel customers who would have happily kept subscribing.
Early voluntary churn: didn’t fit
Some customers cancel because the product or experience didn’t match what they expected. They’re hard to keep but easy to identify: they cancel within the first one to two billing cycles.
The levers here aren’t retention tactics, they’re onboarding and expectation-setting:
Set realistic expectations on the PDP. Don’t promise outcomes you can’t deliver in the first 30 days.
Front-load value in the first shipment. A welcome bonus, a sample of a complementary product, a personalized note. Whatever signals “we noticed you joined.”
Onboard the customer to the brand, not only the product. Educational content, founder story, how to get the most out of the first delivery. If the only thing the customer experiences in week one is the box arriving, you’re under-investing.
Fatigue churn: got too much
The customer likes the product but is accumulating it faster than they can use it. They cancel because the cabinet is full and they don’t want another box.
Fatigue churn is the most preventable category and the easiest to leave on the table. The fix is letting customers self-serve flexibility instead of forcing them to cancel:
Skip a delivery. One-click, no questions asked.
Pause for X weeks or months. Reactivates automatically.
Change frequency. Move from monthly to every six weeks. Keeps the relationship alive.
Swap products. Variety keeps fatigue down on its own.
Brands that hide these options behind support tickets churn customers who would have stayed if they could have clicked “skip.”
Planned churn: life event
The customer’s circumstances changed. They moved, switched diets, had a baby, broke up, retired. Hardest to prevent.
The savable cases get caught in the cancellation flow:
Offer pause, not only cancel. “Going on vacation? Pause for 4 weeks instead.”
Offer a frequency change. “Getting too much? Try every 8 weeks at the same discount.”
Offer a downgrade. Smaller pack size, lower-tier product.
Offer a discount or free shipping for the next order. Use sparingly: heavy discount-saves train future churn behavior.
A well-designed cancellation flow recovers a meaningful percentage of customers who clicked “cancel.”
Setting Up Subscriptions on Your Store
Strategy is the most important part of a successful subscription product. The right product fit, the right offer, the right churn management strategy.
Once the strategy is right, the implementation has more moving parts than most brands expect. Subscriptions touch the product page, the cart, the checkout, the customer account, and several backend integrations.
Each surface has decisions that quietly shape conversion and retention. Let’s take a look at how to implement this on your storefront now:
The product page
The product page is where most subscription decisions get made.
Subscribe vs one-time toggle. Default to subscribe and save selected, with one-time as the alternative. Defaulting to one-time leaves money on the table.
Frequency selector. Show the cadences that match real consumption patterns. If most customers go through one bag of coffee every three weeks, “every 3 weeks” should be a default option, not buried under “more frequencies.”
Discount display. Show the savings clearly. “Subscribe and save 15%” with the original price visibly struck out converts better than a single subscription price.
Trust signals. “Cancel anytime” near the subscribe button is one of the highest-impact micro-copy tweaks for first-time subscribers.
Build-a-box UI. If you’re doing curated boxes, the PDP becomes a configurator. Make sure the app you pick supports the configurator UX you want, not the one it ships with by default.
Mixed cart handling. Decide whether customers can buy a one-time item alongside a subscription. Most apps support it, but not all checkouts handle it gracefully. Test the experience.
Subscription summary in the cart. Show what they’re subscribing to, the cadence, the next billing date, and the total. Surprise costs at the next charge are a leading driver of early cancellation.
Checkout integration. Modern subscription apps integrate with native Shopify Checkout. Older patterns that route through a separate checkout add friction and break Shop Pay flows. Make sure you’re on a current integration.
The customer portal
The customer portal is where retention is won or lost. It’s how customers manage their subscription post-purchase, and a bad one drives churn directly.
A solid portal lets customers:
Skip the next delivery
Pause for a defined period
Change frequency
Swap or add products
Change payment method
Update shipping address
Reschedule the next charge date
Cancel (with a flow attached)
Two specific things matter more than they sound.
Passwordless login is one (most subscription portal traffic comes from email links; making the customer remember a password kills self-service rates).
The other is a portal that’s branded to match your store. A generic third-party portal signals “this isn’t really your brand,” which subtly undermines trust.
Backend integrations
Subscriptions don’t run alone. A handful of integrations carry most of the weight:
Helpdesk. Support agents need visibility into subscription status, upcoming charges, and history. Without it, every support ticket is a fact-finding mission.
Loyalty and referrals. If you run a loyalty program, subscription orders should still earn points and tier progress. If subscribers don’t accrue rewards, you’re missing one of the easiest retention levers available.
Reviews. Post-delivery review requests should fire on subscription orders, not only one-time orders.
Analytics. Most subscription apps have basic dashboards. The brands that scale layer on cohort analysis tools or pipe subscription data into a warehouse for proper LTV modeling.
The integration story matters in app selection. An app with a thinner feature set but deep, tested integrations will often outperform a feature-rich app whose Klaviyo connector breaks under load.
Communications
Actively communicating with your subscription customers is crucial. Don’t make the mistake many brands do, of purposely under-communicating because you’re afraid you’ll “remind customers to cancel”.
Proactive communication reduces churn, it doesn’t create it.
You don’t need to be Hemingway here. Just get the basics right:
Welcome flow. Sets expectations for the first delivery and the relationship.
Pre-charge reminder. Two to three days before the charge. Reduces surprise cancellations and gives customers time to skip or update.
Post-shipment. Tracking, delivery, and a soft prompt to engage with the product.
Win-back. For canceled subscribers, a sequence over the following 30 to 90 days. Don’t write them off after one cancel.
Running a brand with subscription products?
If your portal, communications, and integrations are dialed in, you’ve already done the hard work for your storefront. Carrying that into mobile shouldn’t mean rebuilding it.
Vendrux extends your existing Shopify store into a native iOS and Android app. Your subscription product pages, customer portal, checkout, and every integration you rely on work the same way in the app as they do on your site.
How Subscription Apps Help You Build a Thriving Subscription Product
Shopify has native subscriptions built into the platform, but the feature set is bare-bones: monthly recurring billing, basic frequency options, and a thin customer portal.
Most serious subscription brands use a dedicated subscription app for the rest.
A subscription app handles a lot beyond the basics:
A real customer portal with skip, pause, swap, and frequency control
Build-a-box and bundle configurators
Tiered discounts, gift options, and loyalty integration
Cancellation flows with retention offers
Analytics and cohort reporting
Integrations with the broader stack
A few criteria matter when picking one:
Dunning quality. Ask what the recovery rate looks like for failed payments. The differences between apps here are bigger than most merchants realize.
Portal UX. Spin up a test subscription and see what your customers will see. The portal is the retention surface. Don’t pick on screenshots.
Bundling and build-a-box support. If your offer needs a configurator, make sure the app supports the UI you want, not the one it defaults to.
Pricing structure. Some apps charge transaction fees on top of monthly pricing. Others are flat. At scale, the fee model usually only beats the flat model at the lowest order volumes.
Integration depth. Klaviyo, Gorgias, your loyalty app, your reviews app. Check that the integrations exist and are actively maintained, not listed once and abandoned.
Migration story. If you might switch later (and most brands do), check that the app supports clean export of customer and subscription data.
Here are a few apps worth knowing about:
Easy Subscriptions is a strong choice for growing brands that want advanced subscription mechanics (build-a-box, prepaid, tiered discounts, upsells) without transaction fees. A good fit when you’ve outgrown the basics but don’t need enterprise scale.
Utterbond is a Shopify-native app that handles prepaid and pay-as-you-go billing, build-a-box, and dunning at a price point well below the enterprise apps. Often a sensible first move for brands launching their first subscription product.
ReCharge is the enterprise default. The deepest integration ecosystem, the largest install base among 8- and 9-figure subscription brands, and the most mature dunning and analytics. The trade-off is price (Standard at $99/month, Pro at $499/month) and complexity, neither of which is the right fit for early-stage stores.
Subscription apps like Easy Subscriptions handle all the technical work required to set up and run successful subscription products.
The right app depends on the stage of your business (startup vs SMB vs enterprise), and smooth integration with the rest of your store.
Mobile Apps and Subscriptions
If you’re running a subscription product, you almost certainly need a mobile app as well.
There’s natural synergy between mobile apps and subscriptions. They both excel for products with natural repeat purchase potential, like beauty, supplements or food and beverage. And they’re both built to drive stronger retention and LTV.
Mobile apps also help elevate your subscription product in a number of ways your mobile website, emails and SMS don’t:
Push notifications are perfect for subscription reminders, order updates, small nudges, because they arrive instantly and are almost guaranteed to be seen.
The portal is one tap from the home screen. Skipping or pausing a delivery is a 10-second action instead of a hunt through inbox links.
Win-backs land easier. Email deliverability is fragile; a customer who installed your app gave you a more durable channel.
App users have higher repeat rates and AOV. That compounds with a subscription’s recurring nature.
The full case for the pairing is in our deep dive on mobile apps for subscription brands, as well as the solution for a common issue that brands face when launching apps – their subscription experience breaking in the app.
How to Build a Winning Subscription Product: Get the Foundations Right
Subscriptions look simple from the outside. But they turn out to be one of the harder products in ecommerce to run well.
With the enticing nature of recurring subscription revenue comes a lot of competition, higher CACs, and as such, you need strong retention, or you end up losing money.
Luckily, you can get ahead by simply doing what a lot of brands don’t: getting the basics right.
Pick a product that’s a generally good fit for subscriptions. Craft a solid offer. Build the retention system that makes customers want to stay subscribed, making it more painful for them to miss out than to keep getting their orders.
If you want to level your subscription game up even further, launch a mobile app.
Subscriptions are a great business to be in, if you do it right. Just don’t cut corners or see it as a silver bullet. Craft your program the right way, and you’ll be rewarded.
Launching a referral program is such a sound investment – and is becoming more so with AI and LLMs, and the value of people online recommending your brand and your products.
If you’re running a Shopify store and not sure where to start with your referral program, this article answers all of that. We’ll cover the program design decisions first, then the launch steps, then the apps that help you put your program live.
Why Referral Programs Work for Shopify Stores
Referral programs work because people trust their friends more than they trust your ads. The ROI is high, and it’s the kind of channel that actually incentivizes people to talk about your brand.
Here are a few numbers that make the case:
There’s also a cost-curve advantage. Paid acquisition gets more expensive every year as CPMs rise and iOS privacy changes chip away at attribution. Referrals work the other way: the reward only fires after a purchase happens, with no ad spend in front of it, and the channel gets stronger as your customer base grows. More happy customers, more potential advocates.
Referred customers also behave better after they buy. They convert at a higher rate than paid-acquired customers, and they tend to retain better, because they came in on social proof rather than a retargeted Meta ad.
How a Shopify Referral Program Works
Every referral program follows the same loop:
A customer (the advocate) makes a purchase or signs up.
They get a unique referral link or discount code to share.
They share it to friends or followers.
The friend clicks through, makes a qualified purchase, and gets their reward automatically.
The advocate gets their reward, usually issued as a discount code or store credit.
The reward itself can take several forms:
Percentage discount. “Give 15%, get 15%.” Most common for apparel and beauty.
Fixed-amount discount. “Give $10, get $10.” Cleaner math for higher-AOV stores.
Store credit. Keeps revenue in the store and drives a follow-up purchase. Slightly stickier than a one-off discount.
Loyalty points. Works best when referrals and loyalty run through the same platform.
Cash or gift card. Used by brands with very high AOV, or in affiliate-hybrid programs.
Free product. Strong emotional pull, but requires margin planning.
Where the program lives on your store matters as much as the reward. Common placements include the post-purchase modal, thank-you page, account dashboard, transactional emails, a dedicated /refer landing page, homepage blocks, and SMS campaigns.
The strongest programs surface in several of these at once. A post-purchase modal alone fires once, and most customers close it without thinking about it again. If the program isn’t also in their email, account page, and the footer, you’ve effectively launched it to nobody.
Types of Referral Programs (and When to Use Each)
Picking the right program structure up front saves a lot of rework later.
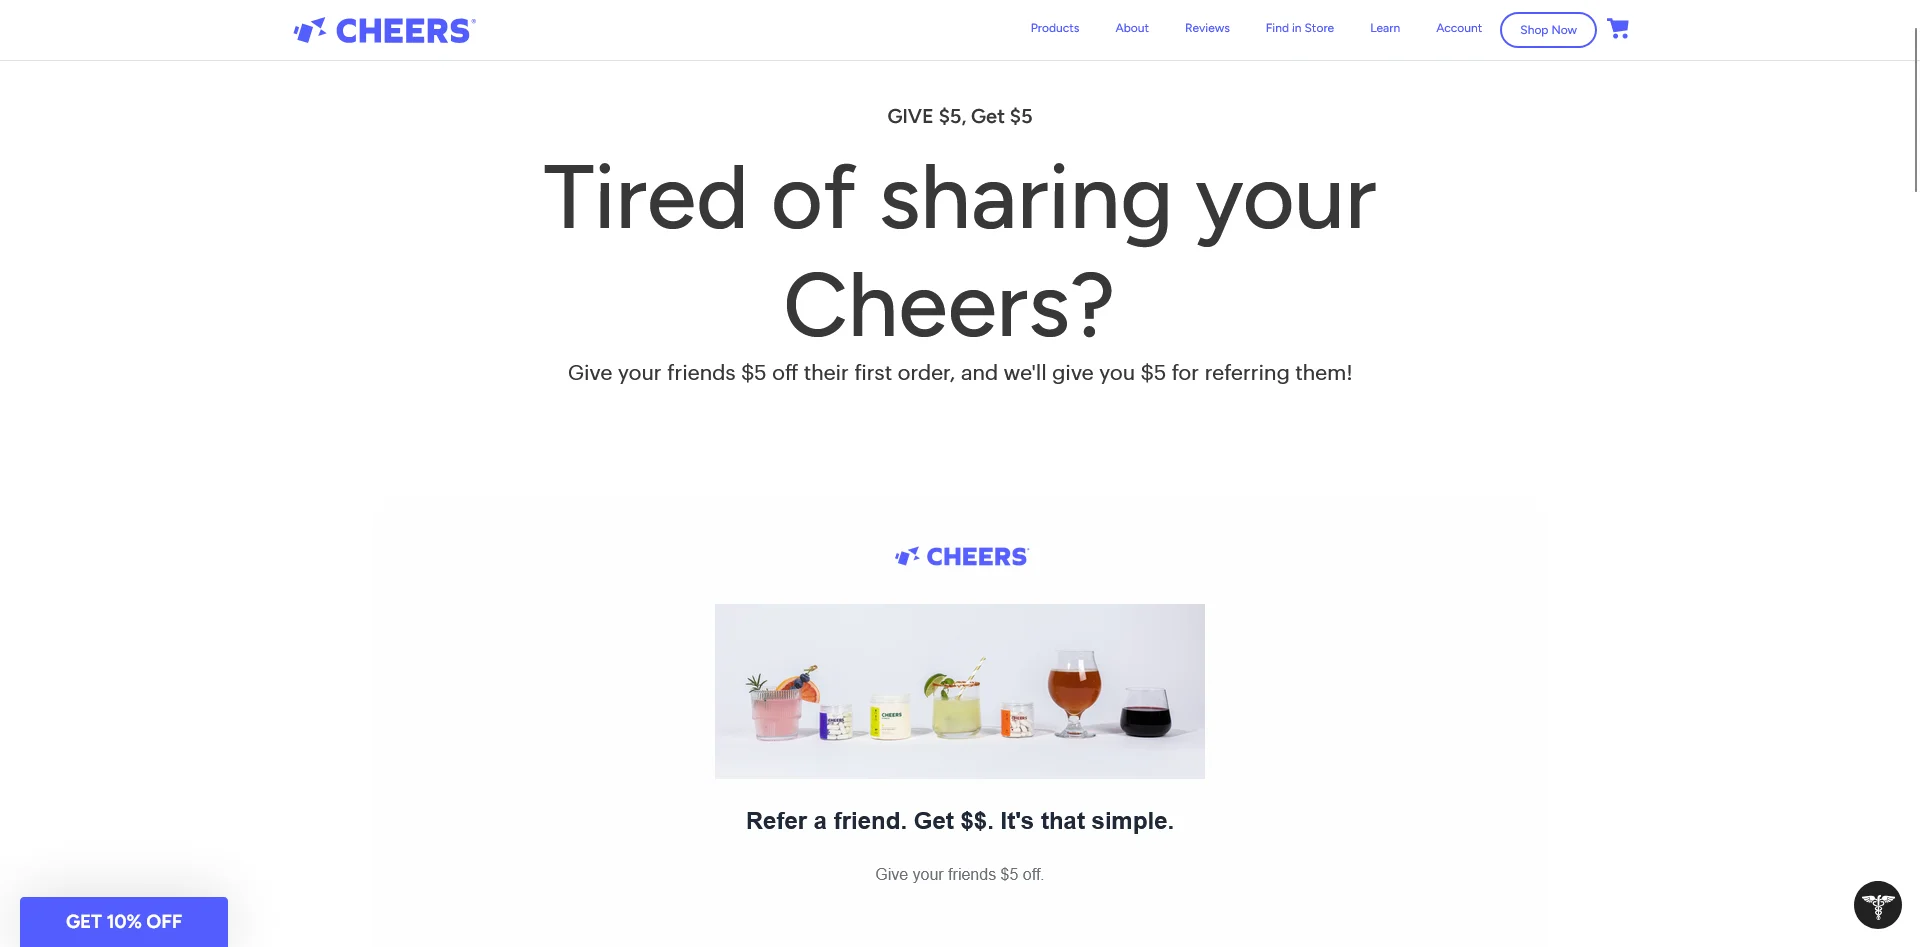
Double-sided
Both the advocate and the friend get rewarded. This is the default, and it’s what 78% of brands use. Advocates feel like they’re giving their friends a real benefit, not just doing you a favor.
Use when: You want a program that scales. This is the right starting point for almost every Shopify store.
Cheers‘ referral program – $5 off for the referrer and the referree
One-sided
Only one party gets rewarded. Advocate-only works for brands with passionate communities where the friend doesn’t need an incentive (rare). Friend-only works as a pure acquisition play, functionally a “tell a friend” discount.
Use when: You have enough brand pull that one side doesn’t need to be bribed, or you’re running a short-term acquisition campaign.
Tiered or milestone
Rewards escalate based on referral count. First referral gets 10% off, fifth gets $50 credit, tenth gets a free product. Tesla’s original referral program made this format famous.
Use when: You have products with genuine recurring-share potential (supplements, coffee, fashion drops) and a customer base engaged enough to chase a bigger reward.
Ambassador or VIP
A separate, higher-tier program for your top advocates. Often invite-only, with custom rewards, early access, or a revenue share.
Use when: A handful of customers drive a disproportionate share of your referrals, or you’ve got an organic community worth formalizing. Layer this on top of a standard double-sided program.
Affiliate-hybrid
Referral program that pays commission per sale instead of (or in addition to) a store credit. Blurs the line between customer referral and affiliate marketing, which is why most of the best apps handle both.
Use when: You want to activate influencers or creators alongside your customer base without running two separate programs.
How to Design a Referral Program That Drives Real Revenue
Installing and setting up a referral program app takes a weekend. Getting the design of your program right pays back for years.
The decisions below are where most programs succeed or fail.
Pick the right program type
Default to double-sided unless you have a specific reason not to. Both sides getting something is what 65% of customers prefer, and it gives you the widest audience willing to participate.
Set the advocate reward
The advocate reward is effectively the CAC for the new customer they bring in. Treat it as acquisition cost, not discount margin, and work backwards from there.
Most Shopify brands settle between 10% and 20% off (or $10-$25 in store credit). Below that range, advocates don’t bother sharing. Above it, the acquisition math starts to hurt.
Store credit often outperforms a straight discount on the advocate side. A credit sitting in someone’s account feels like money they need to spend; a percentage-off coupon feels like an optional saving. The return rate is meaningfully higher.
This is the bigger conversion lever. The friend has no relationship with your brand yet, so the reward is what gets them to click through and try.
Rule of thumb: make the friend’s reward at least as good as your best first-time-buyer offer. If you’re running “15% off your first order” on your site pop-up, the referral offer should match or beat it. Anything less is worse than your default, and advocates will notice.
Choose the trigger point
When does the reward actually fire? Three options:
On share. Advocate gets a reward as soon as they send the link. Easy to abuse.
On friend signup. Advocate gets rewarded when the friend creates an account. Better, but still leaves room for empty accounts.
On qualified purchase. Advocate gets rewarded only when the friend makes a purchase above a set threshold. This is the standard and every app below defaults to it.
Go with qualified purchase. Layer on a minimum order value ($50+) to cut out low-ticket gaming.
Set your fraud rules
Fraud is the most common reason referral programs underperform. Three non-negotiable rules:
One-time-use codes per friend. No static, farmable codes that show up on Honey or Coupert. Most apps handle this automatically, but confirm before launch.
No self-referral. Block cases where the advocate and friend share an email, address, or device fingerprint.
Rate limits per advocate. Cap the referrals an advocate can earn rewards on per month. Prevents one person turning into a discount factory.
A Reddit thread in r/shopify summed up the issue well: static codes get scraped, end up on discount aggregators, and then anyone can use them. Don’t let your referral program become a permanent promo code.
Plan reward delivery
Automatic beats manual every time. When the qualifying event fires, the reward should appear in the advocate’s email immediately, and ideally auto-apply in their cart if they’re logged in. Manual payout flows introduce delay, which kills the dopamine loop that makes referrals work.
Put your referral program in front of your best advocates.
Vendrux turns your existing Shopify store into native iOS and Android apps. Your referral program carries over, putting it in front of your best customers, your app users, the customers most likely to participate in your program and get the word out about your brand.
How to Set Up a Referral Program on Shopify (Step-by-Step)
Once you’ve made the design decisions, the setup is fast. Most stores can go live in under a day.
Pick a referral app that works with your store, and the type of referral program you want to launch.
Install and connect to Shopify. Most apps install in a couple of minutes from the Shopify App Store and auto-detect your products, customers, and order data.
Configure rewards. Plug in the advocate and friend rewards you designed above, plus your trigger point, minimum order threshold, and fraud rules.
Build advocate touchpoints. Minimum: a post-purchase modal, a transactional email, and a dedicated landing page. Better: an account-page block, plus the referral offer in abandoned cart emails to existing customers.
Promote the program. Email your existing customer base at launch (your biggest single pool of potential advocates). Add placements in the footer, homepage, and order confirmation emails. Plan a repeat-promotion cadence, not a one-time blast.
Track and iterate. Watch participation rate, friend conversion rate, referred-customer AOV and LTV, and fraud rate. Every 90 days, tune one lever (reward size, placement, messaging) and measure the delta.
Referral Program Best Practices
Here are a few quick tips on launching a referral program that adds to your bottom line:
Make the reward worth sharing. $5 off a $100 order isn’t worth a text message. Default to percentages your advocates wouldn’t be embarrassed to send.
Make sharing frictionless. One-click share to SMS, WhatsApp, email, and copy-link at minimum. If an advocate has to log in, generate a code, then manually send it, you’ve lost most of them.
Surface the program at peak-satisfaction moments. Post-delivery. After a positive review. After a second purchase. These are the moments customers are most likely to refer, and the moments most brands miss.
Give advocates copy and creative. They’re customers, not marketers. Pre-written SMS and email templates lift share rates noticeably.
Match reward size to customer value. A VIP customer can unlock a better offer than a first-timer. Segmented rewards feel personal and reduce total reward spend.
Combine with loyalty where it fits. One program with a referral tier usually beats two disjointed programs competing for the same home-page real estate.
Ogee integrates referrals with their loyalty program, providing extra points for each person referred
Common Referral Program Mistakes to Avoid
Hiding the program. One launch email and nothing else. If existing customers don’t see the program in the account page, footer, post-purchase screen, and ongoing emails, most of them will never engage with it.
Under-incentivizing the friend. Brands spend all their reward budget on the advocate side and leave the friend a coupon worse than the homepage pop-up. The friend is the one converting. Spend there.
Allowing discount-farm abuse. No one-time codes, no device fingerprinting, no fraud rules. Your referral code ends up on Honey within weeks, and every new customer gets your best discount without ever being referred.
Not segmenting advocates. Not every customer should be promoted as a brand advocate. Customers who’ve returned products, left one-star reviews, or never repeat-purchased shouldn’t receive “refer a friend” emails.
Launching without a promotion plan. Installing the app isn’t launching. A real launch includes a dedicated email, SMS sequence, on-site placement, organic social, and a reason-to-refer moment (a product drop, a seasonal push).
How to Choose the Right Referral App for Your Shopify Store
Referral program apps are what make it such a no-brainer to add a referral program to your store.
If you had to build and maintain a custom-built referral program for your store, the ROI would look a whole lot different than it does when there are sophisticated apps out there to help you set it up and run it (often with best practices built in).
Some of the top rated apps in the Shopify App Store include:
(many more available on the App Store too).
To pick the app that fits best for you, look for these things:
Fit with your store size and budget (some tools are built for enterprise brands, others have entry-level options for smaller stores).
Integration with other areas of your business (like your loyalty program).
Support for the program structure you want to implement.
Design & UI that’s easy to use, fits with your branding and storefront design.
Some key features to look for include:
Fraud controls built in: one-time-use codes per friend, self-referral blocking by email/address/device, minimum order thresholds, per-advocate caps.
Reporting that answers “how many sales did this drive last month” without exporting to a spreadsheet.
Klaviyo or ESP integration for referral follow-up flows.
There’s no one “right” answer for the best app for your store. There are plenty of great options out there. Just find one that fits what you want to do, read the reviews and check out the case studies, and get to launching your program.
All top eCommerce brands today have their own mobile app. An app is an amazing tool to boost customer retention and loyalty, generate more engagement from mobile consumers, and to position your brand as an authority in your industry.
But building an app is hard. Even before you get to the ins and outs of coding an app, you may have no idea where to start in terms of designing a mobile app. That’s why you might be looking for a Shopify mobile app template, to speed up the process.
If you’re looking for a template for your mobile app, we’ve got you covered. In this article we’ll show you where to find Shopify mobile app templates, how to use them, some example templates you can use, and finally explain why you might not need a template in the first place.
What Are Shopify Mobile App Templates & Where to Find Them
A mobile app template can be many things.
In its simplest form, a Shopify mobile app template could be a set of UI design templates for various pages of your app, such as product pages, collection pages, cart page and checkout.
This saves the work of designing a professional and functional interface for your app, and also gives you an idea of which screens or pages you’ll need to build (simple apps may have as few as 3-5 screens, while more complex apps may have as many as 25 or more).
UI templates are useful if you already know what you’re doing when it comes to coding, or you’re passing the designs off to an app developer or app development agency.
But if you’re coding the app in-house, you might require a more in-depth template, that includes starter code for your app.
Code templates essentially give you a shell of an app already built; you just customize it to fit your store, and integrate it with your Shopify admin backend.
In either case, further development is required before you’re able to publish the app for your customers – but a template can give you a head start on the app development process, compared to starting completely from scratch.
Where to Find Shopify Mobile App Templates
You can find Shopify mobile app templates in a number of different places online.
The best place depends on what kind of template you need.
If you’re looking for a basic UI template, check out sites like:
If you’re looking for starter code templates, you can find some options on sites like:
These sites have code you can purchase for a one-off fee (usually quite cheap, somewhere between $30-$150), and thus use for your app.
Alternatively you could look on GitHub, where some developers publish mobile app source code you can take and customize for your own project.
7 Shopify Mobile App Templates to Try (Or Use for Inspiration)
Ready to get a running start on developing your Shopify mobile app? Here are some templates to check out.
This template on UIzard includes all the necessary pages for a basic clothing app, including:
Sign up
Log in
Homepage
Search
Profile
Product details
Cart
Customer account and info
Delivery info
Checkout, payment and credit card page
These are only visual designs, and you’ll need to convert them into proper mockups and then again into code.
UIzard requires a paid subscription ($19 per month, or $12 per month annually) in order to access their templates, which is very minor, all things considered.
You may find this a little basic, but it could provide a good starting point when designing your app’s UI.
This extensive template includes 100 screens, giving a wide variety of options for many different types of page, from login pages, to customer profile pages, wishlist pages, tracking settings and more.
The templates come in Figma/Adobe XD files, which is perfect for passing off to developers, with all the components, vectors and measurements done that developers need to start coding.
You’ll need UI8’s all-access pass to download this template, which is a little costly – $294 per year, or $150 quarterly. But again, considering the overall cost of developing an app, a few hundred dollars for ready-made designs is not too bad.
This template on CodeCanyon provides starter code for a Shopify mobile app written using Flutter, for just $49.
Push notifications and multiple payment options are set up for you, as well as a number of key pages.
You’ll need to customize it to fit your brand, as well as completing the integration with your Shopify backend. You’ll also need to be proficient in the Flutter app development framework to bring this template to life.
Another template on the CodeCanyon marketplace, this template comes with pre-built product detail pages, collection screens, checkout and payment flow, offline wishlist and more, built for React Native.
At $79 for the regular license, it’s an extremely cheap way to get the starter code your developers need to build your mobile app quickly.
This template comes in the form of a codebase on GitHub.
It utilizes a number of open-source tools, including Node, Express, React and SQL. It’s free – you just need to clone the template and start working on your own version.
Be aware that this doesn’t include visual templates like those above, and instead is more akin to boilerplate or starter code for creating a Shopify app.
You’ll need to design your UI, and then you’ll need to know what you’re doing with a few different development tools and frameworks in order to make use of this.
This template is another starter codebase on GitHub, built with React Native, TypeScript and Expo.
It comes with a number of comments already built, and all the starter code your app requires.
This is a great resource for anyone looking to build a Shopify mobile app with React Native, with just some simple customization required to turn the template into a real app for your brand.
Why You Probably Don’t Need a Template
The templates we’ve shown you are all useful ways to speed up the development process if you’re designing and building an app from scratch.
However, for most Shopify stores, a template is unnecessary.
Why?
Because your store is the template.
As long as your website is responsive and mobile-optimized, there’s no need to design a brand new UI for your app.
There are some small tweaks you’ll want to make, but ultimately, if your mobile website’s UI is good enough, it will be good enough for your app.
If it’s not, go work on your website first. Build an app-like experience on the web, and then replicate that in your app.
“In our experience, users break into two camps. There are users who prefer to buy on the app and users who prefer using the browser. Our apps never had any functionality or usability beyond the web experience. The reason to have an app is not to have something that isn’t on the website, but for people who prefer that way to access Rainbow content.”
Besides, do you really want to use a template for your app?
A template, by definition, means your app will likely look the same as tens, hundreds, or perhaps thousands of other apps.
It’s better to give your customers something that feels unique and personal to your brand, rather than a templated solution that looks like it came off a production line.
Launching a Shopify Mobile App with Vendrux
There’s no need to use any templates, or mess around with customizing templates and finding someone to code them for you, if you simply convert your Shopify store to an app with Vendrux.
Vendrux is a full-service platform that turns any website into native apps. It’s perfect for Shopify stores, because you already have 90% of what you need from an app, in your existing website.
We add a few small touches, such as native UI and push notifications, and do the coding required to bring your website to life as apps.
You don’t need to code anything, you don’t need to design or rebuild anything, you don’t even need to worry about updates and maintenance after it’s built. We do all that for you.
The apps will reflect everything your website does, including all apps, integrations, custom features, theme alterations and tiny tweaks and optimizations you’ve made to your website to boost conversions.
It’s fully synchronized with your website, meaning you can update your mobile apps at any time, without having to touch any mobile app code.
Vendrux has worked with many high-revenue Shopify merchants, and is a more flexible, more scalable, and ultimately simpler and more affordable option than any template.
Just a few of the amazing eCommerce apps we’ve built at Vendrux
Book a demo now to learn more about how we can build the perfect app for your store.
Ready to Build Your App?
Start now, and you could have your own mobile app, live in the app stores, in less than a month.
Shopify merchants are uniquely positioned to launch a mobile app fast, and with minimal expense. Your app just needs to replicate your mobile web experience, which Vendrux does (with the small touches that makes your app feel truly native).
Book a demo now to get a sneak peek of your app, and start the process of building an app that costs next to nothing, adds virtually nothing to your workflow, and takes your brand to another level.
Loyalty programs are one of the highest-ROI levers any Shopify brand has.
The classic Bain study, which has been quoted in publications all over for more than ten years, is still accurate: a 5% increase in customer retention boosts profits by 25-95%. Every percentage point of repeat purchase rate is worth more to your business than a similar uptick in acquisition.
The catch: most Shopify loyalty programs underperform, because they’re just bolted on, without much thought put into the program.
Earn rate too low, redemption rate too low, tiers that don’t motivate, and customers earning points they never spend. The program becomes background noise, and the merchant pays a monthly fee for a feature their customers ignore.
Instead of brushing it off as “we have a loyalty program, because we’re supposed to, but it doesn’t really do anything for us”, first take a look at what you could do to build a better loyalty program – one that does the heavy lifting to bring more repeat customers back to your store.
Why Your Shopify Store Should Have a Loyalty Program
Most businesses look at acquisition as the main driver of growth. But realistically, once you reach a certain level, it’s actually retention that’s driving the bulk of your growth.
Here are three relevant stats to think about:
Loyalty programs drive more repeat purchases and higher retention, which both deliver sales with higher profit margins.
It’s structured for engagement. Birthday rewards, double-point days, tier-up celebrations, and points-expiration nudges are all reasons to email or push someone that aren’t pure promotion.
Your most valuable customers stay close to your brand without you having to discount your way into their inbox.
There’s a defensive argument too. Once a customer has $40 of points sitting in your store, a competitor needs to win them back from a position where they’re effectively starting at -$40. That’s a switching cost you didn’t have before, paid for at zero direct cost (you only owe the reward when they actually redeem).
Loyalty programs aren’t free. The cost is the redemption itself, plus the app subscription. But of every retention lever available to a Shopify merchant, loyalty is the lowest-effort, most measurable one.
How a Shopify Loyalty Program Works
Your typical Shopify loyalty program has five parts:
Enrollment. A customer signs up, usually via a post-purchase prompt, an account creation flow, or an email invite.
Earning. They accumulate points (or status, in tiered programs) by taking actions you’ve defined: purchases, reviews, referrals, signups, social follows, birthdays.
Reward catalog. A menu of things they can spend points on: discounts, free shipping, exclusive products, early access.
Redemption. They cash points in at checkout for a reward, usually as a discount code applied to the order.
Tier or status (optional). As they spend more, they unlock higher levels with better perks.
Within these parts, there are a few details that need to be configured. These details depend on how aggressive you want to be with your loyalty strategy.
Earn rate. How many points per dollar spent. The standard is $1 = 1 point. Some brands run $1 = 5 or $1 = 10 to make the numbers feel bigger.
Redemption rate. How many points convert to a dollar of value. The typical spread is 100 points = $5, which works out to about $0.05 of redemption per $1 spent. That’s a 5% effective loyalty cost.
Earning actions. What besides purchases earns points. The good ones expand engagement (reviews, referrals, birthdays). The lazy ones add noise.
Tier thresholds. What annual or lifetime spend unlocks each level, and what each level unlocks.
We’ll walk through all of these below.
Types of Loyalty Programs (and When to Use Each)
Here are five common ways to structure your loyalty program. Yours may have multiple elements, but it generally falls under one main type.
Points-based
Customers earn points for actions and redeem them for rewards. The default and the most common.
Use when: You have a typical DTC catalog and want a structure customers already recognize from other brands.
Tiered / VIP
Status-based, usually tied to annual or lifetime spend. Each tier unlocks better perks: higher earn rate, free shipping, early access, exclusive products.
Use when: You have a long-tail of high-spending customers who’d respond to status, not just discounts. Common in beauty, apparel, and premium DTC.
Paid membership
Customers pay a fee for instant benefits, such as free shipping, member-only pricing, early access. Amazon Prime, Costco, and a growing list of DTC brands run this format (such as Country Life Natural Foods, with their “Country Life Plus” program).
Use when: Your AOV and purchase frequency support a recurring fee. Strong fit for replenishment categories (supplements, coffee, pet food). Weak fit for low-AOV one-off purchases.
Value-based
Points or rewards tied to a brand value: a portion donated to charity, trees planted per purchase, community access. The reward is alignment, not dollars.
Use when: You have a clear brand mission and a customer base that engages with it. Don’t fake it; customers see through values-washing fast.
Hybrid (loyalty + referral)
Loyalty program with a referral component built in. Customers earn points for referring friends, and the friends get a bonus for joining.
Use when: You’re running both, and you want a single coherent system rather than two programs competing for the same on-site real estate. Most loyalty apps handle referral natively, so this is usually the default rather than a separate decision.
How to Design a Loyalty Program That Drives Repeat Revenue
Adding a loyalty program to your Shopify store is possibly the easiest thing you can do. Just go to the Shopify App Store, find a loyalty app (Joy, Smile, Rivyo, or many others), set it up, and away you go.
Launching a loyalty program that actually delivers results? Now, this is a little more difficult.
Most brands install an app, accept the defaults, and wonder why nobody redeems. Don’t be most brands.
Pick the right program type
Default to points + tiers for most Shopify stores. Points give you a universal mechanic; tiers give your top customers a reason to stay engaged after they’ve redeemed their first reward.
If you’re in a replenishment category (supplements, coffee, pet food), evaluate paid membership against (or alongside) the points program. The math can be substantially better.
Set the earn rate
The earn rate is how many points you give per dollar spent. Three common formats:
$1 = 1 point. The straightforward standard.
$1 = 5 or 10 points. Inflates the numbers so they feel substantial. A $50 purchase earns 250 points instead of 50.
Tiered earn rates. Higher-tier members earn at a faster rate (1.25x, 1.5x).
The actual earn rate doesn’t matter on its own. What matters is what those points are worth at redemption. Pick whichever ratio feels good for the brand and design backwards from the redemption side.
Set the redemption rate
This is the lever that decides what your loyalty program actually costs you. The standard structure is 100 points = $5, with $1 = 1 point — a 5% effective discount on repeat purchases.
Three rules of thumb:
5% effective rate is the typical baseline. Most ecommerce loyalty programs sit here.
8-10% effective rate is generous and drives faster redemption. Useful for new programs trying to build engagement quickly.
3% or below rarely works. Customers do the math, see the points are worthless, and disengage.
Redemption increments matter too. Smaller increments (100 points = $5, 200 = $10) get redeemed faster and create more touchpoints. Large increments (5,000 = $50) feel prestigious but lower engagement. Most stores want the smaller end of the range to keep redemption velocity up.
Choose your earning actions
Beyond purchases, which actions earn points? Each one expands engagement:
Account creation. Bonus on signup. Drives initial enrollment.
Reviews. Points per review (with a photo bonus). Amplifies reviews and loyalty in one move.
Referrals. Points per qualified referred purchase. Loyalty + referral integrated natively.
Social follows. Points for following on Instagram, TikTok. Modest reward, free distribution.
Birthday. Bonus points on registered birthday. The cheapest engagement push you can run.
Newsletter signup. Email or SMS opt-in.
App download. Extra points for downloading your app (if you have one).
The mistake is including too many. It’s not really a case of letting people earn too many points, but just overcomplicating your program. Six earning actions, each worth 50 points, scattered across the account page is too much noise.
Pick three or four that map to behaviors you actually want, and weight them so the bonuses feel meaningful.
Set tier thresholds
If you’re running tiers, you need to decide what spend unlocks each level and what each level offers. A workable starting structure:
Tier 1 (default): 1x earn rate, basic rewards.
Tier 2 ($250-500 annual spend): 1.25x earn, free shipping, early access to drops.
Make Tier 1 generous enough that customers reach it without effort. The point is to get people enrolled. If the entry tier feels too exclusionary or hard to reach, customers won’t engage with anything else.
Make tier benefits qualitatively different at the top. Higher earn rates work for Tier 2. Tier 3 should offer something money can’t easily buy: early access, exclusive products, dedicated touch.
Decide on an expiration policy
Points usually expire after 12 months of customer inactivity (no purchase, no engagement). Shorter than that feels punitive; longer turns into a balance-sheet problem because every unredeemed point is a future liability.
The smart play: expiration nudge emails 30 days, 14 days, and 7 days out. These are the highest-converting redemption-driven emails most loyalty programs send.
Name your currency
This is small but it matters. “Points” may sound too generic, especially for brands with a unique brand voice. Everything else is custom-tuned to your brand – until the customer reaches the most personal part of the brand-customer relationship.
“Stars” (Starbucks), “Glow Points,” “Drops,” “Coins” are a few examples – anything that ties to the brand.
The currency is part of your loyalty experience. Spend ten minutes on it.
How to Set Up a Loyalty Program on Shopify (Step-by-Step)
Once you’ve made the design decisions, setup is generally pretty fast and straightforward.
Here’s what the process looks like:
Pick a loyalty app that works with your stack, and has a feature set compatible with how you want to set up your program.
Install and connect to Shopify. Most apps install in a couple of minutes from the Shopify App Store and auto-detect your products, customers, and order history.
Configure the program. Plug in the earn rate, redemption rate, earning actions, tier thresholds, and expiration policy you designed above.
Build customer touchpoints. Account page integration, header bar with points balance, post-purchase modal, transactional email mentions, and a dedicated landing page, like /rewards.
Launch with an enrollment campaign. Email your existing customer base. Give them a one-time bonus for joining (“get 500 points free, on us”). Add prominent placements on the homepage, footer, and post-purchase screen for the first 30 days.
Track and iterate. Watch enrollment rate, repeat-purchase rate of members vs. non-members, redemption rate, and time-to-first-redemption. Tune one variable every 90 days and measure the delta.
Best Practices for Successful Shopify Loyalty Programs
Here are some tips to take on board from successful loyalty programs, to increase the chance of yours having the same success.
Surface the points balance everywhere. Header bar, account page, post-purchase confirmation, transactional emails. If a customer has to log in and click around to find their balance, they won’t.
Trigger redemption-driven emails. “You have $25 to spend.” Customers respond to the dollar amount, not the point total. These are the highest-converting loyalty emails most programs send.
Offer status, not just discounts. Free shipping, early access, exclusive products, surprise gifts. Discounts can feel like a commodity, whereas exclusives drive a different kind of emotional lift.
Run double-point days and seasonal campaigns. A 2x weekend or a member-only Black Friday early-access window creates moments worth caring about.
Tie loyalty into your email and SMS flows. Klaviyo, Attentive, and Yotpo integrations let you segment members by tier and target them with relevant copy at the right moment.
Promote enrollment in transactional emails. Order confirmations and shipping notifications get high open rates. Stick a “join the program” link in there.
On top of that, try to avoid the following mistakes:
Treating points as a pure discount. If your program is “earn points, redeem for $X off,” you’ve built a discount with extra steps. Layer status, exclusivity, and access on top, or members will leave the moment a competitor offers a flat 10% off.
Hiding tiers. Customers can’t aspire to a tier they can’t see. The current tier and next tier should be visible everywhere – account page, header, transactional emails.
No redemption push. Customers earn points and forget about them. Without balance-driven emails (“you have $25 to spend”) and expiration nudges, redemption rates collapse and your program quietly dies.
Launching without an enrollment campaign. “We launched a loyalty program” is not a launch. A real launch is a dedicated email to existing customers with a join bonus, prominent on-site placement for 30 days, and integration into every transactional touchpoint.
Making points worthless. A 1% effective discount that requires three months of buying. Customers do the math, decide it’s not worth caring about, and disengage. Run the program at a 5% minimum or don’t run it.
Choosing the Right Loyalty App for Your Shopify Store
There are many capable loyalty apps on the Shopify App Store.
Realistically, one app is probably not going to make or break your program (unless you choose a poor-quality app, or one that’s not compatible with the type of program you want to run).
A few popular apps, used by brands we work with, include:
We’d advise you to go and try these apps out for yourself, look at the features they offer, read the reviews.
You’ll find one that seems like a good fit with what you want to do.
Amplifying Your Loyalty Program with a Native App
Here’s one more powerful tip for getting more out of your loyalty program:
Put it in a native app.
Mobile apps and loyalty programs are the perfect combo. Your loyalty program is designed to incentivize customers to shop more and spend more, and your app is designed to make it easy to do the same thing.
Brands that get the most out of their loyalty program also have a mobile app. The app amplifies the loyalty program, and offers extra rewards for app users, which does two things:
Makes your loyalty program more attractive
Offers a real incentive for people to use your app, which brings them closer to your brand, and makes them habitual, high-LTV shoppers
You can use push notifications for loyalty updates and redemption offers, and make it super simple for customers to check their balance, redeem rewards, or spend a little bit more to hit their next tier.
“We wanted an app to be in our customers’ pockets, on their phone directly, be able to send push notifications, and be on top of their mind, increase loyalty and retention, to in the end increase revenue.” — Raphael Faccarello, Head of Ecommerce, Yon-Ka Paris
Vendrux turns your existing Shopify store into native iOS and Android apps. It keeps all the features from your site working in the app, including your loyalty program. You don’t need to manage a separate program for the app, or worry about features from the web not carrying over.
Some of the apps built and run by Vendrux, for Shopify brands
Yet you can easily customize your program to provide exclusive offers for app users, and sweeten the deal for your best customers.
It’s the perfect pairing if you want to multiply your LTV – a well-designed loyalty program, running in a Vendrux-powered app.
Designing the program is step one. Putting it where your best customers shop is step two.
You’ve thought through the earn rate, the tiers, the redemption logic, and the apps you might run. The web side of your loyalty program is sorted.
Vendrux extends your existing Shopify store, including the loyalty app you pick, into native iOS and Android apps. Your program lives on your customers’ home screens, with push notifications driving redemptions and tier-up engagement automatically.
A loyalty program is one of the highest-ROI levers a Shopify store has, once it has repeat customers. Design the program first: earn rate, redemption rate, tier thresholds, earning actions, expiration policy. Pick the app that matches your size and stack. Launch with a real enrollment campaign, not a single email.
And if you want your program to run where your highest-LTV customers actually spend their time, put it inside a mobile app. Vendrux turns your existing Shopify store into native iOS and Android apps, with your loyalty program, push notifications, and tier-up alerts built in.
Get a free consultation to see what your mobile app could look like, and how it could amplify the loyalty program you’re about to launch. No commitment required. If the math doesn’t work for your brand, we’ll tell you.
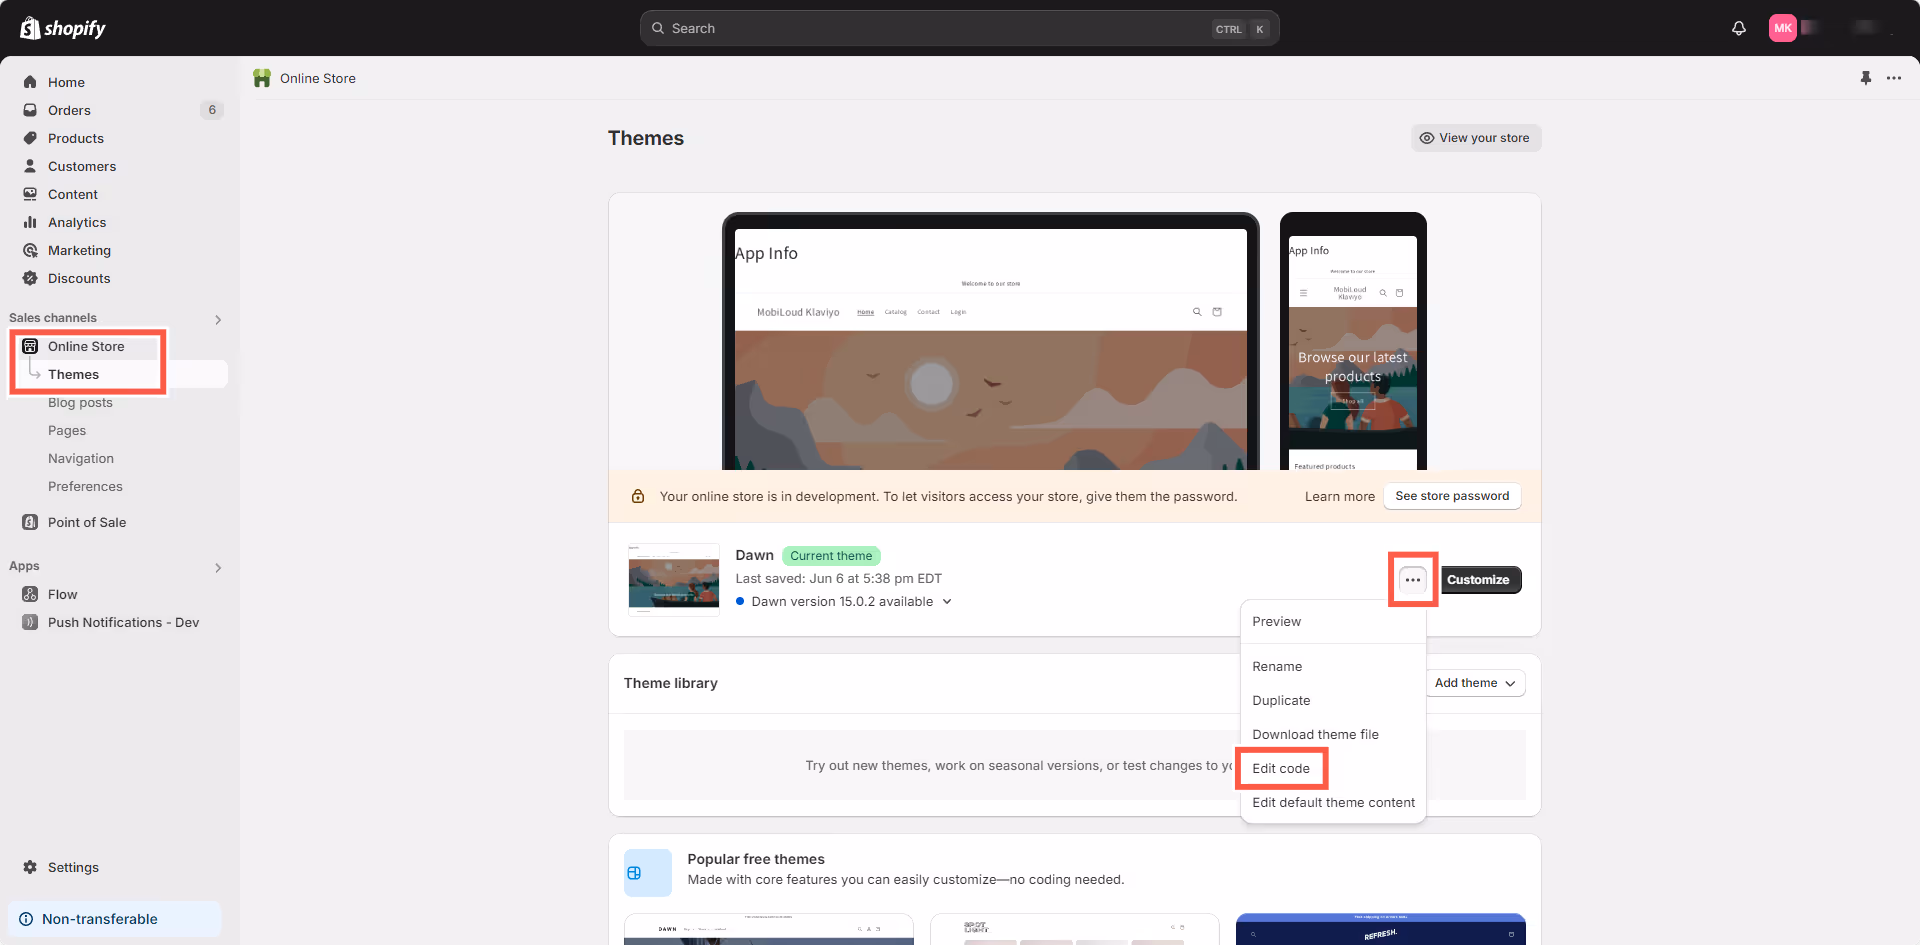
.avif)
.avif)
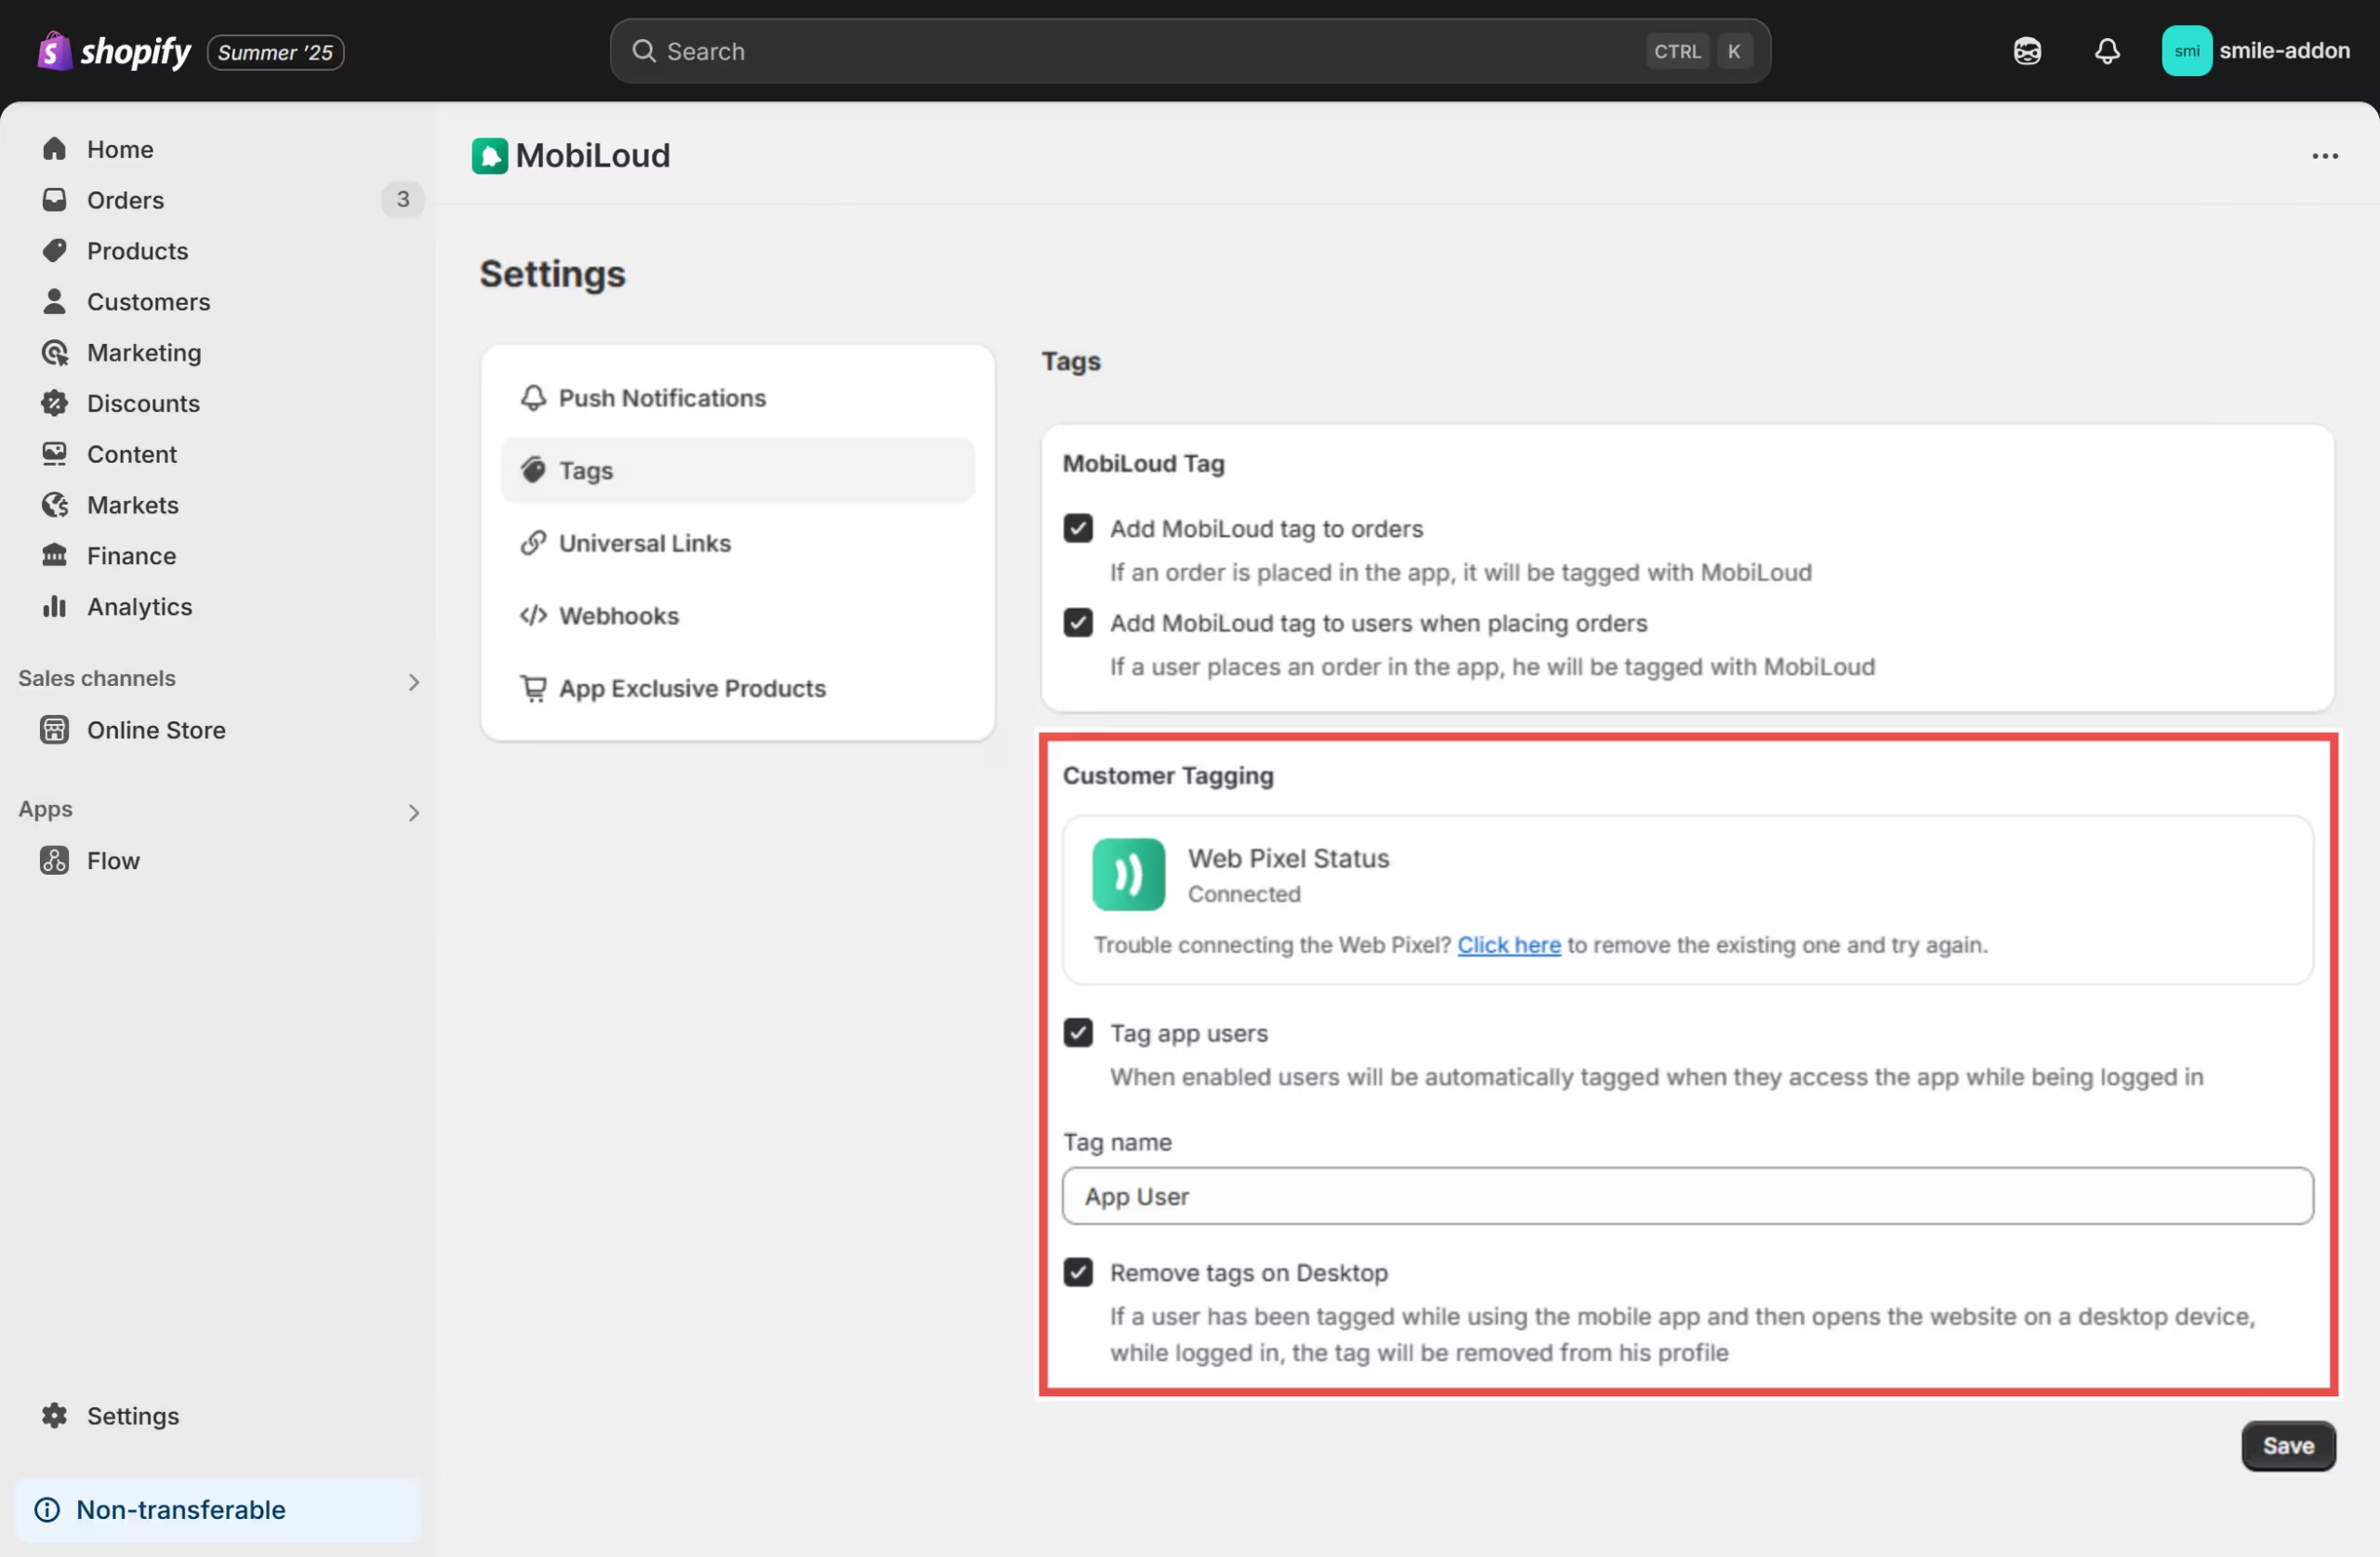
.avif)
.avif)
.avif)
.avif)
.avif)
.avif)
.avif)
.avif)
.avif)
.avif)
.avif)
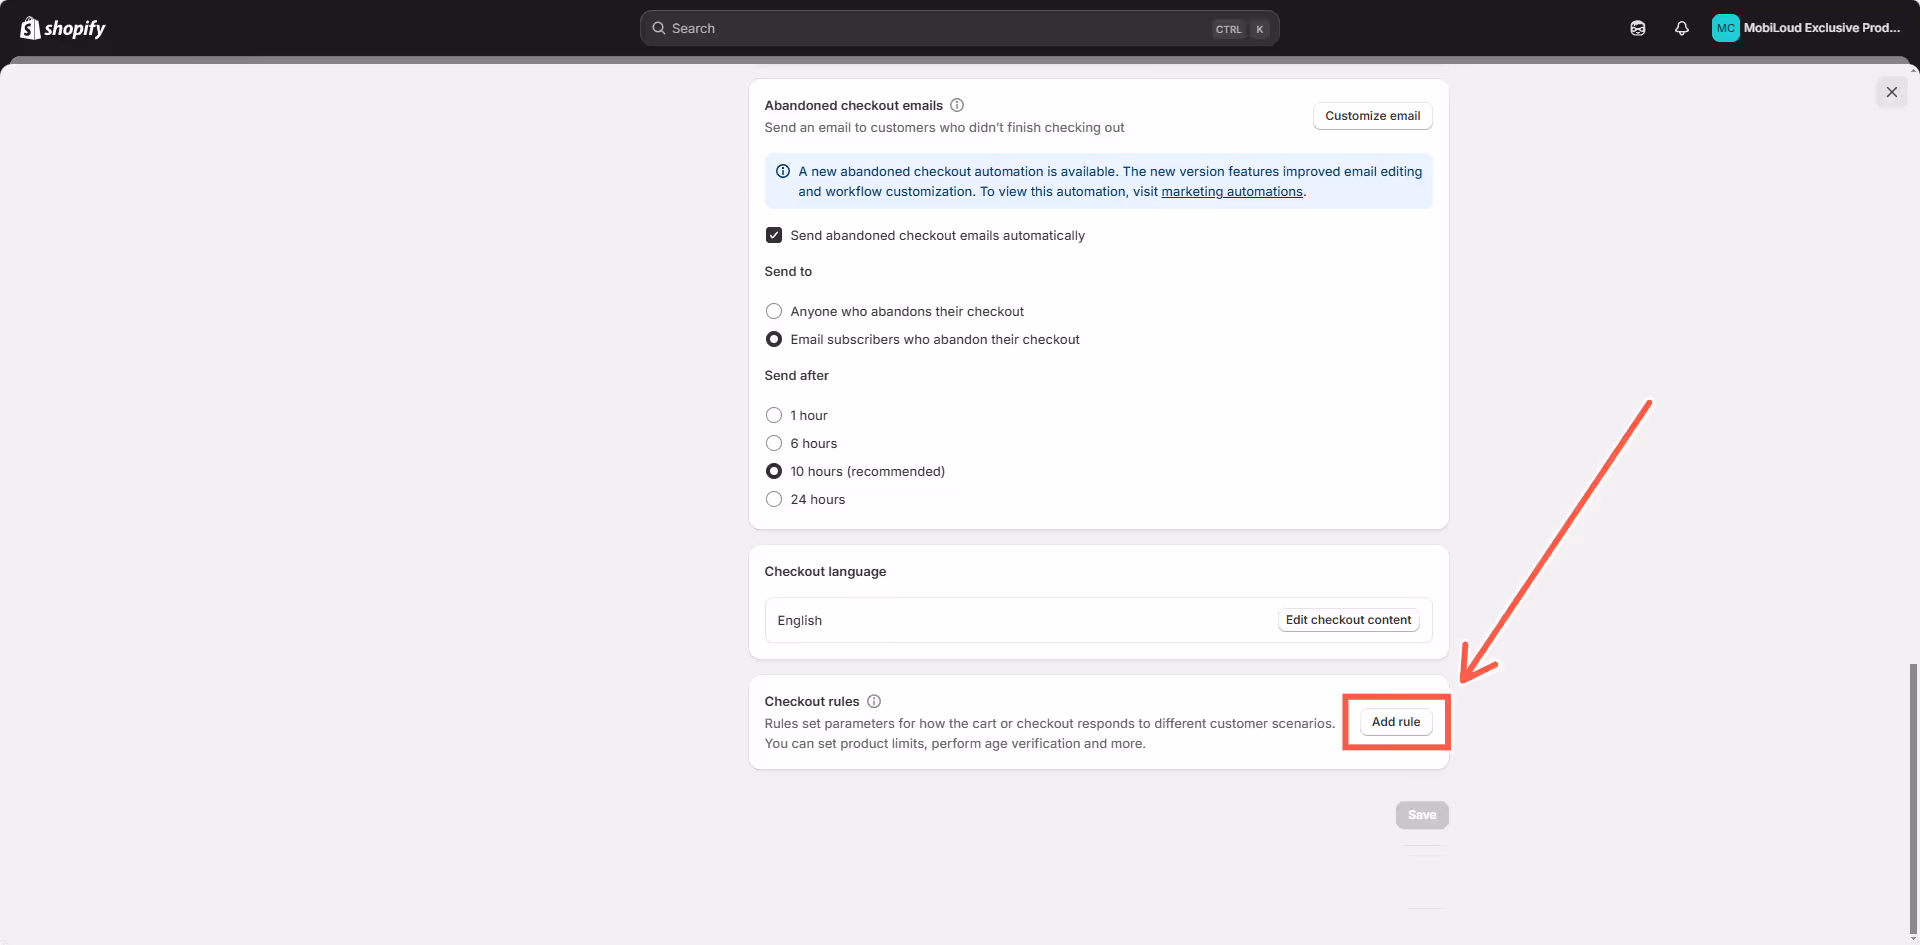
.avif)
.avif)
.avif)
.avif)
.avif)


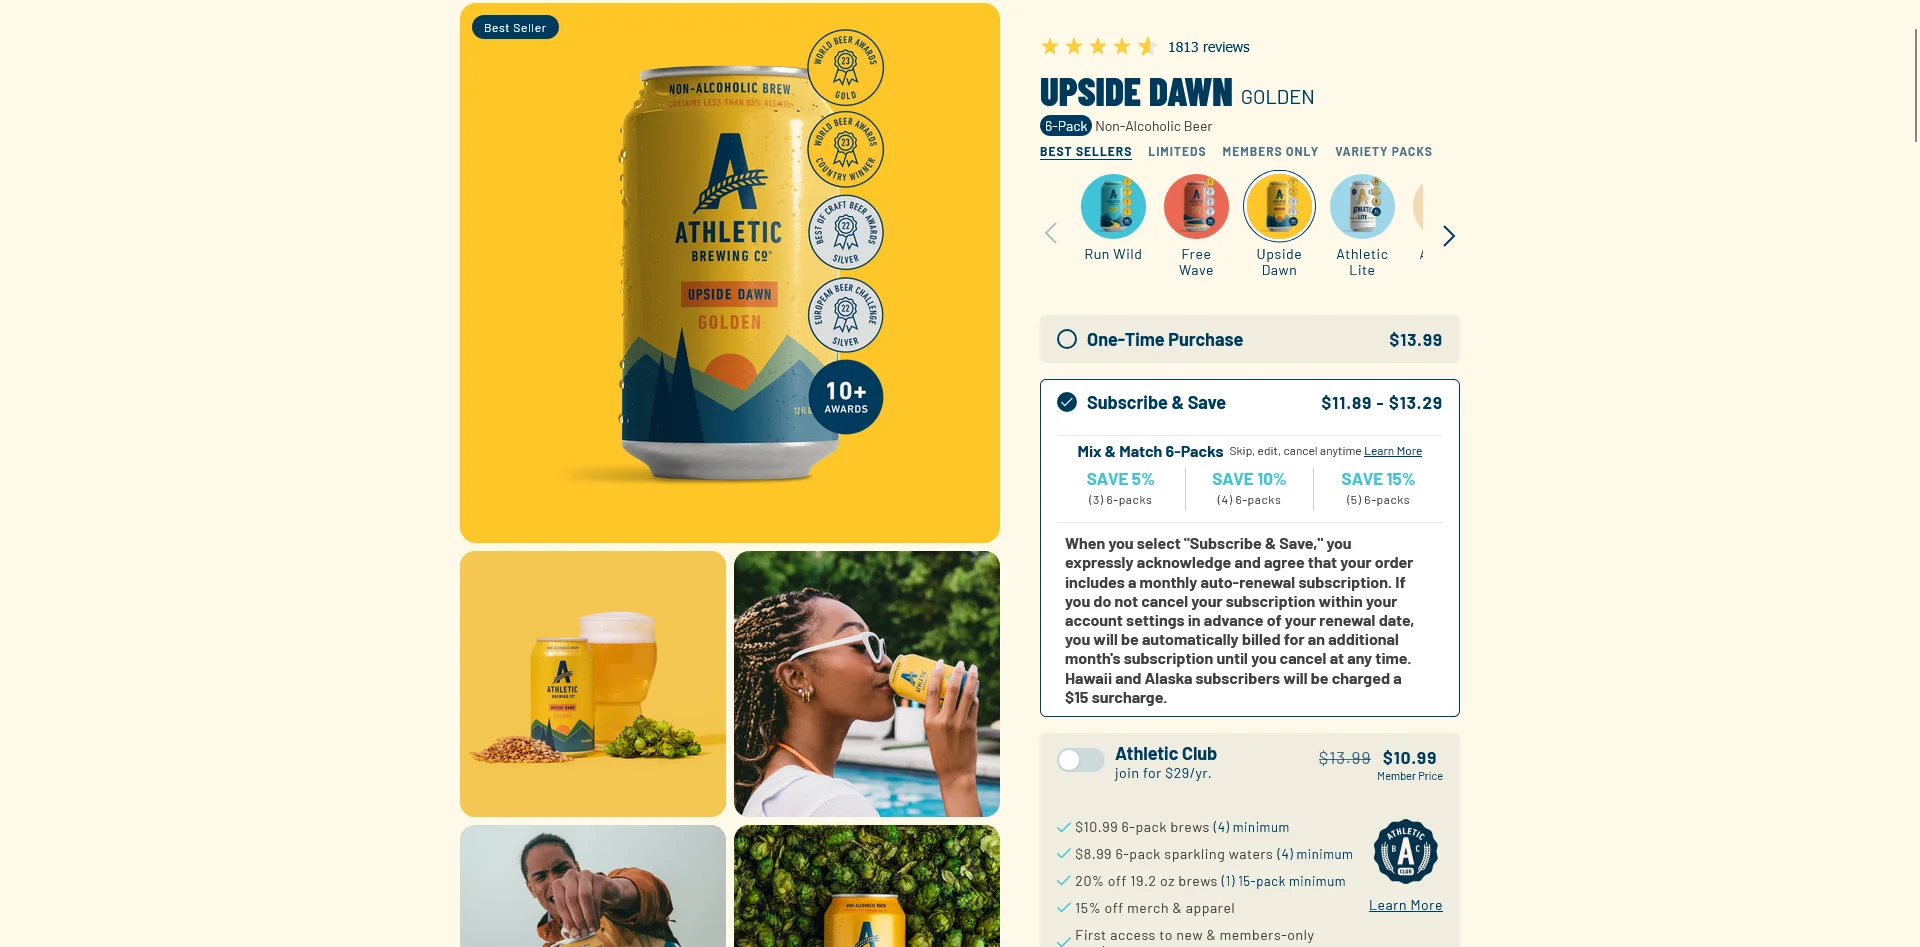

.webp)