TestFlight allows you to generate public links that can be shared with users so they can install your app and test it even before it goes live in the App Store and becomes publicly accessible.
Below you can find a step-by-step guide on how to generate a public link for your app:
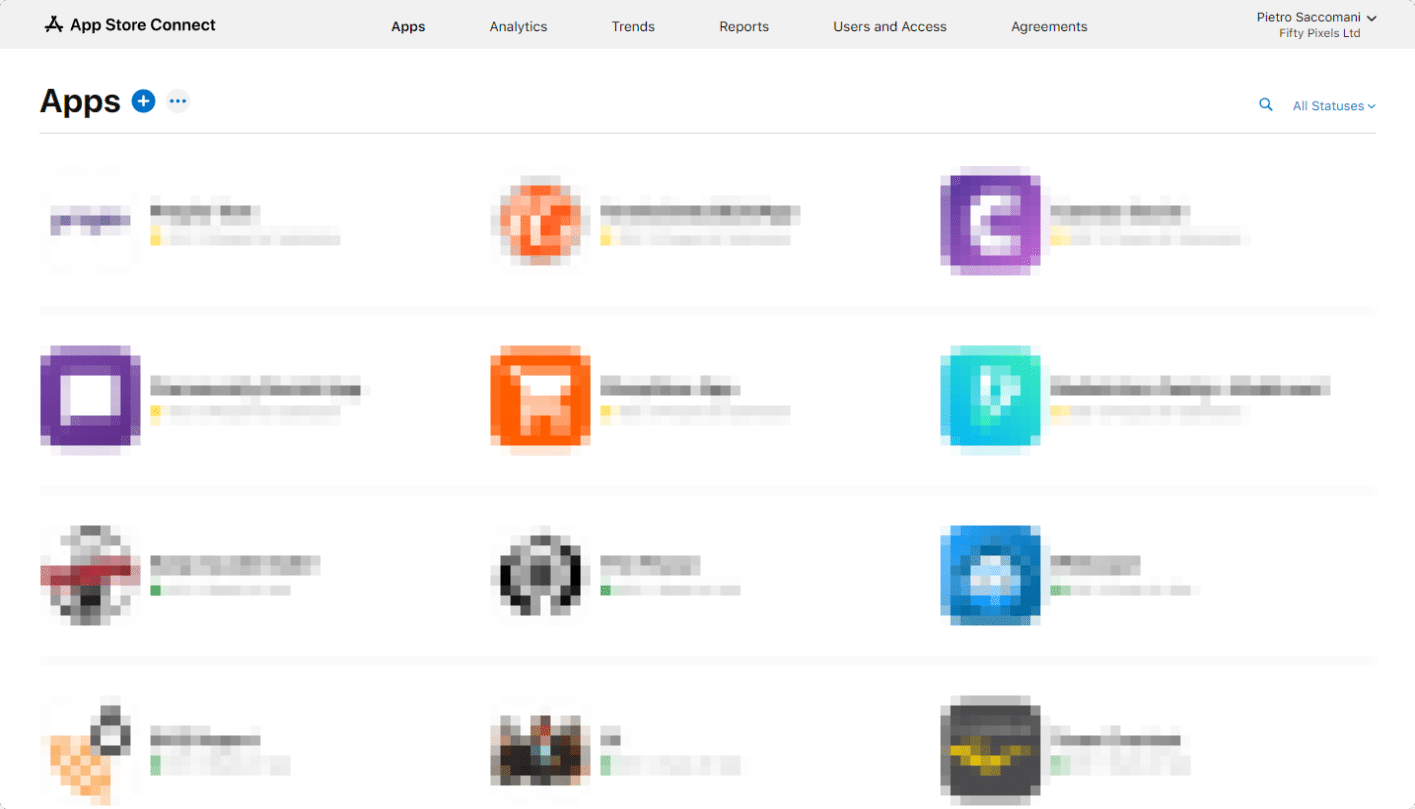
Open your App Store Connect Dashboard and select the app for which you would like to generate the public link. You can access your App Store Connect Dashboard here: https://appstoreconnect.apple.com/apps
Click on “TestFlight”
Now click the “+” icon on “External Testing”
Type in the name of your External Testing Group in the dialog window that will appear
Now click the newly created group, scroll to the bottom of the page, on the “Builds” area click the “+” icon and select the latest build uploaded to your account
You will be requested to fill in some details about the app and contact information for reporting bugs, fill those accordingly
Click “Next” and your build will be submitted for a review. The review process usually takes about 48 hours, but it can take more. Keep in mind that in case your app is not compliant with the policies and guidelines from Apple they will reject your build and you will need to upload a brand new build before you can submit it for a new review
Once your build is approved you will be able to generate a public link, which can then be shared with users that you would like to give access to the app for testing.
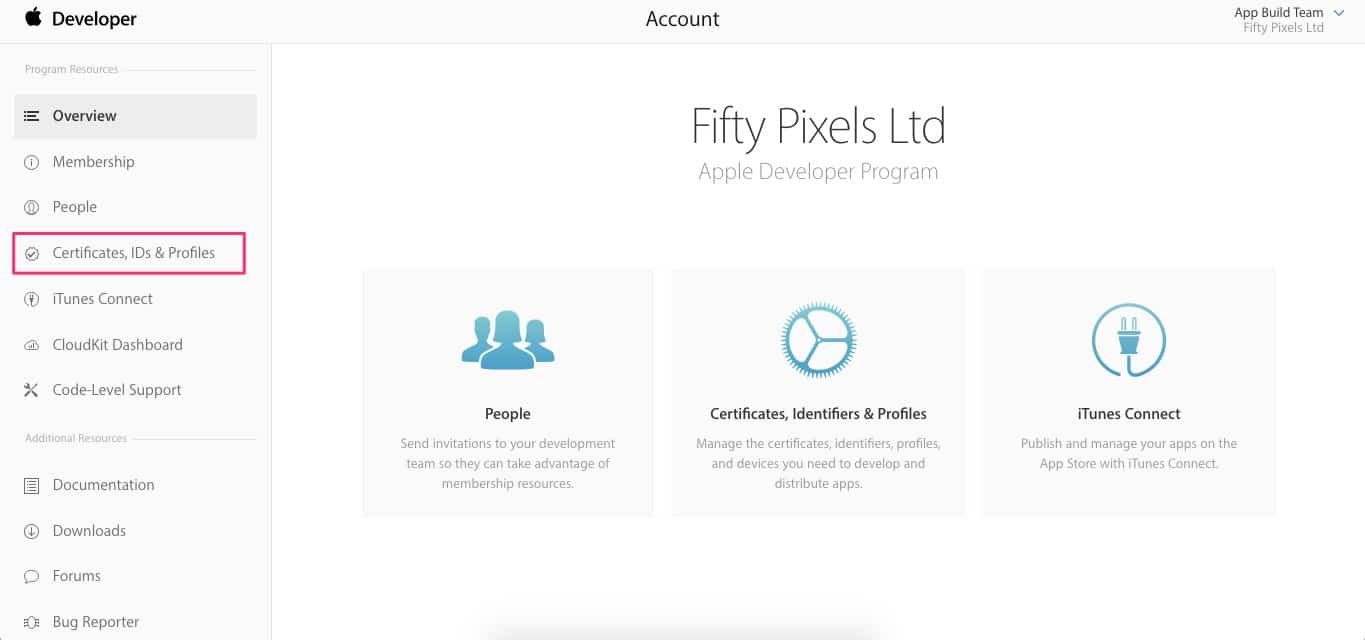
1. Go to iOS Development Center– Click Log-in and proceed to Account >Certificates, IDs & Profiles.
– Then, click on App IDs (1.), select your App (2.) and click Edit button.
2. Scroll down to Push Notifications section, and click Create Certificate button under Production SSL Certificate section. Click Continue when asked to create a CSR file.
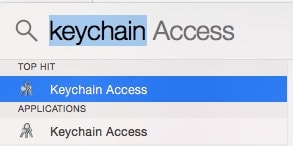
3. Now it is the time to create Certificate Signing Request (CSR) file. In your Spotlight window type in keychain and launch Keychain Access.
4. Within the Keychain Access drop down menu, select Keychain Access > Certificate Assistant >Request a Certificate from a Certificate Authority.
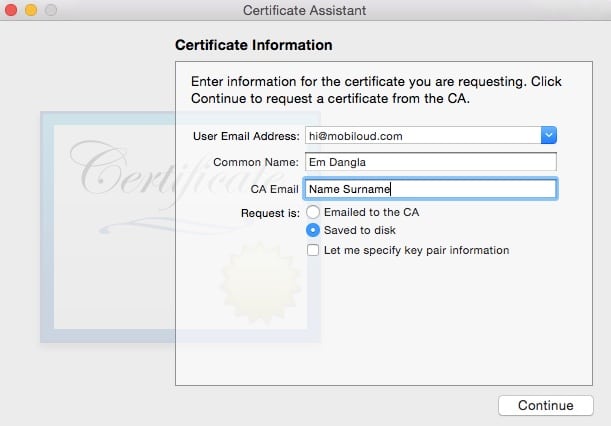
5. Enter the following information in the Certificate Information window:- In the User Email Address field, enter your email address- In the Common Name field, create name for your private key (eg. Name Surname)- Select the ‘Saved to disk’ optionClick Continue within Keychain Access to complete the CSR generating process. Save the file generated. Click Done.
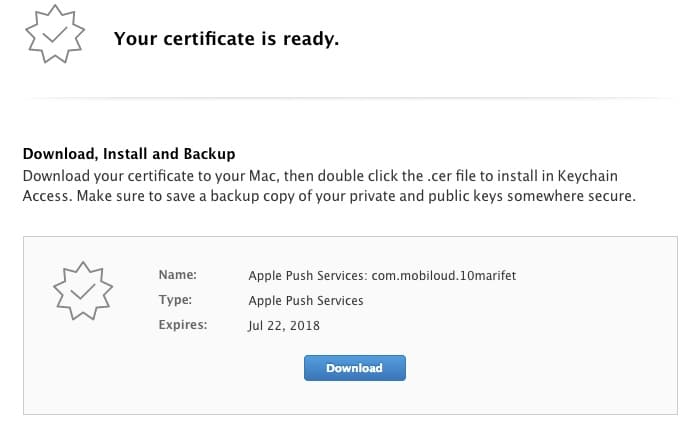
6. Let’s go back to Apple Developer Portal, click on Choose File and select the Certificate Signing Request (CSR) file you have just created. Then, click on Continue and Download the certificate that was generated.
7. Launch Keychain again.- Filter keychains by Login– Filter Category by Certificates– Import your aps_[development/production].cer into your Keychain by dragging and dropping it into login section in keychain.
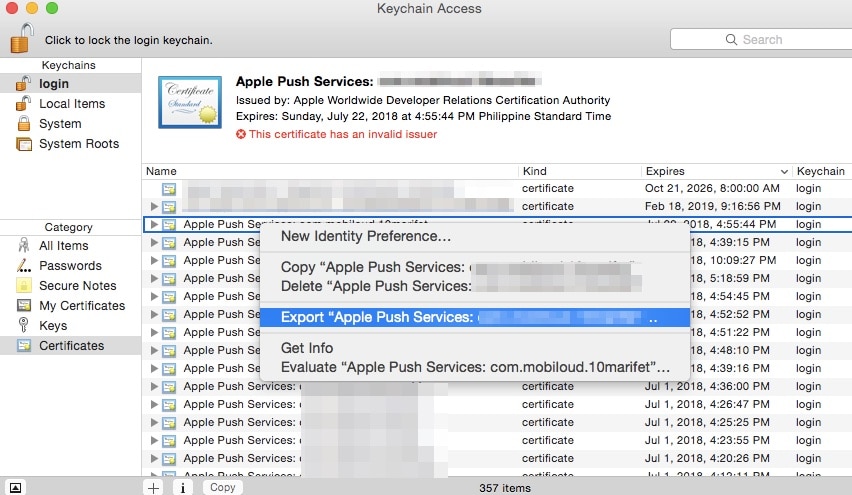
8. After importing your certifications into your Keychain you will see an expandable option called ‘Apple Push Services’. Right click on ‘Apple Push Services’ >Export ‘Apple Push Services.
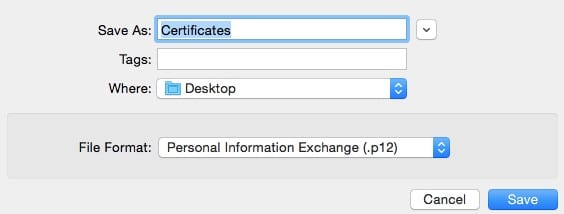
9. Save the certificate as flle somewhere you can access it.Save the certificate as (.p12) flle somewhere you can access it.
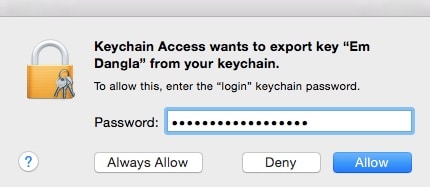
10. If you are submitting your certificate (.p12) file to Vendrux please leave password empty and click on OK.
11. Enter your admin password to confirm and click on Allow to finalize the export process.
If you still have any issues generating your App Push Certificate, please feel free to contact support@vendrux.com
When displaying your website inside an app, often times you will want to either display or hide certain elements in the app only.
There are a few different ways of achieving this, the two best approaches when using Vendrux are described below:
Create a separate page on your website, to be used in the app specifically, e.g. https://yourwebsite.com/app
Detect the user agent using Javascript
If you are not familiar with what a user agent is you can find more details clicking here, but to simplify, whenever your browser, or app, makes a request to your website to pull its content, they include a string into it, which looks like this:
Mozilla/5.0 (Windows NT 6.1; Win64; x64; rv:47.0) Gecko/20100101 Firefox/47.0
That string includes details that can be used to identify the system and browser used to perform the request.
Whenever a request is performed from the app, to your website, it will include “canvas” in that string, so it will look like this:
Mozilla/5.0 (Windows NT 6.1; Win64; x64; rv:47.0) Gecko/20100101 Firefox/47.0 canvas-ios
This allows us to easily detect the app using a small piece of Javascript, as you can see below:
// Check if the user agent contains the canvas string if (isApp) {
// Outputs custom CSS in the app only document.head.innerHTML += ”;
In order to be able to sell your app for a fixed price or charge recurring subscriptions from your app users, you will need to have your Payments Profile configured.Find more details on how to configure your Payments Profile below:
Under “Merchant Account” (last block at the bottom of the screen), click “Set up a merchant account”. You’ll be redirected from Play Console to the payments center to set up your payments profile. Make sure to have your business information available to set up your payments profile.
Enter your legal business name:
Enter the name of your business as you want it to appear on your payments profile. This information will be shown to your customers and also on your receipts.
Enter contact name: Enter the name of an authorized representative for your company who Google can contact if we have questions about your payments profile.
Enter the business location: Provide your legal business address as it appears on official documents. It’s important that we have a valid, physical address on file for your business. Google won’t allow you to use a PO box address. Later, you’ll need to make sure that your bank account is registered in the same country listed in your payments profile. Learn more about bank account requirements.Enter business phone number: Google will use this number to contact you if we have questions about your account.Enter the following public business information, or choose to match your public merchant profile and payments profile information:Enter your business websiteThe category of your products (i.e. what you sell)Your customer support emailThe business / product name that’ll appear on your customers’ credit card statements. Note: To help customers remember what they purchased and keep chargebacks to a minimum for you, use an appropriate credit card statement name.When you’re finished, click Submit.Note: You cannot change your business location country but you can change your public merchant and payments profiles later.
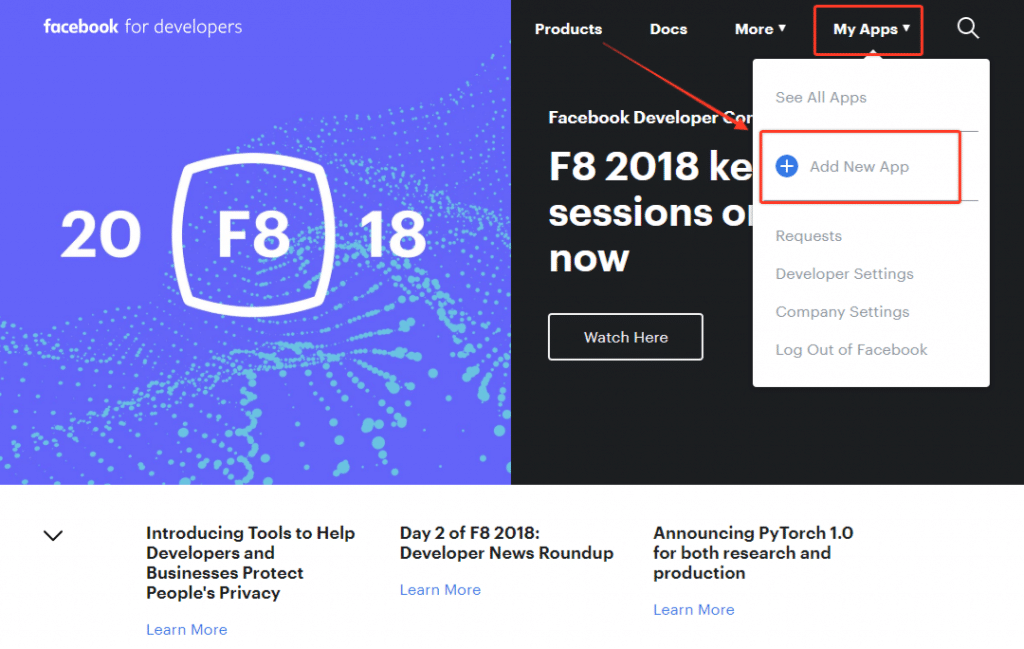
In order to use most of the Facebook features for apps, like Facebook Analytics and Facebook Audience Network Ads, you will need to create a Facebook App ID
The first step is to log in to your regular Facebook account, you can do so clicking here)
After logging in, you can go to the Facebook for Developers website and you should now be already logged in to your own developer account
The app creation process is pretty simple and straightforward, you just need to provide a name for your app and a contact email address, as you can see below:
As soon as you click “Create app ID” you will be redirected to your app dashboard, where you can find your Facebook App ID:
The tabbed menu is displayed at the bottom of the app, it allows the user to quickly navigate through the most important, or most used areas of the app.
The first tab will always be displayed as the app’s home screen.
You can configure several aspects of the tabs such as icon, label, type and order.
Below you will find more details on how to configure your tabbed menu:
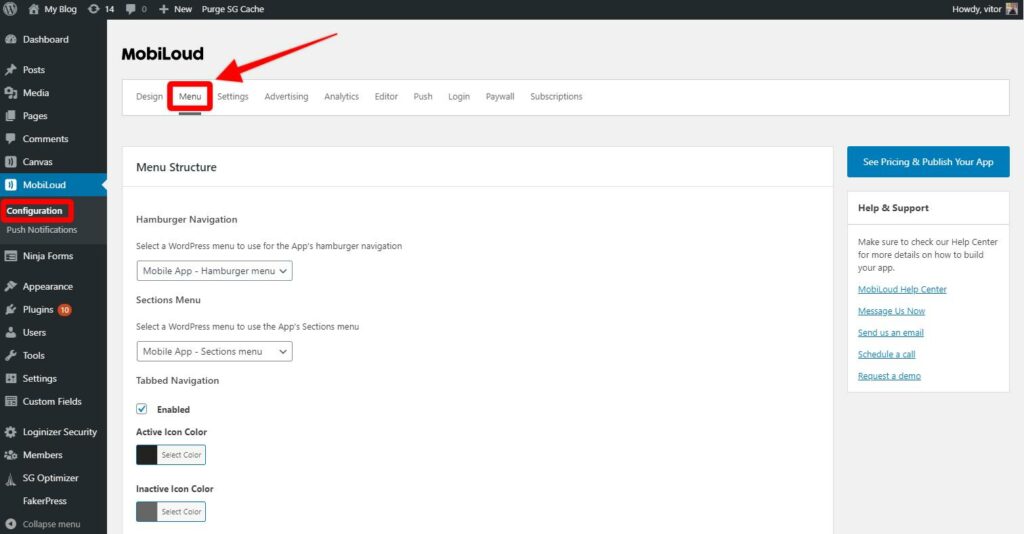
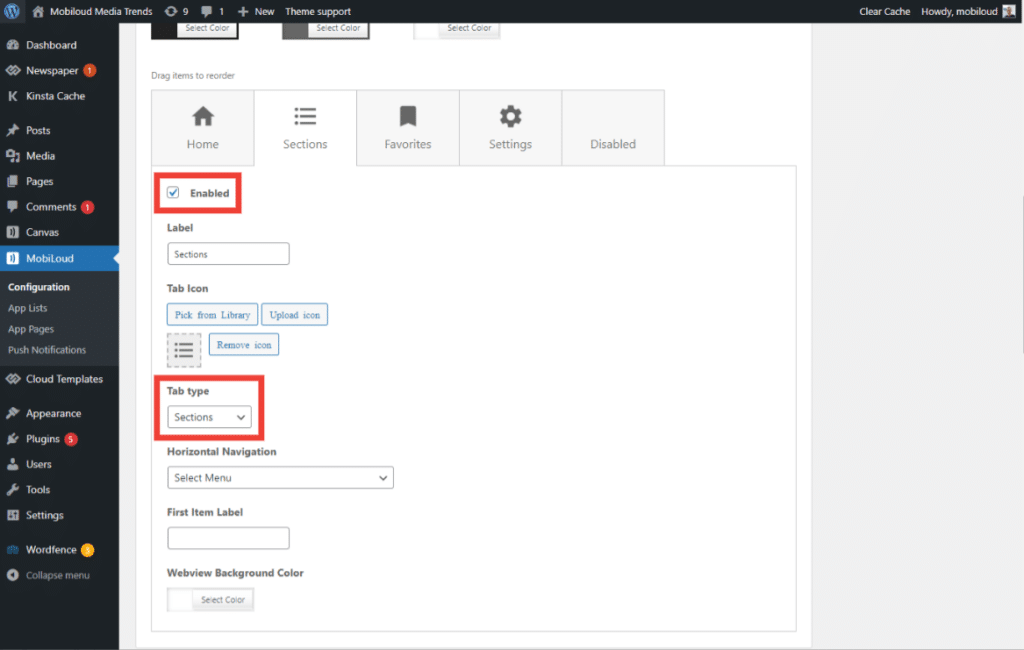
1 – Navigate to “Vendrux > Configuration” then access the “Menu” area
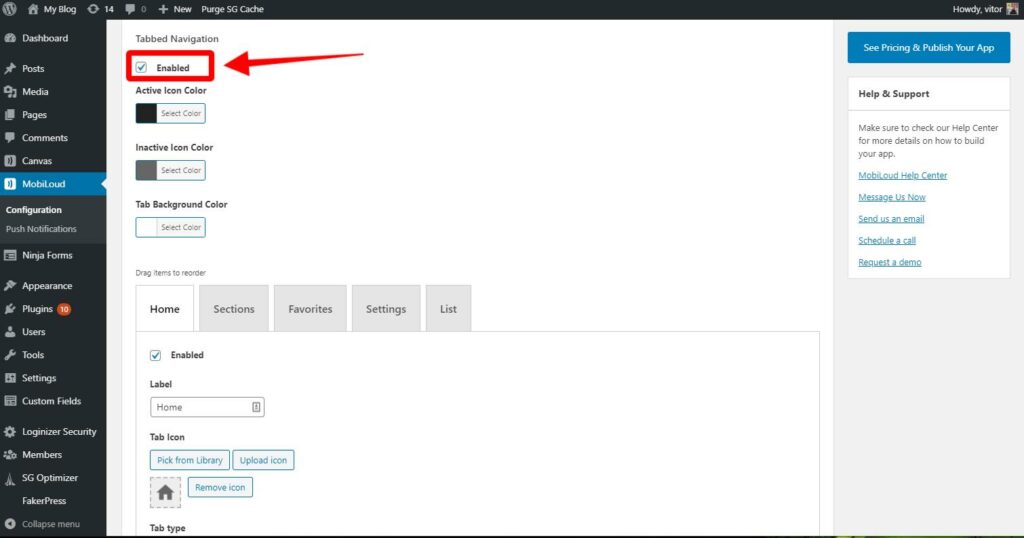
2 – Under the “Menu” area you will find all the options for the Tabbed Menu, make sure the Tabbed Menu is enabled.
3 – You can drag and drop the tabs to determine the order in which they will be displayed. If necessary you can enable/disable certain tabs
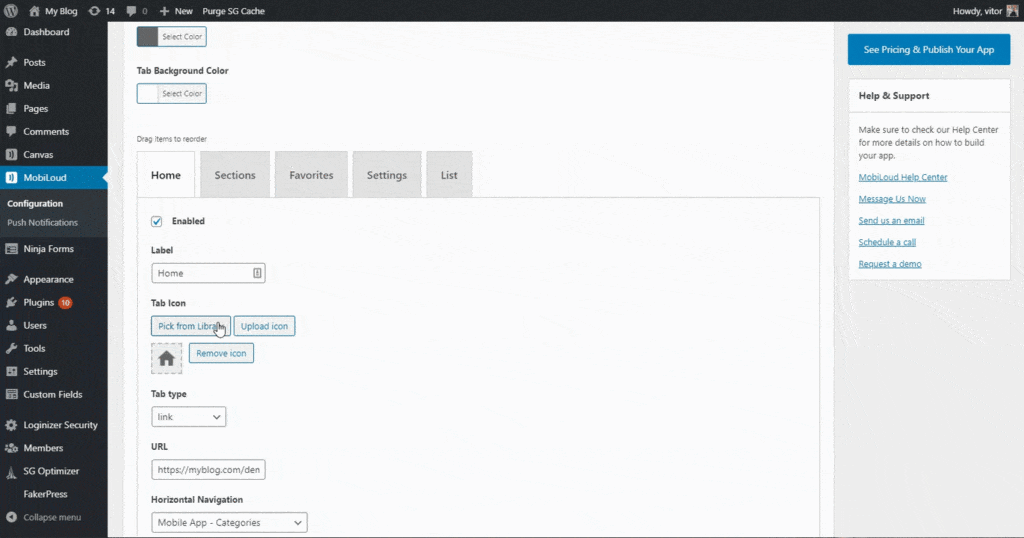
4 – For the icon you can use one of the available options or you can upload your own icon.
5 – You can configure the label for each one of the tabs, it is important to make sure the label is short enough to fit the tab.
The tab type will determine the content that will be displayed in the tab
After configuring the tabs, make sure to save your changes
Once your changes are applied they will reflect in the app configuration instantly. Users will need to close and re-open the app in order to see the changes taking place.
Below you can find more details on how each tab type works:
Homescreen
The home screen will display a list of posts, based on the categories selected under the “Home Screen Settings”
List
Displays a list of posts for the selected category
Link
Displays the content of a URL.
It is extremely important that the URL used in this case is optimized for mobile and to be used inside the app, as the user will not have the ability to navigate back and forth using the native interface.
Favorites
Displays a list of posts that have been favorited by the user
Settings
Displays the app “Settings” screen
Sections
Displays a list of links, based on the menu defined as the “Sections Menu”
The hamburger menu is displayed on the top left corner of the app, and allows app users to quickly access different areas of the app, from categories and pages to the favorites and settings.
In this guide you will learn how to customize the links that are displayed in the hamburger menu, step-by-step. You will also find more details about the different opening methods that are available in the Vendrux News platform.
Vendrux News uses the default WordPress Menu system for the most part of the navigation elements of the app, so the first step will be to create a new WordPress Menu to be assigned to the App’s Hamburger Menu.
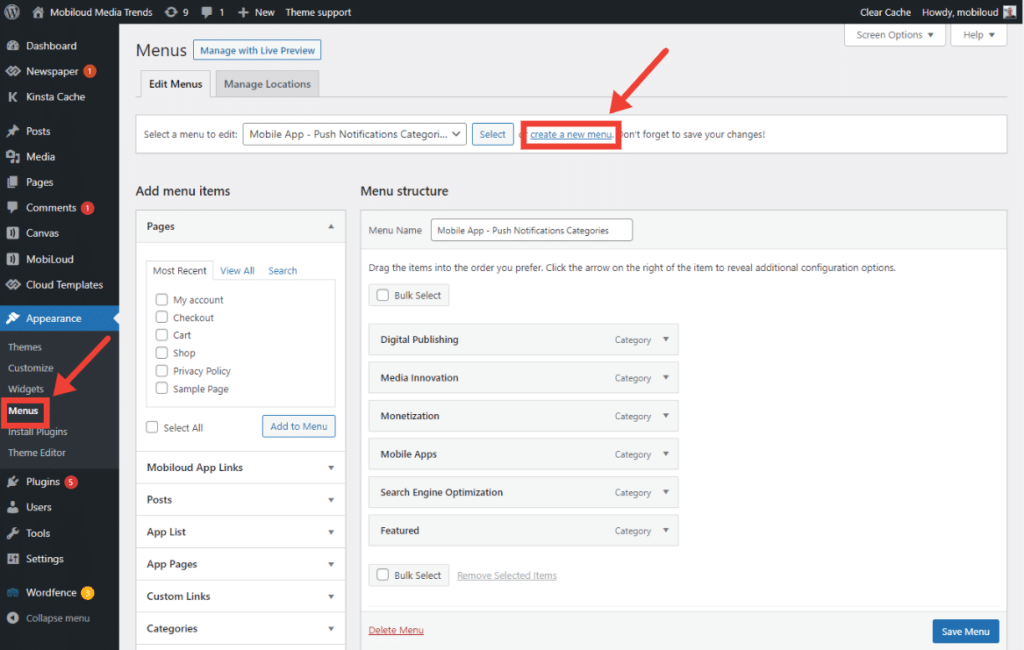
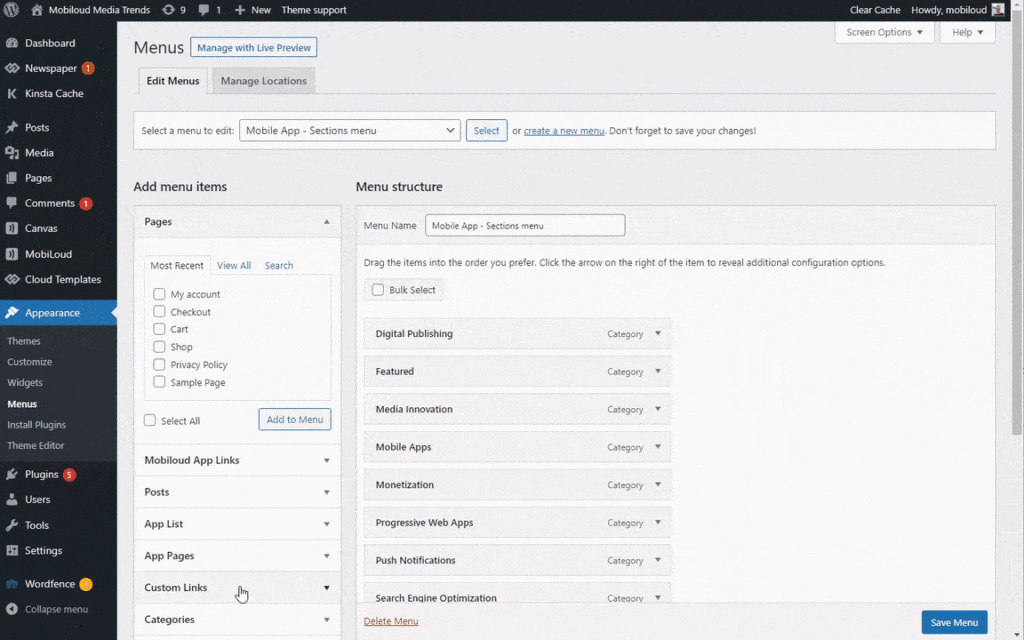
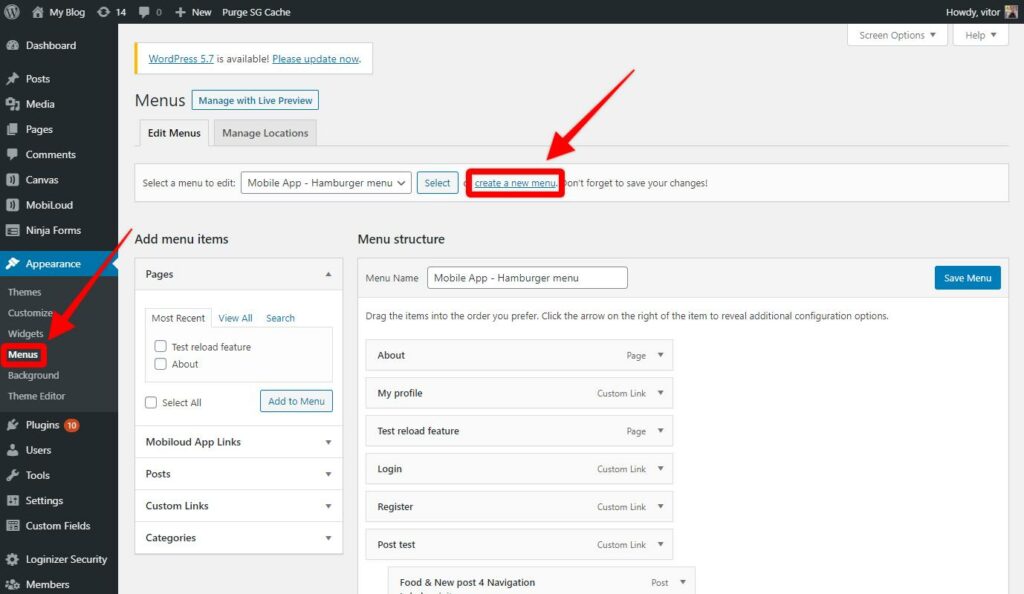
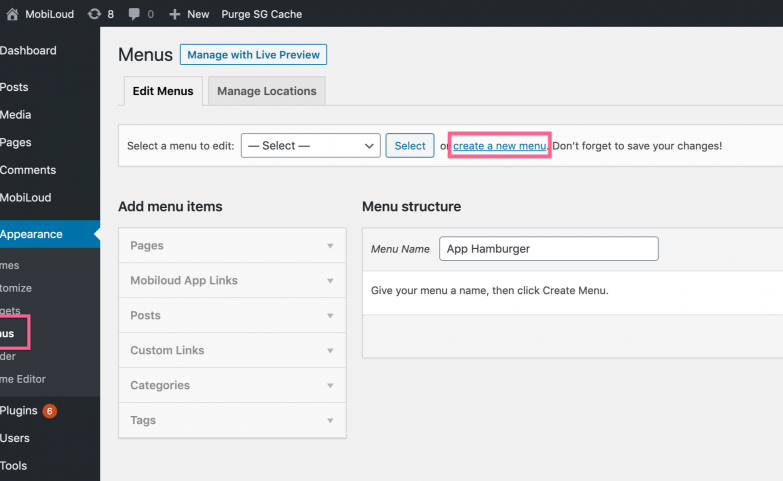
1 – In your WordPress Dashboard, go to “Appearance > Menus” and click “create a new menu”.
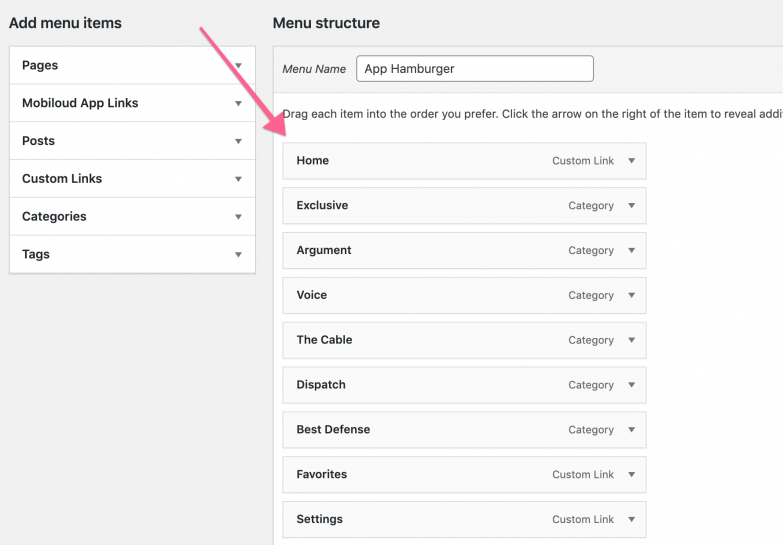
2 – You can now drag and drop the different types of links into the newly created menu
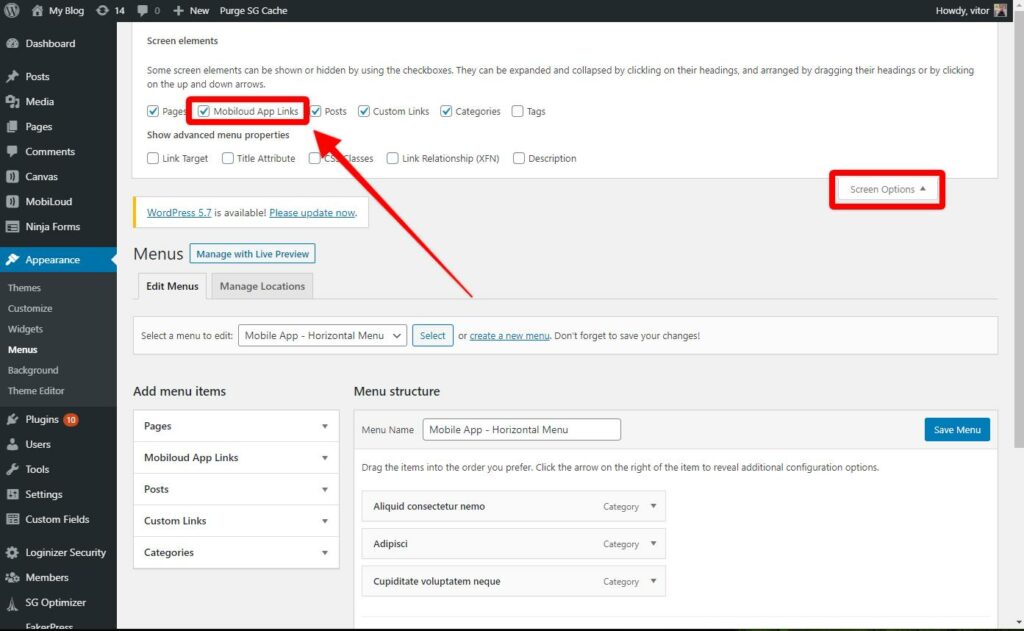
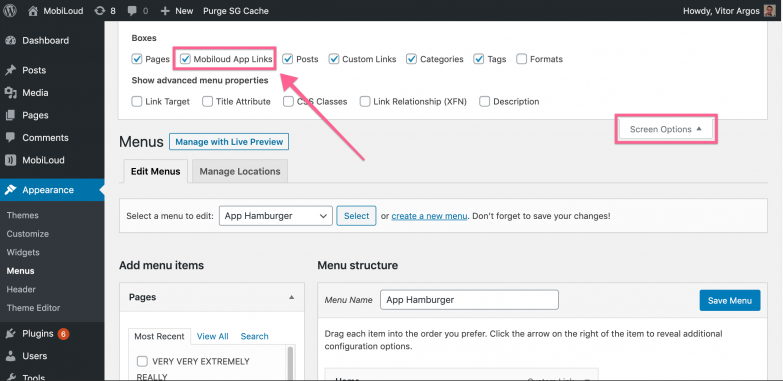
3 – To enable the Vendrux App Links, expand the screen options at the top and make sure “Vendrux App Links” is checked
4 – Once you have organized the menu according to your requirements make sure to save it
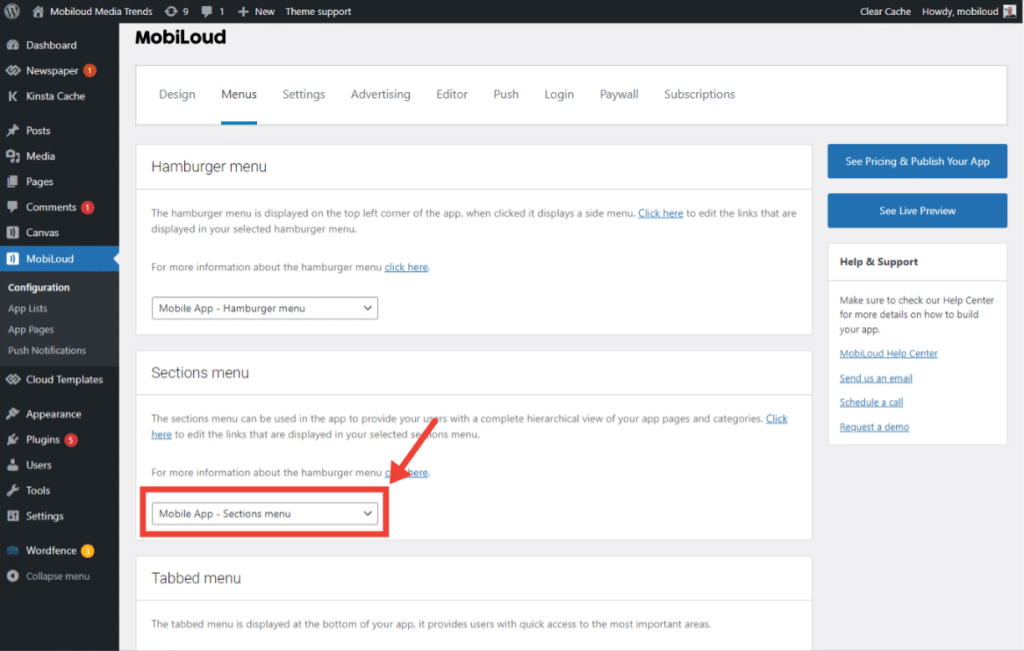
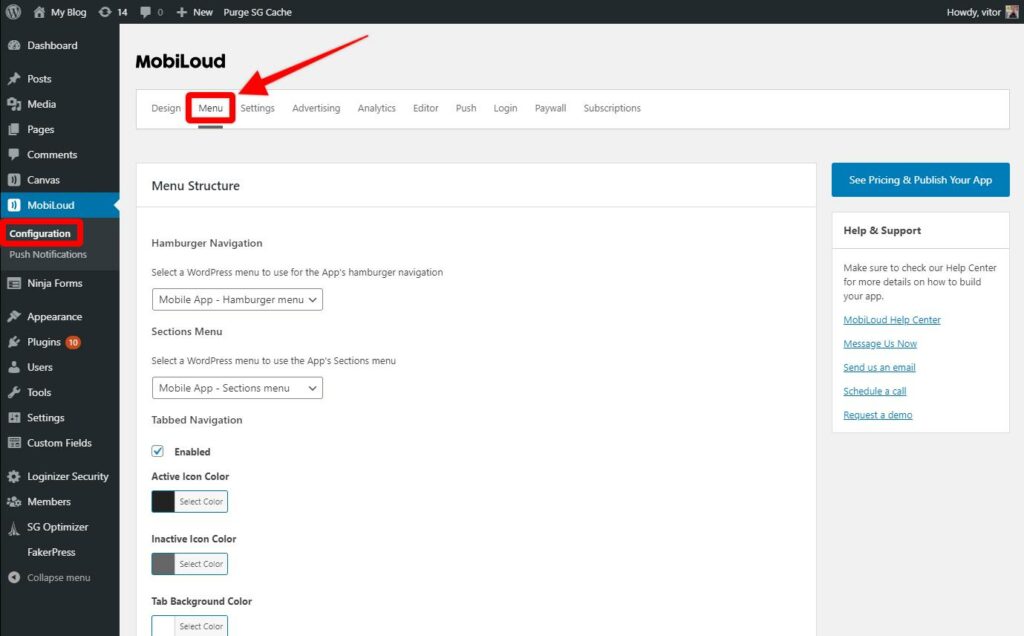
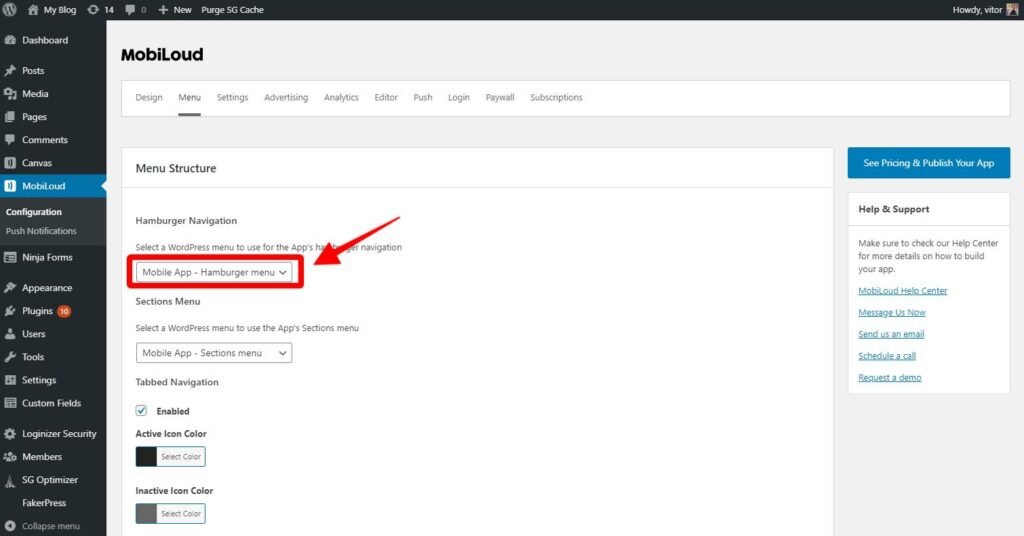
5 – Now go to “Vendrux > Configuration” and access the “Menu” area
6 – Assign the menu you have created to the Hamburger Menu setting as you can see below:
The hamburger menu is required in the Vendrux Platform, so make sure to make good use of it, thinking about how you can provide the best possible experience to your users.
This menu is the only one that will support all link types and opening methods, below you will find a guide on how each link type behaves in the app and the opening methods that are available:
Pages
When using pages in the hamburger menu they will be opened in the native view, meaning that only the content added to the WordPress WYSIWYG editor will be displayed in the app. Any elements that have been incorporated through theme files, or complex features will not be displayed in this case.
The content will be displayed using the app’s stylesheet, which is very basic and optimized for performance.
Some examples of links that you can include as pages: About Us, Privacy Policy, Terms & Conditions
Posts
Posts will be displayed in the exact same as pages, with written content only and a basic stylesheet.
Custom Links
These are the only links that can be configured to open in different ways: native, internal or external.
Native: will open the provided URL inside the native view, with the back bar on the top. This opening method should only be used in specific cases, when the content displayed is not only optimized for mobile devices, but also to be used inside the app
Internal: these links will be opened using an internal instance of the user’s mobile browser (Safari for iOS, Chrome for Android). The content will be displayed in the exact same way that it does on the mobile browser, but inside the app, meaning that the user will not leave the app.
External: the link will be opened outside of the app, on the mobile browser. This opening method is used for donations, as those can only be taken outside of the app.
Categories and Taxonomies
Categories will be displayed in the form of lists, using the native design.
Vendrux App Links
Vendrux app links will trigger specific sections of the app such as the home screen, favorites, settings or the login screen.
The hamburger menu is displayed on the top left corner of your app, it will expand when clicked, displaying a complete list of links.
The Vendrux app hamburger menu can be configured directly from your WordPress Dashboard, using the default Menu functionality of your WordPress installation. Follow the steps below to configure your menu:
In your WordPress Dashboard, go to “Appearance > Menus” and create a new menu for the app, name it “App Hamburger”
Enable the “Vendrux App Links” feature on the top of the screen, so you can add links to your app’s home screen, favorites, and settings
Drag and drop the links that you would like to have displayed in your app’s Hamburger Menu
Save the menu
Go to the Vendrux App settings, under “Menu” and select the newly created menu accordingly
Save your settings and you should now be able to see your updated Hamburger Menu in the app
Apple is constantly making changes to its guidelines and policies, because of that, they will require you to accept new terms and agreements in your Apple Developer account with some frequency.
Some features of your Apple Developer account will get locked until all agreements have been accepted, including the ability to create new versions, certificates, upload apps, etc.
Keep in mind that only the Account holder, in other words, the person who registered the account, can accept the agreements.
Below is a step-by-step guide on how to access your Apple Developer Account and accept all the agreements that are pending.
Open the App Store connect area, here: https://appstoreconnect.apple.com/agreements/
Make sure to log in with your Account holder credentials.
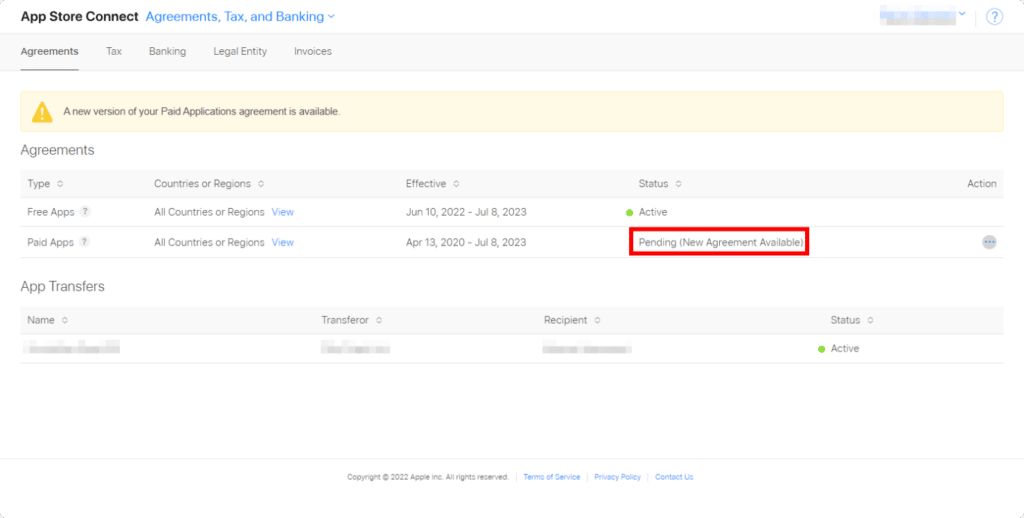
If there are any pending agreements you will see the following screen:
For all your pending agreements, as long as you are logged in as the account holder, you can click on the icon displayed on the “Action” column and then select “View and Agree to Terms”:
This will trigger a popup with all the latest terms, which you can then agree to by clicking on the following button:
That’s it! Just make sure to confirm that all agreements have been accepted.
Do I need to accept the Paid Apps agreement? Why?
Yes, you will also need to accept the Paid Apps agreement even if you do not offer any type of payment in your app.
You don’t need to set up your tax and bank information though, simply accepting the terms is enough.