TestFlight is an app provided by Apple to allow users to test apps before making them publicly available in the App Store.
In order to be able to invite users as testers to TestFlight you first need to make sure the user is added to your App Store Connect account. You can find a complete guide on how to invite users to your account by clicking here.
Below you can find a step-by-step guide on how to invite users to test your app using TestFlight.
On App Store Connect, open your list of apps then select the app to which you would like to invite your users as testers, you can use this link: https://appstoreconnect.apple.com/apps
On the app details page, click “TestFlight”
You will need to create a new Internal Testing group, you can do so by clicking on the “+” icon:
Type in the name of your Internal Testing group, the name will be visible to invited testers
With your Internal Testing group created, you can now invite users by clicking on the “+” icon
Select the users that you would like to add as testers to the app and click “Add”
That’s it! The selected users will receive an invitation in their emails, the invitation will include a “Redeem code” which can be used in TestFlight to redeem and install your app for testing purposes.
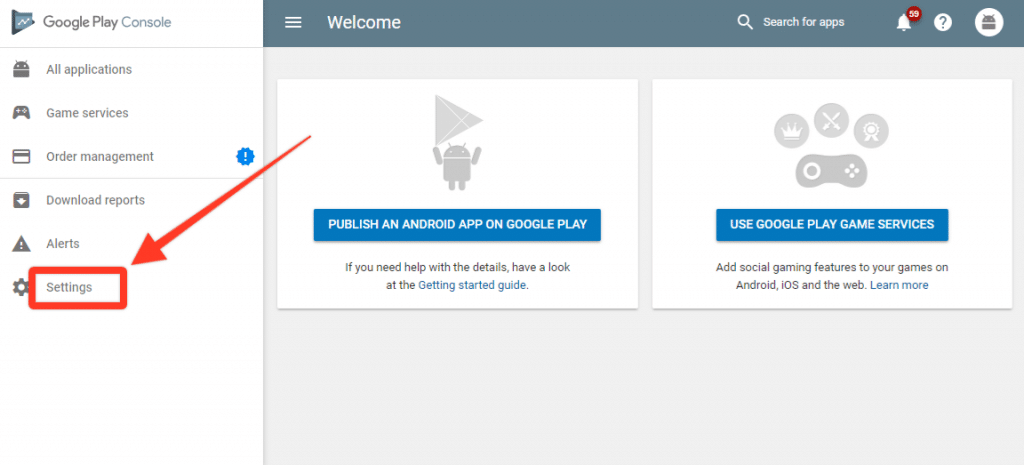
In order for our team to be able to configure and submit your Android apps we will need an invitation to your Google Developer Console.Here you can find a step-by-step guide on how to invite users as an admin to your account:
In order for our team to be able to configure and submit your Android apps we will need an invitation to your Google Developer Console.Here you can find a step-by-step guide on how to invite users as an admin to your account:
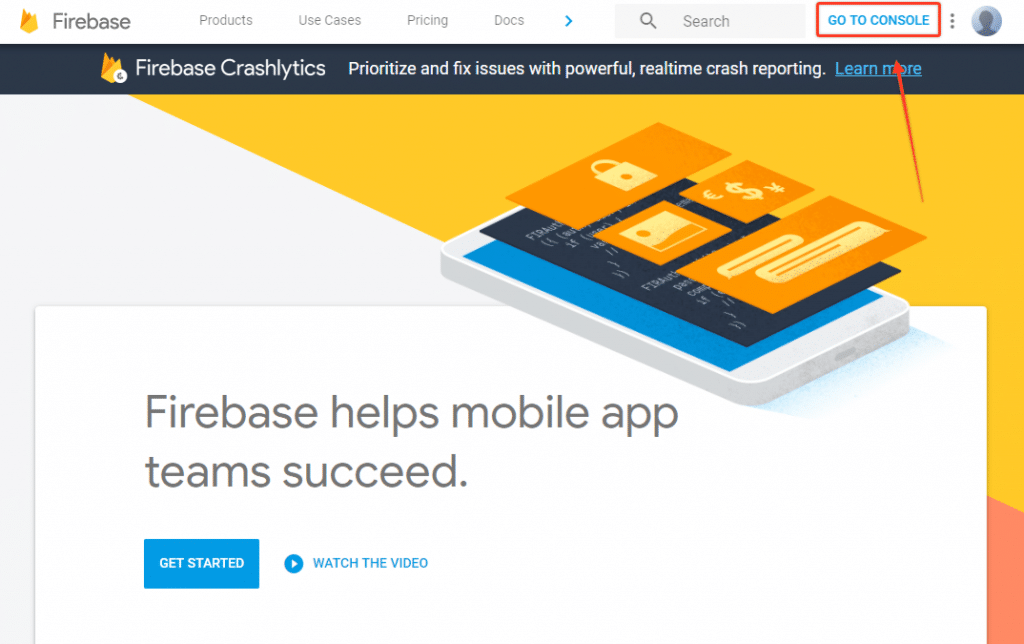
Now that you have your own Google Firebase account (if you don’t click here to see how to get one) it’s time to invite our team to your project so we can configure and test everything for you.Access your Firebase ConsoleThe first step is to go to https://firebase.google.com and click on “Go to Console” in order to access your Firebase Console.
Create a project for your appNow you will need to create a new project for your app, this new project will hold all the features and details that Firebase has to offer. Click the “Add Project” button to get started.
You will then be requested to type a name for your project, we’d suggest that you use your app name for that, but feel free to use what you think is best and then click “Create Project”.
Invite our team as an admin to your accountNow that your project is in place it’s time to invite our team to it, so we can configure Firebase’s features for your app.Click the gear icon on the top left and then click on “Users and Permissions”.
A modal window will be displayed asking you to insert the email that you want to invite and the role that it will have in your project.Make sure to use the email provided by our team and to select the “Owner” role so we have access to everything we need to ensure that your app works correctly and that all features are working as expected.
Our team will then receive an invitation to manage your Firebase Project and that’s pretty much it!
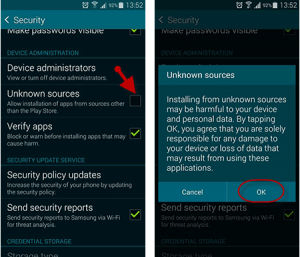
From your smartphone or tablet running Android 4.0 or higher, go to Settings, scroll down to Security, and select Unknown sources. Selecting this option will allow you to install apps outside of the Google Play store.
Next, download the file you were sent or downloaded online from your device. Open the Downloads app and find the file you just downloaded. Open the file and install the app.
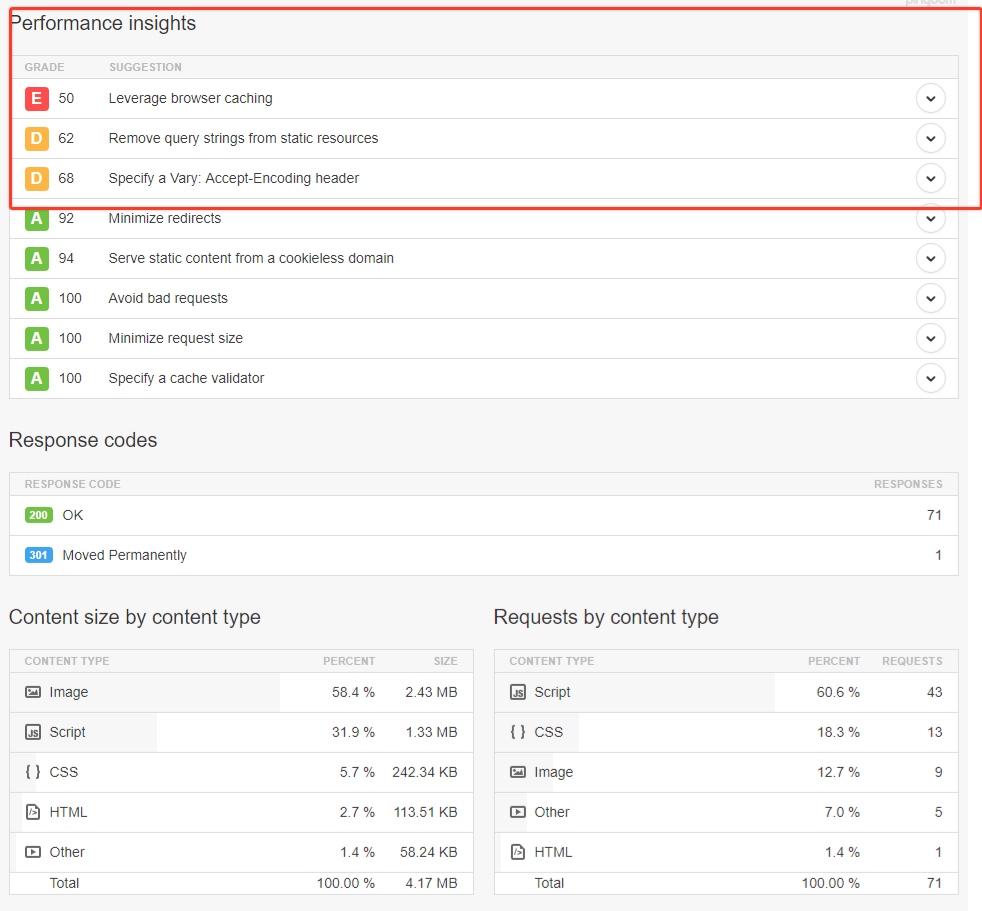
Canvas relies on your website’s design and content, therefore the time your app takes to fully load is directly related to your website loading speed, plus the time that it takes to load the app’s own assets.If you are not satisfied with the time that your app takes to load, we suggest that you perform some tests on your website, to make sure it is fully optimized to provide the best possible performance.The best way to start, would be to use a website speed test tool like Pingdom, which provides some in-depth information about your website performance along with some insights on how you can improve it.
Make sure to go through all the optimization tips provided under the Performance Insights section of Pingdom and you should be able to see some nice improvements in your app loading speed.
App Optimization
Canvas allows you to use any pages from your website inside your app, so you might want to take advantage of this and create specific pages for it, with an app optimized page structure and content.Synthesizing the content of your app might not only improve the overall user experience but also help with reducing the loading times of your app as there will be less text, images, and code being loaded.
When you submit your iOS app to the App Store, it goes through a long and strict review process, where a real reviewer (not a robot or anything like that) opens your app in his iPad/iPhone and navigates through it, as a real user would do.The reviewer then makes sure your app complies with Apple’s guidelines, works correctly, and provides a well thought and optimized user experience, which must be, in a way, different from what the mobile version of your website offers.
What should I do to make sure my app gets approved?
Since we are dealing with real people, it is hard to predict which parts of your app the reviewer will focus on, but there are some general tips and suggestions we can offer that might help with increasing the chances of having your Vendrux News app approved:
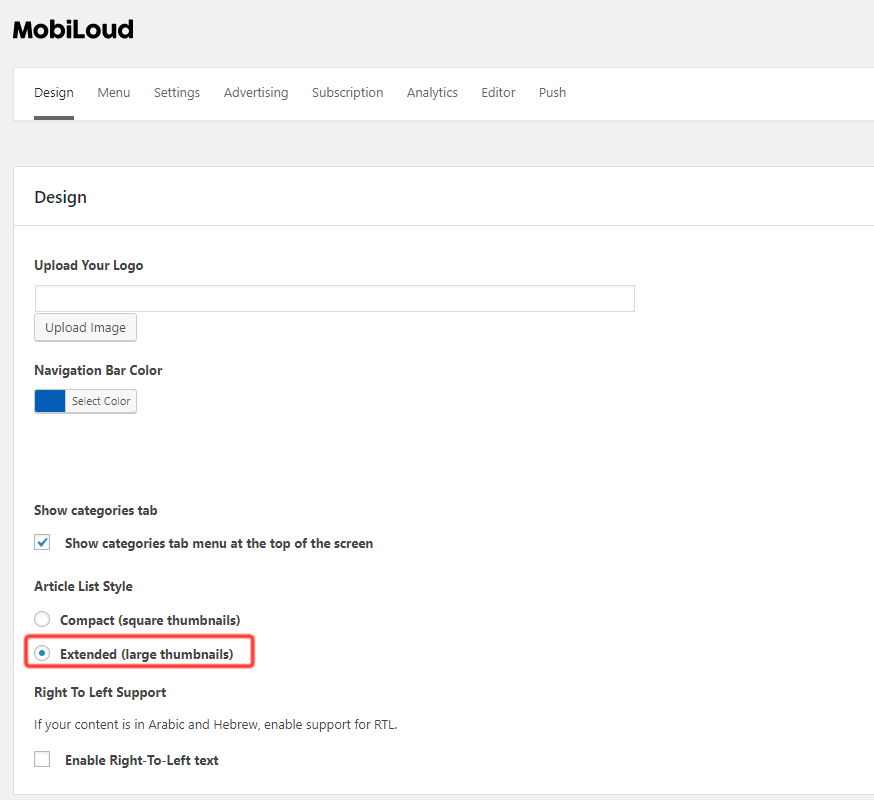
Make sure your text is well written and formatted. By this we mean, not only try to avoid typos and include a minimum amount of text, but also make sure your text follows a pattern in terms of alignment, line breaks, image positioning, etc. You can take a closer look into some famous news apps like New York Times, Apple News, and BuzzFeed for reference.
Enable the extended view mode and excerpt in the Vendrux News plugin settings. This is not a rule at all, but we have noticed that apps with bigger, good-looking images, and with more content on the app’s main screen, have a higher approval rate than those that use the compact view with no extra content.
Include features that are exclusive to your app. Using the menu tool, you will be able to incorporate any pages from your website into your app, our suggestion would be to create one or more pages that offer a specific and useful functionality to your app users, giving them extra reasons to use your app rather than simply opening your mobile website on their phones. Spending some time thinking about how you can take the most out of your app can certainly be rewarding.
Customize your app and make sure it looks good. Sounds quite obvious right? But Apple really likes when things look good, having a nice logo, high-resolution logo, that matches your header background color and works well on small screens can definitely help with making sure your app gets approved. Again, it will be worth spending some time creating proper graphics, solid color combinations and a good looking app rather than receiving a rejection message after 5 days waiting for the review.
My app got rejected even after making the mentioned changes
We can always assist with making the necessary adjustments to your app, based on the feedback provided by Apple, and then proceed with resubmitting it for a new review.There are specific cases, where the best option would be to take a step back and re-think your app purpose, design, and features, to make sure you are providing the best possible user experience in your app. We’ll make sure to address these with you.
Even though Canvas relies on your website for all the design and content, in some cases you will want to have the app set up in a slightly different manner.
In a social network app, for example, users will usually be required to log in before they can access the app content.
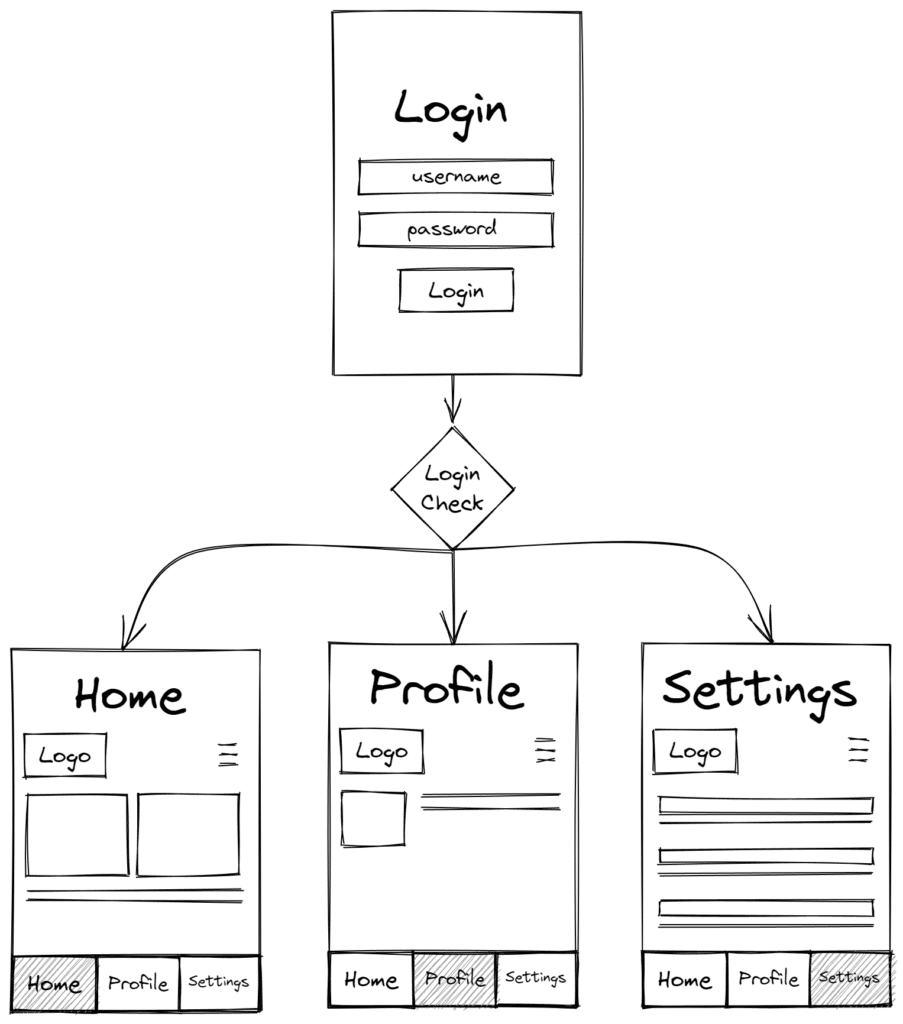
Below you can see a diagram of what this user flow would look like in the app:
As you can see, the login page is displayed as soon as the app is opened, before any piece of content, and only after we check if the login was successful, does the content gets displayed.
The login check, performed once the user submits a username and password is key to ensuring a smooth login process, and it can be handled in a few different ways:
WordPress
When using WordPress, our Canvas Plugin will handle most part of the login process for you.
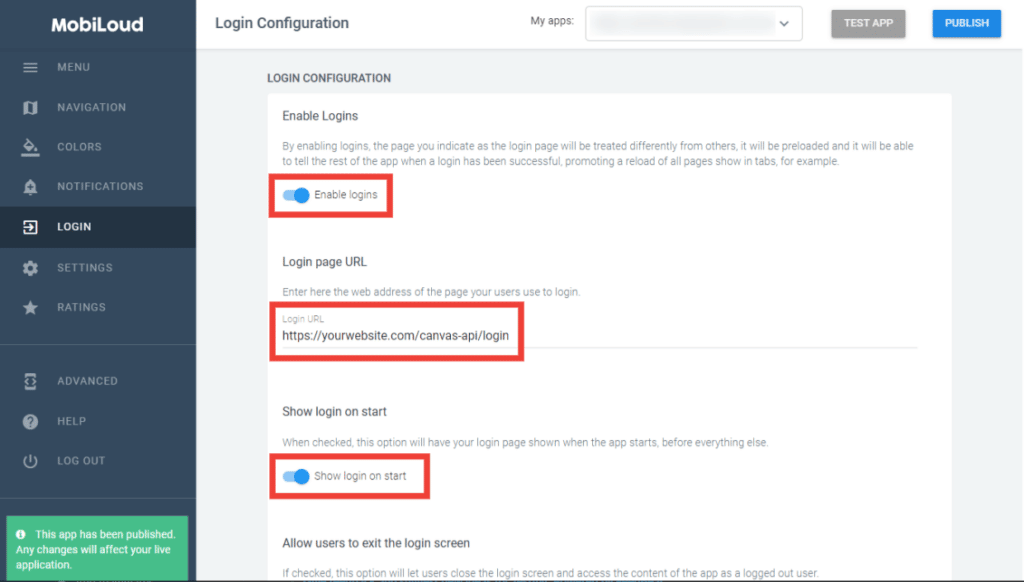
In order to enable the login functionality for your app, go into your Canvas Dashboard, and follow these steps:
Enable the login
For the “Login page URL” use the https://yourwebsite/canvas-api/login or another login page of your preference
Set the login to be displayed when the app starts
You will have something like this:
Now under “Advanced”:
Change the value of Remote_Server_Available to true
Change the value of Remote_Server_Root_URL to https://yourwebsite.com/canvas-api/loginstate
That’s it, the app will now display the login screen on start and identify a logged-in user accordingly.
If you are having issues with users not remaining logged in to the app, please check this guide.
Checking the redirect URL
After a successful login, you can redirect the user to a unique URL, one that will be specific to the successful login event.
In most cases, the URL to which the user will be redirected after a successful login will look like this: https://yourwebsite.com/home?login_successful=true
With this redirect in place, we can make sure that the app is capable of recognizing the successful login, dismissing the login screen, and taking the user to the content.
We perform this check using the “Login Redirect” method:
Then using the “Login Complete Regular Expression” field to determine the URL that will confirm that the user has been successfully logged in. If we are using https://yourwebsite.com/home?login_successful=true for example, this is how the regular expression could look like:
You can use a tool like Regex Tester to test your Regex and see if it matches a specific URL.
Triggering native functions
In some cases, a redirect is not optimal, when you have a one-page application for example.
The alternative, in this case, would be to use the Native Functions.
Once you have determined that the user login was successful, calling the nativeFunctions.login() will have the same effect as the redirect, dismissing the login screen and displaying the content to the user.
What about the user logout?
Similarly, whenever a user gets logout you will want to tell the app to display the login screen over the content, so the user gets prompted to log in again in order to continue accessing the content.
The logout works similarly to the login, meaning that you can either use a redirect or trigger the nativeFunctions.logout() to tell the app that the user has been successfully logged out.