The Vendrux News plugin will allow you to customize some aspects of your app directly from your WordPress Dashboard.
Under “Vendrux News > Configuration > Design” you will find settings for the following:
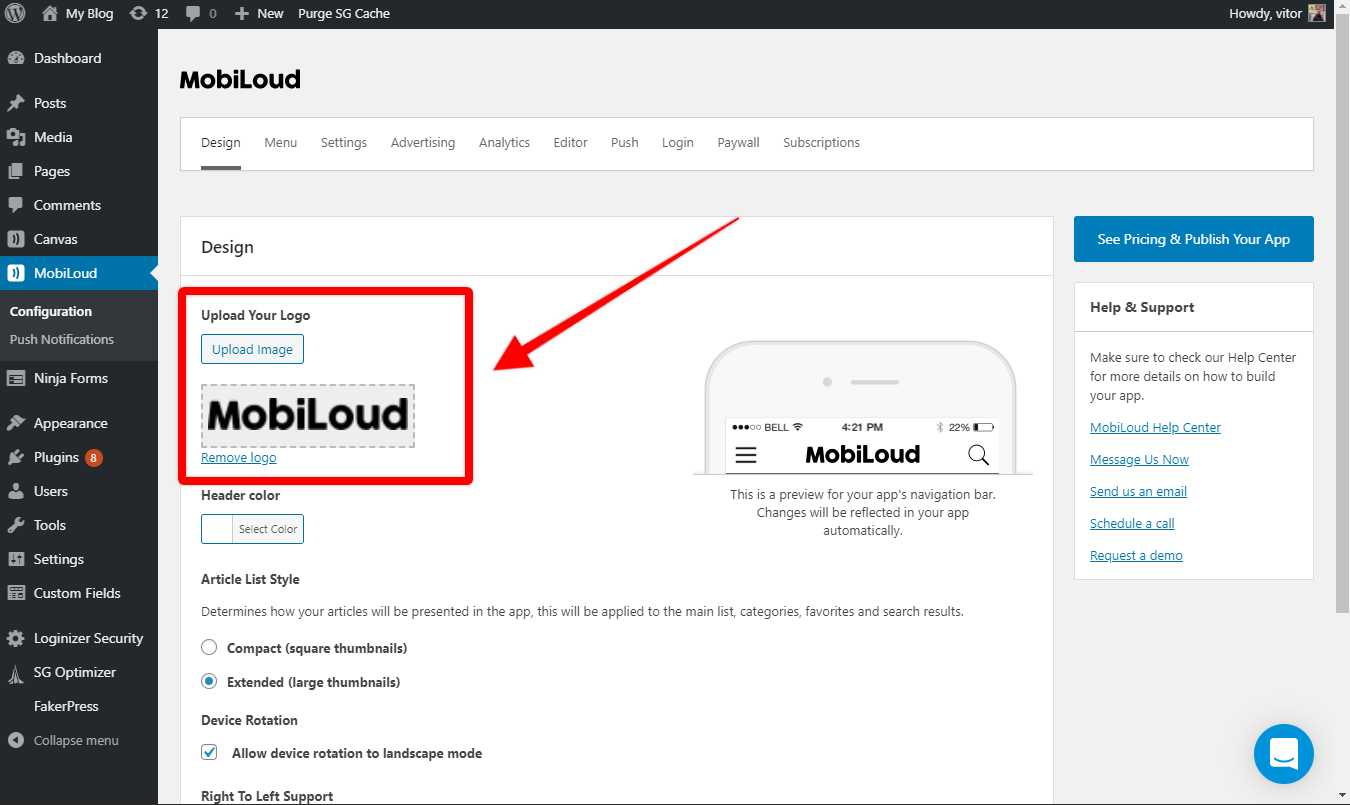
Logo
The logo is displayed in the app’s header and can be uploaded on the following area:
The logo must be in .PNG format with a transparent background.
Header Color
The header color will dictate the colors of your app, keep in mind that the header is displayed in all screens of your app, so it is important to select a color that matches your logo and branding. You can define the header color using the following setting:
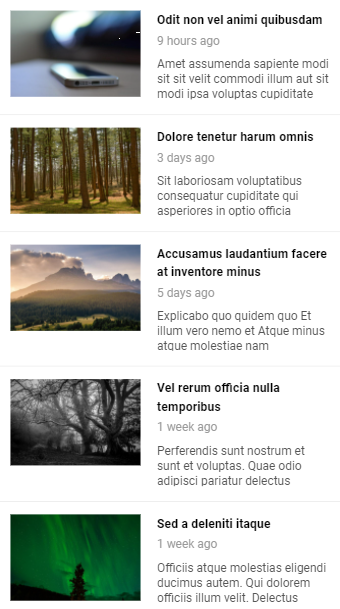
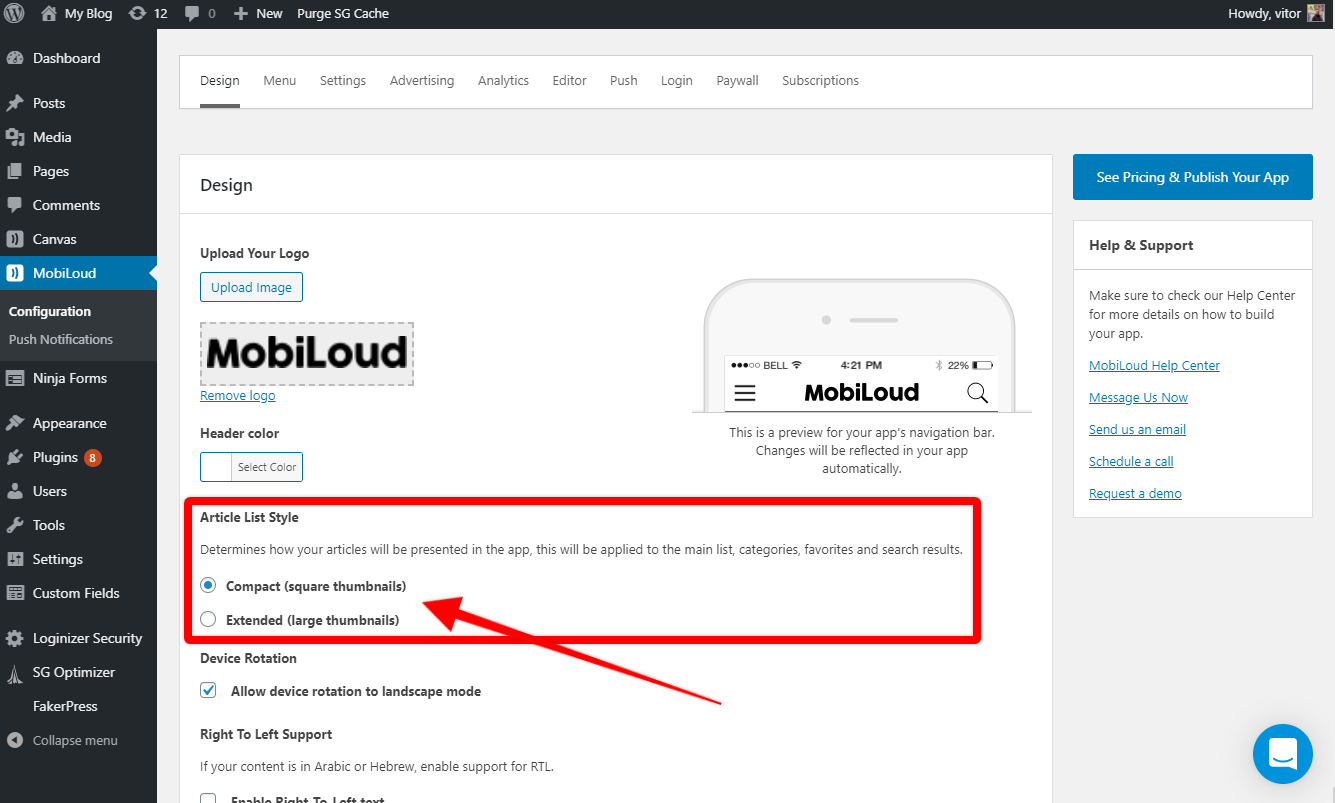
Article List Style
You can choose between a compact and extended style for the lists, keep in mind that the selected style will be applied to all the different lists in your app, such as: home screen, categories, authors, search results, favorites.
Below you can see how each style will look like by default:
The list style can be adjusted using the following setting:
Click on the Store Presence menu, and click the “Pricing and Distribution” item.
Click Unpublish
Now that you’re done with that… if you’d like to build a fast, native mobile app for your content site, check out Vendrux and if you think we could help, get in touch at support@vendrux.com or request a demo.We focus on native apps for content sites, news sites but also information-rich sites, directories, corporate websites. Our service is full featured and includes a customized app, push notifications, maintenance and ongoing updates.
The home screen is, as the name suggests, the first screen that users will see in your app. For that reason it is important to make sure your articles are displayed with all the details your users will look for when choosing a post to read.
Below you will find a list of all the settings that will affect the design and structure of your app’s home screen and how to use them.
Article List Style
You can choose between a compact and extended style for the lists, keep in mind that the selected style will be applied to all the different lists in your app, such as: home screen, categories, authors, search results, favorites.
Below you can see how each style will look like by default:
The list style can be adjusted using the following setting under the “Design” area of the Vendrux News Plugin:
Date Display Options
Under “Configuration > Settings” you will find a long list of settings, the “Date Display Options” will allow you to determine how the post date should be presented in the lists.
You can display the dates using what we call pretty dates (e.g. “2 hours ago”, “1 day ago”), or you can set a custom date format.
The list preferences will allow you to show or hide several details in your article lists, such as:
Post date
Excerpt
Comment count
Category
Author
Image proportions
Whenever you make changes to these settings, make sure to clear your server/website cache and then close and re-open the app to see the changes taking place.
Here you can see the settings:
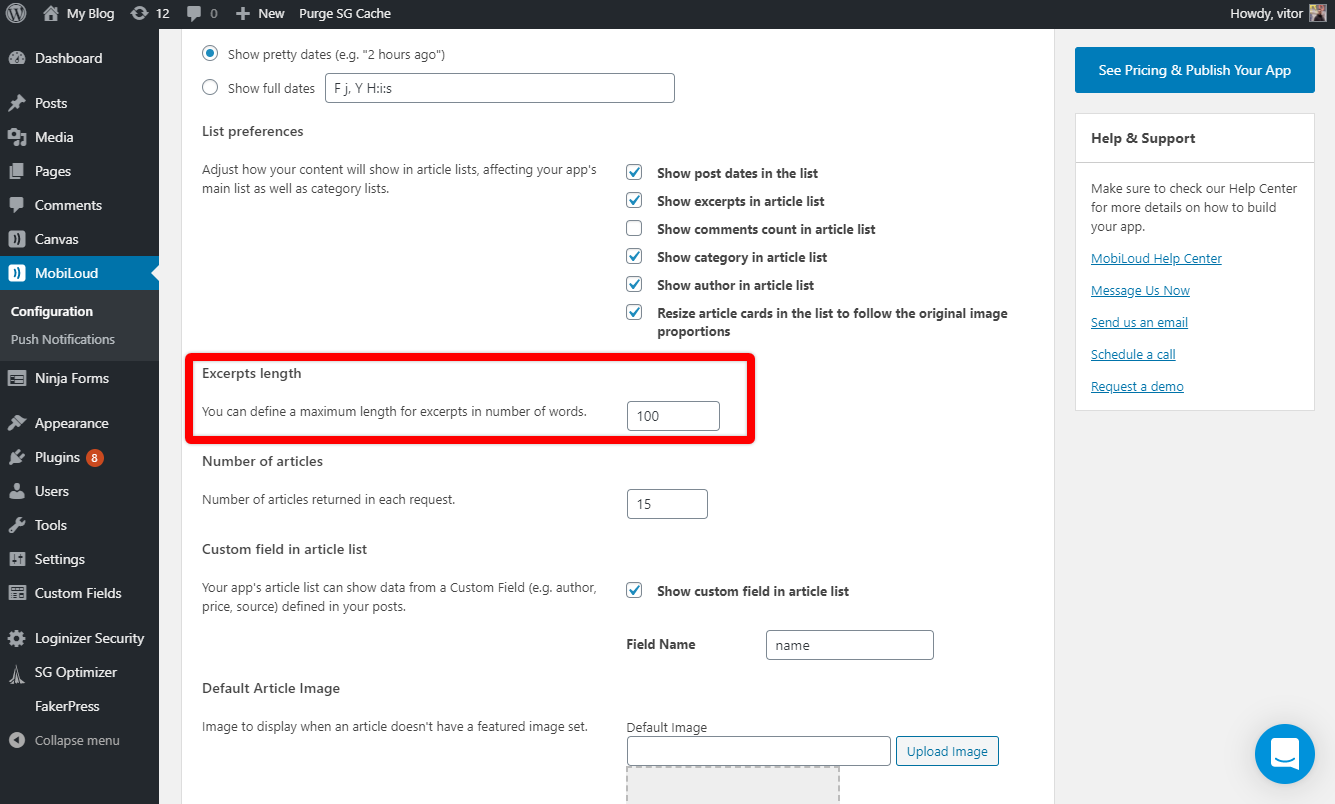
Excerpt Length
The excerpt length will determine how many words are displayed in the excerpt when that element is enabled in your lists, we’d recommend using something around 15 and 20.
Number of Articles
The number of articles that are displayed in your lists when they are loaded is an important aspect of the app, the more articles you decide to load, the longer the lists will take to load. Keep in mind that every time the user scrolls down, the same number of articles will be loaded when the user reaches the end of the initial list.
Default Article Image
The default article image will be displayed in your lists whenever you don’t have a featured image set for your posts. We’d recommend using a simple image, that matches your branding design.
The suggested image size is 560px in width x 400px in height.
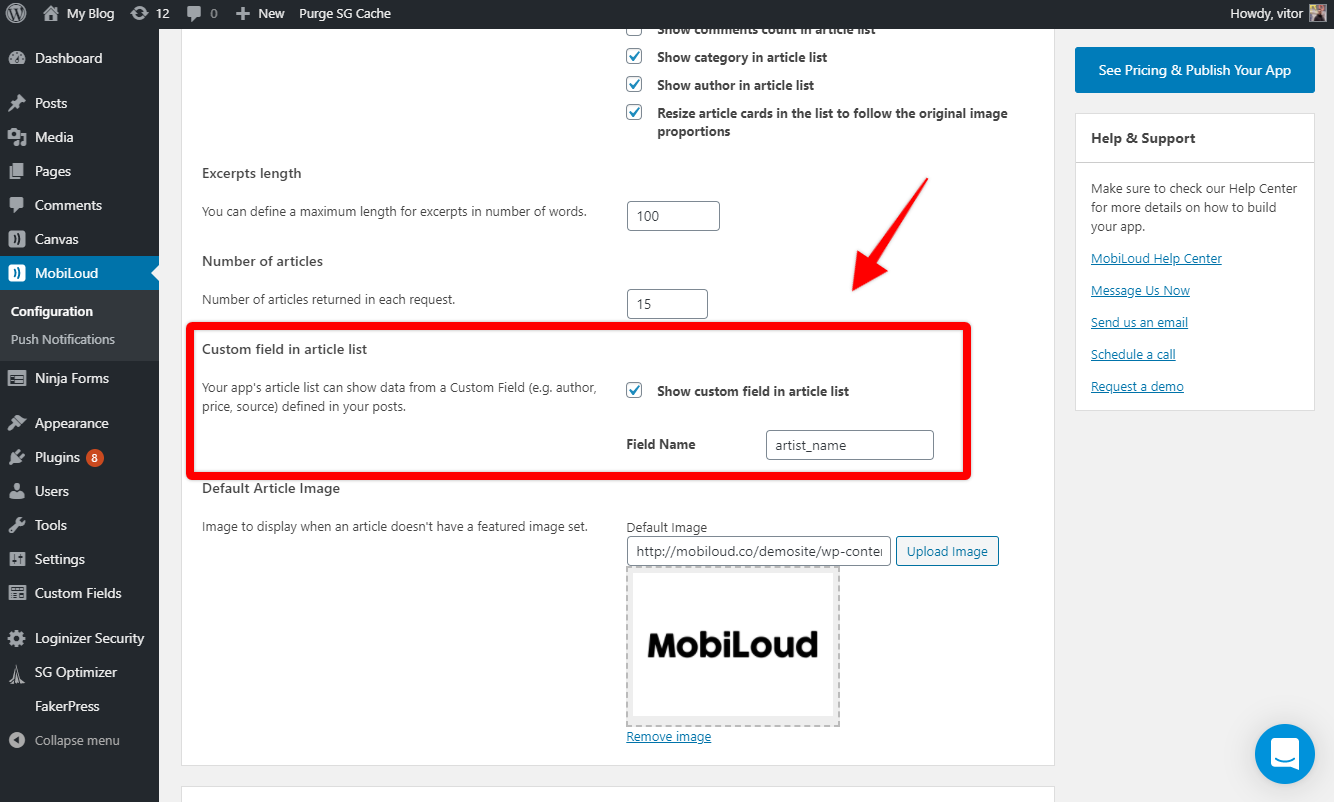
Custom field in article list
The “Custom Field in Article List” setting will allow you to display a custom field in the list of articles, for each post.
In order for the custom field to be displayed you will need to add its
This feature will be useful in case you have a unique setup on your website, where you use a custom field to store specific information about your posts.
Customising your app’s logo, color, menu and content
Once installed, you will be able to find the Vendrux plugin in your sidebar.
1. Add your branding
Under this tab, you will be able to upload your app’s logo, change the navigation bar color, and choose what to show on your app’s home screen.You can also see a quick preview of the app design. To test your app, load your app from the stores and see changes taking place immediately.
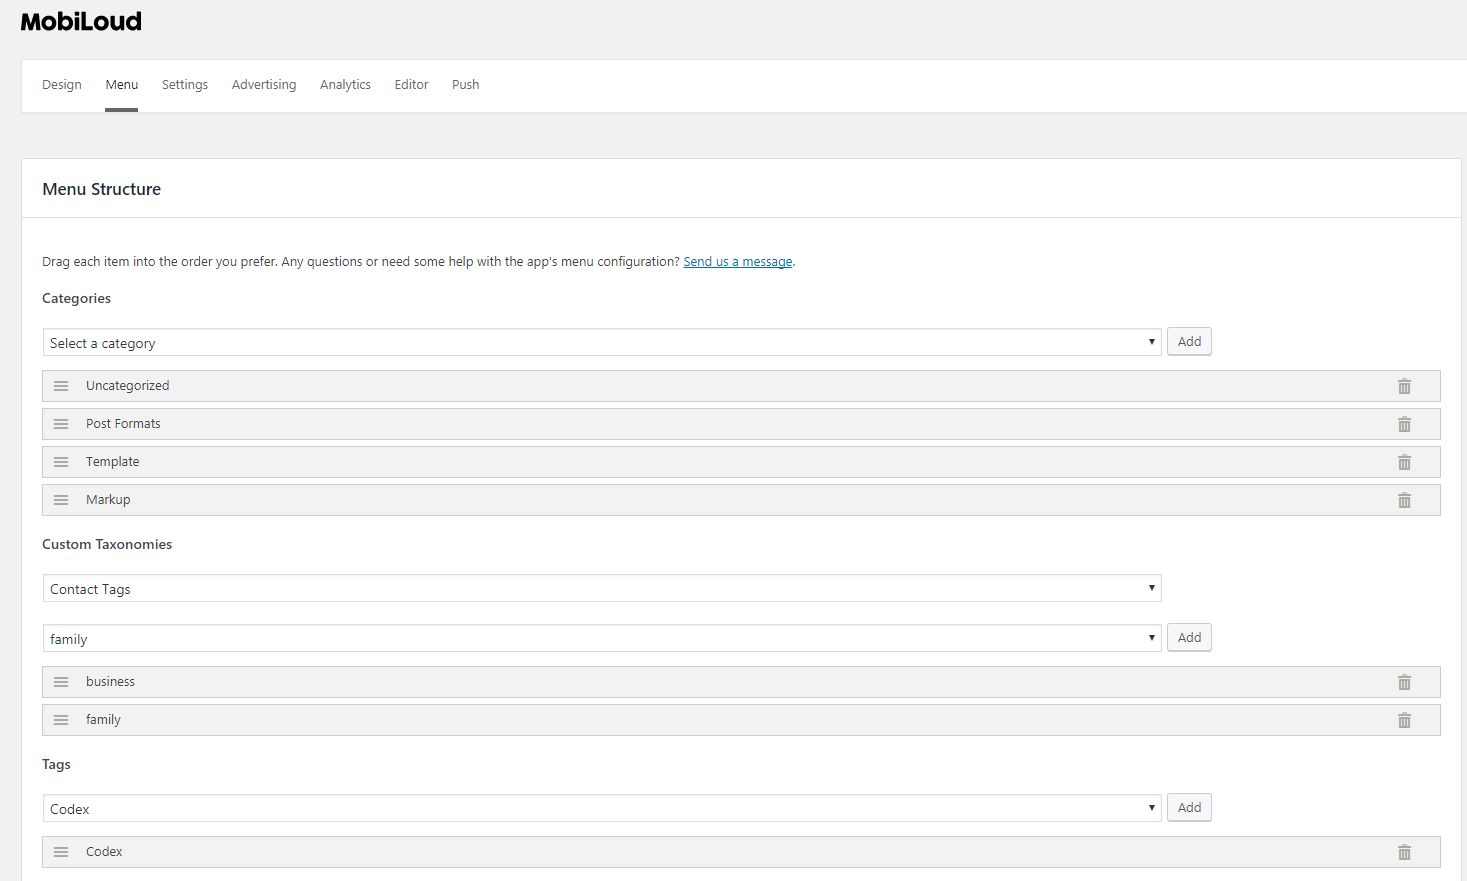
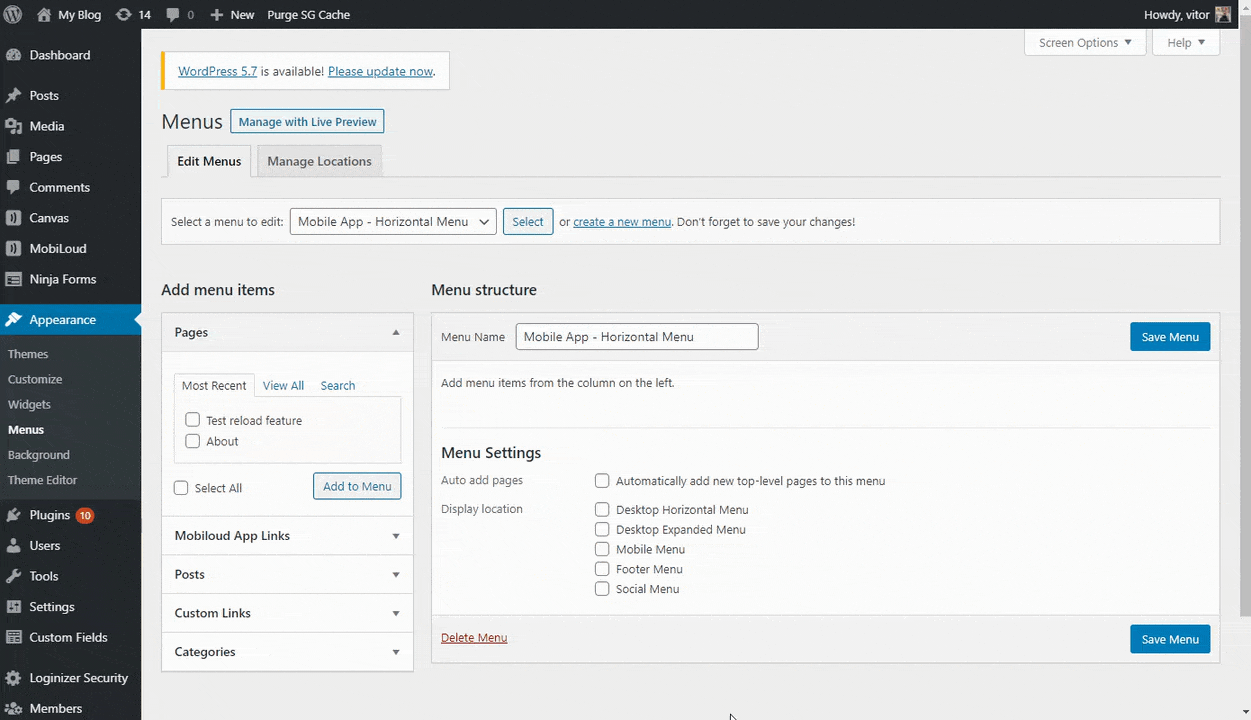
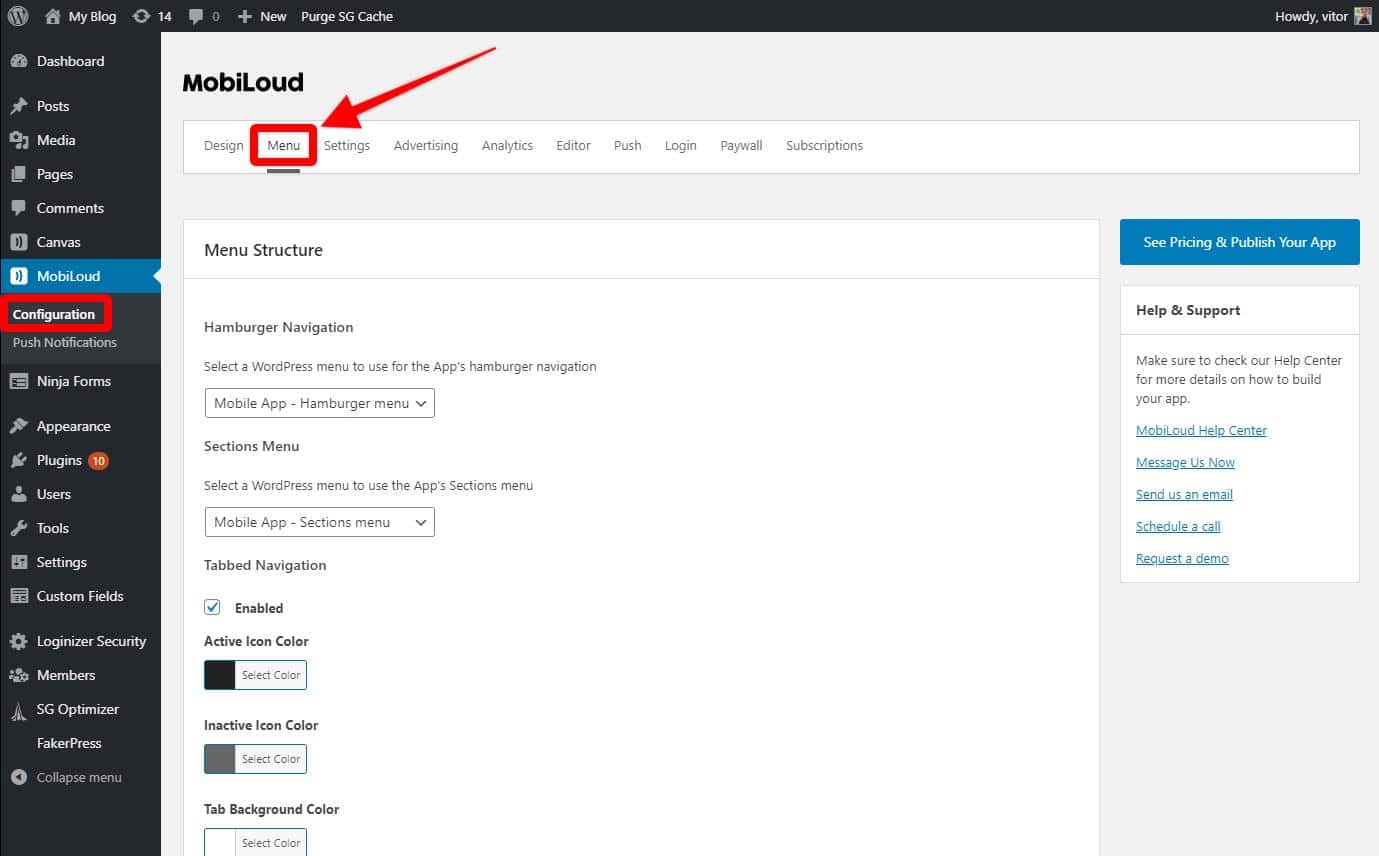
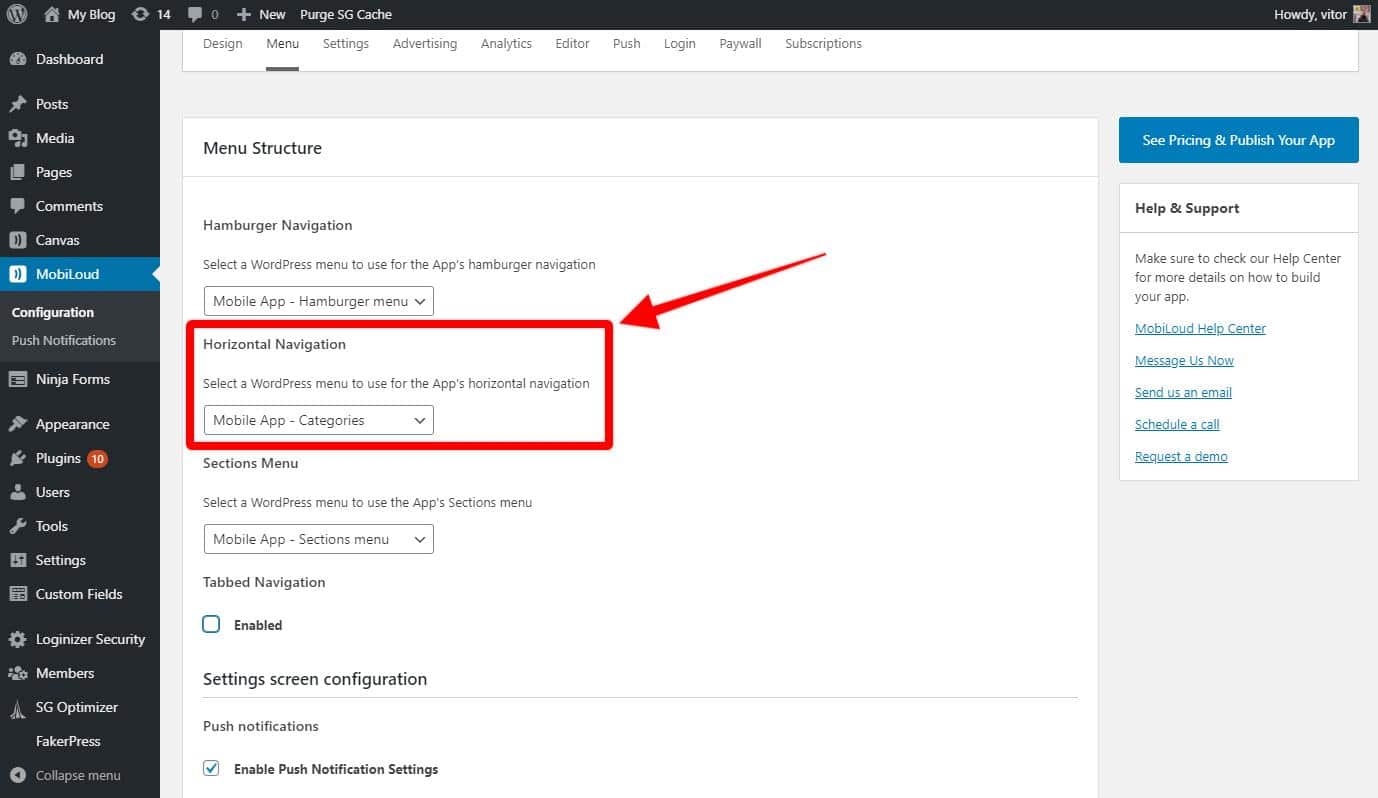
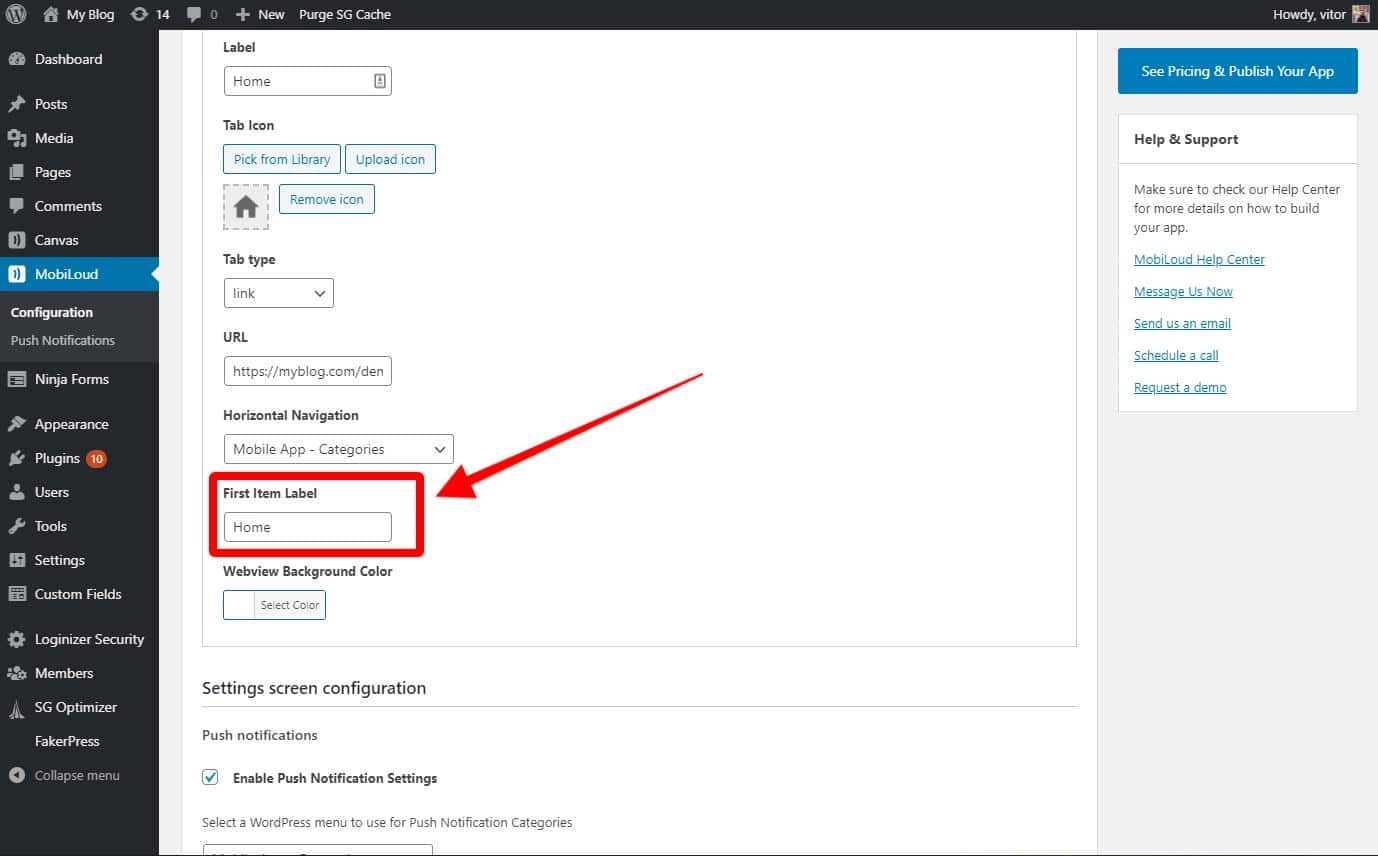
2. Configure the Menu
On the Menu Tab, you will be able to customize your Menu structure, adding pages, categories, custom taxonomies and any URL you’d like to load in the app.You can change all menus in the app, the hamburger menu, tab menu and even a “Sections” menu if your app is using one.
https://www.youtube.com/watch?v=igf_VzuCqdI With Vendrux you have the ability to add any custom code to your app’s post/page layout. Just click on Vendrux in your WordPress admin dashboard, select Settings and then click on the Editor tab. You’ll see something like this:
Using the Editor, select a “PHP” position within the article screen, like “PHP after Content”. This allows you to add any PHP code and have the result shown below the main article or page contents. Note for “PHP” spaces, you should enter PHP code directly, without the ID, ‘fieldname’, true). Say for example you want to include the value for a book title you’ve reviewed and include the “Title:” text before the value, while checking if the value is actually present for the current post, you’d use this code:
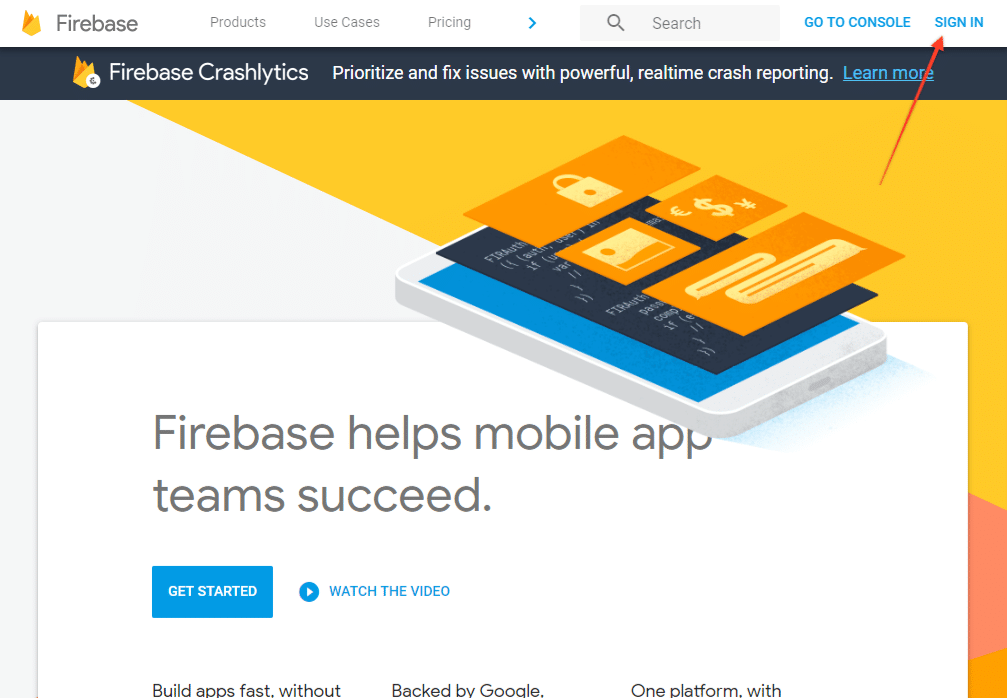
Google’s Firebase is an app development platform that gives you control over several parts of your app, with it you will be able to track analytics data, crashes, user behavior, ads and much more.Just like other Google services, in order to have a Firebase account, you will need to sign-in with your own Google Account login details here: https://firebase.google.com/
If you’ve incorporated your business, then Apple will require you to register as a Corporation to have your app published on the App Store. If you submit your app under an Individual account in your name, it will be rejected.
You must enroll as an organization if your company is a registered company such as Corporation (Corp., Inc.), Limited Liability Company (LLC, LC, Ltd. Co.), or a legal entity (GmbH, AG, KG, oHg, etc.).
If you are a sole proprietorship you must register as an Individual. Apple does not accept DBAs, fictitious businesses, trade names, or branches for enrollment as a company/organizationBenefits of an Organization account:
You can choose the name that will be displayed on the stores as the Developer of the app – this will match your company name e.g. Business Inc.
Apple will know you’re authorized to act for the company and will not challenge your use of your own brand name and content
At Vendrux, our team of experts are here to hold your hand through every step of the app development and publishing process. Click here to learn more about how we can help.
Convert your registration
To change your account to a Corporate account, submit a request to Apple Developer Program Support.
Navigate to the Contact Us form on Apple Developer’s Program pages.
Log in with the Apple ID and Password
Select your Region.
Choose Account Updates and Renewals as your Subject.
Enter a message with text along these lines
“I’d like to convert my account from Individual to Organization. This will be our only Organization account. Here is the information regarding the company:
– CEO/Director Name: First and Last Name.
– Company Name: Your Company Name, including Ltd or Inc.
– Account Type: Organization.
– D-U-N-S Number: your Company’s DUNS number.
– Address: Your Company’s Legal Address.
– Phone Number: Your mobile phone or another phone number where you can be reached
Apple will call to verify your enrollment. They’ll then send you an email with a link to a form for you to fill out more info about your Company.
Organizations enrolling in the Apple Developer Program will need:
Your business must be recognized as a legal entity (e.g., a corporation, limited partnership, limited liability company) to enter into the legal terms and obligations of Apple Developer Program. The legal entity name will appear as the developers for apps you distribute on the App Store. Example: Seller: ABC Company, Inc.
You must have a D-U-N-S Number so that Apple can verify your organization’s identity and legal entity status. Learn more about what is a DUNS number and how you can get one for your company.
You must have the legal authority to bind your organization to legal agreements. You must be the organization’s owner/founder, executive team member, senior project lead, or have legal authority granted to you by a senior employee.
Your Company needs a public website and your domain name should be owned by the company.
One of the most popular monetization methods for apps is to display ads in the content.
We offer a few different ways for you to include your ads, below you can find more details about each one of them.
Google Admob
Google DFP
HTML + Javascript embeds
Google AdMob
With our Google AdMob integration, you will be able to display banner ads in a fixed position at the bottom of the screen on list and article screens as well as interstitial ads every time a certain amount of posts has been viewed by the user.
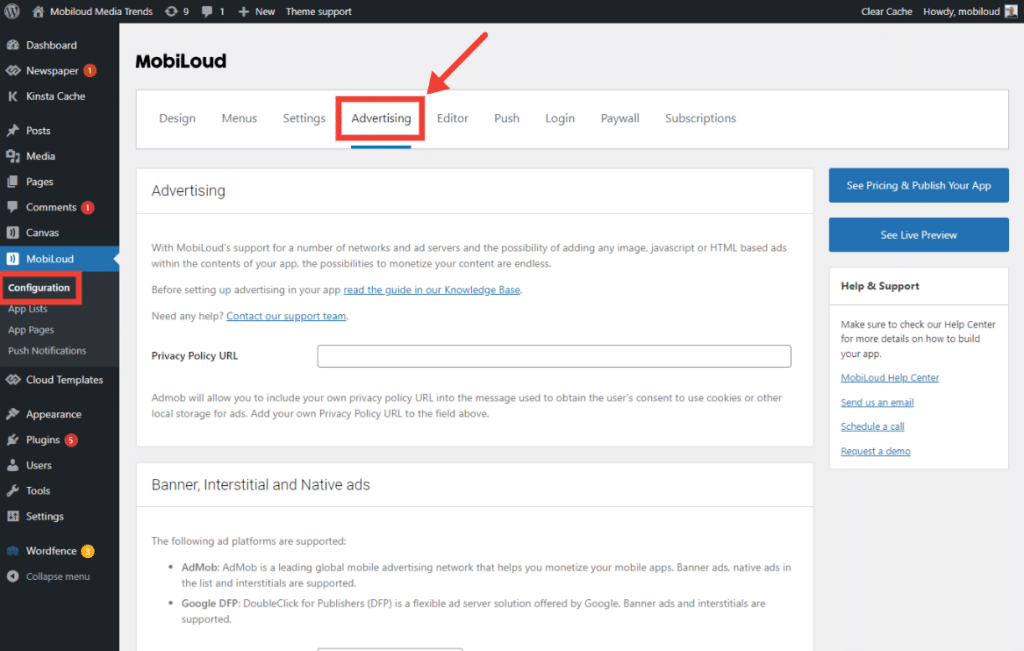
You can find the Google AdMob settings under “Vendrux > Configuration > Advertising” as you can see here:
Scroll down a bit and you will find the settings to insert your AdMob App ID and ad units.
The AdMob App ID is required in order for the ads to work.
Does a OneSignal paid plan ($99/month) automatically opt out a customer of data collection in the app – data sharing with third parties?Yes, OneSignal‘s paid plans do not share any data with 3rd parties.If we use a free plan from OneSignal does that mean that an EU company would not be compliant with GDPR?Generally there are 2 options in working with OneSignal:
Stay on the free plan and ask users to opt-in to share their data with services you use (including OneSignal).
The first option keeps OneSignal free, but puts the burden on you to make sure users opt-in. The second option shifts the onus to OneSignal. For additional guidance on any specific GDPR responsibilities, we recommend working with your legal counsel.OneSignal’s paid plans do provide a DPA and model clauses which help provide the necessary legal framework for the data processing on your behalf and for EU-US data transfer. They work with many enterprise businesses in the EU/UK and this has not been an issue as long as the DPA is in place.