Category: Help Knowledge Base

  • How to track post URLs in Firebase with vendrux News

    How to track post URLs in Firebase with vendrux News

    Firebase allows you to track and monitor different aspects of your app using its Analytics tool.

    If you want to be able to track the URL of the posts that have been opened in the app you will need to set up a custom dimension in your Firebase or Analytics account.

    The objective is to tell Firebase to track a specific parameter (the URL) of a post view event.

    Unfortunately, this needs to be done manually, as Firebase will no longer track all parameters tied to events, they have also applied a limit of 50 parameters tracked on free Firebase accounts. In the past, they used to track all parameters on all events (A LOT of data!), which was certainly a problem on their end since most Firebase accounts are free.

    The first step to set this up is to access your Firebase account (https://console.firebase.google.com) and click on “Custom Definitions”:

    Now go to “Create custom dimensions”:

    Fill out the form using the following values and click “Save”:

    Now that you have a custom dimension created Firebase will start tracking the “url” parameter of your “post” event, it might take up to 24 hours until the tracked data is available for you to see in your Analytics account.

    Once enough data has been tracked, follow the instructions below to see the list of post URLs:

    Go to “Events” and select “post”:

    Scroll to the bottom of the screen and you will find the statistics for the custom dimension you created:

  • How to test iOS apps using TestFlight

    In this guide, we will go through some of the frequently asked questions about testing iOS apps.

    Unfortunately, Apple doesn’t provide users with an easy way to test iOS apps before they are available in the App Store, they require you to use TestFlight, an app that is maintained by Apple itself. Although the app is easy enough to use, it will require you to take some extra steps before your users can test it.

    Different testing methods using TestFlight

    Invitation

    This is the quickest method to get users to start testing your app.

    You will be required to add your testers to your Apple Developer Account, and then, once they have accepted the invitation, add them as testers to TestFlight.

    Here is a breakdown of the steps for your reference:

    1. Invite a user by his Apple ID email, to your Apple Developer Account. You can find a guide on how to do so, clicking here
    2. Once the user has accepted the invitation, you will need to add him as a tester to your app in the TestFlight area. You can find a guide on how to do so, clicking here

    Public link

    If instead of adding users to your Apple Developer account and then inviting them to TestFlight you prefer to simply send a link to the users that you would like to test the app you can use the Public Link alternative.

    To generate your public link you will need to submit your app for review and wait until it gets approved by Apple, which usually takes about 48 hours. Once your app is approved you will be able to generate a link that can be shared with users so they get access to a test version of your app.

    You can find a complete guide on how to generate the public link for your app by clicking here.

    Redeem Code

    The redeem code is required in order for users to be able to download the app in TestFlight.

    Below you will find answers to the most common questions about the redeem code.

    How do I get a redeem code?

    The redeem code is sent to your email once you are added as a tester to TestFlight.

    Where do I use the redeem code?

    The redeem code is used inside the TestFlight app, when you open TestFlight you should see a “redeem code” link on the top right:

    Can other users use my redeem code?

    No, each user will need to be invited separately in order for a unique redeem code to be generated.

    I didn’t get my redeem code, what do I do?

    Before anything make sure to check your email SPAM box, if you still can’t find your code we recommend resending the invitation to your email.

  • How to send push notifications from your WordPress Dashboard with vendrux News

    How to send push notifications from your WordPress Dashboard with vendrux News

    Push notifications let younotify your usersof new content available on the site, or anything else like anevent or a message from you.Notifications are received without the userhaving to openthe app to check for updates. Push, used well and with respect for your users, will help you with drive traffic to your content and increase loyalty and returned visits over time.To enable push notifications, you will need to enter your App ID and Secret Key in the Settings/Push page in the plugin. You will be given the necessary information when your app is submitted by our team (if you can’t find it, just get in touch).So how can you send push notifications? Easy!

    1. Go to the admin panel of your blog and click on the Vendrux plugin in the sidebar.
    2. Still in the sidebar, click on Push Notifications

    With Vendruxyou have two options forsending out notifications.You can manually send a notificationto your users or you can setup Vendrux so that it will automatically send out notifications when a new post is published.1. Manual Push NotificationsOpenthe Notifications tab to manually send notifications. Compose the message that you want to send to your users on the message bar.Optionally you can also attach a post or page to your notification. You can use this to prompt users to open a post when the notification is clicked. You can also create a static page for anything like a special event or deal, then attach the page to your push message.When an attachment is added to a push, the user will automatically load the post or page when opening the notification.Whenmanually sending out push notifications you can send choose to alert all users or select iOS or Android devices. You’ll see a count of registered devices.2. Automatic Push NotificationsPush for new posts, hassle free! From the Push settings panel, enable the checkbox to automatically send push notifications when a new post is published.You can also define categories which will trigger notifications automatically, for example sending out push messages only for particularly important or time sensitive stories.

  • Sending Push Notifications from WordPress

    Sending Push Notifications from WordPress

    In order to start sending push notifications from your WordPress Dashboard you will need to fill the “Push App ID” and “Secret Key” fields, under the “Push Notifications” tab, with your OneSignal keys.

    The mentioned fields can be found under “Canvas > Configuration > Push Notifications” as you can see below:

    These keys can be found in your OneSignal account, under the “Settings > Keys & Ids” area as you can see below: 

    Once you save your Push Notifications settings, a new section will be available, as you can see below:

    The Push Notifications area will allow you to send manual notifications to your users and tracking information about previously sent notifications.

    Automatic notifications for new posts

    If you would like to send automatic notifications to your users when a new post is published on your website, you can enable this feature under “Canvas > Configuration > Push Notifications”.

    At the very bottom of the page you will find all the settings to configure notifications that will be automatically sent when a new post is published, as you can see here:

    Notification tags

    Tags will allow you and your users to segment the notifications they will receive.

    In your app, if you have the “Alerts” tab enabled, users will be able to determine for which tags they will receive notifications, as you can see here:

    In this case Main Alerts, Jobs, Updates and News are all tags that the user can enable or disable so that when a notification is sent with one of these tags assigned to it, only users that have that tag enabled will receive it.

    You can create or edit the tags directly from your Canvas Dashboard, keeping in mind that each tag will have two values assigned to it:

    • Label: the text that will be visible to users in the app
    • ID: the actual tag name that will be assigned to the user profile and used to send the notifications

    To clarify, “Main Alerts” would be the label and “main-alerts” the ID of this tag.

    The Canvas plugin gives you two options for tags, both explained below:

    Category slugs as tags

    When you attach a post to your notification, you can mark this option to include the “category slugs” of that post as tags in the notification. If a post is assigned to the “Featured News” category, the “featured-news” tag will be assigned to your notification and only users that have that tag enabled will receive the notification.

    Keep in mind that you will need to manually create this specific tag in your “Canvas Dashboard”.

    Manual notification tags

    If instead, you prefer to add tags to your notification manually you can use this option. You can simply add the IDs of your tags in the text field and those will be included in your notification.

    How tags work in OneSignal

    Whenever a user enables or disables a specific tag, his profile in OneSignal will be updated with his selection, as you can see below:

    The actual notification that you send, will include the necessary logic to ensure it only gets delivered to users that have the selected set of tags turned on:

  • PeepSo Push Notifications | vendrux

    PeepSo Push Notifications | vendrux

    If you are converting your PeepSo website into an app using Canvas you will definitely want to enable our integration with PeepSo for push notifications.

    Canvas offers support for the following PeepSo notification types:

    • Mentions in comments
    • Mentions in posts
    • Private messages
    • Friend requests

    The first step would be to install the Canvas plugin on your WordPress website, you can find the plugin here: https://wordpress.org/plugins/mobile-app/

    With the Canvas plugin installed go to “Canvas > Configuration > Push Notifications”:

    Make sure your push keys are properly configured into the settings.

    Scroll down a bit and if you have PeepSo and its modules installed you will then be able to enable the push notifications:

    That’s it! Your users will now start receiving push notifications in the app whenever they are mentioned, receive a friend request or message.

  • How to register for a OneSignal account

    How to register for a OneSignal account

    OneSignal is world’s leading Mobile and Web Push Notification service, we use it to deliver push notifications to your app users.You will be required to register for your own OneSignal account, but our team will take care of everything else for you.Here you can find more details on how to register for an OneSignal account:

    1. Access www.onesignal.com and click the login button on the top right
    1. A new dialog window will be displayed, at the very end you will see a sign-up link, click on it
    1. You will then be requested to either sign-up with an existing account or provide details to create your account with OneSignal directly, chose the best option for you and proceed with creating your account
    1. You will then receive a confirmation link in your email, make sure to check and activate your account so we can use it to configure your apps.
  • How to Register for an Apple Developer Account

    In order to be able to publish your app to the App Store, for iOS devices, you will need to have an Apple Developer Account.Below we will list all the steps that you need to take in order to register for your own Apple Developer Account.Keep in mind that you will need a few things in order to be able to enroll in the Apple Developer Program, these are the requirements:Apple IDIf you have an iOS device, you probably already have an Apple ID, if for some reason you don’t have one yet, you can quickly register here: https://appleid.apple.com/accountEnable Two-Factor AuthenticationAs a security measure, Apple will require you to have two-factor authentication enabled in your Apple ID before you can proceed with the enrollment. You can find more details on how to enable the two-factor authentication clicking hereDUNS NumberApple will also require you to have a DUNS number if you are a Company. If you are not sure if you have a DUNS number or if you’d like to request one (totally free), you can do so in this page: https://developer.apple.com/enroll/duns-lookup/Why should I enroll as a Company?You must enroll as an organization if your company is a registered company such as Corporation (Corp., Inc.), Limited Liability Company (LLC, LC, Ltd. Co.), or a legal entity (GmbH, AG, KG, oHg, etc.).If you are a sole proprietorship you must register as an Individual. Apple does not accept DBAs, fictitious businesses, trade names, or branches for enrollment as a company/organizationBenefits of an Organization account:

    • You can invite developers to access your account
    • You can choose the name that will be displayed on the stores as the Developer of the app – this will match your company name e.g. Business Inc.
    • Apple will know you’re authorized to act for the company and will not challenge your use of your own brand name and content

    Next StepsOnce you have your Apple ID and DUNS Number in hands, you can then proceed with the next steps:

    1. Register as a Developer, you just need to read and accept the agreement here: https://developer.apple.com/account
    2. Start the Apple Developer Program enrollment as an Organization here: https://developer.apple.com/programs/enroll/After filling in the form, make sure to check your email for the enrollment confirmation.Note that Apple will verify the provided information and that the internal review process might take up to 3 days.
    3. The Apple Developer Program has a recurring cost of $99 per year, and you will need to maintain the payments up to date in order for your app to be available in the App Store. At the end of the enrollment, you will be requested to proceed with the payment, click Purchase and make the payment to complete the enrollment.

    That’s it! The enrollment process is now completed, as soon as you receive a confirmation from Apple saying that your account has been approved you can then invite our team to your account so we can start working on your iOS app.

  • How to Register for a Google Developer Account

    How to Register for a Google Developer Account

    If you’d like to have your Android app available in the Play Store, so users can easily download and install it, you will need a Google Developer Account.The only thing you will need, is a Google Account. If you don’t have one yet you can register here: https://accounts.google.com/signupNext Steps

    1. You can start the registration process for the Google Developer Account here: https://play.google.com/apps/publish/signup
    1. The Google Developer Account costs $25 once off, you will be asked to pay during the registration process.

    That’s it! You will be good to go right after the payment. You can invite our team as an admin to your account so we can start building and publishing your Android app.

  • How to prepare graphics for Canvas

    In this guide you will find more details on how to prepare the following graphics:

    • Splash screen
    • App icon
    • Notification icon
    • Featured image

    The app icon and splash screen are important aspects of apps, they are the first two things a user will see after installing your app.

    Below you will find instructions and tips on how to prepare the graphics for your Canvas app.

    Before you start, make sure you have a good quality version of your logo to work with, this will drastically improve the final graphics for your app.

    What is a high-quality version of my logo?

    A high-quality version of your logo means that it allows it to be resized without losing quality, below you will find the two most common cases:

    Source files as vector

    If you have the source file for your logo in .ai, .svg, .cdr, .pdf, it means that you can easily increase its size without losing any quality, this is the ideal scenario

    Good quality and big size

    Alternatively, you might only have your logo in .png or .jpeg, which is fine, but in these cases, your logo will need to be at least 1000x1000px in size, so we can resize it with minimal quality loss.

    I don’t have any of these 🙁

    In this case, our recommendation would be for you to have a designer assist with preparing a vectorized version of your logo, which will allow you to apply your brand in different scenarios with a more professional and better quality look.

    If your logo consists of a simple font, you can then provide the font files to our team and we will try to work with it to prepare the graphics.

    Below you can see the difference that a high-quality graphic can make in your app:

    Splash screen background

    The splash screen for your app consists of two graphics, the logo, and the background, which will be placed one over the other in the final version, as you can see below:

    It is important to keep in mind that your background will get cropped depending on the device size in which your app is installed, so you definitely don’t want to use text or anything that can’t be cropped in your background.

    The background image must be 2048x2048px in size, no transparencies, in .png or .jpeg format.

    Splash screen logo

    Your logo will be placed over the background, it must be 1000x1000px in size, with a transparent background, in .png format.

    Note that although the file size is required to be 1000x1000px in size, your logo should be centered and have some bleeding on the sides, to make sure your logo won’t touch the edges of the device.

    See the images below for reference:

    App icon Android

    When preparing the icons for your apps you need to keep in mind that the app icon will be displayed in a small size, so depending on how your logo looks like you will want to use a reduced or minimalistic version of your logo, which will fit much better into the icon, see below:

    SAMPLE ICONS

    For Android specifically, you will need to provide 2 different files for the app icon, similarly to what you did for the splash screen.

    App icon logo

    The app icon logo must be 512x512px in size with a transparent background, in .png format, with some padding on the sides.

    You can see an example below:

    App icon background

    The app icon background must also be 512x512px in size, with no transparencies, in .png format, you can see an example below:

    App icon for the Play Store

    You will also need to provide a separate version of your app icon, with your background and logo merged into a single file, this graphic will be used in the Play Store.

    The Play Store app icon must be 512x512px in size, no transparencies, in .png format, here is an example:

    App icon iOS

    The iOS app icon consists of a single file, with 1024x1024px in size, no transparencies, in .png format.

    For iOS keep in mind that the icon will be automatically rounded by Apple, so you will want to make sure that you have some padding on the sides to avoid having elements getting cropped.

    Here you can see an example:

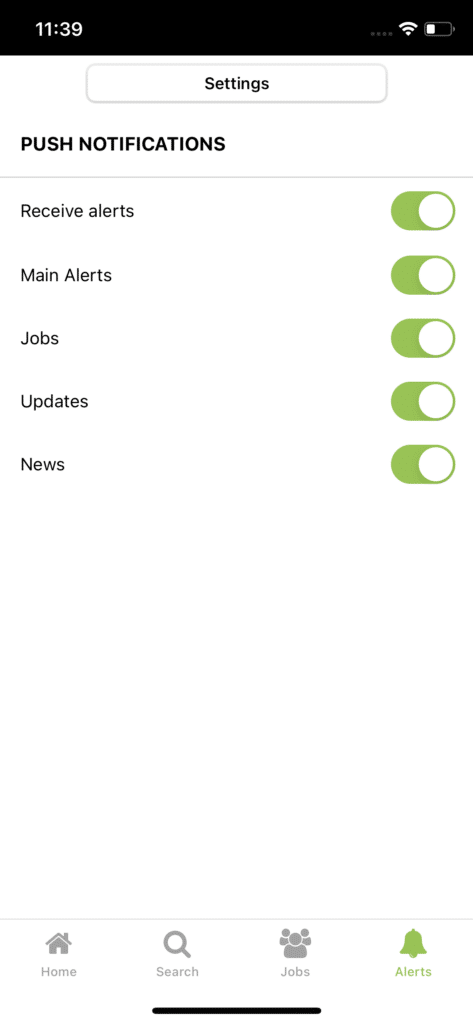
    Push notification icon for Android

    Android allows you to customize the icon that is displayed on the user’s device when a notification is received.

    Just like with the app icon you will want to use a minimalistic version of your logo, since the push icon is displayed in very small sizes.

    The file must be at least 200x200px in size, with a transparent background, in .png format.

    You will then need to upload your file to the Android Asset Studio tool, which you can find clicking here.

    Here you can see a quick video of how that process looks like:

  • How to keep users logged-in in WordPress

    Keeping users logged-in is extremely important, so they don’t have to login everytime they open their app.

    In some cases the user login time might be affected by your server configuration or even third-party plugins installed on your website.

    Below you can see a function that will help with adjusting the login duration in WordPress, the code must be placed in your theme’s functions.php file:

    // keep users logged in for longer in wordpress
    function keep_users_logged_in_longer( $expirein ) {
    // 1 month in seconds
    return 2628000;
    }
    add_filter( ‘auth_cookie_expiration’, ‘keep_users_logged_in_longer’ );