Keeping users logged-in is extremely important, so they don’t have to login everytime they open their app.
In some cases the user login time might be affected by your server configuration or even third-party plugins installed on your website.
Below you can see a function that will help with adjusting the login duration in WordPress, the code must be placed in your theme’s functions.php file:
// keep users logged in for longer in wordpress function keep_users_logged_in_longer( $expirein ) { // 1 month in seconds return 2628000; } add_filter( ‘auth_cookie_expiration’, ‘keep_users_logged_in_longer’ );
In order to be able to build and submit your iOS app an invitation to your Apple Developer Account is required.Note that this will only work if you have an Organization Account.Below you can find more details on how to invite users to it.
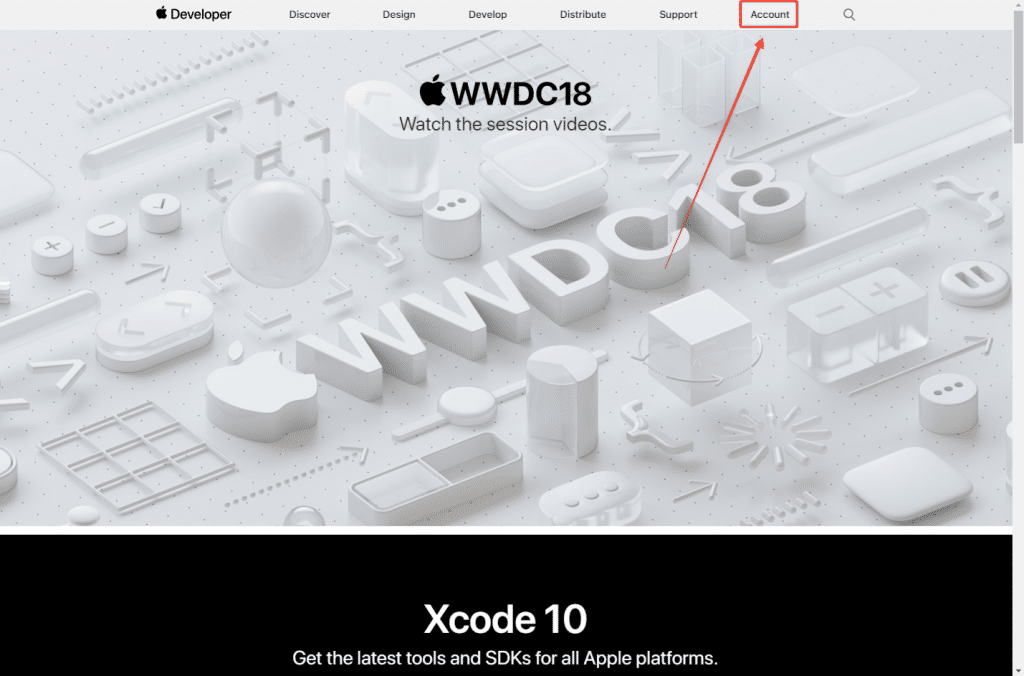
Access the Apple Developer website clicking here. On the top right section, you can click on “Account” to be redirected to the login form.
You can then insert your login credentials to sign-in into your Apple Developer Account
Once logged in you will see your Apple Developer Account Dashboard. There you can click on “People” in the left sidebar.
You will then be requested to access your App Store Connect account to invite users, you can click the button that takes you there
Now on your App Store Connect dashboard, click the “+” icon to add users to your account:
Add the details for the user that you want to invite and click “Invite”
That’s it! The user will receive an invitation his email, and he will need to accept it in order to become a member in your Apple Developer account
In order to be able to build and submit your iOS app an invitation to your Apple Developer Account is required.Note that this will only work if you have an Organization Account.Below you can find more details on how to invite users to it.
Access the Apple Developer website clicking here. On the top right section, you can click on “Account” to be redirected to the login form.
You can then insert your login credentials to sign-in into your Apple Developer Account
Once logged in you will see your Apple Developer Account Dashboard. There you can click on “People” in the left sidebar.
You will then be requested to access your App Store Connect account to invite users, you can click the button that takes you there
Now on your App Store Connect dashboard, click the “+” icon to add users to your account:
Add the details for the user that you want to invite and click “Invite”
That’s it! The user will receive an invitation his email, and he will need to accept it in order to become a member in your Apple Developer account
TestFlight is an app provided by Apple to allow users to test apps before making them publicly available in the App Store.
In order to be able to invite users as testers to TestFlight you first need to make sure the user is added to your App Store Connect account. You can find a complete guide on how to invite users to your account by clicking here.
Below you can find a step-by-step guide on how to invite users to test your app using TestFlight.
On App Store Connect, open your list of apps then select the app to which you would like to invite your users as testers, you can use this link: https://appstoreconnect.apple.com/apps
On the app details page, click “TestFlight”
You will need to create a new Internal Testing group, you can do so by clicking on the “+” icon:
Type in the name of your Internal Testing group, the name will be visible to invited testers
With your Internal Testing group created, you can now invite users by clicking on the “+” icon
Select the users that you would like to add as testers to the app and click “Add”
That’s it! The selected users will receive an invitation in their emails, the invitation will include a “Redeem code” which can be used in TestFlight to redeem and install your app for testing purposes.
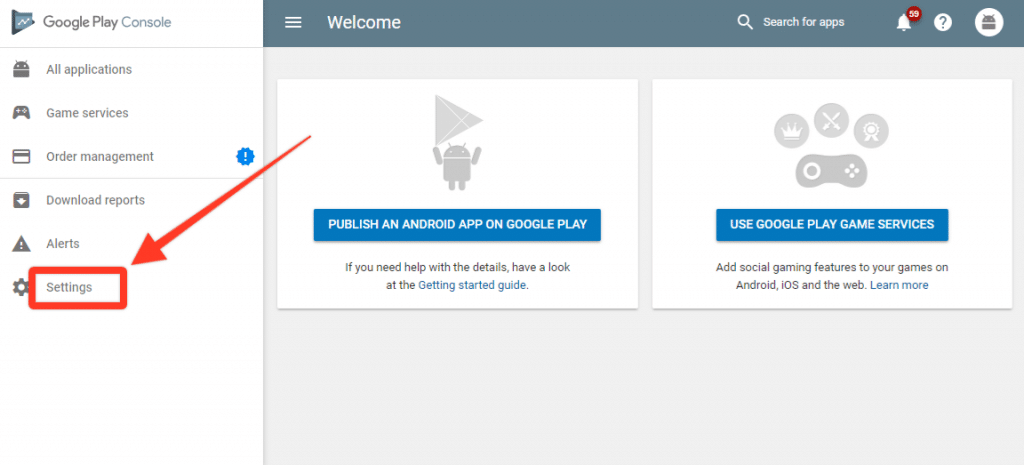
In order for our team to be able to configure and submit your Android apps we will need an invitation to your Google Developer Console.Here you can find a step-by-step guide on how to invite users as an admin to your account:
In order for our team to be able to configure and submit your Android apps we will need an invitation to your Google Developer Console.Here you can find a step-by-step guide on how to invite users as an admin to your account:
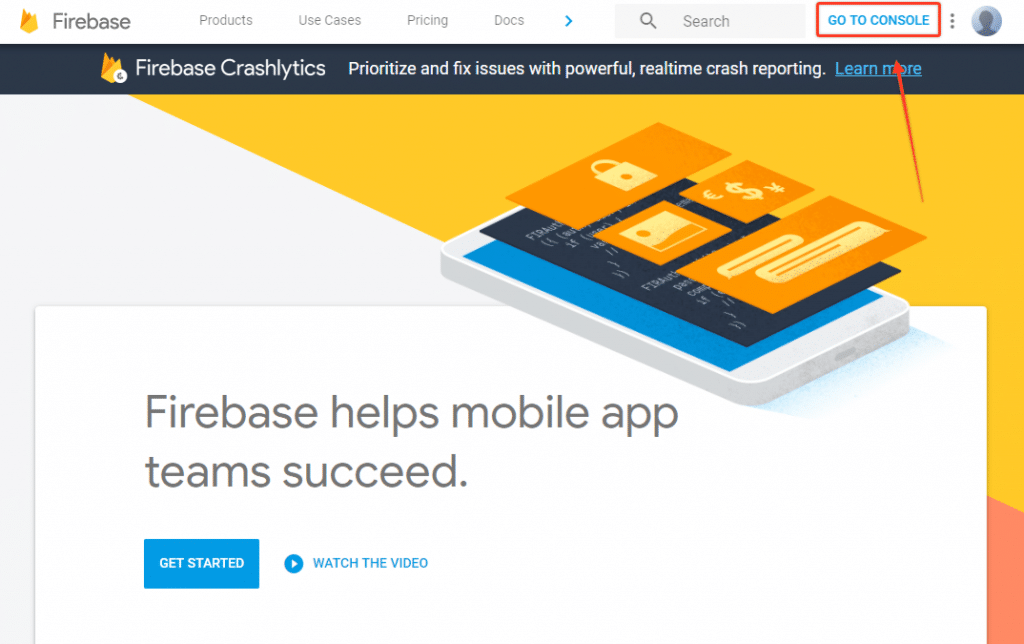
Now that you have your own Google Firebase account (if you don’t click here to see how to get one) it’s time to invite our team to your project so we can configure and test everything for you.Access your Firebase ConsoleThe first step is to go to https://firebase.google.com and click on “Go to Console” in order to access your Firebase Console.
Create a project for your appNow you will need to create a new project for your app, this new project will hold all the features and details that Firebase has to offer. Click the “Add Project” button to get started.
You will then be requested to type a name for your project, we’d suggest that you use your app name for that, but feel free to use what you think is best and then click “Create Project”.
Invite our team as an admin to your accountNow that your project is in place it’s time to invite our team to it, so we can configure Firebase’s features for your app.Click the gear icon on the top left and then click on “Users and Permissions”.
A modal window will be displayed asking you to insert the email that you want to invite and the role that it will have in your project.Make sure to use the email provided by our team and to select the “Owner” role so we have access to everything we need to ensure that your app works correctly and that all features are working as expected.
Our team will then receive an invitation to manage your Firebase Project and that’s pretty much it!
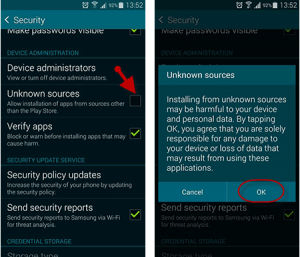
From your smartphone or tablet running Android 4.0 or higher, go to Settings, scroll down to Security, and select Unknown sources. Selecting this option will allow you to install apps outside of the Google Play store.
Next, download the file you were sent or downloaded online from your device. Open the Downloads app and find the file you just downloaded. Open the file and install the app.