Generally, the contents such as posts and pages will preload once the app is opened and online.However, streaming content such as music (e.g. Soundcloud, Spotify, Podcasts) and videos (e.g. Youtube, Vimeo), will only work when the user is connected to the internet.
Category: Docs
-
Using the Code Editor | vendrux
https://www.youtube.com/watch?v=JBgdDD6uCWQThe Editor included in the Vendrux WordPress plugin allows you to customize your app’s post, page, and lists with your own CSS/javascript, PHP, or HTML code.Note you’re adding code that will be executed outside “the loop”, therefore you’ll need to refer to the current post ID with the $post->id variable – most WordPress functions and plugins will be accessible with custom code.Here are some frequent uses for the editor:
Through the editor and the “head” and “footer” code placements, you can easily load some themes or plugin’s CSS or Javascript, which may be necessary for its output to work correctly in the app. You may also load the wp_head(); function to load all the standard javascript and CSS loaded first in your site’s template, as well as the wp_footer(); function for those loaded last.
-

Using the Canvas Dashboard | vendrux
The Canvas Dashboard is the configuration area for your app, it allows you to easily adjust the bottom navigation, login options, alerts, and many other elements.
In this guide, we will go through the most used settings and how to modify them.
Making changes to your app
Before anything, it is important to understand that your app configuration is live, meaning that any changes you make will be instantly applied to your apps as soon as you save them.
Once you modify the values of your settings, you just need to click the “Save changes” button and your changes will be applied.
In order to be able to see the changes on the apps you will need close and reopen them.
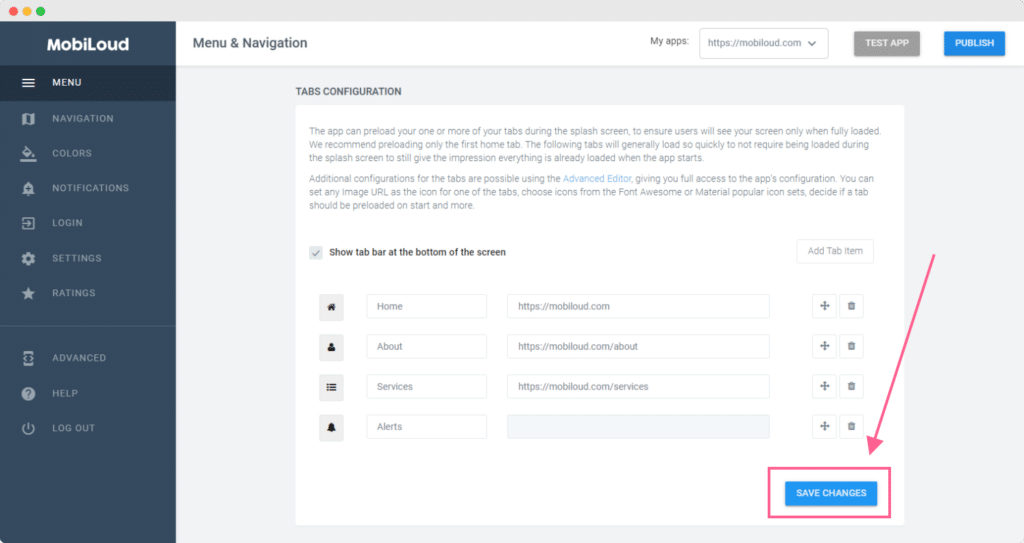
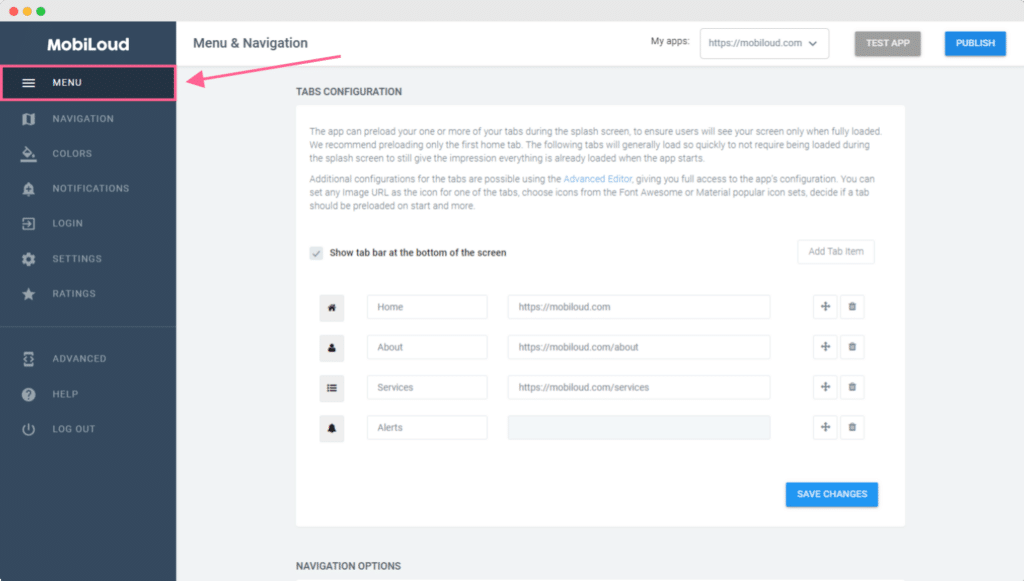
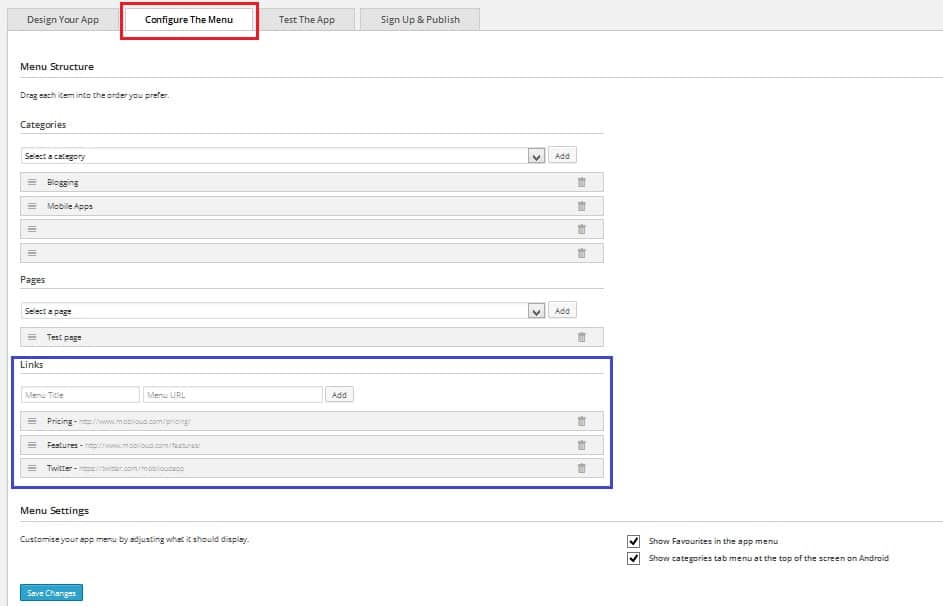
Menu
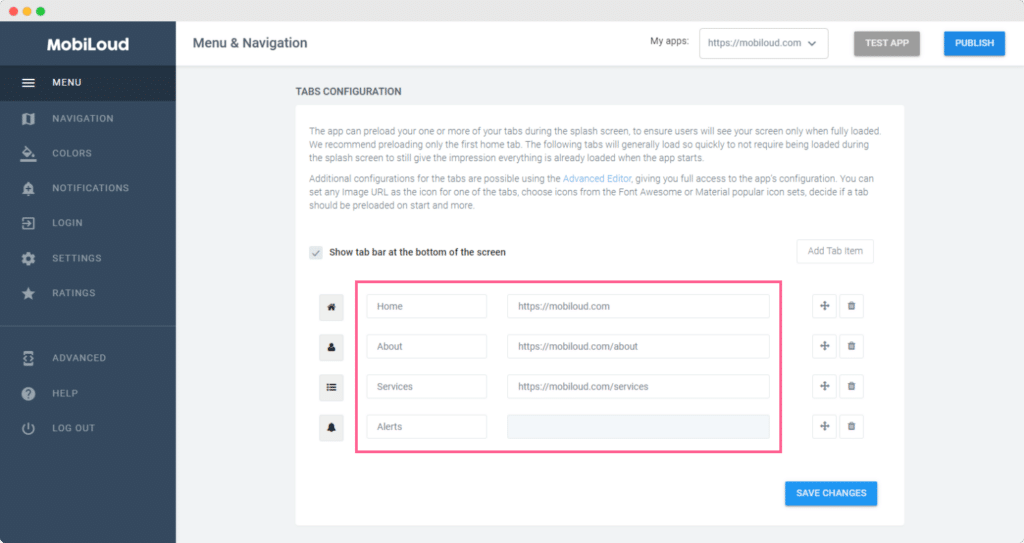
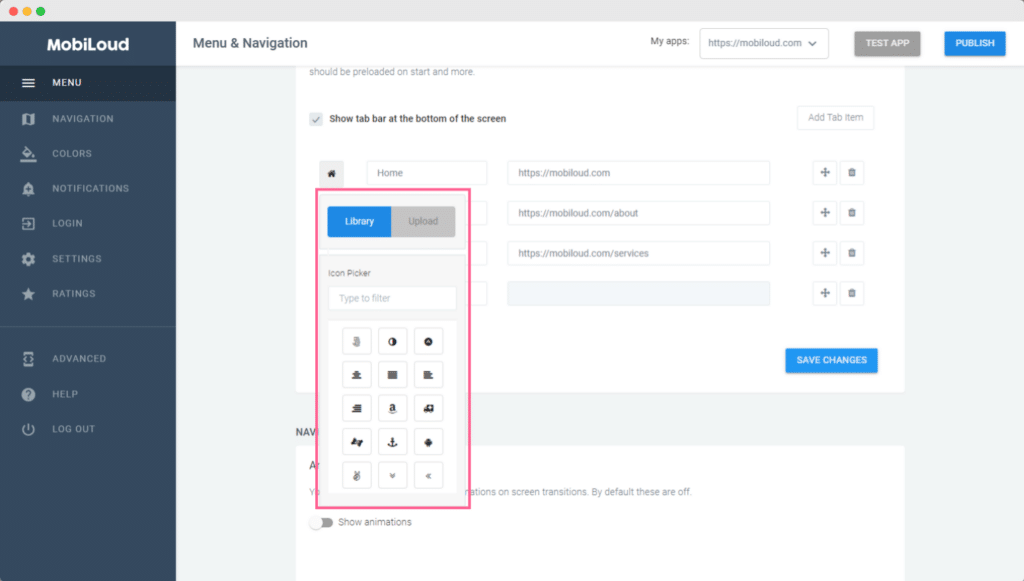
In the menu area you will be able to configure the menu displayed at the bottom of your app, which consists of a set of tabs, each with its own label and icon.
Labels and links will be available as text inputs, see below:
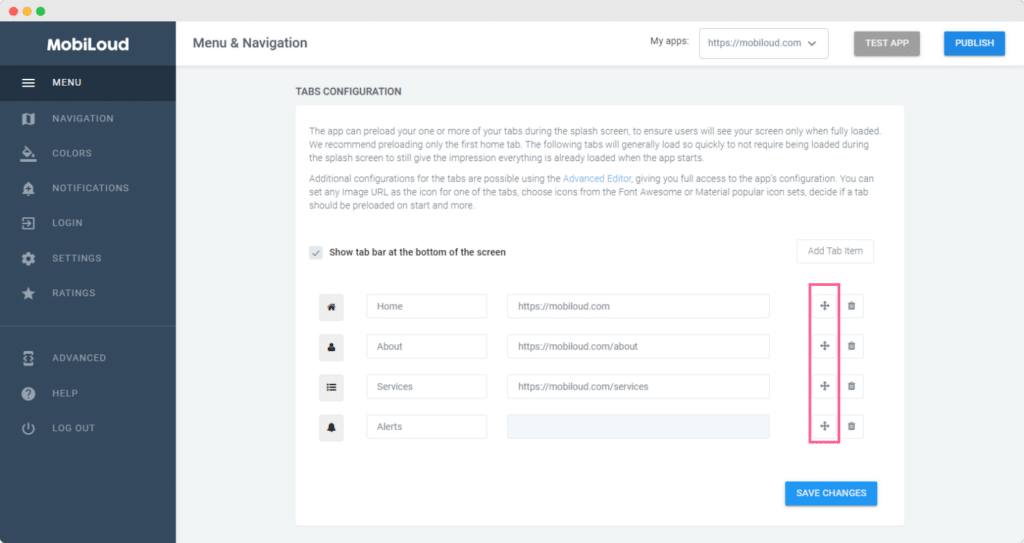
You can easily drag and drop the tabs to re-order them:
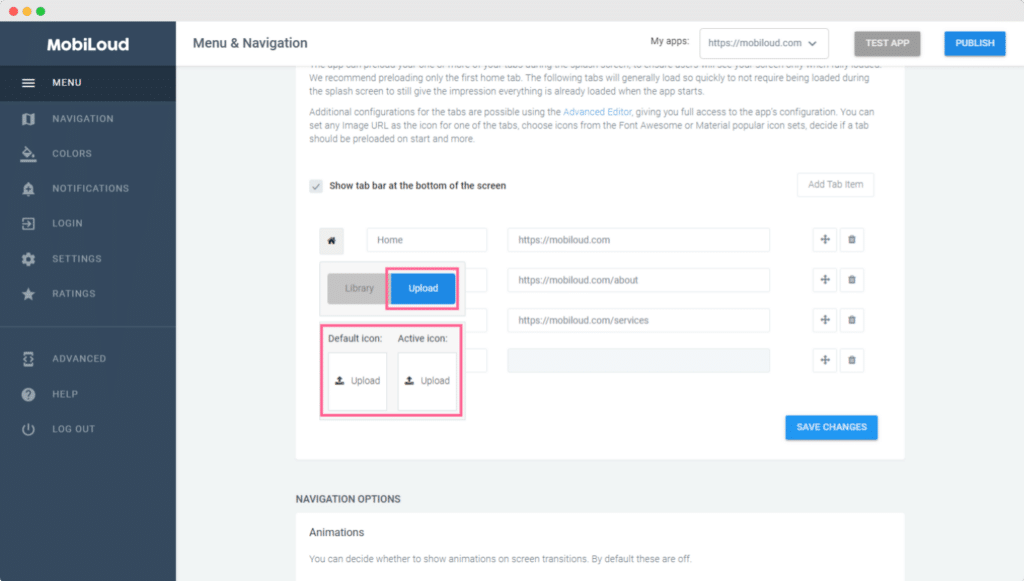
We have a set of default icons that you can pick from:
If you prefer to use something different you can easily upload your own .png icon, making sure to follow these requirements:
- The icon must have a transparent background
- The icon must have the final color for the active and default states (the values from the app configuration will not be applied to custom icons)
- The icon must have a maximum size of 250x250px
- The icon must be in .png format
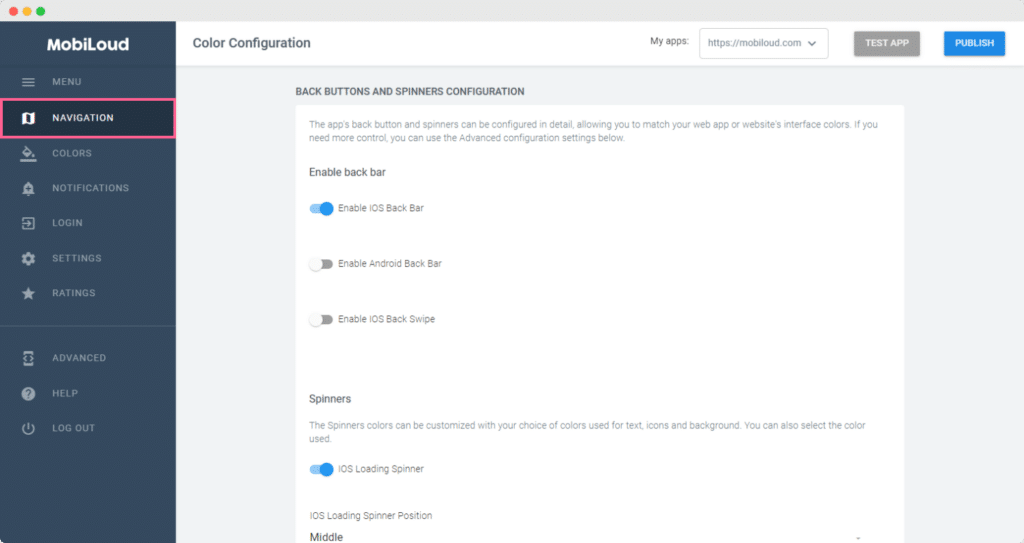
Navigation
The navigation area will allow you to configure different aspects of the elements that help users with navigating through the app content, such as the back bar displayed at the top and the loading spinners.
We generally recomment to keep these as default, since they have been pre-configured to provide users with the best experience in the app.
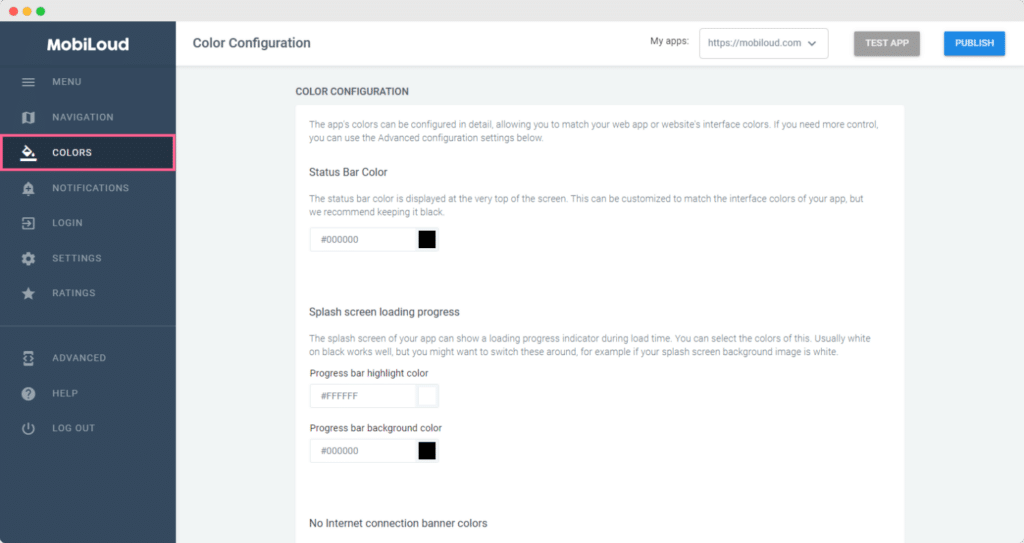
Colors
As the title suggests, here you will be able to configure the colors of different elements displayed throughout your app.
The main elements you might want to adjust are the colors of tabs and loading spinners.
Notifications
Under Notifications you will be able to create and manage the notification tags, which allow users to select from which topics they want to receive notifications from.
We have a more detailed guide with more details on how the notification tags work here: How to use notification tags

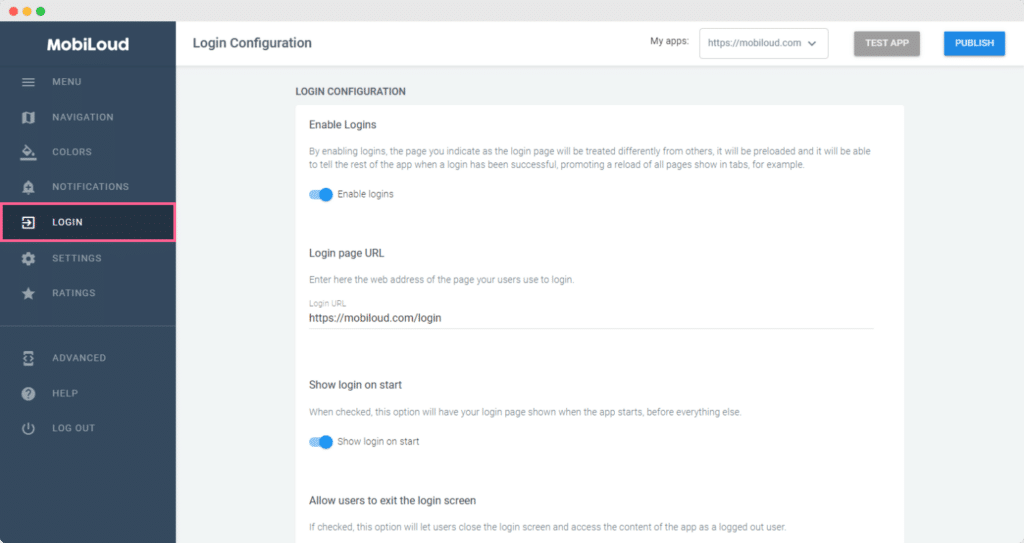
Login
If you want to require users to login before they can access the content of your app, this is the place where you will be able to configure that behavior.
-
Using the Advanced Configuration | vendrux
The basic configuration of Canvas will give you control over the tabbed menu and its colors, but in order to make further changes to the design and even behaviors of your app, you will need to use the advanced configuration.Below you will find a detailed explanation for each one of the available settings for the advanced configuration:
General Configuration
Configuration NameTypeDescriptionRemote_Server_Availabletrue/falseIf true, the app will look for the Vendrux Canvas plugin and the login endpoint on the URL specified below.Remote_Server_Root_URLtext (url)The URL to your website where the Vendrux Canvas is installed.Development_Always_Download_New_Config true/falseYou can enable this to make sure the app always downloads the latest remote configuration when it starts. It makes sense to disable it once the app is published and configuration changes are less frequent (it will take a couple loads of the app for a change to take effect, but the start time will be reduced).Allow_Local_Caching_For_Offline_ModeWhen local caching is enabled, the app stores the pages opened during a session (all tabs, any link clicked) and makes them available for offline use.Main_Page_URLtext (url)The page that will be displayed when the app is launched in case tabs are not configured.Preload_Main_Page_URLtrue/falsePreload the main page during the splash screen.
Navigation
Configuration NameTypeDescriptioniOS_Pull_To_Refreshtrue/falseIf disabled, pulling the screen down will not refresh the current page on iOSAndroid_Pull_To_Refreshtrue/falseIf disabled, pulling the screen down will not refresh the current page on AndroidiOS_Back_Button_Bartrue/falseIf enabled a bar containing a back button will be displayed at the bottom section of your iOS app, allowing users to return to the previous page – swipe from left should still work even if disabled.Android_Back_Button_Bartrue/falseIf enabled a bar containing a back button will be displayed at the bottom section of your Android app, allowing users to return to the previous page – physical back button should still work even if disabledEnable_Progress_Viewtrue/falseIf enabled displays a progress bar above the tabbed navigation while the content is loading.Open_Links_In_A_New_Screentrue/falseIf enabled, whenever a link is clicked a new window will be displayed, over everything, and the link content will load there. Keeping this feature disabled will cause links to load on the current view/tab.Open_External_Links_In_Apptrue/falseIf enabled, external links will open in the app rather than the device’s native browser.Share_Buttontrue/falseIf enabled a share button will be displayed in the bottom bar.Exit_App_With_Back_Buttontrue/falseOn Android, if this is enabled, using the device back button from the app’s main screen will close the app.Enable_Webview_Transition_Animationtrue/falseIf true, when navigating to an internal/external link, an animation will be displayed when the new content is loaded.
Tab Menu
Configuration NameTypeDescriptionShow_Tab_Menutrue/falseSet it to true to display the bottom tabbed navigation containing the tabs that were configured in the Items section.Auto_Hide_Tab_Menu_On_Scrolltrue/falseIf enabled, this feature will cause the bottom tabbed navigation to be automatically hidden if the user starts to scroll.ItemsarrayThis item contains the details for each one of the tabs that will be displayed in the bottom tabbed navigation, each item has its own settings as you can see below.
Items Array
KeyTypeDescriptionBackground ColorhexThe background color of the tabStatus_Bar_ColorhexThe color of your status bar when the tab is selectedPreloadtrue/falseIf enabled the content of the tab will be pre-loaded in the splash screen.Icon_FontstringIcon_Font_NamestringThe code used for the icon that should be displayed in the tab.Icon_URLstring (url)In case you decide to use a custom icon rather than the available icon libraries, you can insert the URL to the icon image here.URLstring (url)The URL that should be loaded in the tabLabelarrayContains the label for each one of the different languages, using the language code for the key and the label for value, as in the following example:”en”: “Home”,”es”: “Início”Typeconstant: “Webview” or “Alerts”Categorizes the tab item into a certain type.
Styling
Configuration NameTypeDescriptionStatus_Bar_Colorhex valueThe status bar color is displayed at the very top of the screen. This can be customized to match the interface colors of your app, but we recommend keeping it black.External_Links_Status_Bar_Colorhex valueThe background color of the status bar when the webview displays an external link in the internal/external screenView_Background_Colorhex valueThe background color for all the screens in the app. This color can be overriden by Webview_Background_Color in each tab itemAndroid_Themeconstants: “Dark” or “Light”Two main styles for the UI elements, following Android standardsNo_Internet_Connection_Colorhex valueThe color used as a background for the “No internet connection available” message.No_Internet_Connection_Text_Colorhex valueThe color used as text color for the “No internet connection available” message.Tab_Bar_Loading_Progress_Colorhex valueThe color to use for the progress bar displayed above the tab barTab_Bar_Background_Colorhex valueThe background color of the Tab MenuTab_Bar_Selected_Tab_Colorhex valueThe color of the icon+text used in the Tab Menu when that tab item is selectediOS_Translucencytrue/falseAndroid_Tab_Bar_Disabled_Tab_Colorhex valueThe color of the icon+text used in the Tab Menu when that tab item is NOT selected (default state)Android_UI_Tab_Background_Colorhex valueThe background color of any other tab bar (i.e. top Alerts bar) used in the appAndroid_UI_Tab_Selected_Colorhex valueThe color of the icon+text used in any other tab bar (i.e. top Alerts bar) inside the app, when that tab item is selectedAndroid_UI_Tab_Disabled_Colorhex valueThe color of the icon+text used in any other tab bar (i.e. top Alerts bar) inside the app, when that tab item is NOT selected (default state)Android_Alerts_Tab_Bar_Bottom_Line_Selectorhex valueMostly used on Android, this colors the line which marks the selected tab in the Alert’s top barWebpage_Unavailable_Button_Colorhex valueThe color for the button which is shown when the page inside a webview is not availableAndroid_Toggle_Switch_Thumb_Color_Onhex valueThe color of the thumb (knob of the switch) when the switch is ONAndroid_Toggle_Switch_Thumb_Color_Offhex valueThe color of the thumb (knob of the switch) when the switch is OFFAndroid_Toggle_Switch_Background_Color_Onhex valueThe color of the background of the switch when the switch is ONAndroid_Toggle_Switch_Background_Color_Offhex valueThe color of the background of the switch when the switch is OFFiOS_Toggle_Switch_Thumb_Color_Onhex valueThe color of the thumb (knob of the switch) when the switch is ONiOS_Android_Toggle_Switch_Thumb_Color_Offhex valueThe color of the thumb (knob of the switch) when the switch is OFFiOS_Toggle_Switch_Background_Color_Onhex valueThe color of the background of the switch when the switch is ONiOS_Toggle_Switch_Background_Color_Offhex valueThe color of the background of the switch when the switch is OFF
Login
Configuration NameTypeDescriptionModal_Login_Enabledtrue/falseIf true the app will require users to login in order to access the contentExit_Login_Button_Enabledtrue/falseShow or hide the bottom tab bar on the login screen modal that allows users to exit the login processShow_Login_On_Starttrue/falseIf enabled the login window will be displayed when the app is launchedLogin_URLtext (url)URL that will be displayed in the login windowSignup_URLtext (url)If users should be allowed to register within the app you can insert the sign up URL here.Login_Complete_String_Messagesarray of text valuesIf your page is not redirected to a different URL when the user logs in, you can use this to identify a specific string on the page, to help the app identify if a user is logged in or not. When using this, do not use “Login_Complete_Regex”Login_Complete_Regextext (url – regex)If your user is redirected after logging in you must include the URL to the redirect page so that the app can identify if a user is successfully logged in or not.Signup_Complete_String_Messagesarray of text valuesIf after registering for an account on your website the user is not redirected to a different URL, you can use this to identify a specific string in the success registration page. When using this, do not use “Signup_Complete_Regex”Signup_Complete_Regextext (url – regex)the regex of URL that represents a successful signup.,After a successful registration, the website will redirect to a URL. This regex will represent that URL.Logout_Complete_String_Messagesarray of text valuesIf after logging out on your website the user is not redirected to a different URL, you can use this to identify a specific string in the success logout page. When using this, do not use “Logout_Complete_Regex”Logout_Complete_Regextext (url – regex)If your user is redirected after logging out you must include the URL to the redirect page so that the app can identify if a user is logged out.Login_Check_URLtext (url) can contain $$USER$$ to be replaced in app with the userNameURL that responds with a redirect when the user is not logged in. Performing a request at this URL, if the response.URL then the user is not logged inLogin_Check_String_Messagesarray of text valueswhen there is no redirect, the page should contain this string. Notw! Settings this requires “Login_Check_URL” to be set as well
Advertising
Configuration NameTypeDescriptionAdvertising_Enabledtrue/falseUse true to enable the advertising settings belowAdvertising_Platformtext (constant)Use one of our available platforms: “Mopub”, “Admob”, “DFP”Banner_Screen_Locationsarray of text (constants)Accepted constants: “Home”, “PushDetails”,”InternalLinks”iOS_Phone_Banner_Unit_IdtextiOS_Tablet_Banner_Unit_IdtextiOS_Banner_Positiontext (constant)Accepted constants: “bottom”,”top”,”both”iOS_Interstitial_Unit_IdtextiOS_Interstitial_IntervalnumberThe number of internal/external links displayed to the user after which we display an interstitial adAndroid_Phone_Banner_Unit_IdtextAndroid_Tablet_Banner_Unit_IdtextAndroid_Banner_Positiontext (constant)Accepted constants: “bottom”,”top”,”both” !! USE ONLY ONE !Android_Interstitial_Unit_IdtextAndroid_Interstitial_IntervalnumberThe number of internal/external links displayed to the user after which we display an interstitial adBanner_Background_Colorhex valueThe color of the background where the banner will go.
-
Updating an existing app in the store
Yes you can! We can build and submit your app to replace existing apps built with another service or any developer. We’ll need some information and files from you or your previous developer so that we can proceed.Updating an existing iOS appWhat we’ll need: Bundle ID and version number of the app, Apple distribution certificate, certificate’s private key, certificate password.Updating an existing Android appWhat we’ll need: Package name and version number for the app, keystore file, alias name and passwordYou can forward this to your previous developer or app provider to obtain the information and files we need.In case you can’t obtain these, we’ll have to submit the app as a new app.
-
Uninstall the vendrux WordPress plugin
Uninstall via the WordPress administration area
- Go to Plugins screen.
- Find the Vendrux plugin.
- Click Deactivate.
- Once deactivated, Click Delete
Manual uninstallation
- Login to the site via your FTP Program.
- Go to the Plugin directory and find where the Plugin is installed, this is usually the /wp-content/plugins/ directory
- Delete the “vendrux-mobile-app-plugin” folder and/or files from your server.
-
Showing Twitter and Facebook profiles in your News app
Yes, Twitter and Facebook profile pages can be linked from the menu.These social media sites will load within the app and provide your users with direct access to your social media posts.To do this, you need to add your profile’s URL (e.g. http://www.twitter.com/profilename) as a link in the app’s menu configuration

-
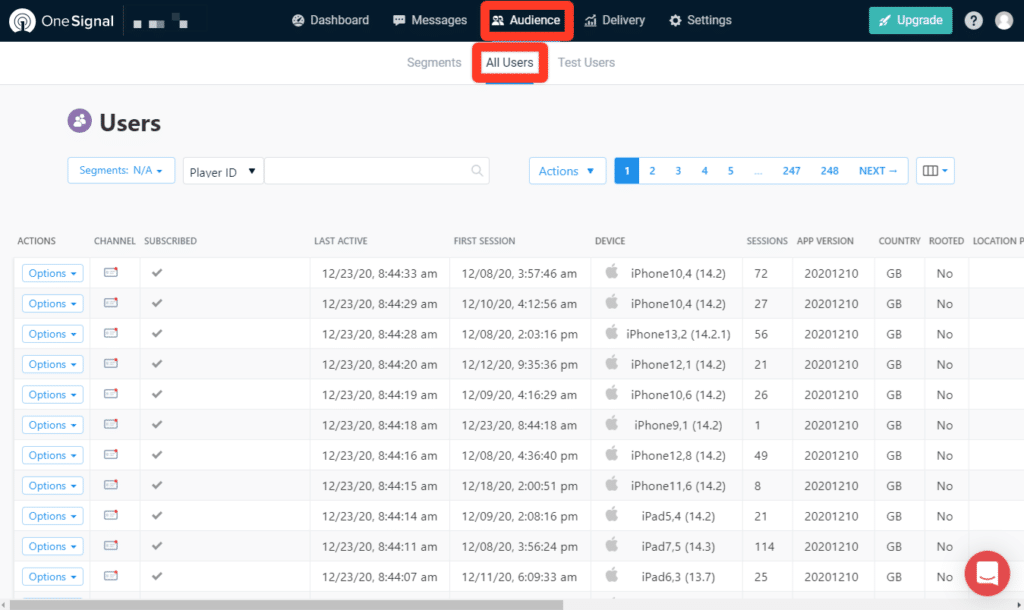
Testing OneSignal Notifications | vendrux
Before sending your notifications to users you can send a test notification to your own device only, this will allow you to test the actual notification in a real environment.
The first step is to add your device to the list of testers in OneSignal, access the “Audience” area in your OneSignal account and then click “All Users”:

You will need to find your own device in the list of users that is displayed, our suggestion is to close and re-open the app then look for your device based on the “Last Active” date, make sure to refresh the page to see your device at the top of the list. You can also refer to the Device model, Country and First Session parameters to identify your device.
Now click on “Options” and “Add to Test Users”:

Now when sending your notifications you will be able to use the “Send to Test Device” option, clicking on it will open a list of Test Users for you to select, and you can then send a test notification to yourself before sending it to all your users.

-
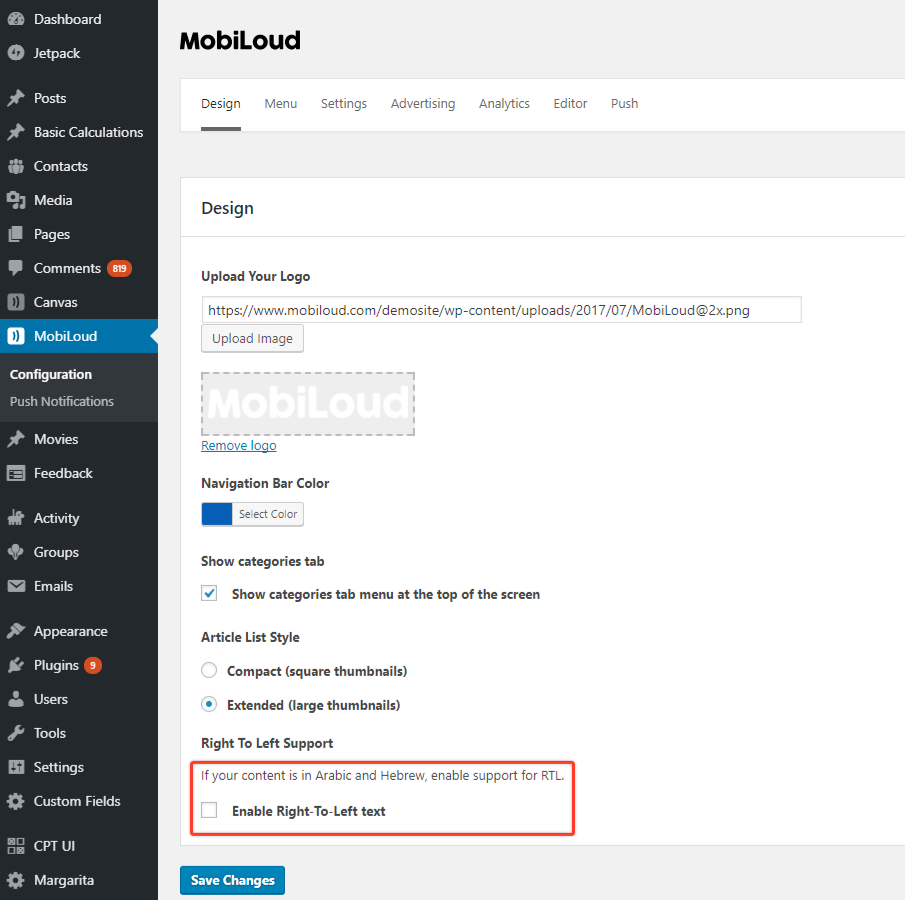
What languages does vendrux support?
Vendrux apps are multi-language and support RTL for Arabic and Hebrew.

We add new languages all the time, currently supported languages include: Arabic, Azerbaijani, Chinese (Si.), Chinese (Tr.), Danish, Dutch, Farsi, Finnish, French, German, Greek, Hebrew, Hindi, Italian, Japanese, Korean, Malay, Norwegian (Bo.), Portuguese (Br.), Russian, Spanish, Swedish and Turkish
-
Using subscriptions on vendrux News
Before implementing any of the monetization methods described in this guide we’d recommend reading our article on Why You Don’t Need In-app Purchase In Your Mobile App.
Also, keep in mind that you will need to sign-up for our paid add-ons in order to use in-app purchases and login options in your app.
Vendrux News offers a few different ways for you to set up subscriptions in your app, and there are two types of subscriptions available:
In-app Purchases
When using in-app purchases you will be integrating your app with Apple’s and Google’s native payment frameworks, allowing your users to sign-up for a recurring subscription in your app.
The payment flow will be as smooth as it can be and the user will then get access to the paid content right away.
Keep in mind that in-app purchases will only integrate with your app, meaning that users who signed up for a subscription will not receive any sort of credentials to use on your website.
Website
Website subscriptions, as the name suggests, are handled directly on your website, not in the app.
In this case, the user will be presented with a link inside the app and will be taken to your website, outside of the app, when that link is clicked. You will then be responsible for providing him with the registration or subscription interface.
After signing up he can then use the login credentials generated on your website to log in to the app.
Which subscription type is ideal for me?
It depends on several factors, you will need to discuss this with Vendrux’s team to determine what the best approach for your app is.
Below you can find a quick overview of all the available setups and how they work.
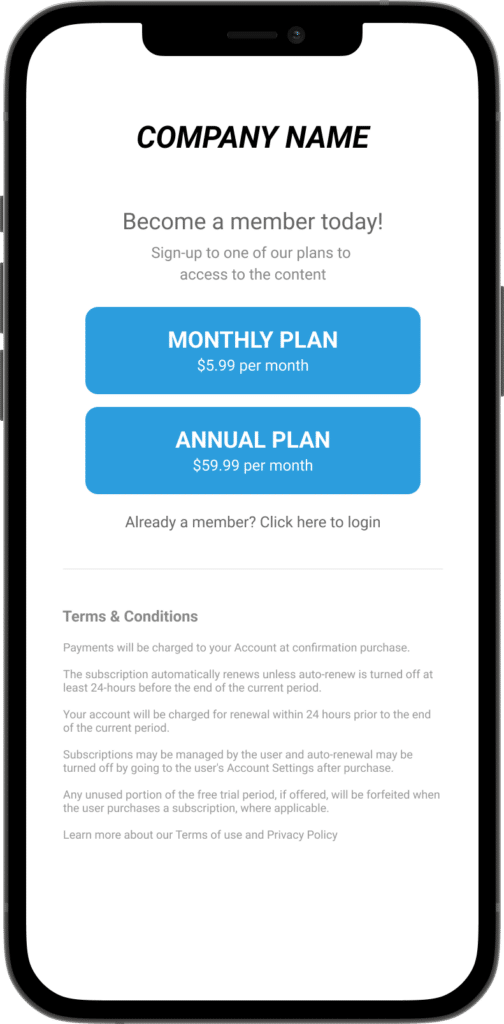
Subscriptions on start
The first and most common solution for adding subscriptions to an app is to lock your app so that only subscribed or logged-in users can access the content.
In this setup, the user will be presented with a screen containing buttons that will either trigger the in-app purchase payment flow or send the user to your website outside of the app.
You can also include a link to trigger the login page for those users that have previously purchased an account on your website.
Here you can see an example of what that screen looks like:

Content paywall
Users will be able to access all areas of the app with this setup, but once they access a specific post or category that should only be available to subscribed users they will see a paywall.
The paywall will prevent the user from reading through the content of the selected post and will provide the user with a button to start the in-app purchase payment flow or take the user to your website where he can register for an account.
Here you can see an example:

Remove ads
If you display ads in your app you might want to offer your users a way to remove them, so they can have an ad-free experience.
You can use in-app purchases for this so that users will be able to sign-up for a recurring subscription in order to remove the ads from their app.
To promote this functionality we can incorporate a button within the content of your articles, and when that button is clicked it will start the in-app purchase payment flow.