Category: Docs

  • Setting up Onesignal to send notifications to specific users

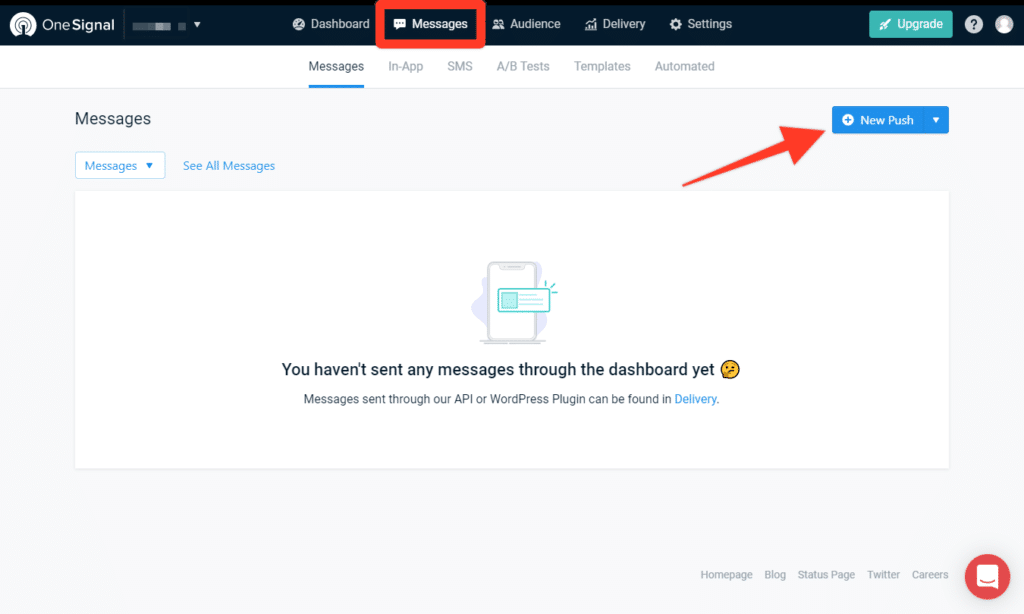
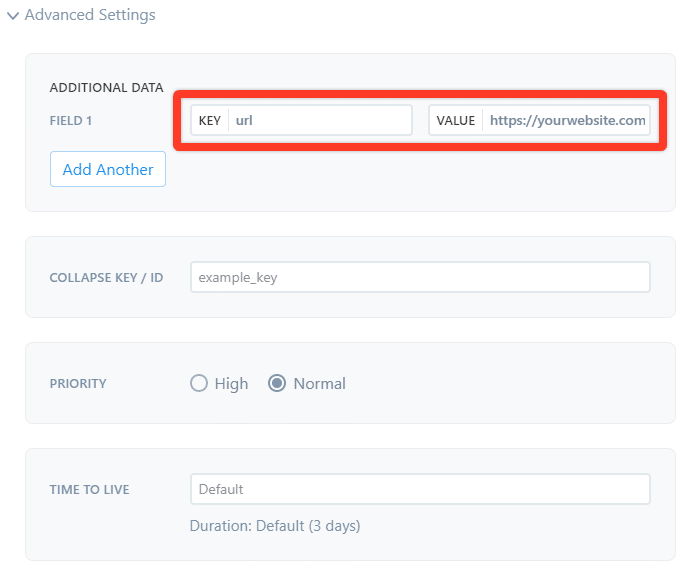
    Your app will let users pick different interests based on the selection you decided to make available in the Interests screen.When a user switches a notification category on, they’ll be tagged in Onesignal with the id of the tag and a value based on their selection (on or off).Using Onesignal’s Segmentation feature, you can create groups of users to target them with specific notifications, based on their choices in the app and so based on their tags.The OneSignal dashboard does not allow tags to be targeted directly. They first need to be attached to Segments. In order for you to create a new tag and send a push to users who have that tag value set to “on”, you needs to follow these steps:Step 1:Create a SegmentStep 2: Attach one or more tags to that segment.

    • The value of the tags should always be either “on” or “off” (you’ll likely want to use “on”, as you won’t want to send a push to a Segment with a tag set to “off”)
    • It is recommended to set one tag per ONE Segment to offer more “granular” access to tags, but nothing prevents you from creating a Segment that includes different tags, to group them together in a group of users you’ll want to target together.

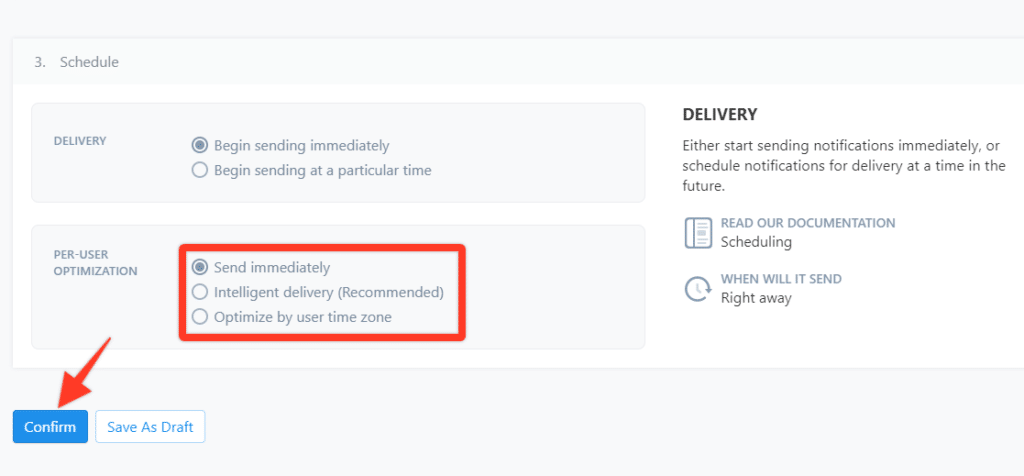
    Step 4: When creating a new push, you will need to manually add the segment (or segments) to the push so the push will be sent to only those users.

  • Sending Push Notifications from OneSignal

    Sending Push Notifications from OneSignal

    After your app is live and users are using it, you will want to send notifications to engage users and take them to your latest content in the app.

    In this guide, we will cover the basics of sending notifications directly from your OneSignal Dashboard, but keep in mind that you also have the option of sending the notifications directly from your WordPress Dashboard.

    To get started access your OneSignal account through the following URL: https://app.onesignal.com/login

    Now that you are in your account, make sure to select the Mobile App that you previously created, then access the “Messages” area and click on “New Push” as you can see below:

    You will be presented with several options to customize your push notification, as well as a preview tool to see exactly how the notification looks like on iOS and Android:

    There is one key aspect when sending notifications from your OneSignal Dashboard to the Vendrux Platform, the “Launch URL” field must always be empty, and you must use the “Additional Data” area to specify the URL that must be opened when users click on the notification.

    Under the “Additional Data” area you will have two fields to fill, these must be filled different depending on the platform you are using.

    You will need to fill the “Key” field with “url” and the “Value” field with the URL that must be opened (e.g. https://yourwebsite.com)

    You can now proceed with sending the notification, make sure to select the best sending method, if you are sending breaking news mark the “Send Immediately” option, otherwise we’d recommend using the “Smart Delivery”.

    Just press “Confirm” to start sending the notifications.

  • Sending rich push notifications with Onesignal

    Sending rich push notifications with Onesignal

    Sending a push via the OneSignal dashboard is somewhat straightforward and will not be detailed in this document, as Onesignal already provides extensive documentation for basic usage.Here’s something specific to your Canvas app you will need to take into consideration:Adding a URLIf you’d like your users to open a URL directly in the browser (without opening your app) when tapping on a notification in the Notification Bar or on a push list item in the Alerts list, you will need to fill in this field:

    If you’d like the URL to open within your app when the notification is opened, then you’ll need to leave the field above empty and add the URL in the notification’s Additional Data, using the “website’ key, as shown below.

    Adding images to notificationsYour app is capable of displaying an image attached to a notification in the Alerts screen.Attaching an image to a push needs to be made in the “Additional Data” field in the dashboard and always use the “large_image” name for the key. Any other key name for the image will be ignored by the app.

    Additionally, if you’d like the image to show up in the notification itself in the lock screen or notifications list on iOS and Android, you’ll have to add the image to the appropriate fields for each platform.For Android devices, enter the image URL in the field “Big Picture”, so it will get displayed by the OS in the notification itself.

    For iOS devices, you’ll have to fill in the media URL field for iOS 10 devices.

    Icons and other imagesThe Android OS (not supported by iOS) allows for small images to be displayed alongside the title and text of the push in the Notification bar, so you can fill out the “Small Icon URL” field in the dashboard as well.

  • Reselling vendrux apps to your own clients

    We offer an Affiliate Program allowing you to earn a recurring 30% commission for every sale you refer to us.Join our Affiliate Program to immediately receive your custom referral code and link. Send traffic to any page on vendrux.com while adding your account code to the end of the URL. Earn commissions for every sale coming from your links.By joining the Partner Program (free) you’ll receive:

    • A custom referral link to send your customers to
    • Materials and content to use in emails or content on your site
    • Banners to promote Vendrux on your site or blog

    Should you have any questions on the Program, don’t hesitate to contact us.

  • What is the recommended size for the app logo?

    There is no strict requirement for the logo image size, as anything you’ll upload will be resized to fit in the native app menu bar on iOS and Android. For optimal results we recommend to use a png or jpg image file with 60px height and no more than 250px width.

  • How to preview your News app

    We know it’s important for you to test your app before it’s published. That’s why we make sure you get to try it on your own devices once it’s been built and configured for you.Here are the steps we’ll follow:

    1. Sign up for one of our plans
    2. We get on the phone and discuss exactly how you want to your app to look and work
    3. We customize it and configure it for you, then build a first version
    4. You get to test the app on your own devices, iOS or Android
    5. Once you give us an OK, we publish it for you on your own App Store and Google Play accounts
  • https://www.vendrux.com/help-knowledge-base/nativefunctions-onesignalsetexternaluserid

    https://www.vendrux.com/help-knowledge-base/nativefunctions-onesignalsetexternaluserid

  • https://www.vendrux.com/help-knowledge-base/nativefunctions-onesignalsendtags

    https://www.vendrux.com/help-knowledge-base/nativefunctions-onesignalsendtags

  • https://www.vendrux.com/help-knowledge-base/nativefunctions-onesignalremoveexternaluserid

    https://www.vendrux.com/help-knowledge-base/nativefunctions-onesignalremoveexternaluserid

  • https://www.vendrux.com/help-knowledge-base/nativefunctions-onesignaldeletetags

    https://www.vendrux.com/help-knowledge-base/nativefunctions-onesignaldeletetags