This guide will walk you through the process of setting up app-exclusive products in your Shopify store using our app. By following these steps, you can ensure that certain products are only visible and purchasable within the mobile app.
To mark products as app-exclusive, you need to make sure the required metafield is created.
Open your Shopify admin panel.
Navigate to Apps > Vendrux
Under Settings, if the metafield is not already created, click Create Metafield.
Once this is set up, you will be able to assign specific products as app-only.
Step 3: Assign Products as App-Exclusive
Open the Products section in your Shopify admin.
Select a product you want to make available only in the app.
Scroll down until you find the “Metafield” area.
In the “Mobile App Exclusive” metafield, set the value to “true“
Step 4: Edit Your Theme
To ensure app-exclusive products are hidden from the online store but visible in the app, you need to modify your Shopify theme.
Enable the App Embed
Go to Online Store > Themes.
Click Customize.
Navigate to App Embeds.
Enable the Mobile App Products embed.
Save the settings.
Step 5: Modify the Theme Template File
This is a more technical step, and if you are not familiar with your theme code, we suggest asking a web developer to implement these changes for you.
Vendrux is also available to help if needed, just let us know!
In the Online Store > Themes section, click the 3 dots button, then Edit Code.
Locate the appropriate template file where products are listed.
In the default Dawn theme, this is found under Sections > main-collection-product-grid.liquid.
Now, you will need to find the “loop” where the products are being displayed, it will usually look like this:
{%- for product in collection.products -%}
Inside that “loop”, you will need to find a “wrapper” element, which is usually an HTML tag that wraps all the product related elements, such as title, image, pricing, etc. In the “Dawn” theme, that wrapper looks like this:
Once you’ve completed the setup, verify that the feature works as expected:
Open the store on a desktop browser.
The app-exclusive product should not appear.
Open the store in the mobile app.
The app-exclusive product should be visible.
By following these steps, you ensure that certain products are only available in your mobile app, creating a unique shopping experience for your app users.
Important
This feature uses HTML and CSS to hide products on your website; however, these products may still be accessible if a user navigates directly to the product URL.
IMPORTANT! App Exclusive Discounts will only work for Shopify Plus stores.
This guide will walk you through the process of setting up app-exclusive discounts in your Shopify store using our app. By following these steps, you can ensure that certain discount codes are only valid within the mobile app.
Step 1: Install the Vendrux Shopify App
In your Shopify Admin Dashboard, install the Vendrux Shopify App, found here: Vendrux Shopify App.
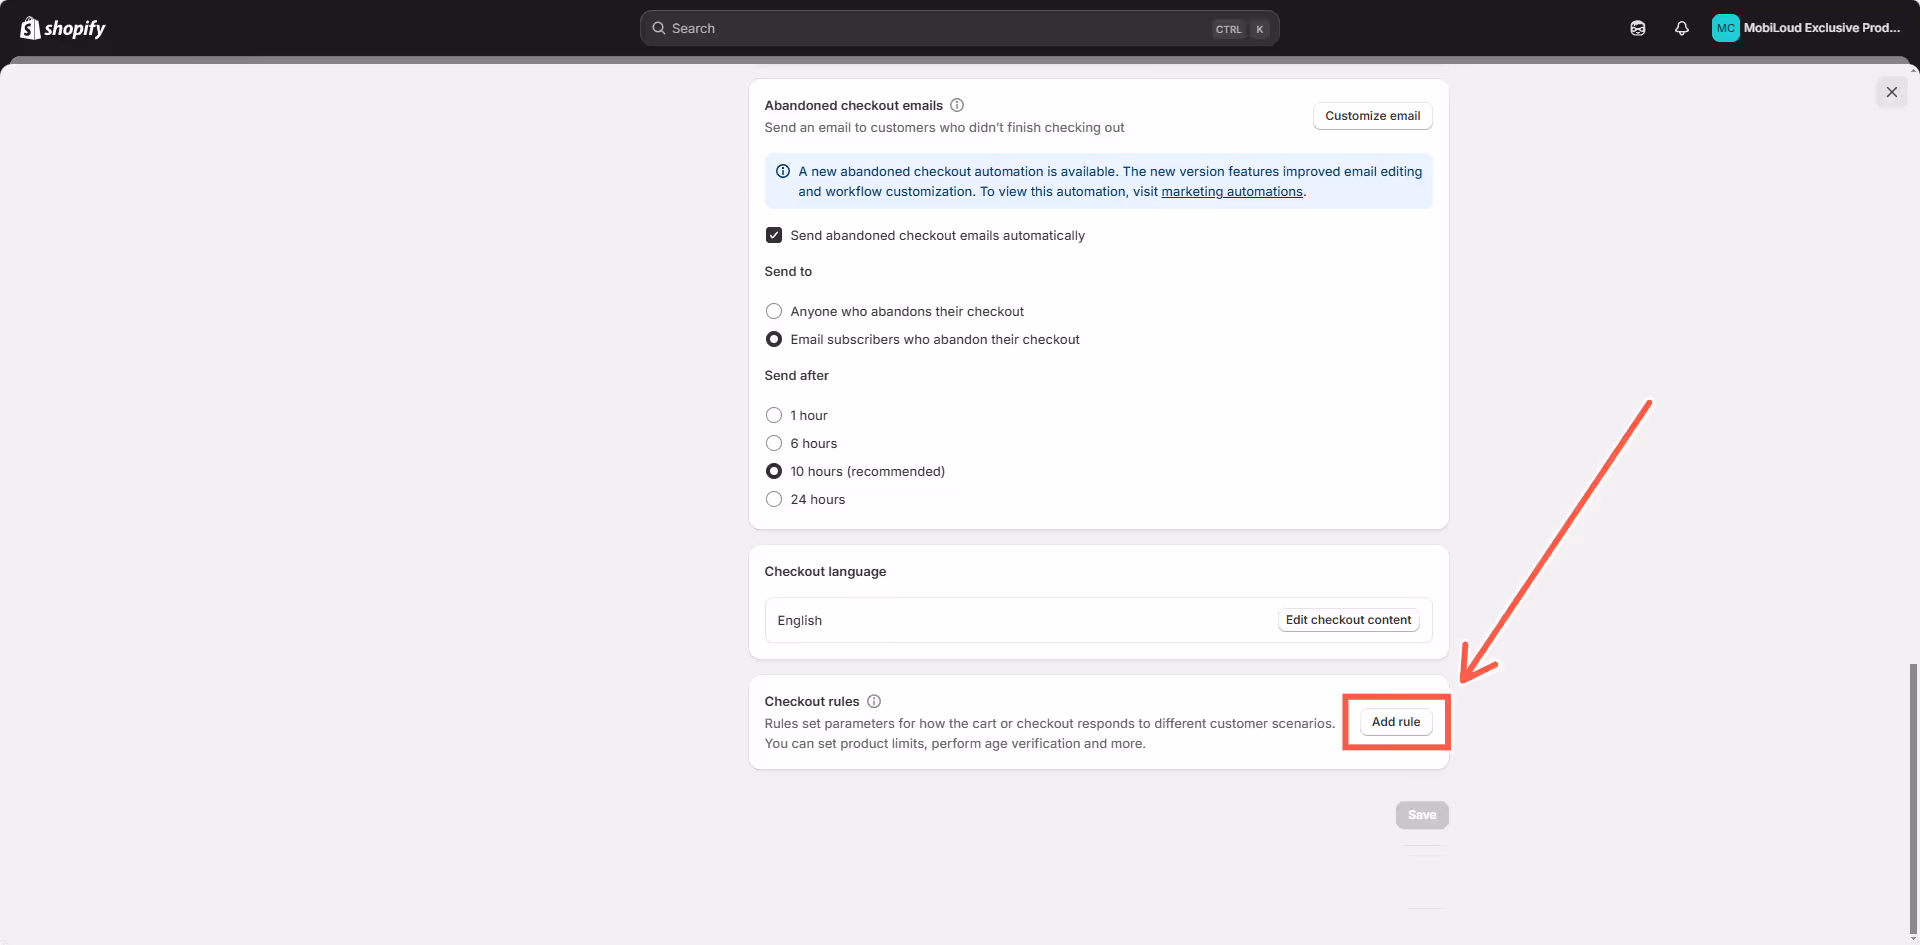
Step 2: Configure Checkout Rules
Open your Shopify Admin Dashboard.
Navigate to Settings.
Go to Checkout.
Scroll down to Checkout Rules.
Click Add Rule.
Locate Mobile Checkout Validation and deselect the Allow all customers to complete checkout option.
Click Save.
Once saved, turn on the Checkout Rule.
Step 3: Edit Checkout Configuration
In Settings, navigate to Checkout.
Click on the Customize button under Checkout Configuration.
In the left menu, go to Apps.
Select Mobile Checkout UI and add it to the checkout.
Enable the “Include app block in Shop Pay” option.
Click Save.
Step 4: Create an App-Exclusive Discount
Any discount coupon that contains “APP” in its code will automatically be restricted for use within the mobile app. To set this up, simply create a coupon with “APP” in its code, no additional configuration is needed.
Step 5: Test Your Coupon
Once the setup is complete, verify that app-exclusive discount codes function correctly.
Open your Shopify store on the web.
Proceed to checkout.
Try applying an app-only discount code.
You should receive an error stating that the discount is only valid on the mobile app.
Attempt to complete the checkout process.
The checkout should be blocked until all invalid discount codes are removed.
By following these steps, you ensure that app-exclusive discount codes are correctly enforced, restricting their use to purchases made through your mobile app.
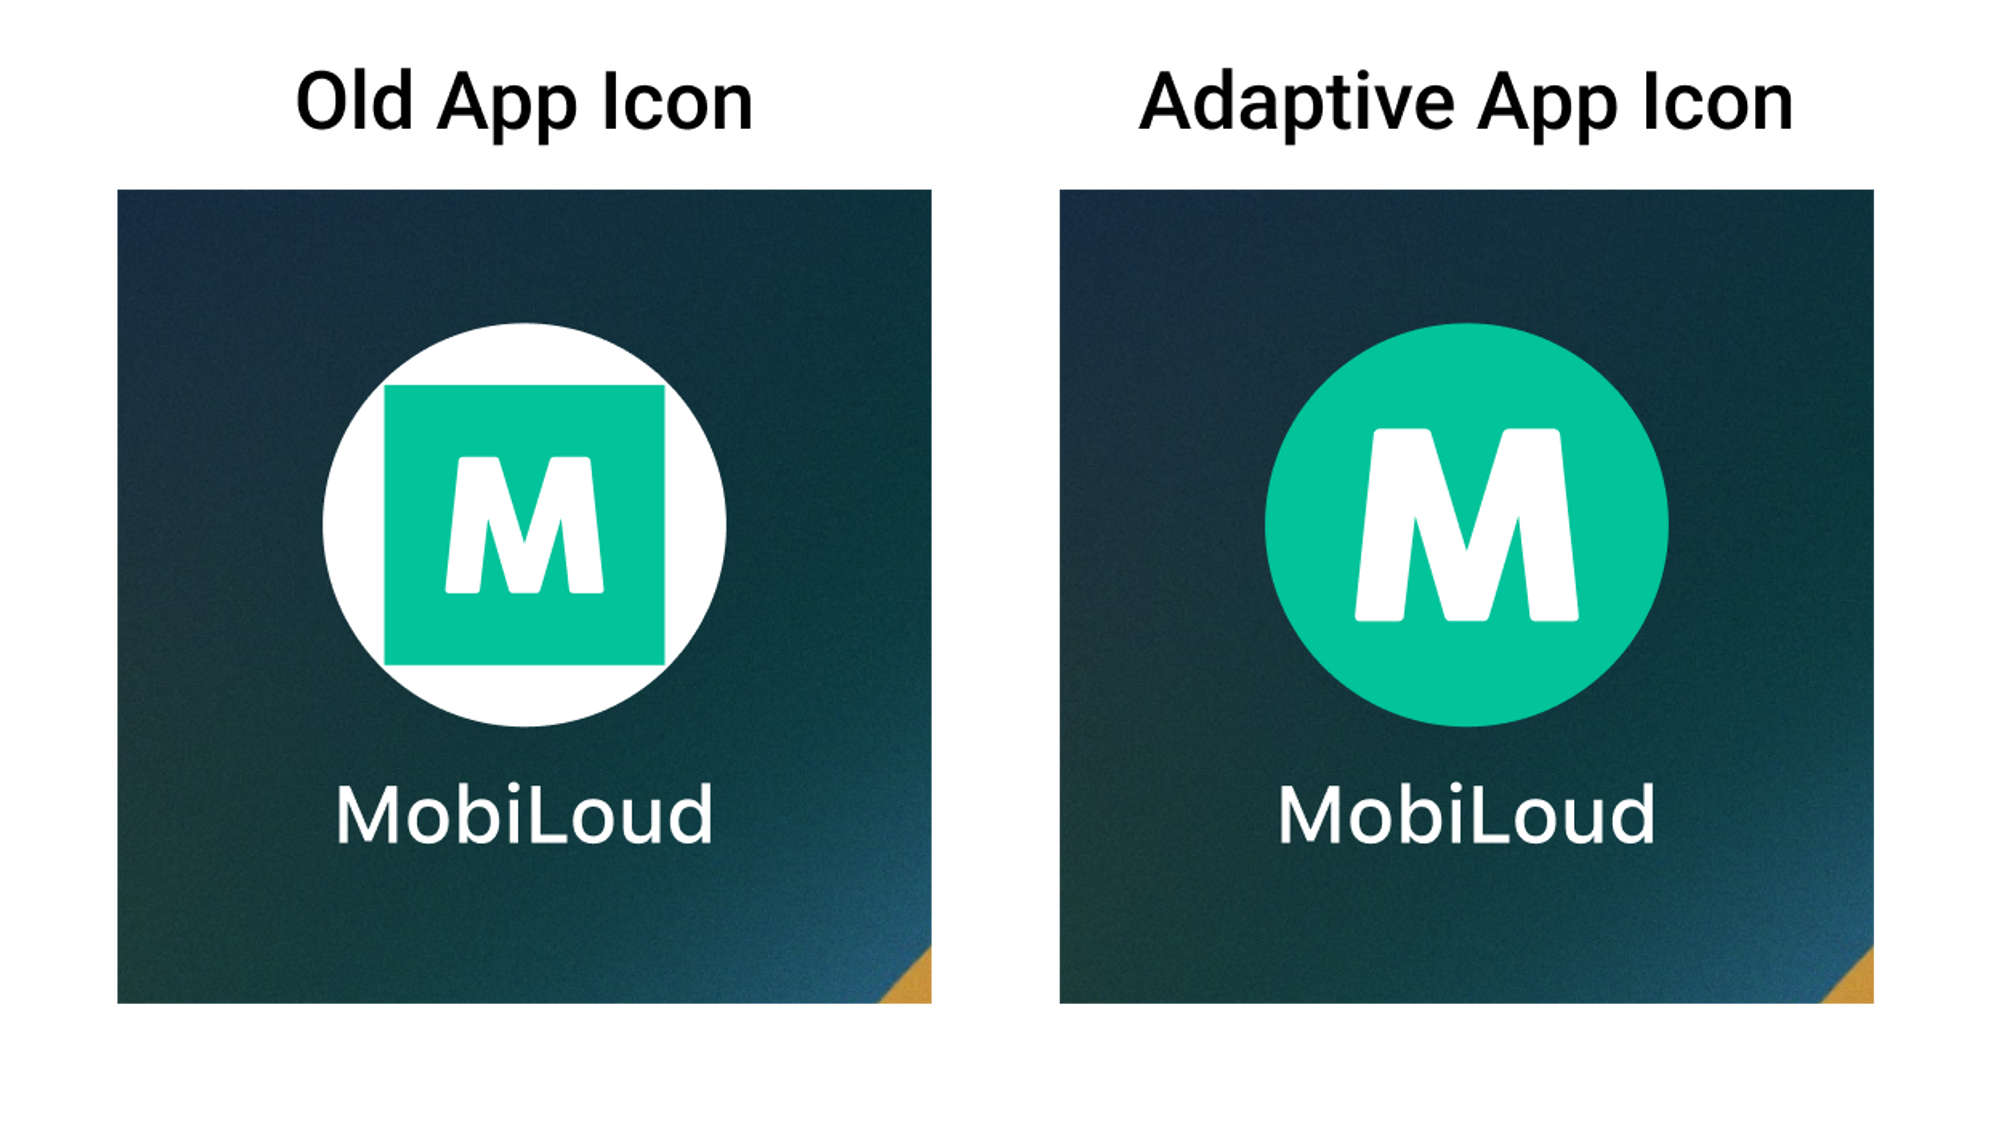
Creating an app icon is an important aspect of developing an Android app. A well-designed icon can make your app stand out and attract users.
Before we move forward with this guide, it is important for you to know that we are going to use an “adaptive app icon” for your Android app.
This is important because even though there is a bit more work into the creation of that icon, the final result looks way better, as you can see below:
The Adaptive App Icon for Android consists of two files:
1 – Foreground Image
The foreground image should contain your logo or whatever element you want to be presented in the center of your logo. We recommend using something simple that allows users to recognize your company name or brand.
2 – Background Image
For the background image, you should use something simple, without text or any important information as this part of your icon might get cropped to fit into different icon shapes and sizes.
The files will be placed over each other on your final icon, something like this:
Note that you should also provide a HEX color code to be used as the background of your logo in some special situations. We recommend using the same color, or the main color, of your background file.
Here are some tips on how to make a great iOS app icon:
1 – Make it unique
The app icon is the first element of your app that users will see after installing it, make sure you have something unique that allows the user to easily recognize your brand.
2 – Keep it simple
App icons should be simple because they will be seen quickly by users, and the simpler the icon, the easier it is to recognize and remember. Also, the simpler the design, the less likely it is to confuse users. A simple icon is more likely to fit within the design of the operating system in which it is included.
3 – No words or complex images
You have minimal space to work with inside your app icon, avoid using words or complex images as these will not look good when displayed in a small element.
Even for your logo, you might want to use a smaller version or simply a piece of it, something that allows users to easily recognize it.
4 – Space
Make sure to leave some space around your app icon foreground to make sure it will be displayed properly.
The basic configuration of Vendrux will give you control over the tabbed menu and its colors, but in order to make further changes to the design and even behaviors of your app, you will need to use the advanced configuration.
Below you will find a detailed explanation for each one of the available settings for the advanced configuration:
If you’d like to be able to segment your users based on specific interests or categories when sending push notifications you can use the nativeFunctions.onesignalSendTags() functions to add tags to your users in OneSignal.
If a user enables an option on your website, to receive promotional messages, for example, you could trigger the native function to add the “promotions” tag into his OneSignal profile.
Later on, when sending promotions to your users, you would then be able to target all those users who have the “promotions” tag in their profiles.
Here is an example on how to trigger the native function:
>
// Get the user agent and convert it to lowercase for case-insensitive comparisonvar userAgent = navigator.userAgent.toLowerCase();
// Add a tag directly if the user agent contains 'canvas'functionaddTag() {
try {
// Check if the user agent contains the string "canvas"if (userAgent.indexOf('canvas') > -1) {
nativeFunctions.onesignalSendTags("promotions");
}
} catch (ex) {
console.log(ex.message);
}
}
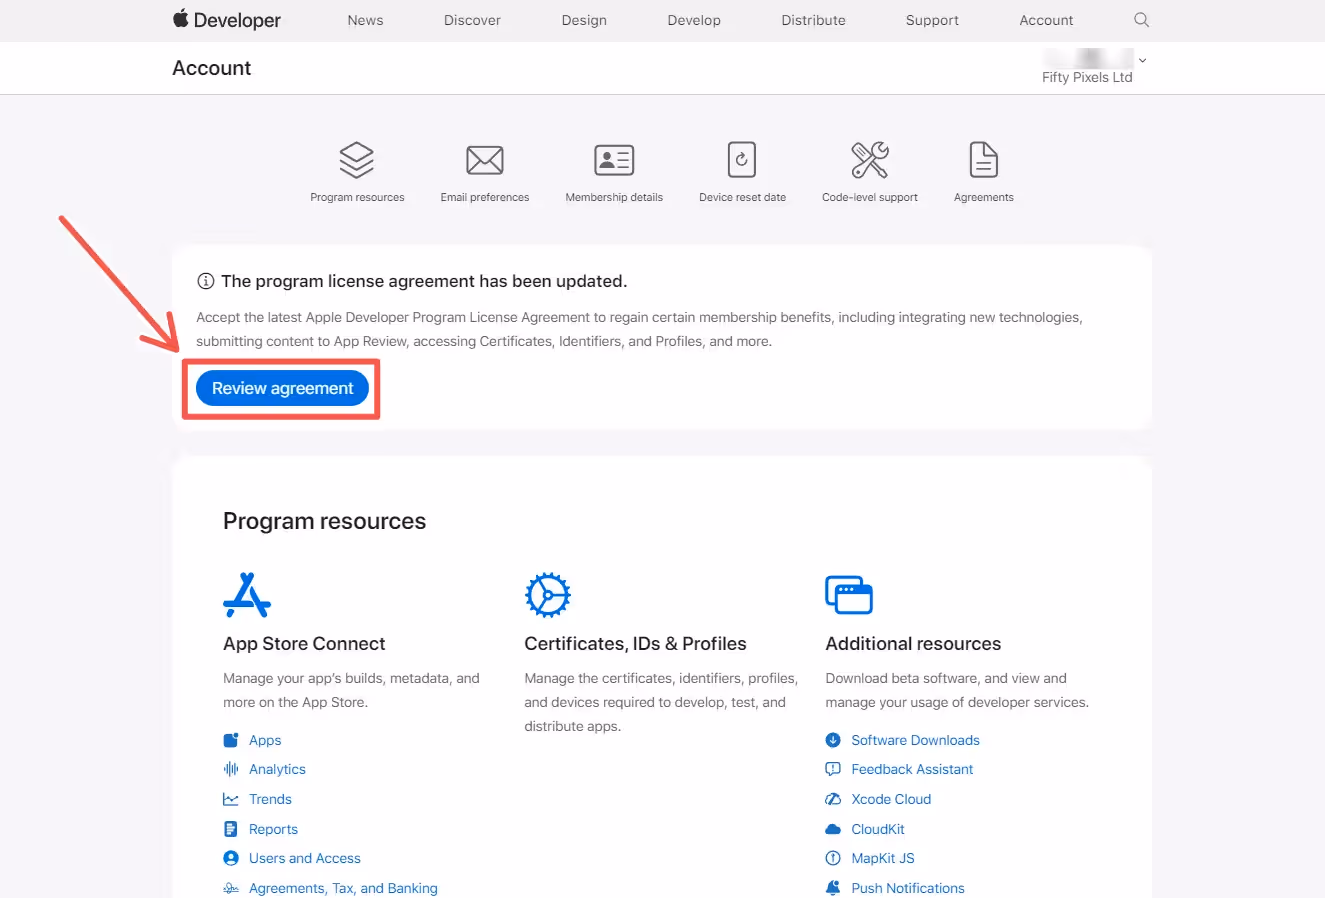
Apple is constantly updating their terms of agreement, and in order to be able to update a new version of your app or make changes to it, you will need to make sure all agreements on your account are accepted.
Before you proceed, it is important to note that only the account owner, the person who originally enrolled for the Apple Developer program, will be able to accept pending agreements.
Checking for pending agreements
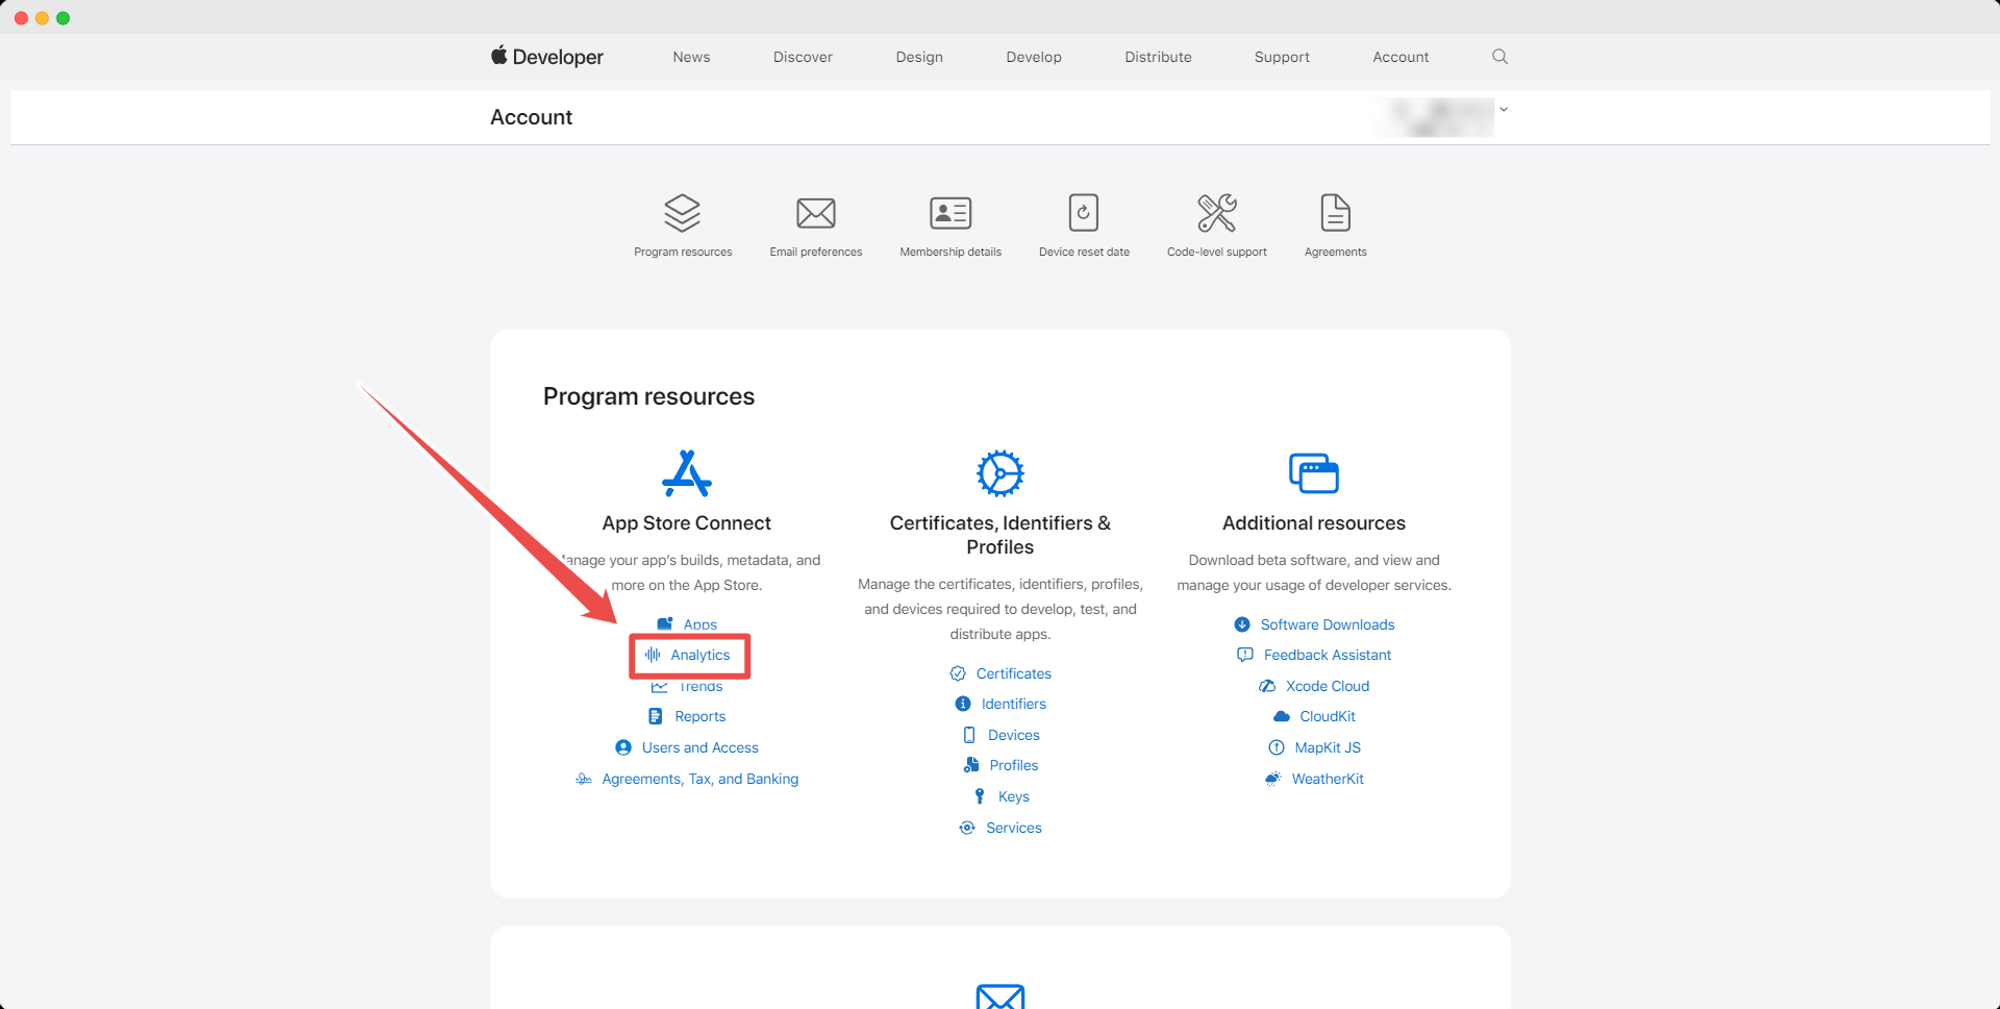
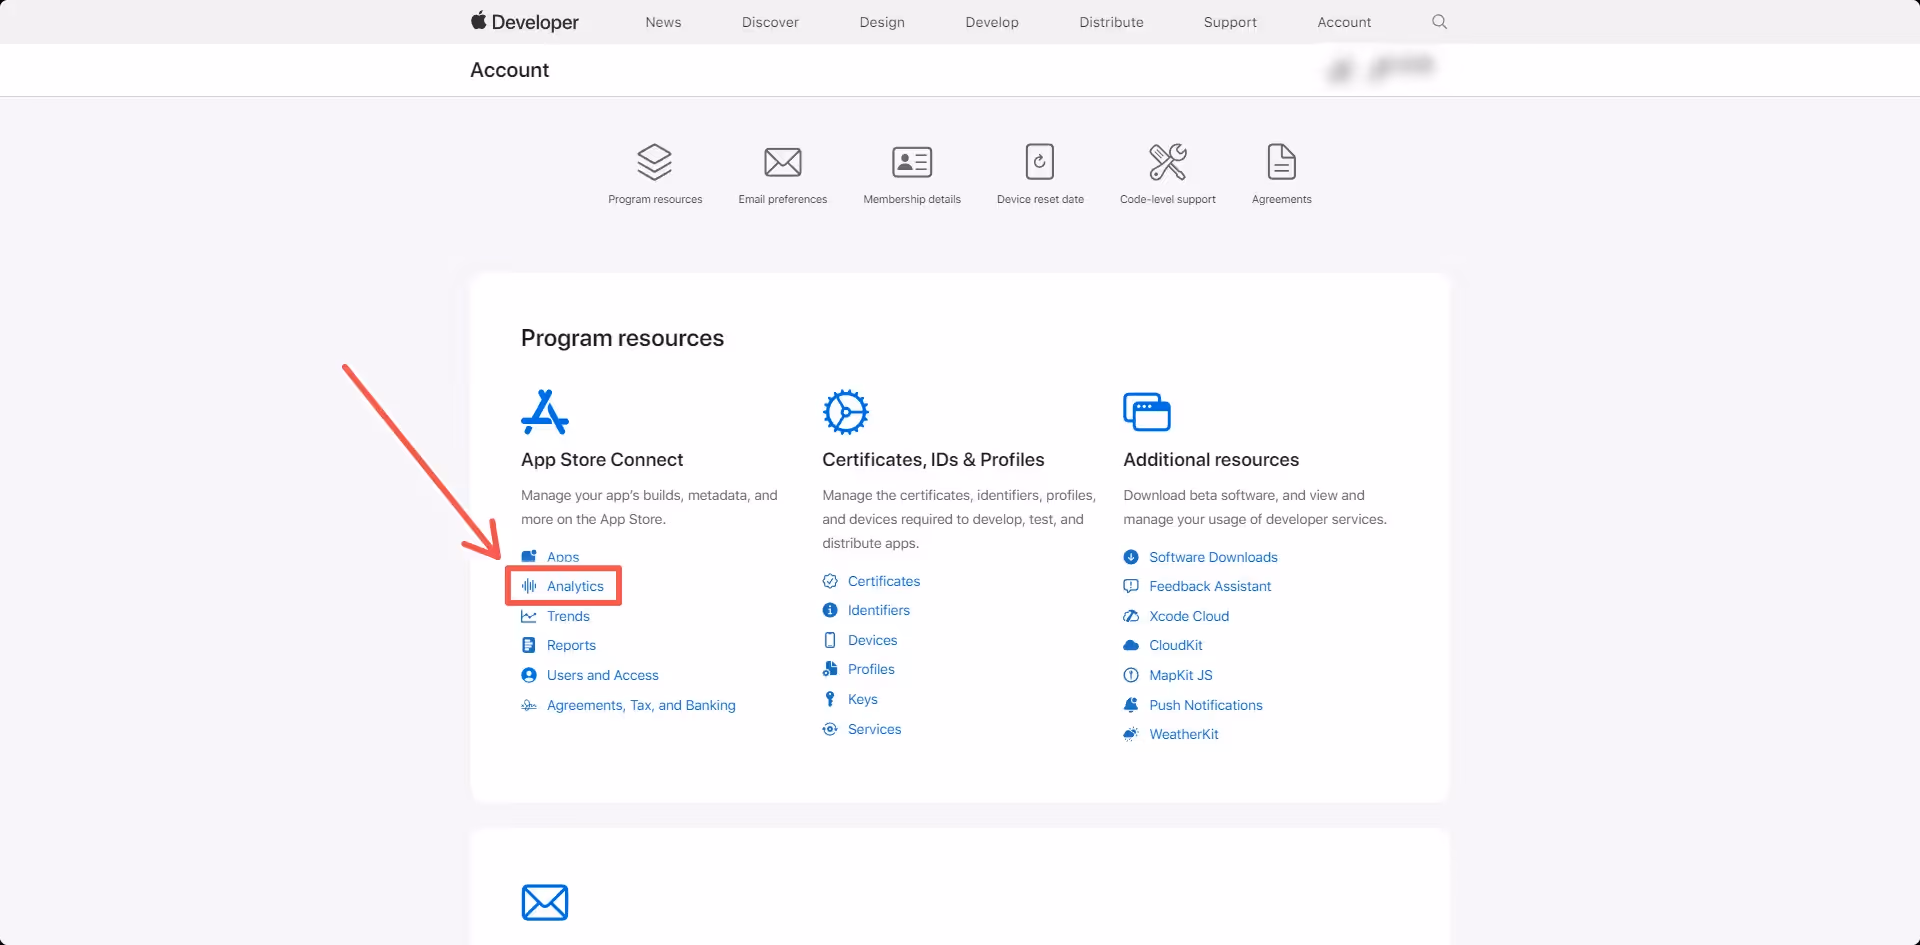
To check if you have any pending agreements, log in to the account owner account here: https://developer.apple.com/account
If your main agreement is pending you should immediately see a notice at the top of the screen as soon as you login, just click the “Review agreement” button:
You will then be prompted to read and accept the agreement, make sure to read it through and click the “Agree” button, as you can see here:
Checking all agreements
We’d also recommend that you check the “Agreements, Tax, and Banking” area of your account, to make sure that all agreements have been accepted. You can use this link: https://appstoreconnect.apple.com/agreements/
You will see a list with all agreements, accepted or not:
Note on the “Paid Apps” agreement
IMPORTANT! Sometimes you will see a “Paid Apps” agreement pending acceptance, even if you don’t have any paid apps. Apple requires that agreement to be accepted in order to allow changes to your account and new versions to be uploaded, so even if you don’t have a paid app, make sure to accept the agreement.
After accepting the “Paid Apps” agreement, you might also be asked to provide Banking and Tax information, in this case you can simply ignore that request. Accepting the agreement is all you need to do to re-enable the app uploads and account changes, so don’t worry.
In order to be able to send transactional, or user-specific notifications to your users, you will need a way to identify which device belongs to each which user.
The nativeFunctions.onesignalSetExternalUserId() function allows you to assign a custom ID to the device in OneSignal, which can be the same ID used on your website to identify users, making it very easy for you to know to whom a specific device belongs, and allowing you to send user-specific notifications to that user.
We recommend triggering this function whenever you perform a check to see if the user is logged-in, so you can assign his user ID to OneSignal accordingly, here is an example of how to implement the Javascript code:
>
// Get the user agent and convert it to lowercase for case-insensitive comparisonvar userAgent = navigator.userAgent.toLowerCase();
// Get the user IDvar userId = "1";
try {
// Check if the user agent contains the string "canvas"if (userAgent.indexOf('canvas') > -1) {
// Native function can be called here nativeFunctions.onesignalSetExternalUserId(userId);
}
} catch (ex) {
// Log any error messages for easier debuggingconsole.log(ex.message);
}
.png)
.png)
.png)
.avif)
.avif)
.avif)
.avif)
.avif)
.avif)
.avif)
.avif)
.avif)
.avif)
.avif)
.avif)
.avif)
.avif)
.avif)
.avif)
.avif)
.avif)
.avif)